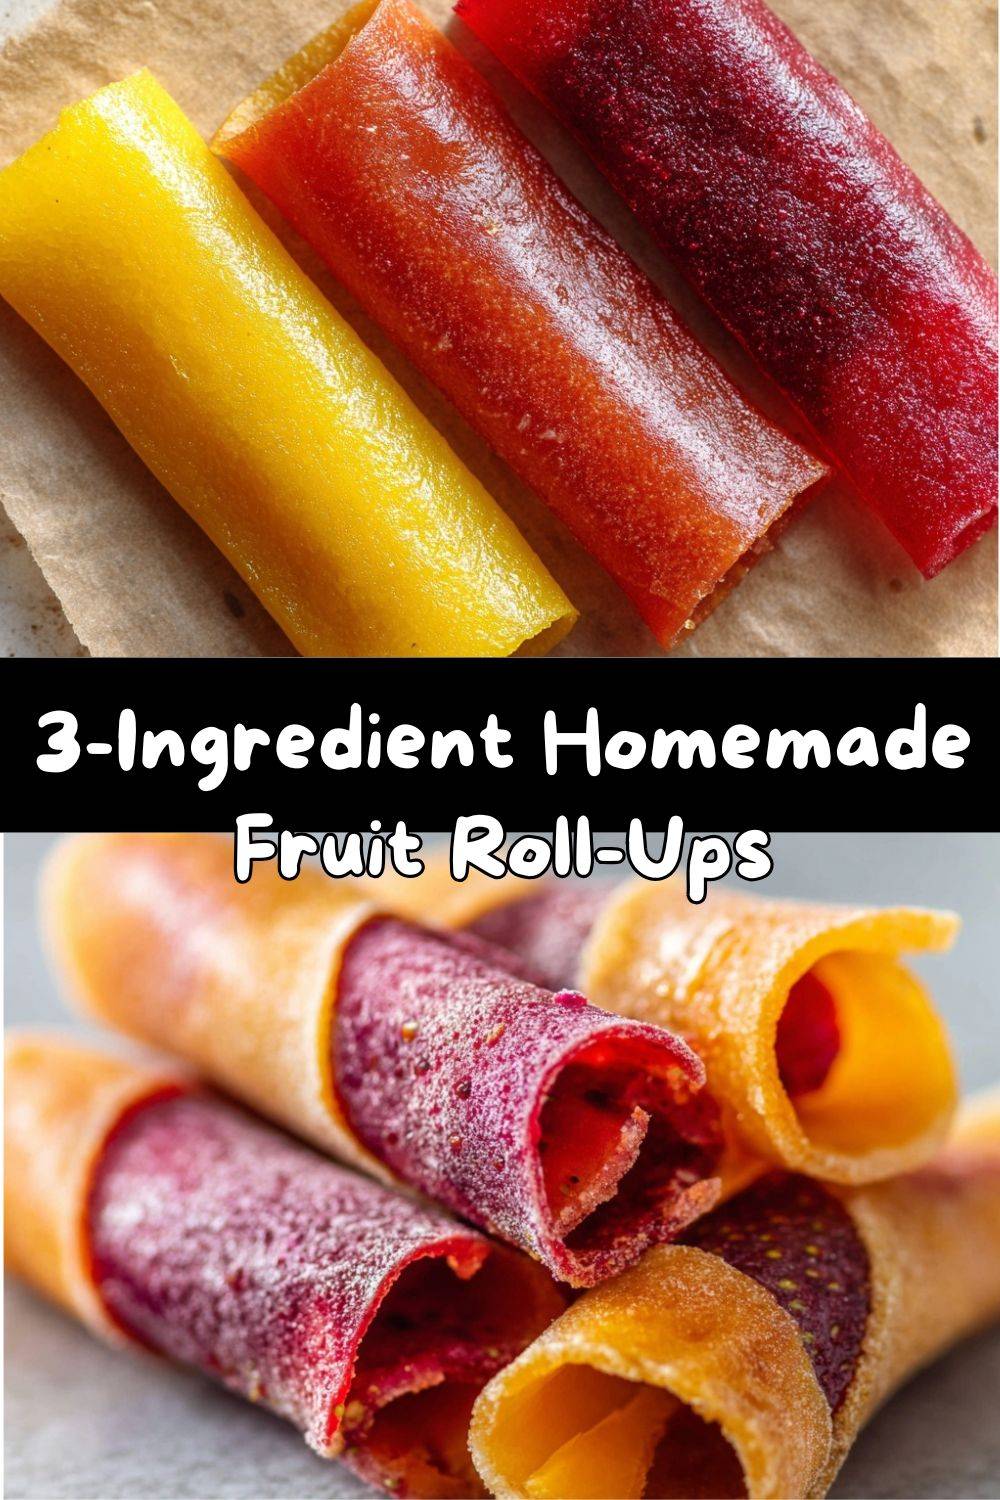
3-Ingredient Homemade Fruit Roll-Ups: Your New Favorite Healthy Snack!
Hey there, friend! Pull up a chair and let’s talk about one of the greatest snack-time comebacks of all time—the mighty fruit roll-up. But we’re not talking about the neon-bright, sticky-fingered sheets from your childhood lunchbox (though, no shame, I loved those too!). We’re talking about the real deal: Homemade Fruit Roll-Ups that are bursting with nothing but pure, sweet fruit flavor. Imagine your favorite berry or sun-ripened mango, transformed into a chewy, satisfying snack you can roll up and savor. The best part? You only need 3 simple ingredients and a little bit of patience while your oven does all the work.
I know what you’re thinking: “Emily, making my own fruit leather? Isn’t that… complicated?” I promise you, it’s one of the easiest projects we’ll ever tackle together. This is less about fancy chef skills and more about capturing the simple joy of fruit at its peak. We’re skipping the added sugars, dyes, and mysterious “natural flavors.” This is just fruit, maybe a kiss of honey, and a squeeze of lemon to make the flavors pop. It’s a snack you can feel fantastic about giving to your kids, packing for a hike, or sneaking from the jar for yourself (I won’t tell!). So, let’s ditch the complicated recipes and get back to basics. Grab your blender and your favorite fruit—it’s time to make some magic.
A Sticky-Fingered Trip Down Memory Lane
My love affair with fruit roll-ups started long before culinary school, in my grandma’s cozy, sun-drenched kitchen. She was the queen of “from-scratch” before it was a trendy hashtag. One summer, when our strawberry patch went wild, she pulled out these strange plastic sheets for her dehydrator. “We’re not letting these beauties go to waste,” she declared. I watched, mesmerized, as she transformed a mountain of berries into a smooth, vibrant puree. She spread it out like she was frosting the world’s biggest, thinnest cake, and then we waited. Oh, the waiting felt endless to a seven-year-old!
But when she finally peeled back that sheet to reveal a perfect, pliable layer of pure strawberry, it was like uncovering edible stained glass. We cut it into rectangles, rolled them up, and I spent the rest of the afternoon carefully unrolling and re-rolling my treasure, savoring every tangy-sweet bite. It felt like we’d captured summer itself. That day taught me that the best foods aren’t just about taste; they’re about the story, the anticipation, and the sheer fun of making something with your own two hands. This recipe is my little homage to her—and to that sticky-fingered, sunlit afternoon.
Your Simple, Star Players: The 3-Ingredient Breakdown
Here’s the beautiful part: our ingredient list is short, sweet, and totally flexible. The quality of your fruit is the star here, so choose the ripest, most fragrant ones you can find!
- 2 ½ cups Chopped Fresh or Frozen Fruit: This is your canvas! Strawberries are a classic start—sweet and vibrant. Mango gives a tropical, intensely chewy result. Raspberries or a berry blend offer a gorgeous color and tangy flavor. Chef’s Insight: Frozen fruit works brilliantly, is often more affordable, and is flash-frozen at peak ripeness. Just thaw it first and drain any excess liquid.
- 1–2 teaspoons Honey or Maple Syrup (Optional): Taste your fruit puree before adding this! Super-ripe fruit might be perfect on its own. The honey or maple syrup is just there to balance out any tartness. Substitution Tip: For a vegan version, stick with maple syrup. If you’re avoiding added sugars, just leave it out—the fruit’s natural sugars concentrate beautifully as it dries.
- 1 teaspoon Lemon Juice: This is our secret weapon! It’s not just for a little zing. The acid in the lemon juice brightens all the other flavors and helps preserve the gorgeous color of the fruit during the long drying time. Fresh is best, but bottled works in a pinch.
Let’s Make Some Magic: Step-by-Step Fun
Ready? Let’s turn that fruit into snackable art. I’ll walk you through every step with my favorite tips and tricks.
- Blend It Up! Toss your chopped fruit, lemon juice, and honey (if using) into a blender or food processor. Now, let it rip! Blend until you have a completely smooth, pourable puree. No lumps allowed—we want a silky-smooth texture. Chef’s Hack: If you’re using fruits with seeds (like raspberries or blackberries) and want a super-smooth finish, press the puree through a fine-mesh sieve after blending. It’s an extra step, but oh-so-elegant.
- The Great Spread Line a standard-sized rimmed baking sheet with parchment paper or a silicone baking mat. DO NOT use wax paper—it will stick and become a nightmare. Pour your puree onto the center of the sheet. Using an offset spatula or the back of a spoon, spread it into a thin, even layer, about 1/8-inch thick. Get it as even as possible; this ensures everything dries at the same rate. Aim for the edges to be just as thick as the center. Pro Tip: Gently tap the baking sheet on the counter a few times to release any air bubbles.
- The Low & Slow Dry This is where patience pays off! We’re not baking, we’re dehydrating with gentle heat.
- Oven Method (My Go-To): Preheat your oven to its lowest setting, ideally 170°F (75°C). If your oven only goes down to 200°F, that’s okay—just prop the door open an inch with the handle of a wooden spoon to let moisture escape. Place your baking sheet on the center rack. Let it dry for 4 to 6 hours. It’s done when the surface is dry to the touch, slightly tacky but not sticky, and you can peel it away from the parchment easily.
- Dehydrator Method: If you have a dehydrator, you’re a step ahead! Spread the puree on your dehydrator’s fruit leather sheets or parchment-lined trays. Dry at 135°F (57°C) for 4-6 hours, checking periodically.
Patience Note: Drying time depends on your fruit’s water content and how thick you spread it. Check at the 4-hour mark, but don’t rush it!
- The Grand Reveal & Roll Once dry, take the sheet out and let it cool completely at room temperature. This is crucial! When cool, gently peel the giant fruit sheet away from the parchment. Place it on a clean cutting board. Using kitchen shears or a pizza cutter, cut it into strips about 1.5 to 2 inches wide. Roll each strip up (I like to keep a little piece of parchment or wax paper inside the roll for easy storage) and store them in an airtight container at room temperature for up to 2 weeks… if they last that long!
How to Serve & Savor Your Creation
The beauty of these roll-ups is in their simplicity, but a little presentation never hurt! For lunchboxes, tuck a couple of parchment-wrapped rolls beside a sandwich for a sweet surprise. On a snack board, roll a few up and stand them in a small jar for a colorful, healthy option next to cheese and nuts. Heading out for a hike or road trip? They’re the perfect, no-mess, energy-boosting companion. My favorite way? Simply unrolling it slowly, savoring each chewy bite with a hot cup of tea, and feeling like a kitchen wizard who just captured sunshine in edible form.
Get Creative! Flavor Twists & Swaps
Once you master the basic formula, the flavor world is your oyster! Here are a few of my favorite riffs:
- Tropical Paradise: Use a mix of mango and pineapple. Add a teaspoon of coconut extract to the puree for a piña colada vibe!
- Apple Pie Spice: Use unsweetened applesauce as your base (it’s already smooth!). Blend in ½ teaspoon of cinnamon and a pinch of nutmeg before spreading.
- “Swirl” Technique: Make two separate purees (like strawberry and mango). Place alternating dollops of each on the baking sheet, then use a toothpick to gently swirl them together for a marbled effect.
- Green Machine (Veggie Boost): Blend 2 cups of fruit with ½ cup of fresh baby spinach. You’ll get a gorgeous color and a hidden veggie boost—the fruit flavor still dominates!
- No-Sugar-Added Blueberry: Use blueberries and add a ripe banana to the blender. The banana adds incredible natural sweetness and a lovely chewy texture, no extra sweetener needed.
Chef Emily’s Kitchen Notes
This recipe has evolved in my kitchen more times than I can count. I’ve learned that ripe fruit is non-negotiable—it’s the difference between “good” and “can I eat the whole tray right now?” good. I also used to be impatient and spread the puree too thick, leading to a drying time that felt like an eternity. Thin and even is the mantra! One of my funniest kitchen fails was trying to make a “swirl” with raspberry and kiwi. Let’s just say the colors muddled into a… less-than-appetizing brown. I learned that vibrant colors work best! Now, this recipe is my go-to for using up seasonal fruit gluts. When summer berries are about to turn, this is their glorious second act.
Your Questions, Answered!
Q: My fruit leather came out sticky/tacky. Did I do something wrong?
A: It might just need a bit more drying time! Pop it back in the oven for another 30-60 minutes. Sticky spots usually mean the layer was a touch too thick in that area or your fruit had a very high water content (looking at you, watermelon—not recommended for this!).
Q: Can I make this with no sweetener at all?
A: Absolutely! Taste your puree before adding anything. Ripe bananas, mangoes, pineapples, and berries are often sweet enough on their own. The drying process concentrates their natural sugars beautifully.
Q: How do I store these, and how long do they last?
A: Store them in an airtight container at room temperature, separated by parchment paper if you’ve rolled them up. They’ll keep for 1-2 weeks. For longer storage, you can keep them in the fridge for a month, but they might become a bit stiffer.
Q: It’s peeling off in bits and won’t come off the parchment in one sheet!
A: Don’t panic! This usually means it’s slightly over-dried at the edges. It’s still delicious! Just score it with a knife or scissors and peel up what you can. Next time, check it a little earlier and ensure your spread is perfectly even from center to edge.
A Note on Nutrition & Goodness
Let’s be clear: I’m a chef, not a dietitian. But I love knowing exactly what’s in my food! These homemade roll-ups are a fantastic alternative to store-bought snacks. You’re getting all the natural fiber, vitamins, and antioxidants from the whole fruit, without any added sugars, artificial colors, or preservatives. A typical roll-up (1/10th of a batch made with just strawberries and lemon juice) might have around 30 calories, trace amounts of fiber and vitamin C, and about 6-7 grams of naturally occurring sugar from the fruit itself. It’s a snack that gives you real energy and satisfaction. Compare that to a packaged version where sugar is often the first ingredient—it’s a no-brainer!
Final Thoughts & Happy Snacking!
And there you have it! The simplest, most satisfying project to bring a little homemade joy into your snack routine. This recipe isn’t about perfection; it’s about the fun of creating something delicious and wholesome with your own hands. Maybe you’ll make it with your kids on a rainy afternoon, or maybe you’ll whip up a batch for yourself as a sweet, guilt-free treat. However you enjoy them, I hope these little rolls of fruity goodness bring a smile to your face. Remember, the best kitchen is a happy, messy, experimenting one. Thanks for cooking with me today! Now, go roll up some happiness.
With love and a fully stocked fruit bowl,
Emily