Spooky, Salty, Sweet: Let’s Make Frankenstein Pretzels!
Hey there, my fellow kitchen adventurers! Chef Emily here, back in my happy place—my slightly messy, always-delicious kitchen—to talk about one of my favorite times of the year. That’s right, Halloween is creeping up on us, and my brain is buzzing with all things spooky, fun, and, most importantly, edible. If you’ve been around Tasty Chow for a while, you know I live for recipes that are equal parts delicious and delightful, the kind that make you smile before you even take a bite. And these Frankenstein Halloween Pretzels? They are the absolute embodiment of that spirit.
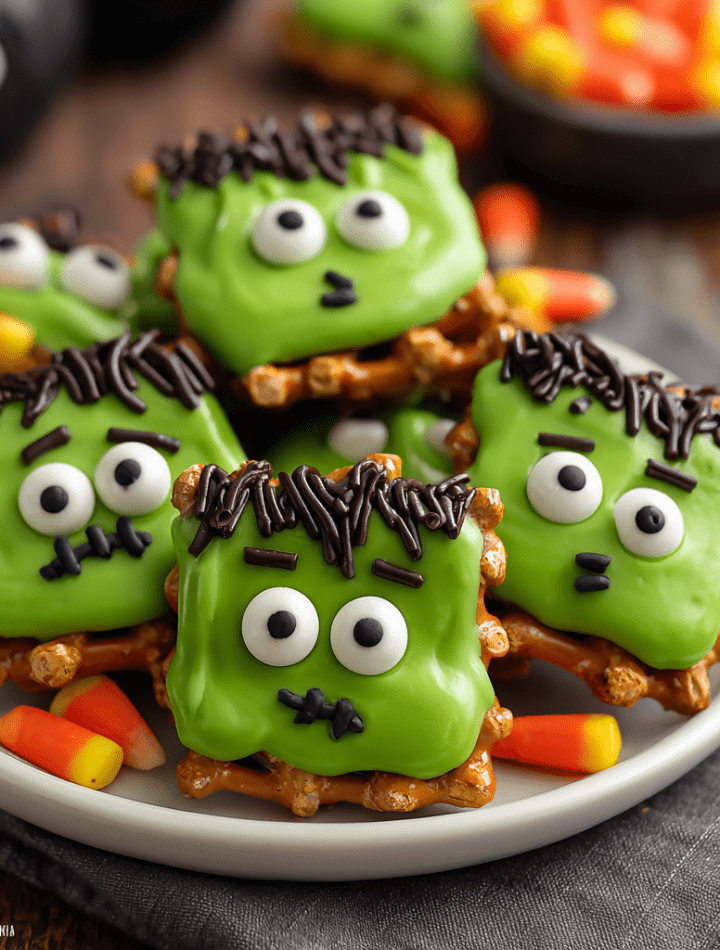
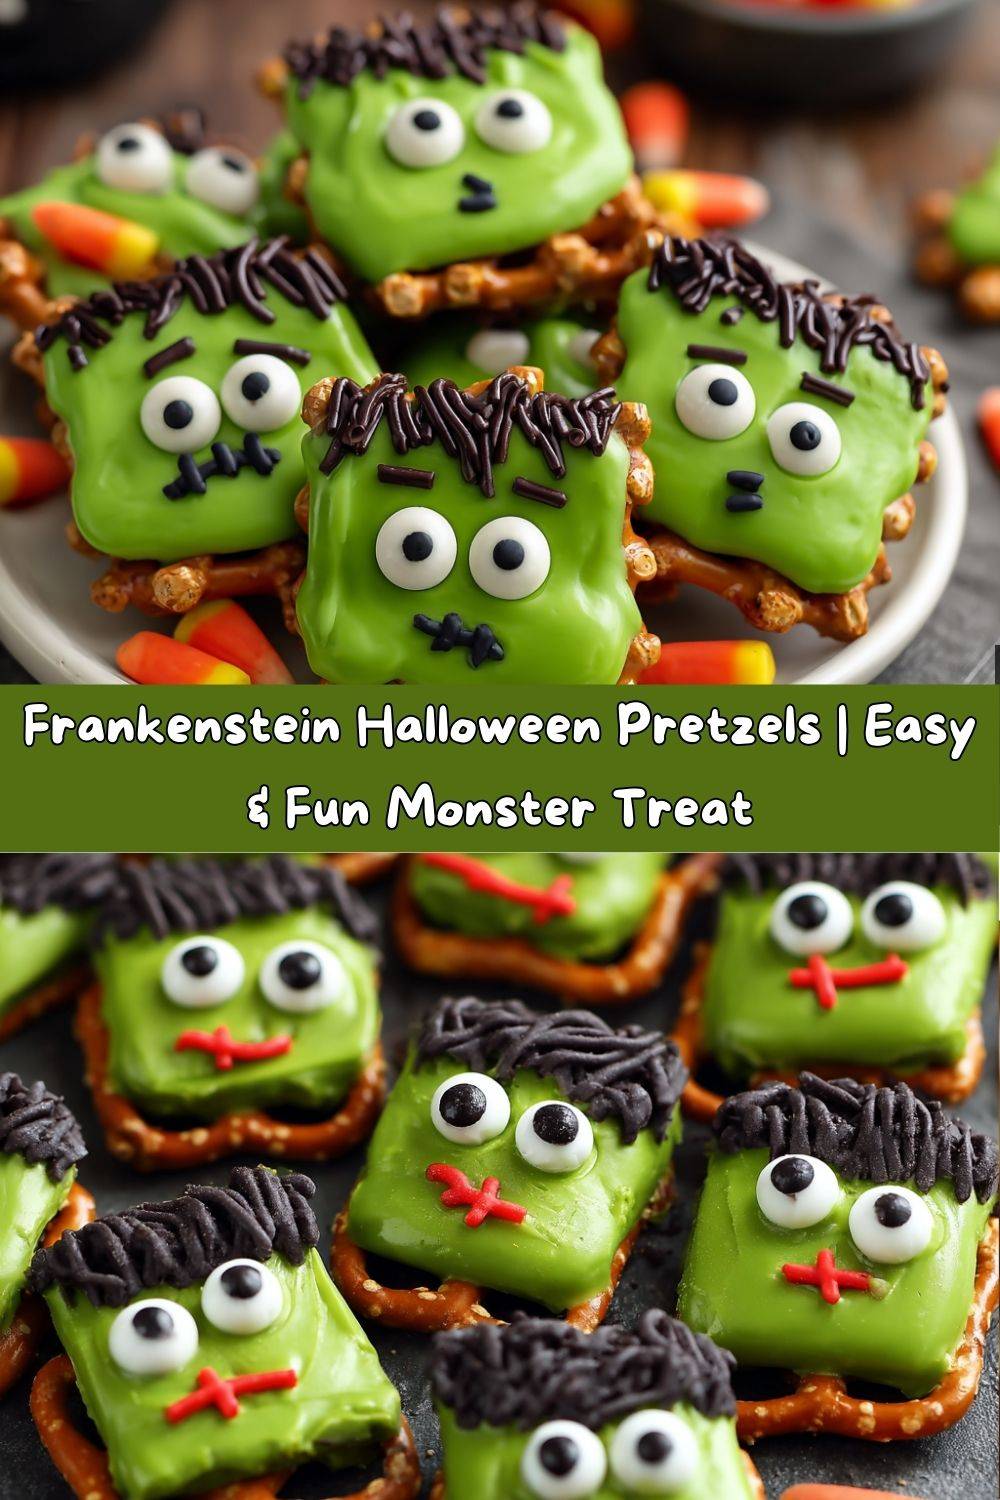
Imagine this: a crunchy, salty pretzel base. A smooth, sweet layer of green chocolate. Two googly candy eyes staring right back at you. And the pièce de résistance—cute little pretzel bolt “neck bolts” on the sides. They’re a salty-sweet masterpiece, a spooky-cute project, and an undeniable crowd-pleaser. Whether you’re hosting a monster mash of a party, putting together a next-level trick-or-treat tray that will make you the coolest house on the block, or just looking for a super fun activity to do with your favorite little monsters (aka your kids), this is the recipe for you. They’re incredibly easy to whip up, but they pack a huge punch of personality. So, put on your favorite Halloween playlist, grab your apron, and let’s make some edible art that’s so good, it’s scary!
The Monster Mash-Up That Started It All
This recipe always takes me right back to my early days of culinary school. It was my first Halloween away from home, and a bunch of us broke, sleep-deprived students decided to throw a last-minute potluck. The rule was simple: bring something spooky and something you could make with the contents of our meager dorm kitchens. I stared into my pantry like it was a crystal ball, seeing… pretzels… chocolate chips… and not much else. But then, a flash of inspiration struck! I melted some chocolate, tinted it with a drop of green food coloring (a true kitchen hack back then!), and started assembling little faces. They were lopsided, the eyes slid right off, and my “bolts” were broken pieces of more pretzels. They were a hot mess—a Frankenstein’s monster of a snack, literally!
But you know what? They were the hit of the party. My friends gobbled them up, laughing at their derpy expressions. In that moment, surrounded by friends and fun, I realized that the best recipes aren’t about perfection. They’re about joy, creativity, and a little bit of shared laughter. This updated version is a little more polished (we’re using proper candy melts now!), but the spirit remains the same: fun, approachable, and utterly delicious. It’s a reminder that sometimes, the most memorable dishes come from a place of playful improvisation.
Gathering Your Monster-Making Supplies
Here’s everything you need to bring these little green guys to life. The beauty of this recipe is in its simplicity, and I’ve included my best chef insights and substitution tips to make it work for you!
- 2 cups green candy melts: This is your monster’s iconic green skin! Candy melts (also called candy wafers or melting chocolates) are my go-to because they set firm and are specifically formulated for coating and dipping. Chef’s Tip: If you can’t find green, you can use vanilla or white candy melts and mix in a few drops of green oil-based food coloring. Do not use water-based food coloring, as it can cause the chocolate to seize up into a grainy mess!
- 56 square pretzel snaps: The perfect sturdy base for our creation. Their grid-like pattern is ideal for holding the melted candy. Substitution Tip: If you can’t find the square snaps, the standard waffle-patterned pretzels work just as well! You’ll just get a slightly different look.
- 112 candy eyeballs: The windows to the monster’s soul! You can find these in the baking aisle in various sizes. The standard small size works perfectly. Chef’s Insight: For an extra spooky touch, mix and match different sized eyes!
- 16–20 pretzel sticks (or broken snap pretzels): These become Dr. Frankenstein’s famous neck bolts! I love using the thin pretzel sticks for accuracy, but if you only have snaps, just break them into small, bolt-sized pieces. Zero waste!
- ⅔ cup semi-sweet chocolate melting wafers: This is for the hair, mouth, and scars. I prefer the darkness of semi-sweet against the bright green, but you can use milk or dark chocolate too. Chef’s Tip: Melting wafers are easier than chocolate chips for detailing, as they thin out nicely.
- Optional: Edible candy hair (black licorice laces, black sprinkles) or red gel icing for “scars”: This is where you get to be the artist! Licorice laces make for wild, crazy hair. Black sprinkles (jimmies) give a spiky hair effect. A little dab of red gel icing can create a fun “stitched” scar look. Raid your baking cupboard and see what inspires you!
Building Your Monster Squad: A Step-by-Step Guide
Alright, let’s get building! This process is so much fun and goes by in a flash. Read through all the steps first, then let the monster-making commence!
Step 1: Line two large baking sheets with parchment paper or silicone baking mats. This is non-negotiable for easy cleanup and preventing your Frankensteins from sticking! Now, lay out your square pretzel snaps in a single layer on the sheets. You’ve got your blank canvas ready.
Step 2: Time to melt the green candy melts. You can do this two ways. The Microwave Method is fastest: place the wafers in a microwave-safe bowl and heat in 30-second bursts, stirring vigorously between each burst, until completely smooth. The Double Boiler Method is more gentle: place the wafers in a heatproof bowl set over a pot of simmering water (make sure the bottom of the bowl doesn’t touch the water). Stir until melted. Chef’s Hack: If your melted candy seems too thick for piping, you can add a tiny, tiny amount of coconut oil or paramount crystals (about ½ tsp at a time) to thin it out to a perfect, pipeable consistency.
Step 3: Transfer your smoothly melted green candy to a piping bag or a sturdy plastic zip-top bag. If using a plastic bag, snip a very small corner off the bottom. Now, pipe the green candy into the center of each pretzel snap. You want to fill most of the square but not go all the way to the edges—we still want to see that pretzel frame! Alternatively, you can carefully spoon the candy on, but piping gives you so much more control.
Step 4: Work quickly now! Before the green candy sets, it’s time for the face. Gently press two candy eyeballs into the upper part of the green candy. Then, take your pretzel sticks (or broken pretzel pieces) and insert one on each side of the head to create the iconic neck bolts. Press them in just enough so they stand up and stay put.
Step 5: Let the green candy base set completely. You can pop the trays in the fridge for about 10 minutes to speed this up. Meanwhile, melt your semi-sweet chocolate wafers using the same method you used for the green candy. Transfer this to a new piping bag or plastic bag and snip an even smaller hole—you want a fine tip for detailing.
Step 6: This is the most fun part! Once the green base is firm, use the semi-sweet chocolate to draw on Frankenstein’s features. Get creative! Draw a stitched mouth (a simple line with little dashes crossing it), some angry eyebrows, and crazy hair. If you’re using licorice for hair or gel for scars, add those on now too.
Step 7: Allow all the chocolate to set completely at room temperature or in the fridge. This usually takes about 15-20 minutes. Once they’re firm, they’re ready to serve! Store any leftovers (yeah, right!) in an airtight container at room temperature for up to a week.
How to Serve Your Spooky Snack Squad
Presentation is half the fun with these guys! Don’t just toss them in a bowl—give them the spotlight they deserve. I love to arrange them on a large, dark platter or a slate board; the dark background really makes their green faces pop. You can even use a food-safe black piece of paper as a liner.
For a real party scene, create a whole monster mash tableau. Scatter a few autumn leaves (fake or clean real ones), some plastic spiders, and maybe a few other Halloween candies around the platter. Label them with a cute little sign that says “Frank Snacks” or “Laboratory Experiments.” If you’re packing them for a school party or as a gift, layer them in a cellophane bag tied with a black and orange ribbon. They also make fantastic edible party favors—just put a few in a small box or bag for each guest to take home. However you choose to serve them, be prepared for a chorus of “These are so cute!” before they all mysteriously disappear.
Get Creative: Monster Mash-Ups & Twists
Once you’ve mastered the classic Frankie, the kitchen laboratory is yours to experiment with! Here are a few of my favorite twists to keep the fun going.
1. The Bride of Frankenstein: Give her a fabulous look! Use white candy melts for the face instead of green. Use the dark chocolate to draw her iconic white-streaked, sky-high hairdo. She’s a glamorous monster!
2. Zombie Pretzels: For a truly gory treat, skip the green candy and use a flesh-toned color (like light pink or beige candy melts). Use the red gel icing to create dripping “blood” effects from the eyes or mouth. So creepy, so cool.
3. Peanut Butter Monster: For an extra layer of flavor, before you add the green candy, place a small dollop of peanut butter (or any nut or sun butter) onto the pretzel base. Then pipe the green candy over the top. It’s a salty-sweet-nutty surprise!
4. Gluten-Free Monsters: This recipe is incredibly easy to adapt! Simply use your favorite certified gluten-free pretzels and ensure your candy melts and other decorations are gluten-free. Boom, everyone can enjoy the monster madness.
5. Minty Fresh Frankies: Add a drop or two of peppermint extract to your green candy melts as you melt them. The combination of chocolate, mint, and pretzel is absolutely divine and feels extra festive.
Chef Emily’s Notes from the Kitchen
This recipe has come a long way from my lopsided culinary school days, but it’s still one of the most joyful ones I make. The biggest lesson I’ve learned? Embrace the imperfections! Not every Frankenstein pretzel will be a perfect twin of the next. Some might be cross-eyed, some might have crazy hair, and some might look like they’ve had a rough night. That’s what gives them character and makes them charming. I’ve made these with kids more times than I can count, and their creations are always my favorite—full of personality and pure, unfiltered creativity. So don’t stress about making them look identical. Let your inner mad scientist out and have fun with it. The best kitchen memories are made from a little bit of mess and a whole lot of laughter.
Frankenstein Pretzel FAQs
Q: My candy melts are thick and clumpy! What did I do wrong?
A: This is called “seizing,” and it usually happens if a tiny bit of steam or water gets into the melting chocolate. Candy melts can also be overheated. To fix it, try adding a very small amount of coconut oil or vegetable shortening (start with ½ tsp) and stir vigorously. If that doesn’t work, unfortunately, you’ll need to start over. Always make sure your bowl and tools are completely dry!
Q: My eyes and bolts keep sliding off. How do I make them stick?
A: This means the base green candy was starting to set before you added the decorations. The key is to work in small batches. Only melt a portion of your candy at a time, or only pipe a dozen pretzels, then immediately add the eyes and bolts before moving on to the next batch. The melted candy acts as the glue, so it needs to still be wet.
Q: Can I make these ahead of time?
A: Absolutely! They are a great make-ahead treat. Once fully set, store them in a single layer in an airtight container at cool room temperature for up to 5 days. You can stack them with parchment paper between layers if needed. I don’t recommend refrigerating them long-term, as it can cause the pretzels to lose their crunch.
Q: The chocolate for my details is too thick to pipe. Help!
A: No problem! Just like with the green candy, you can thin it with a minuscule amount of coconut oil. If you’ve already piped it and it’s too thick, you can use a toothpick to gently spread and shape the chocolate into hair and mouths.

Frankenstein Halloween Pretzels
- Total Time: 40 minutes
- Yield: 28 pretzels 1x
Description
These Frankenstein pretzel bites are salty-sweet, spooky-cute, and irresistibly easy to make. Perfect for Halloween parties, trick-or-treat trays, or edible crafting fun with kids. Doubled for a crowd and twisted with extra flair, they’re a monster hit in every bite.
Ingredients
2 cups green candy melts
56 square pretzel snaps
112 candy eyeballs
16–20 pretzel sticks (or broken snap pretzels)
⅔ cup semi-sweet chocolate melting wafers
Optional twist: edible candy hair (licorice laces, black sprinkles)
Optional twist: red gel icing for “scars” or candy stitches
Instructions
Line a baking sheet with parchment. Lay out pretzel snaps in a single layer.
Melt green candy melts according to package instructions.
Spoon or pipe green chocolate into the center of each pretzel snap.
Before it sets, add two candy eyes and insert pretzel stick “bolts” on both sides.
Melt chocolate wafers and use a piping bag or toothpick to draw hair, eyebrows, and a stitched mouth.
Add optional red gel scars or candy accessories. Let cool and harden completely.
- Prep Time: 20 minutes
- Cook Time: 15–20 minutes
Nutrition
- Calories: 130 / Per Serving (2 pieces)
- Sugar: 10g / Per Serving (2 pieces)
- Fat: 6g / Per Serving (2 pieces)
- Carbohydrates: 18g / Per Serving (2 pieces)
- Fiber: 1g / Per Serving (2 pieces)
- Protein: 1g / Per Serving (2 pieces)
Nutritional Information (Because Knowledge is Power!)
Okay, let’s be real: these are a fun treat, not a health food! But it’s always good to know what you’re enjoying. This nutritional estimate is for two Frankenstein pretzel bites, which is a pretty standard serving size because let’s be honest, it’s hard to stop at just one!
Per Serving (2 pieces): Approximately 130 calories | 6g fat | 18g carbs | 1g protein | 1g fiber | 10g sugar
The calories and macronutrients come primarily from the pretzels (providing carbs and a little protein) and the candy coatings (providing sugar and fat). Please note that this is just an estimate generated from common ingredients; actual values can vary based on specific brands and any optional additions you use. These little guys are a perfect example of mindful indulgence—enjoy them as part of your Halloween festivities!
Final Spooky Thoughts
Well, my foodie friends, I hope you’re as excited to make these as I am to share them. This recipe is everything I love about cooking: it’s creative, it’s communal, and it ends with something delicious that brings a smile to people’s faces. It proves that you don’t need fancy skills or complicated ingredients to create something truly magical in the kitchen.
So this Halloween, I encourage you to gather your ingredients, maybe some little helpers, and put on a classic monster movie. Embrace the messy, fun process of creating these adorable edible monsters. Share them with friends, family, and neighbors. Tag me on social media @TastyChow if you make them—I absolutely love seeing your kitchen creations and your unique spins on my recipes. From my kitchen to yours, Happy Halloween! Now go forth and make some deliciously spooky memories.
— Emily 🧟♀️