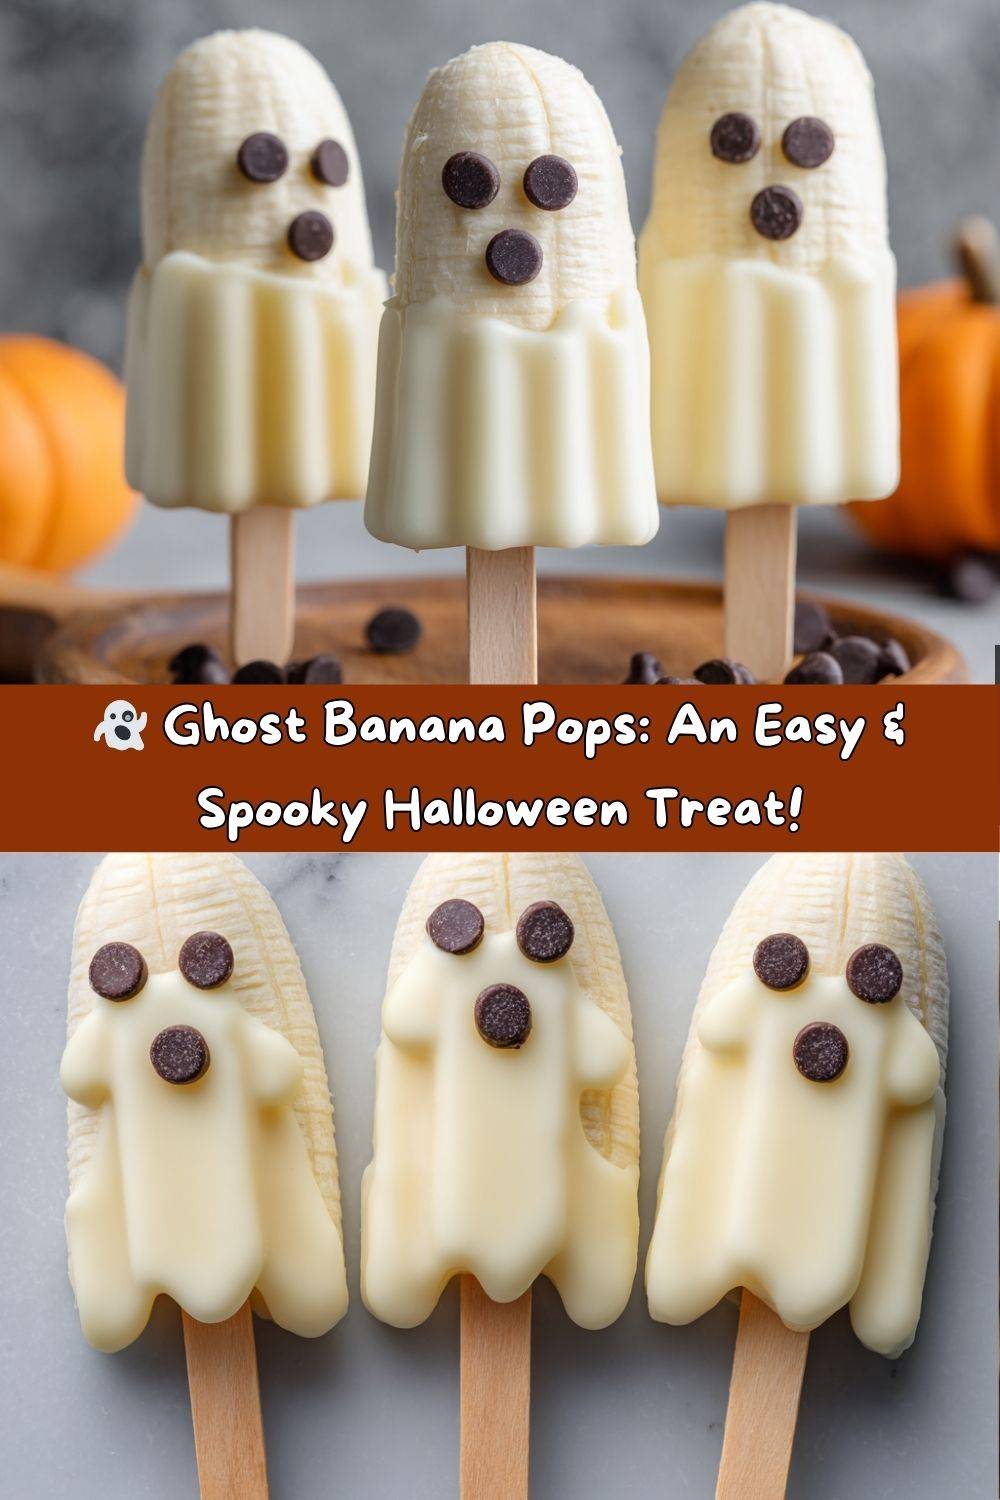
Spooky, Sweet, and So Simple: Meet Your New Favorite Halloween Treat!
Hey there, my fellow food adventurers! Chef Emily here, back in my happy place—the kitchen—and buzzing with excitement to share a recipe that’s an absolute blast to make. Picture this: it’s a crisp October afternoon. The leaves are turning, there’s a faint smell of cinnamon in the air, and you’re looking for a kitchen project that’s equal parts fun, festive, and downright delicious. Something that will make the kids (and let’s be real, the adults too!) squeal with delight. Well, my friend, you’ve just found it.
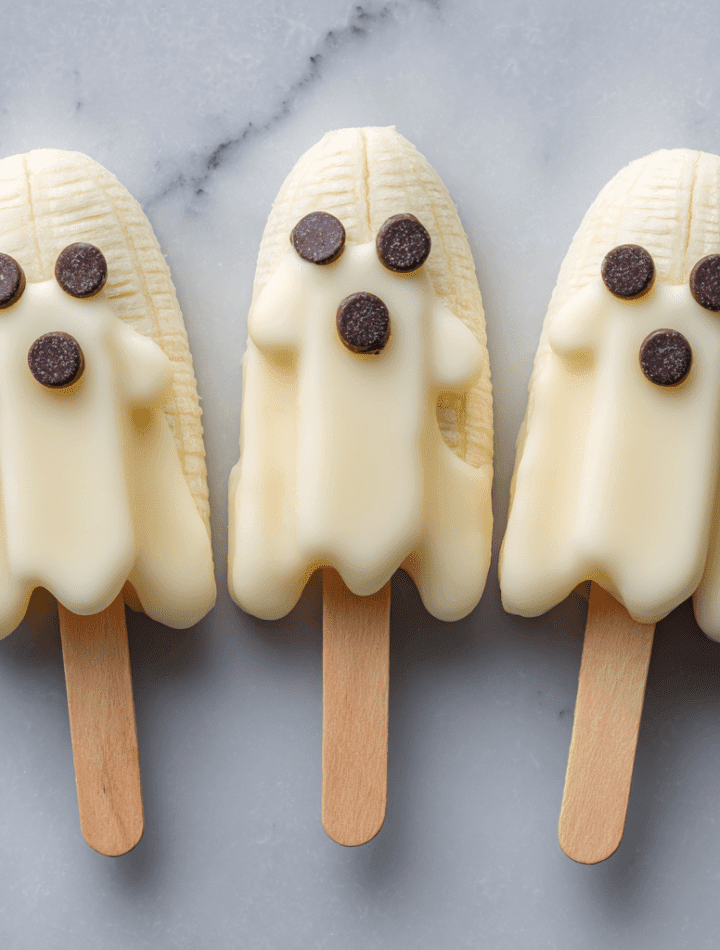
Today, we’re whipping up a batch of 👻 Ghost Banana Pops! These adorable, spooky little treats are the perfect way to celebrate the season without spending hours in the kitchen. They’re creamy, they’re chocolatey, and they have so much personality. The best part? They require zero baking skills. All you need is a few simple ingredients, a willingness to get a little messy (my specialty!), and about 10 minutes of active time. They’re the ultimate party pleaser for Halloween gatherings, a fantastic after-school snack, or a playful dessert that breaks the monotony of the everyday. So, tie on your favorite apron (the one with the ghosts or the pumpkins, if you have it!), and let’s create some edible magic that’s sure to vanish from the freezer in a flash.
A Spooky Tradition is Born
This recipe takes me right back to my first Halloween in my own apartment. I was fresh out of culinary school, bursting with ideas but on a serious budget. I wanted to host a party, but my wallet was screaming louder than a banshee. I stared into my nearly empty fridge and saw two sad, overripe bananas staring back. It was a “eureka!” moment. I had some white chocolate left over from a baking experiment and a bag of mini chocolate chips. Twenty minutes later, my kitchen counter was filled with a squadron of silly, sweet ghost pops. They were a little wobbly, a little imperfect, but my friends absolutely lost their minds over them! They were the hit of the party, and a tradition was born. Now, I make them every single year. It’s a little reminder that the most memorable treats aren’t about being fancy or perfect—they’re about being creative, sharing a laugh, and enjoying the simple, sweet moments together.
Gathering Your Ghostly Brigade
Here’s the beautiful part: the ingredient list is short, sweet, and probably already in your kitchen. Let’s break it down!
- 3 ripe bananas – The key word here is ripe! You want them yellow with a few brown speckles. They’re sweeter, softer, and have the most intense banana flavor, which creates an amazing contrast with the sweet white chocolate shell. If they’re too green, they’ll be starchy and hard to work with.
- 1 cup white chocolate chips (or white candy melts) – This is your ghostly casing! Chef’s Insight: White chocolate chips can be a tad trickier to melt smoothly because they contain cocoa butter. If you’re new to melting chocolate, candy melts (like Wilton’s Candy Melts) are a fantastic, user-friendly option. They’re designed to melt perfectly every time and set up with a nice snap.
- Mini chocolate chips – These are for the personality! You’ll use them to create the classic ghostly eyes and a little “O” of a mouth. You could also use black sprinkles or even tiny dots of melted dark chocolate if that’s what you have on hand.
- Popsicle sticks – The backbone of our operation! These make the treats easy to dip and even easier to eat. No popsicle sticks? Skewers cut in half or even sturdy paper straws can work in a pinch.
Conjuring Your Creepy Crew: A Step-by-Step Guide
Ready to bring these friendly phantoms to life? Let’s do this! I’ll walk you through every step with all my best tips and hacks to ensure ghost-making success.
- Prep Your Bananas: Peel your bananas and slice each one in half, right across the middle. You’ll now have six banana halves. Pro Chef Hack: Give them a very, very light pat with a paper towel. This removes excess moisture and helps the chocolate coating stick like a dream, preventing any slippery, slidey ghost situations.
- Insert the Sticks: Gently but firmly push a popsicle stick into the flat end of each banana half. You want to push it in about halfway through the banana so it’s secure. Be careful not to push so hard that it pokes out the other end! Tip: If your bananas are very soft and you’re worried about them splitting, you can pop them in the freezer for about 15 minutes first to firm them up slightly.
- Melt the Chocolate: This is the most important step! Place your white chocolate chips or candy melts into a microwave-safe bowl. Microwave on high in 30-second intervals, stirring vigorously in between each blast. DO NOT just set it and forget it! This is how chocolate seizes up and becomes a grainy, clumpy mess. Be patient. It usually takes about 90 seconds total. You’re looking for a smooth, lava-like consistency. If it’s still a little thick, try 15-second intervals until it’s perfect.
- The Big Dip: Now for the fun, messy part! Holding onto the stick, carefully dip each banana pop into the melted chocolate, swirling it gently to coat it completely. Let the excess chocolate drip back into the bowl. You can give it a little shake or a gentle twirl to help smooth it out.
- Create a Face: Working quickly before the chocolate sets, grab your mini chocolate chips and press them into the chocolate to create two eyes and a little “O” mouth. This is where you can get creative! Make them happy, surprised, or even a little spooky.
- Set and Freeze: Place your finished ghost pops on a baking sheet lined with parchment paper or a silicone baking mat. This prevents sticking and makes cleanup a breeze. Slide the entire sheet into the freezer and let them set for at least 2 hours, until the chocolate shell is completely hard and the banana inside is frozen.
How to Serve Your Spectral Squad
Presentation is half the fun with these guys! Once they’re fully frozen, you can transfer them to an airtight container with layers of parchment paper in between to store. When you’re ready to serve, let’s make it an event.
For a killer party platter, stick a block of styrofoam or even a upside-down colander covered with a black napkin into a Halloween-themed bucket. Then, simply stick the pops into the foam to make a standing army of ghosts! You can scatter some orange and black sprinkles or candy corn around the base for an extra festive touch.
For a simpler family dessert, just lay them out on a dark-colored plate. They’re delicious straight from the freezer—the frozen banana has an incredible ice-cream-like texture that pairs magically with the crisp chocolate shell. Serve them immediately after taking them out for the best texture and to prevent melting mishaps!
Spooky Swaps & Ghoulish Twists
Want to mix it up? This recipe is a fantastic blank canvas for your creativity!
- Pink Phantom: Use pink candy melts instead of white for a fun, girly twist. So cute for a Boo-to-You party!
- Dairy-Free Ghosts: Easily accommodate allergies! Use dairy-free white chocolate chips (like the brand Enjoy Life) and ensure your chocolate chips are dairy-free. The bananas are naturally vegan and glorious.
- Zombie Edition: Add a drop of green food coloring to your melted white chocolate for a spooky zombie green tint. Use red icing to draw little “blood” drips coming from their mouths!
- Nutty Haunting: After dipping in chocolate, roll the bottom of the ghost in finely chopped peanuts or pistachios before the chocolate sets for a little salty crunch.
- Boo-nana Pops: For an extra flavor layer, spread a thin layer of peanut butter or almond butter on the banana before you dip it in the chocolate. Trust me, it’s a game-changer.
Chef Emily’s Spooky Notes
Over the years, I’ve made approximately a million of these pops (it feels like it, anyway!), and they’ve evolved a bit. My first batch, as I mentioned, was a little rough around the edges. The chocolate was too thick, the faces were lopsided, and they were more “blob” than “ghost.” But you know what? Nobody cared. They were made with love and a heck of a lot of laughter.
My biggest lesson learned: don’t stress about perfection. A ghost with one eye slightly higher than the other has more character! If the chocolate doesn’t coat perfectly, just call them “Casper’s cousins who got caught in a rainstorm.” The goal is to have fun in the kitchen and make something that brings a smile to someone’s face. That’s always the most important ingredient.
Ghostly Guidance: Your Questions, Answered!
Q: My white chocolate became thick and clumpy when I melted it. What did I do wrong? How can I fix it?
A: Ah, the dreaded “seized” chocolate! This usually happens if a tiny bit of steam or water gets into the melting chocolate, or if it gets too hot. To prevent it, always ensure your bowl is completely dry. If it happens, try adding a tiny bit of solid vegetable shortening (like Crisco) or coconut oil (about ½ tsp at a time) and stir vigorously. This can sometimes bring it back to a smooth state. If it’s too far gone, sadly, it’s best to start over.
Q: Can I make these ahead of time?
A: Absolutely! They are the perfect make-ahead treat. Once frozen solid, store them in an airtight container or a large freezer bag separated by parchment paper. They’ll keep beautifully for 1-2 weeks. Any longer and the banana might start to get too icy.
Q: The chocolate coating is cracking when I bite into it. Why?
A: This typically means the coating was applied too thickly. Next time, try dipping and letting more of the excess chocolate drip off. A thinner layer is more flexible and less likely to crack when you bite into the frozen banana beneath.
Q: Can I use milk or dark chocolate instead?
A: Of course! They just won’t be “ghosts” anymore. You could make mummy pops by drizzling white chocolate over dark chocolate-coated bananas to create bandages. Get creative with it!
Ghost Banana Pops
- Total Time: 2 hours 10 minutes
- Yield: 6 ghost pops 1x
Description
A fun and spooky treat that’s as easy to make as it is to enjoy! These chilly ghost banana pops are perfect for Halloween parties, kid-friendly snacks, or just a little ghostly delight on any day. Grab your ingredients and bring these edible ghosts to life!
Ingredients
3 ripe bananas
1 cup white chocolate chips (or white candy melts)
Mini chocolate chips (for eyes and mouth)
Popsicle sticks
Instructions
Peel and cut each banana in half crosswise.
Insert a popsicle stick into the flat end of each banana half.
Melt white chocolate chips in a microwave-safe bowl in 30-second intervals, stirring in between until smooth.
Dip each banana pop into the melted white chocolate, covering completely.
Place mini chocolate chips for the eyes and mouth while the coating is still wet.
Lay on a baking sheet lined with parchment paper.
Freeze for at least 2 hours until firm.
- Prep Time: 10 minutes
- Freeze Time: 2 hours
Nutrition
- Calories: 130 / pop
- Sugar: 18g / pop
- Fat: 5g / pop
- Protein: 2g / pop
Nutritional Boo-st
While these are definitely a treat, it’s nice to know what you’re enjoying! This approximate nutritional information is for one pop, based on the specific ingredients listed.
Each ghost pop is a fun source of energy. The banana provides potassium and a bit of fiber, while the chocolate offers a quick carb boost. It’s a dessert you can feel a little better about compared to sugar-loaded candy, especially since you’re controlling the ingredients. Remember, it’s all about balance! Enjoy your treats mindfully and savor every spooky bite.
Per Serving (1 pop): ~130 calories | 2g protein | 5g fat | 18g sugar
Happy Haunting & Happy Eating!
And there you have it, my friends! Your complete guide to creating the most adorable, spook-tacular Halloween treat on the block. I hope you have as much fun making these Ghost Banana Pops as I do. Remember, the kitchen is your playground. Don’t be afraid to get a little messy, put on some Halloween tunes, and let your creativity run wild.
I’d love to see your ghoulish creations! If you make these, please share your photos and tag me @TastyChow on social media. Seeing your kitchen adventures absolutely makes my day.
Until next time, keep your whisks busy and your hearts full. Happy cooking!
— Emily 🧡