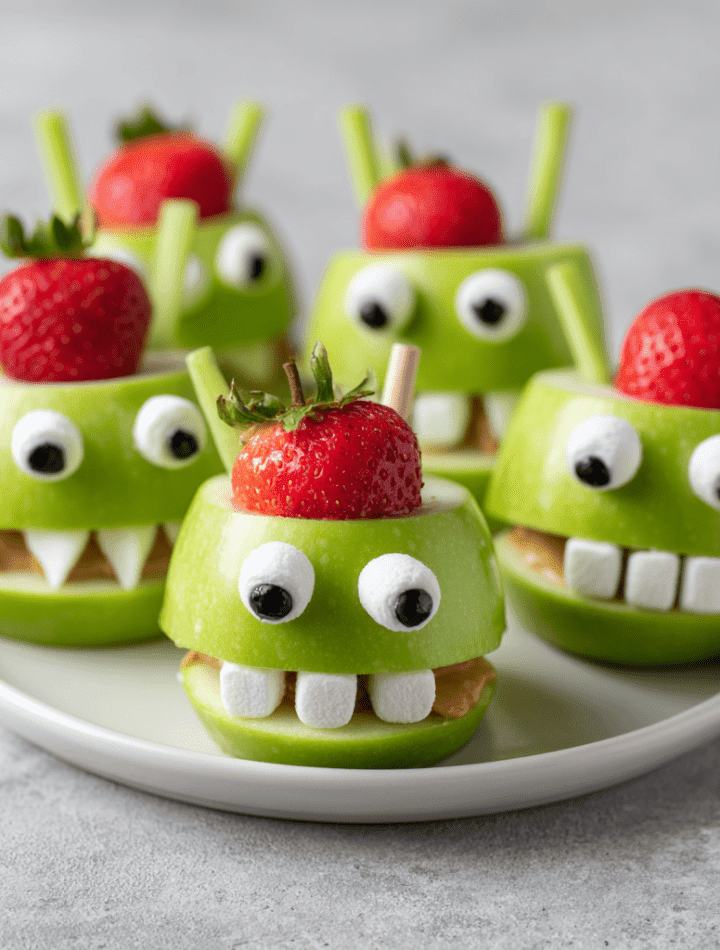
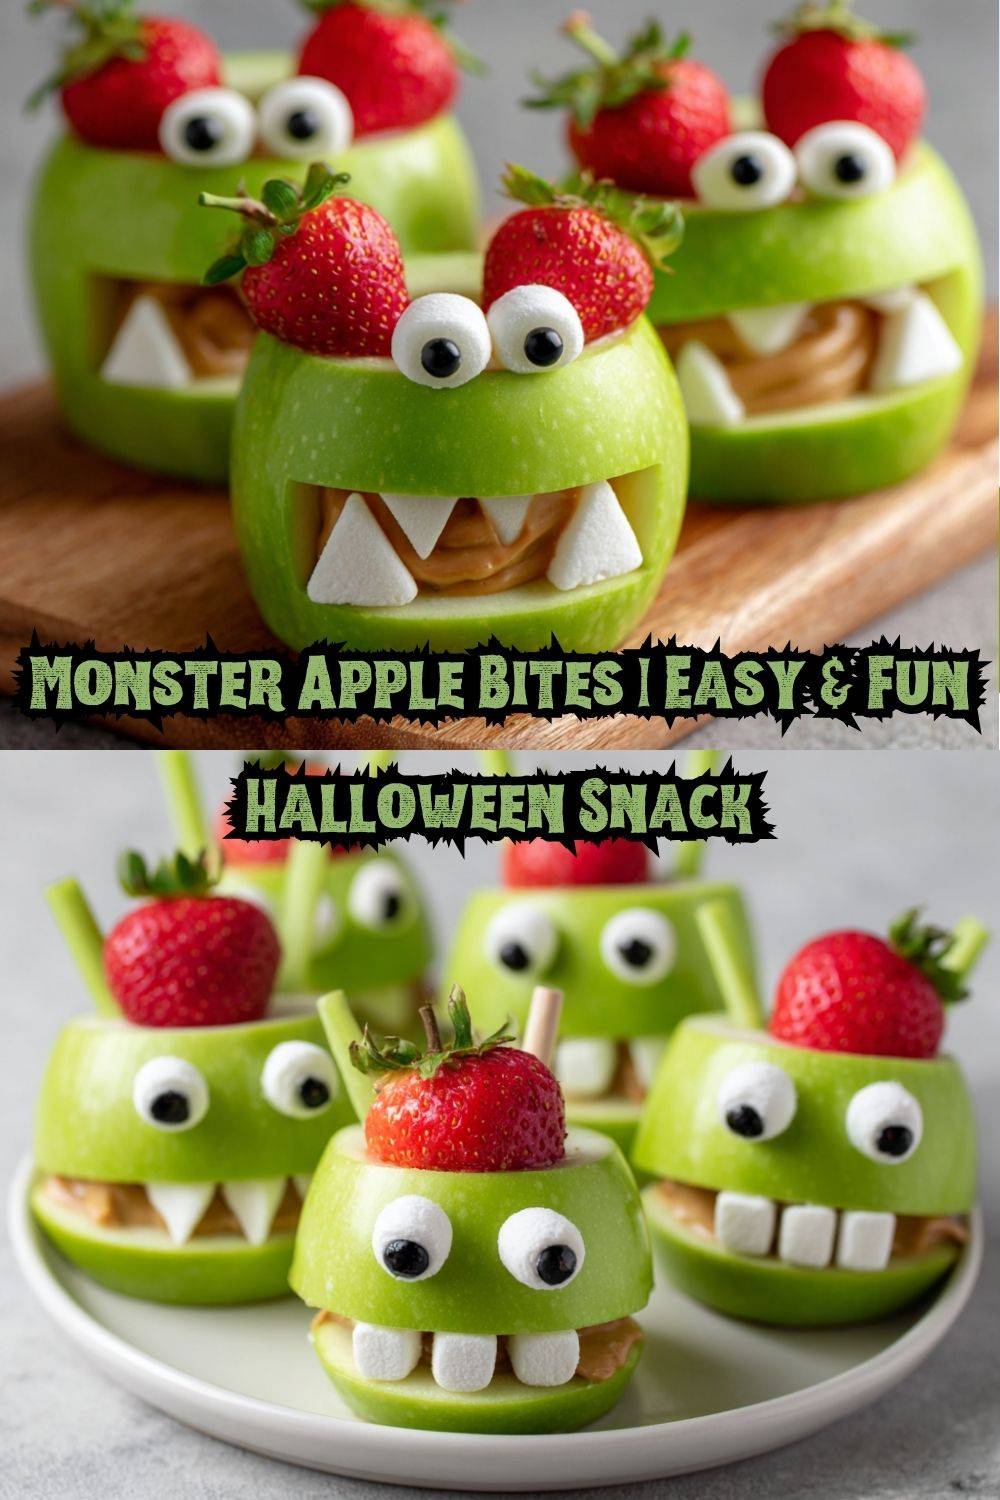
Unleash Fun & Flavor with These Adorably Spooky Monster Apple Bites!
Hey there, my fellow food adventurer! Chef Emily here, waving at you from my flour-dusted kitchen. Is there anything better than a recipe that’s equal parts delicious, adorable, and just a little bit silly? I don’t think so. That’s why today, we’re throwing our serious chef hats to the wind and diving headfirst into a project that’s pure, unadulterated fun. We’re making Monster Apple Bites!
Now, I know what you might be thinking. “Emily, these look almost too cute to eat!” But trust me, the second that sweet, crisp apple meets the creamy peanut butter and the fluffy marshmallow “teeth,” you’ll be so glad you did. These little guys are the ultimate kitchen activity. They’re perfect for getting the kids involved on a rainy afternoon, they’re a total show-stopper at Halloween parties, and they’re a brilliant way to make snack time feel like a celebration.
Best of all? They come together in about 15 minutes with just a handful of ingredients you probably already have in your pantry. This isn’t about perfection; it’s about creativity, laughter, and making a memory (and a mess!) in the kitchen. So, grab your favorite little helpers, put on some fun music, and let’s create some monsters that are more likely to get a “YUM!” than a “BOO!”.
A Kitchen Full of Giggles & Googly Eyes
This recipe takes me right back to my first apartment after culinary school. My walls were bare, my couch was a hand-me-down, but my kitchen was always full of friends. One October, I decided to throw a last-minute “Spooky Snacks” potluck. I was broke, but I was determined to bring something memorable.
I stared into my nearly empty fridge: apples, a half-used jar of peanut butter, and some leftover strawberries. My eyes then landed on a forgotten bag of mini marshmallows from a previous hot chocolate night. And then it hit me. Teeth! I could make little apple mouths! I frantically dug through my baking supplies and found a rogue container of candy eyes. Twenty minutes and a whole lot of laughter later, a platter of goofy, grinning apple monsters was born. They were the hit of the party! They didn’t cost much, but they were made with heaps of love and a dash of improvisation—which, in my book, is the secret ingredient to the best recipes. It reminds me that cooking doesn’t always have to be serious; sometimes, it’s just about playing with your food and sharing the joy.
Gathering Our Monster-Making Supplies
Here’s everything you need to bring these friendly fiends to life! The beauty of this recipe is in its flexibility, so don’t stress if you need to make a swap.
- 2 green or red apples: I love using a mix for a monster variety! Granny Smith apples give a fantastic tart contrast to the sweet toppings, while sweeter varieties like Fuji or Gala are a kid-favorite. Chef’s Insight: A quick squeeze of lemon juice on the cut apples will keep them from browning if you’re making them ahead of time!
- ½ cup peanut butter: This is our “glue” and our delicious, protein-packed filling. Creamy works best for spreading, but chunky can add a fun texture for “monster skin.” Substitution Tip: For a nut-free version, sunflower seed butter or soy nut butter work perfectly. For a different flavor profile, try almond butter or even cookie butter for a real treat!
- 1 cup mini marshmallows: These are our classic monster teeth! Their small size and soft texture are ideal. Chef’s Insight: If your marshmallows are a bit stale and sticky, dust your fingers with a little powdered sugar or cornstarch to make handling them easier.
- 1 large strawberry, thinly sliced: This provides the perfect pop of red for a silly, lolling tongue. Substitution Tip: No strawberries? A thin slice of a fruit roll-up, a piece of red licorice, or even a sliver of a red apple peel can work in a pinch!
- 24-32 candy eyes: The pièce de résistance! You can find these in the baking aisle of most grocery stores. They instantly give each apple bite its own personality.
- Toothpicks (optional): Helpful for securing wobbly eyes or stubborn tongues, especially if you’re transporting these little guys to a party.
Let’s Build Some Monsters! A Step-by-Step Guide
Alright, team! Let’s get our hands dirty and create some edible art. Follow these steps, and you’ll have a plate full of charming monsters in no time.
- Slice and Carve Your Apple Mouths. First, wash and dry your apples thoroughly. Using a sharp knife, slice each apple into quarters. Now, here’s the key step: take each quarter and, about halfway down the fleshy part (not the skin side), cut out a small wedge. This removed wedge is what forms the open “mouth.” You can make the mouths wide and grinning or narrow and sneaky—it’s totally up to you and your monster’s personality! Chef’s Hack: If the apple quarters are too round and wobbly, you can carefully slice a tiny bit off the bottom (skin side) to create a flat base so your monster sits steadily on the plate.
- Spread the Peanut Butter “Glue.” Using a small butter knife or a spoon, spread a generous layer of peanut butter inside the carved-out “mouth” of each apple quarter. Don’t be shy! This layer acts as the glue that will hold our teeth and tongue in place, and it’s the delicious, creamy heart of the snack. Make sure you spread it all the way to the edges.
- Give Them a Smile (or a Snarl!) with Teeth. Now for the fun part! Take your mini marshmallows and gently press them into the peanut butter along the top and bottom edges of the mouth. You can line them up neatly for a polished look or cluster them randomly for a more crooked, crazy monster smile. Let those creative juices flow!
- Add a Silly Strawberry Tongue. Take a thin slice of strawberry and gently tuck one end of it into the peanut butter in the center of the mouth, letting the rest of it loll out dramatically. This instantly brings your monster to life! If it’s not sticking well, a tiny dab of peanut butter on the back of the strawberry can help secure it.
- Don’t Forget the Googly Eyes! Finally, it’s time for the eyes. Dip the back of each candy eye into a tiny bit of peanut butter and then press them firmly onto the top of the apple skin. You can place them close together for a cross-eyed look, far apart for a goofy vibe, or even put one slightly askew for extra character. If they’re not sticking, a short piece of toothpick can be used as a stake to hold them in place—just be sure to warn anyone eating them about the toothpick!
- Serve and Enjoy the Chaos! You can serve these monster bites immediately for the ultimate crisp crunch, or you can pop them in the fridge for 15-20 minutes to let the peanut butter set a little. Then, arrange them on a platter and watch them disappear!
How to Serve Your Apple Monster Crew
Presentation is part of the fun with these guys! Don’t just plop them on a plate. Give them a stage!
Arrange them on a dark-colored platter or a piece of slate to make their colors really pop. You can add a few autumn leaves (clean and food-safe, of course!) or some Halloween-themed sprinkles around the plate for a festive touch. For a party, consider creating a whole scene—maybe a “monster mash” with a few dancing candy skeletons nearby. If you’re serving these as an after-school snack, pile them high on a napkin and watch your kids’ faces light up. They’re also a fantastic, healthier addition to a Halloween party spread, sitting proudly next to witch’s finger cookies and pumpkin-shaped pizzas.
Monster Mash-Ups: Creative Twists & Swaps
The basic formula is just the beginning. Let your imagination run wild with these fun variations!
- Vampire Bites: Use red apples and omit the strawberry tongue. Instead, use two large slivered almonds, pressed into the peanut butter at the top of the mouth to create fangs. Spooky!
- “Dressed-Up” Monster: After adding the peanut butter, roll the entire sticky surface in sprinkles, colored sugar, or even mini chocolate chips before adding the teeth and eyes. It gives your monster a fun, furry texture!
- Chocolate Monster: Swap the peanut butter for Nutella or a melted chocolate-hazelnut spread. Use white chocolate chips for the teeth and add the eyes directly onto the chocolate. Decadently delicious.
- Yogurt-Dipped Monster: For a lighter option, use Greek yogurt sweetened with a tiny bit of honey or maple syrup instead of peanut butter. It adds a tangy flavor and a boost of protein.
- Dairy-Free & Vegan Monster: Ensure your marshmallows are vegan (many standard ones contain gelatin), use a seed butter, and find vegan-friendly candy eyes. It’s an easy swap to make everyone happy!
Chef Emily’s Notes from a Messy Kitchen
This recipe has evolved so much since that first potluck! I’ve learned that if you let kids decorate their own, you’ll get some truly avant-garde monsters with five eyes and teeth everywhere—and that’s the best kind. I once tried to make a “family” of monsters using different apple types and my dog, Chowder, was so fascinated by the googly eyes staring at him from the coffee table that he tried to “befriend” one. Let’s just say it didn’t end well for that particular monster. The point is, don’t take it too seriously. Embrace the mess, laugh at the lopsided creations, and enjoy the process as much as the product. The best recipes are the ones that create stories, and these silly apple bites are guaranteed to create a few.
Monster Bites FAQs: Taming Your Creations
Q: How far in advance can I make these?
A: You can assemble them up to 2-3 hours ahead of time. To prevent the apples from browning, give the cut sides a light brush with lemon juice or a spritz of Fruit-Fresh before you add your other ingredients. Store them in a single layer in the fridge until you’re ready to serve.
Q: My candy eyes won’t stick! What can I do?
A: Peanut butter can sometimes be a bit too thick. You can try using a tiny dot of cream cheese, honey, or even a speck of frosting as “glue.” If all else fails, a short piece of toothpick poked into the apple and then into the back of the eye will hold it securely—just remember to remove it before eating or alert your guests!
Q: Can I use something other than marshmallows for teeth?
A> Absolutely! Slivered almonds, white candy melts, small pieces of white chocolate, or even vanilla yogurt chips make great alternatives for a different look and texture.
Q: Are there any other nut-free alternatives to sunflower butter?
A> Yes! Pumpkin seed butter has a great green color that could look awesome for a Frankenstein monster vibe! You could also use a thick, Greek yogurt or a dairy-free cream cheese alternative.
Monster Apple Bites
- Total Time: 15 minutes
- Yield: 8 monster bites 1x
Description
Get ready to unleash your inner mad scientist with these playful Monster Apple Bites! They’re sweet, crunchy, and just the right amount of creepy—perfect for kids, parties, or a fun snack-time surprise. These monsters are more delicious than scary, and they’re ready to bite back!
Ingredients
2 green or red apples
½ cup peanut butter (or almond/sunflower butter for allergies)
Mini marshmallows (for teeth)
1 strawberry, sliced (for tongues)
Candy eyes
Toothpicks (optional for securing)
Instructions
Slice apples into quarters, then cut a small wedge out of each quarter to form a mouth.
Spread peanut butter inside the cut section.
Press mini marshmallows along the top and bottom for teeth.
Add a slice of strawberry sticking out as a tongue.
Place candy eyes on top using peanut butter as glue.
Chill or serve right away for maximum monster effect!
- Prep Time: 15 minutes
Nutrition
- Calories: 95 / Bite
- Sugar: 10g / Bite
- Fat: 4g / Bite
- Protein: 2g / Bite
Nutritional Quick Bite
While these are a fun treat, it’s nice to know they have some redeeming qualities! Apples are a great source of fiber and vitamin C. Peanut butter provides healthy fats and protein to help keep energy levels stable. Using a natural peanut butter without added sugar is a great way to cut down on sweetness. Of course, the marshmallows and candy eyes are pure fun, but they’re used in moderation. It’s a snack that balances a little indulgence with some real nutritional benefits, making it a win-win in my book!
Prep Time: 15 minutes
Servings: 8 monster bites
Per Serving (approx.): ~95 calories | 2g protein | 4g fat | 10g sugar
Happy Creating, My Friends!
Well, that’s it, my friends! You are now officially a master monster-maker. I hope this recipe brings a little bit of whimsy and a whole lot of deliciousness to your day. Remember, the kitchen is your playground. It’s where memories are baked, stories are simmered, and sometimes, where silly apple monsters are brought to life.
I’d love to see your creations! Did you give your monster blue sprinkles for hair? Did your little one make a cyclops apple? Tag me on social @tastychow so I can see your incredible edible art. Now, go forth and chow down!
With love and a handful of candy eyes,
Emily