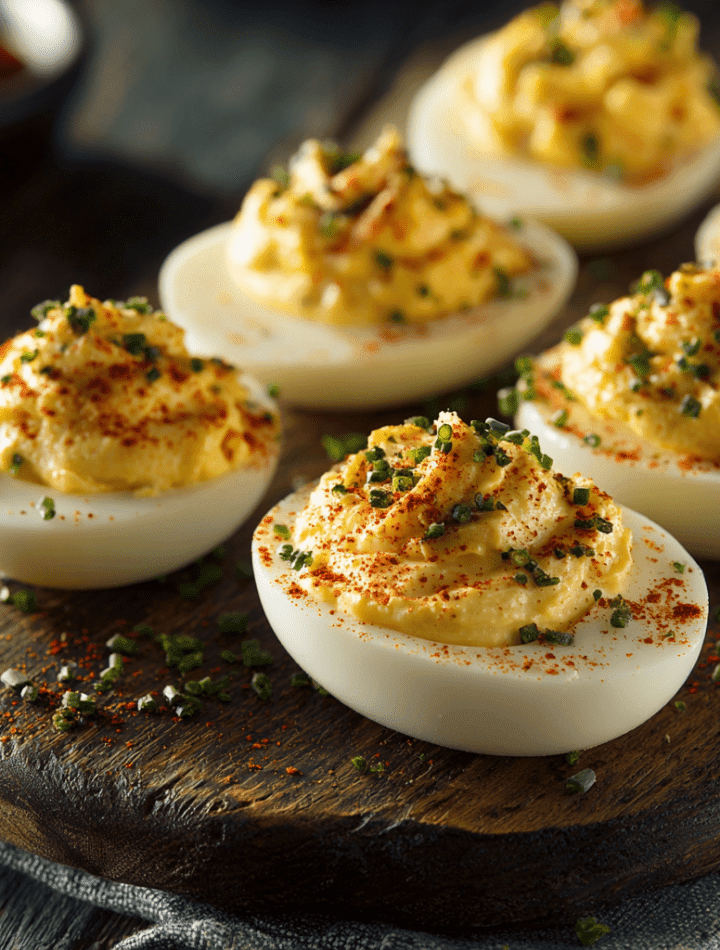
Your New Go-To Party Trick: The Ultimate Classic Savory Deviled Eggs
Hey there, my fellow flavor-seeker! 👋 Emily here, from my happy little kitchen to yours. Is there any sound more quintessentially “party” than the gentle *clink* of a deviled egg platter being set down on a table? It’s a sound that immediately triggers a wave of nostalgia, a chorus of “oohs” and “aahs,” and a stampede of hungry guests. These little flavor bombs are the undisputed champions of potlucks, holiday gatherings, and sunny Sunday brunches.
But here’s the thing I’ve learned after years of culinary adventures (and a few hilarious kitchen fails): the simplest recipes are often the ones we overcomplicate. We think we need a dozen fancy ingredients to impress a crowd. Friends, I am here to tell you that magic lives in simplicity. A perfectly creamy, tangy, savory deviled egg is a thing of pure, unadulterated joy. It’s a bite-sized hug that says, “I care enough to make something delicious for you.”
Today, we’re going back to basics with my absolute favorite Classic Savory Deviled Eggs recipe. This isn’t just about mashing yolks with mayo; it’s about mastering a technique that will make you the star of every gathering. We’re talking silky-smooth filling, perfectly cooked whites, and that classic flavor profile that everyone knows and loves, with a few of my secret chef hacks thrown in for good measure. So, tie on your favorite apron (the messy one is always the best!), and let’s make something truly delicious together.
A Tale of Two Grandmas and a Deviled Egg Standoff
My love affair with deviled eggs didn’t start in a fancy culinary school. Oh no. It started at a long-ago family reunion, right in the middle of a very friendly, yet fiercely competitive, deviled egg standoff between my two grandmothers.
Grandma Betty, on my dad’s side, was a “measure with your heart” kind of cook. Her deviled eggs were always a surprise—sometimes heavy on the vinegar, sometimes with a mysterious, delicious spice she’d never reveal. Grandma Eleanor, my mom’s mom, was a precisionist. She followed recipes to the letter and believed a deviled egg should be a perfect, consistent, creamy delight every single time. Their platters would sit side-by-side on the picnic table, and we’d all have to try one from each and declare a winner (a nearly impossible task!).
This recipe is my love letter to both of them. It has Grandma Eleanor’s flawless, creamy technique and perfectly balanced base. But it also carries the spirit of Grandma Betty’s playful experimentation—the understanding that this classic is a canvas, waiting for your personal touch. Making deviled eggs now always takes me back to that sunny day, the sound of laughter, and the lesson that the best food is the food made with love and shared with people you adore.

Gathering Your Dream Team: The Ingredients
This is where the magic begins! The ingredient list is short and sweet, which means every single one plays a starring role. Here’s exactly what you’ll need and why it’s so important:
- 6 large eggs: This is your foundation! I highly recommend using eggs that are a week or two old. Why? Fresh eggs are notoriously harder to peel. Slightly older eggs have a higher pH level, which causes the membrane to pull away from the shell, making your peeling life infinitely easier.
- 3 tbsp mayonnaise: This is the key to that luxurious, creamy texture. Use a good-quality, full-fat mayo for the richest flavor and best consistency. For a tangier twist, you can swap half of it for Greek yogurt or sour cream!
- 1 tsp Dijon or yellow mustard: Hello, flavor! Dijon mustard adds a gentle, sophisticated tang and a bit of sharpness, while classic yellow mustard gives you that bright, picnic-style flavor we all know. I’m a Dijon girl myself, but you truly can’t go wrong.
- ½ tsp white vinegar: This is the secret weapon that cuts through the richness and makes the flavors pop. It provides that signature “deviled” tang. Apple cider vinegar is a fantastic substitute if that’s what you have on hand.
- Salt and pepper, to taste: Don’t you dare forget to season your filling! I use a fine sea salt and freshly cracked black pepper. Taste as you go—this is non-negotiable for a great result.
- Paprika, for garnish: The classic crimson crown! Not only does it add a beautiful pop of color and a tiny bit of smoky flavor, but it also tells your guests, “Yes, these are the classic deviled eggs you were hoping for.” Smoked paprika is a game-changer here.
- Optional: chopped chives or parsley for topping: A little sprinkle of fresh green herbs adds a wonderful freshness, a lovely color contrast, and makes your platter look professionally styled.
Let’s Get Cooking: Your Foolproof Step-by-Step Guide
Alright, team! Let’s transform these simple ingredients into a masterpiece. Follow these steps, and you’ll have perfect deviled eggs every single time.
Step 1: The Perfect Hard-Boil
Place your eggs in a single layer in a saucepan. Cover them with cold water by about an inch. Why cold? Starting them in cold water allows for gradual, even heating and helps prevent cracked shells. Now, bring the pot to a rolling boil over high heat. The second it hits a full boil, remove it from the heat, slap a lid on it, and set a timer for 12 minutes. This “off the heat” method is the secret to tender, not rubbery, yolks with no nasty green ring.
Step 2: The Ice Bath Shock
While the eggs are cooking, prepare an ice bath—a big bowl filled with cold water and ice. As soon as that 12-minute timer goes off, drain the hot water and immediately transfer the eggs to the ice bath. Let them chill out for at least 15 minutes. This rapid cooling stops the cooking process and, most importantly, contracts the egg inside the shell, making them a dream to peel.
Step 3: The Peel (Without the Fear!)
Gently tap each egg on the counter to crackle the shell all over. Then, roll it gently between your hands to loosen things up. Start peeling from the wider end, where there’s usually a small air pocket—it gives you a great starting point. Peeling under a slow trickle of cool running water can help wash away any tiny shell bits and make the process even smoother.
Step 4: The Great Halving
Pat your perfectly peeled eggs dry with a paper towel. Using a sharp knife, slice each egg in half lengthwise. Wipe the knife clean between cuts for pristine edges. Gently pop the yolks out into a medium-sized bowl. Arrange your beautiful, empty egg white boats on a serving platter.
Step 5: Creating the Dreamy Filling
Now, for the main event! Using a fork, mash the yolks until they form a fine crumble. This is your base. To this, add your mayonnaise, mustard, vinegar, salt, and pepper. Now, here’s my pro tip for an unbelievably smooth filling: push the yolk mixture through a fine-mesh sieve using the back of a spoon. It takes one extra minute but creates a cloud-like, lump-free consistency that is absolutely worth it. If you’re feeling lazy, a quick whisk works great too!
Step 6: The Grand Finale – Piping & Garnish
You can simply spoon the filling back into the whites, but for a truly elegant look, piping is the way to go. Spoon the filling into a zip-top bag, snip off a corner, or use a piping bag fitted with a star tip for a fancy swirl. Fill each egg white generously. Just before serving, give them a gorgeous dusting of paprika and a sprinkle of fresh chives. This keeps the paprika from getting “sweaty” and the herbs nice and bright.
Setting the Stage: How to Serve Your Masterpiece
You’ve crafted these beautiful bites; now let’s give them the presentation they deserve! A simple white platter is a classic choice that really makes the colors of the eggs pop. If you want to get fancy, use a deviled egg tray—those little divots keep them from sliding around.
To make your platter look abundant and professional, tuck a few little lettuce leaves (butter lettuce is perfect) or fresh parsley sprigs underneath the eggs before you place them. It adds a beautiful green backdrop and makes the platter look full.
What to serve them with? These are the ultimate team players! They’re fantastic alongside other BBQ favorites like pulled pork sandwiches and coleslaw. They shine on a brunch spread next to fluffy pancakes and crispy bacon. Or, they can be the star of a simple appetizer night. Pair them with a crisp, cold white wine or a light beer. Honestly, they go with just about everything!
Get Creative! 5 Flavorful Twists on the Classic
Once you’ve mastered the classic, the world is your oyster… or your deviled egg! Here are a few of my favorite ways to mix things up:
- The “Everything Bagel”: Mix a teaspoon of everything bagel seasoning into your filling. Garnish with more seasoning and a tiny piece of smoked salmon. Absolutely incredible.
- Spicy Sriracha & Bacon: Add 1-2 teaspoons of sriracha (to taste!) to the filling for a kick. Top with crumbled, crispy bacon and a thin slice of jalapeño for the brave.
- Herb Garden Fresh: Fold 2 tablespoons of finely chopped fresh herbs into the filling—dill, chives, and parsley are a perfect combo. It’s light, bright, and perfect for spring.
- Avocado Lime: Replace half of the mayonnaise with the flesh of one ripe avocado and add a big squeeze of fresh lime juice. You’ll get the creamiest, dreamiest green filling. Garnish with a tiny cilantro leaf.
- Protein-Packed (Keto-Friendly): For a higher-protein, lower-fat version, swap the mayo for plain Greek yogurt. You’ll still get amazing creaminess with a tangy punch.
Chef Emily’s Notebook Scribbles
Over the years, this recipe has seen some things! I once, in a pre-coffee haze, accidentally used powdered sugar instead of paprika for garnish. Let me tell you, a sweet and savory deviled egg is… an acquired taste I do not recommend. Learn from my mistakes, people! Label your spices!
I also firmly believe deviled eggs are a “make ahead” friend. You can hard-boil and peel the eggs up to two days in advance—keep them whole and stored in an airtight container in the fridge. You can also make the filling a day ahead and store it separately in a piping bag or container. But always wait to assemble until a few hours before serving to keep those whites firm and beautiful.
Your Deviled Egg Questions, Answered!
Q: Help! My eggs are impossible to peel. What am I doing wrong?
A: This is the #1 question! The two biggest fixes are 1) Don’t use super fresh eggs. Slightly older ones peel better. 2) Don’t skip the ice bath! Shocking them in ice water is the most crucial step for easy peeling.
Q: My filling is a bit runny. How can I thicken it up?
A> No worries! Pop the filling into the refrigerator for 20-30 minutes to firm up. If it’s still too loose, you can mix in a tiny bit more mashed yolk or a sprinkle of breadcrumbs to absorb the moisture.
Q: Can I make these ahead of time?
A: Absolutely! See my Chef’s Notes above. The key is to store the components separately and assemble within a few hours of serving for the best texture.
Q: Why are they called “deviled” eggs?
A: I love this bit of food history! The term “deviling” dates back to the 18th century and refers to seasoning food with spicy or zesty ingredients like mustard and pepper—things that were considered “hot” and therefore, in the spirit of the devil!

Classic Savory Deviled Eggs
- Total Time: 20 minutes
- Yield: 6 1x
Description
A timeless party favorite, deviled eggs are creamy, tangy, and endlessly satisfying. This classic version keeps it simple and savory—with a hint of mustard and a dusting of paprika. Perfect for brunch spreads, BBQs, or anytime you want to impress without the stress.
Ingredients
6 large eggs
3 tbsp mayonnaise
1 tsp Dijon or yellow mustard
½ tsp white vinegar
Salt and pepper, to taste
Paprika, for garnish
Optional: chopped chives or parsley for topping
Instructions
Place eggs in a saucepan and cover with cold water. Bring to a boil, then remove from heat, cover, and let sit for 12 minutes.
Drain and cool eggs under cold running water or in an ice bath. Peel.
Slice eggs in half lengthwise and carefully remove yolks.
In a bowl, mash yolks with mayo, mustard, vinegar, salt, and pepper until smooth.
Spoon or pipe mixture back into egg whites.
Sprinkle with paprika and garnish with herbs if desired.
Chill until ready to serve.
- Prep Time: 10 minutes
- Cook Time: 10 minutes
Nutrition
- Serving Size: 2 halves per serving
- Calories: 100 / Serving
- Fat: 8g / Serving
- Protein: 6g / Serving
Nutritional Information (Approximate)
Let’s be real, we’re not eating deviled eggs because they’re a “health food,” but it’s always good to know what’s in your favorite treats! Here’s a breakdown per serving (2 halves), based on the classic recipe with full-fat mayo.
Calories: 100 | Protein: 6g | Fat: 8g | Carbohydrates: <1g | Sugar: 0g
Eggs are a fantastic source of high-quality protein and essential nutrients like choline, which is great for brain health. The fats come primarily from the egg yolks and mayo, providing energy and helping you feel satisfied. To lighten them up, try the Greek yogurt swap mentioned in the variations!
Final Thoughts from My Kitchen to Yours
Well, my friend, there you have it—everything I know about creating the most perfect, classic, savory deviled eggs. This recipe is more than just a list of instructions; it’s a foundation. It’s a reliable, crowd-pleasing classic that you can always fall back on, and a springboard for your own delicious creativity.
I hope this guide gives you the confidence to whip up a batch for your next gathering, or even just for a tasty Tuesday treat for yourself. Remember, the best meals aren’t about perfection; they’re about the joy of creating and the happiness of sharing. I’d love to hear how yours turn out! Tag me on social @TastyChow with your creations.
Now, go forth and devil some eggs! Until next time, happy cooking!
— Emily 🥚❤️