Ditch the Boring Breakfast: Meet Your New Morning BFF, the Mini Muffin Tin Casserole!
Hey there, my fellow food enthusiast! Let’s have a real chat for a second. How many mornings have you found yourself sprinting out the door, stomach grumbling, with nothing but a sad granola bar or a hastily gulped cup of coffee to power you through until lunch? I’ve been there more times than I care to admit, usually on days when my apron strings are already tangled with a million things to do. We all know that breakfast is the fuel that kicks off our day, but who has the time to whip up a gourmet feast when the alarm clock is screaming and the day’s to-do list is already a mile long?
Well, my friend, I’m about to change your entire morning game with a recipe that is so simple, so delicious, and so brilliantly customizable, you’ll wonder how you ever lived without it. Say a cheerful hello to my beloved Mini Muffin Tin Casseroles! Think of them as the ultimate, all-in-one, portion-controlled breakfast powerhouse. They’re fluffy, packed with protein, loaded with your favorite flavors, and they come in their own adorable, grab-and-go package. I’m not just sharing a recipe today; I’m handing you the keys to a stress-free, happy morning routine. So, preheat that oven, grab your favorite mixing bowl, and let’s make something delicious together that your future self will thank you for!
The Little Muffin Tin That Could: A Kitchen Memory
This recipe takes me right back to my grandma’s warm, always-busy kitchen. Sunday mornings were a sacred ritual. The air would be thick with the smell of sizzling bacon, strong coffee, and something sweet baking in the oven. My job, as her tiny, apron-clad sous-chef, was to carefully grease the muffin tins for her famous blueberry muffins. I loved the ritual of it—the methodical brushing of each little cup, feeling like I was preparing tiny homes for something wonderful.
One particularly chaotic Sunday, with a house full of hungry relatives, we realized we were short on flour for the muffins. Panic? Not my grandma. She just winked, pulled out a dozen eggs, and said, “We’re building a different kind of home today, Em.” She whisked those eggs with a splash of cream, tossed in the crispy bacon bits and some leftover chopped chives from the garden, and poured it all into those freshly greased muffin cups. Twenty minutes later, we had these puffy, golden, individual egg casseroles. They were a massive hit! That day, she taught me one of my most cherished kitchen lessons: the best recipes aren’t about fancy ingredients; they’re about creativity, using what you have, and turning a potential kitchen flop into a fabulous win. These mini casseroles are my modern, make-ahead tribute to her brilliant, no-fuss spirit.
Gathering Your Breakfast Dream Team: The Ingredients
The absolute beauty of this recipe lies in its flexibility. This is your base camp—your launchpad for infinite flavor adventures. Here’s what you need to get started:
- 8 large eggs: This is the superstar, the main event, the protein-packed glue that holds our dream team together! For a richer, denser texture, try using half whole eggs and half egg whites. For the fluffiest result, make sure your eggs are at room temperature.
- ¼ cup milk (any kind!): This is our secret weapon for achieving a tender, creamy texture instead of a rubbery one. Whole milk or half-and-half will give you the richest result, but I regularly use unsweetened almond milk or oat milk and it works like a charm!
- Salt & pepper to taste: Don’t be shy here! Seasoning your egg mixture well is non-negotiable for flavor that pops. I love adding a big crack of fresh black pepper.
- ½ cup shredded cheese: The melty, glorious bonus. I’m a sharp cheddar gal myself, but the world is your oyster! Monterey Jack, pepper jack, Swiss, feta crumbles, or even a Parmesan blend all work wonders.
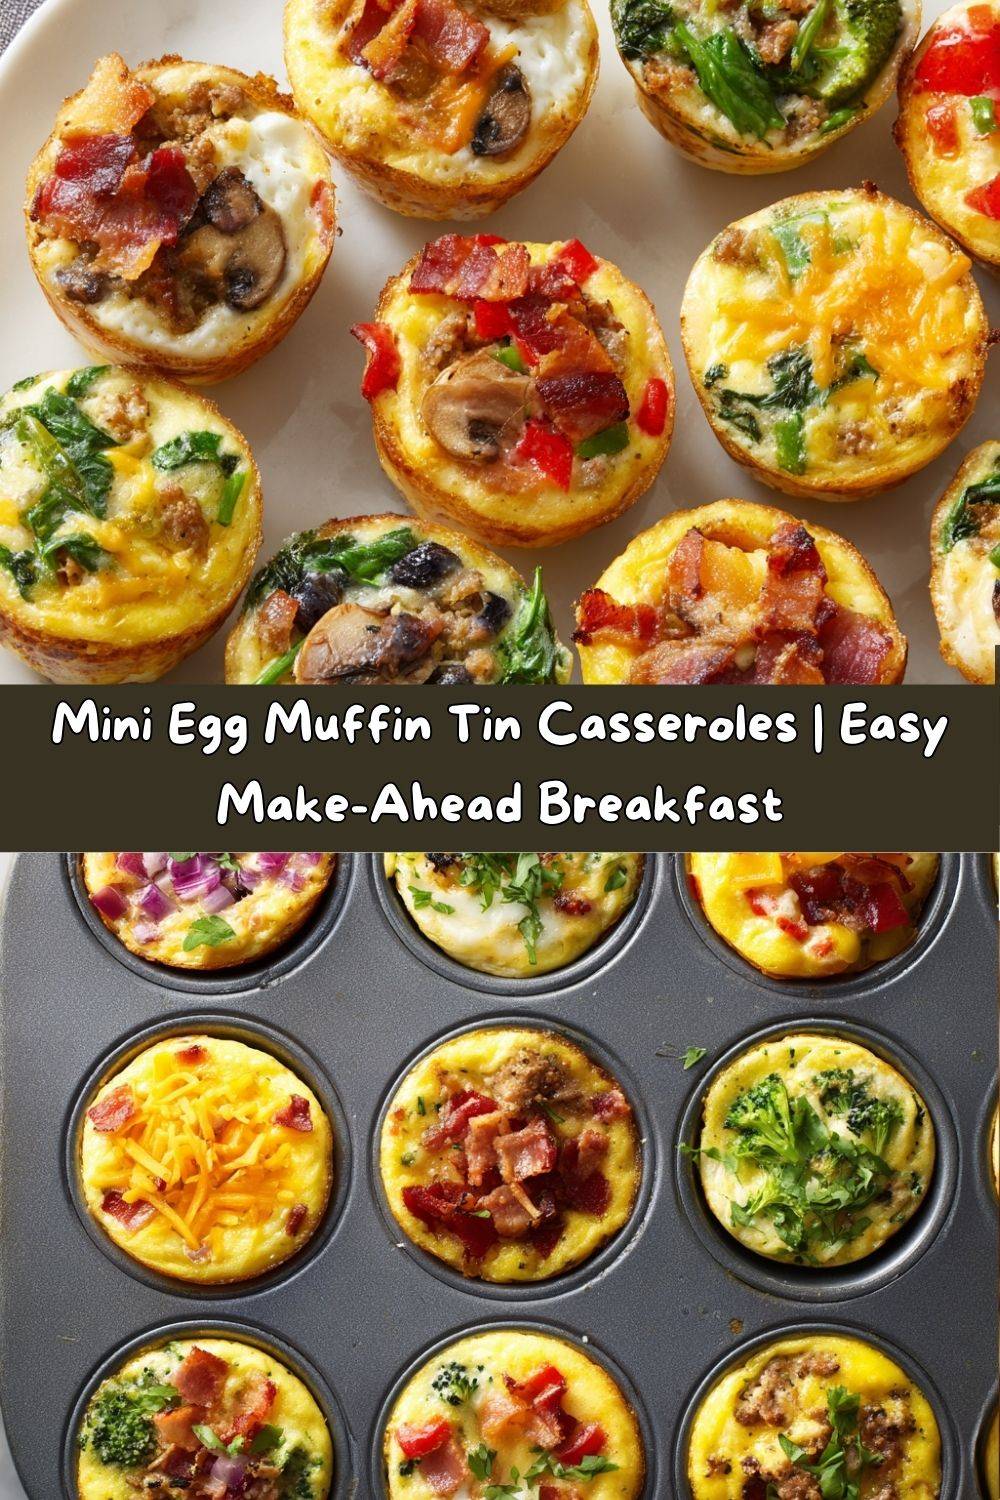
- ½ cup cooked bacon bits or sausage crumbles: Hello, savory goodness! This is optional for my vegetarian friends, but it adds a wonderful heartiness. Pre-cooked and crumbled sausage is a huge time-saver. Pro tip: chopped ham or even diced pancetta are fantastic swaps!
- ½ cup diced veggies: This is where you can really shine. My go-to combo is red bell pepper, spinach, and green onion. But mushrooms, onions, zucchini, broccoli florets, or sun-dried tomatoes are all incredible. Chef’s Hack: If using watery veggies like mushrooms or zucchini, sauté them first to release moisture and prevent soggy egg muffins!
- Olive oil spray: Our trusty tool for a stick-free release. I’m a big fan of using avocado oil spray for its high smoke point, but any cooking spray will do. Silicone muffin liners are also a game-changer here for zero sticking and easy cleanup.
Let’s Get Building: Your Step-by-Step Guide to Egg Muffin Bliss
Ready to create magic? It’s easier than you think. Follow these steps, and you’ll have a perfect batch of mini casseroles in no time.
- Preheat and Prep: First things first, get that oven heating to a cozy 375°F (190°C). This is the perfect temperature to cook the eggs through without over-browning them too quickly. While it’s warming up, grab your standard 12-cup muffin tin and give it a generous coating of your olive oil spray. Get into every nook and cranny! This is the most important step for easy removal later. If you’re using silicone liners, place them in the tin now.
- The Whisking Ritual: In a large mixing bowl with a nice pour spout (trust me, this makes life easier!), crack in your 8 eggs. Add the milk, a good pinch of salt, and a few grinds of pepper. Now, whisk it like you mean it! You’re not just combining ingredients; you’re incorporating air, which is what gives us that lovely, light texture. Whisk until the mixture is a uniform pale yellow and slightly frothy on top.
- Load ‘Em Up! Here’s the fun part. Take your chosen mix-ins and start dividing them evenly among the 12 muffin cups. I like to do a layering strategy: a little meat on the bottom, then a sprinkle of cheese, then the veggies on top. This ensures every single bite is packed with flavor and helps the cheese get all melty and glorious.
- The Big Pour: Slowly and carefully pour your whisked egg mixture over the fillings in each cup. Aim to fill each one about ¾ of the way full. They will puff up a little as they bake, so leave a little room at the top for rising. A ladle or a large liquid measuring cup can make this pouring process super neat and tidy.
- Bake to Golden Perfection: Slide your loaded muffin tin into the preheated oven and set your timer for 18 minutes. I like to rotate the pan halfway through for even baking. At the 18-minute mark, take a peek. They should be puffed up and the tops should look set. A toothpick inserted in the center should come out clean. If they still look a little jiggly, give them another 2-4 minutes. You’re looking for beautifully set eggs with lightly golden edges.
- The Cool Down: This might be the hardest part: you have to let them cool! Remove the tin from the oven and place it on a wire rack. Let the muffins cool in the tin for at least 5-10 minutes. They will deflate a bit, and that’s totally normal. This resting period allows them to firm up, making them infinitely easier to remove with a small offset spatula or a butter knife.
Plating Up (Or Packing Up!) Your Masterpiece
So, you’ve got a gorgeous batch of golden mini casseroles. Now what? The possibilities are endless!
For a cozy weekend brunch at home, plate two or three of these little guys alongside a simple arugula salad with a lemon vinaigrette, some fresh fruit, and a warm, buttered biscuit. It feels fancy with zero fuss.
For the ultimate grab-and-go breakfast, let them cool completely before popping them into a airtight container. In the morning, you can grab one and eat it at room temperature, or give it a quick 30-second zap in the microwave to warm it up. I love wrapping one in a paper towel and tucking it into my bag for a mid-morning snack that actually satisfies.
Get the kids involved by setting up a “breakfast bar” with little bowls of salsa, sour cream, avocado slices, or hot sauce for dipping. Let them customize their own breakfast—it’s a surefire way to make mornings more fun!
Mix It Up! 5 Delicious Variations to Try
Once you’ve mastered the basic formula, the flavor world is your oyster! Here are a few of my favorite twists to keep things exciting:
- The Denver Omelet: A classic for a reason! Use diced ham, green bell pepper, and onion. Swiss cheese is perfection here.
- Mediterranean Sunshine: Crumble in some feta cheese, add chopped spinach, sun-dried tomatoes, and a sprinkle of dried oregano. So bright and flavorful!
- Everything Bagel: Whisk a tablespoon of everything bagel seasoning right into the egg mixture. Fill with a cream cheese dollop and chopped chives. You won’t believe how good this is!
- Keto “Caprese”: Perfect for a low-carb diet. Use halved cherry tomatoes, fresh mozzarella pearls, and ribbons of fresh basil. Drizzle with a little balsamic glaze after baking.
- Southwest Fiesta: Spice it up with cooked chorizo or seasoned black beans, corn, Monterey Jack cheese, and a pinch of cumin. Serve with a dollop of salsa and avocado.
Chef Emily’s Notebook Scribbles
Over the years, this recipe has become a true kitchen workhorse for me. I’ve learned a few things through (sometimes hilarious) trial and error. I once tried to skip the sautéing step for mushrooms and ended up with mini mushroom soups in an egg cup. Not my finest hour! I also highly recommend a dedicated “mini casserole Sunday” where you whip up a double batch to freeze. It’s the ultimate act of self-care for your busy future self. This recipe is endlessly adaptable, so don’t be afraid to clean out your veggie drawer. That lone stalk of celery or that last handful of baby spinach? Toss it in! The best family recipes are the ones that evolve with you in your kitchen.
Your Questions, Answered!
Q: Can I make these ahead of time and how do I store them?
A: Absolutely! That’s the whole point. Let them cool completely after baking, then store them in an airtight container in the fridge for up to 4 days. To reheat, microwave for 30-45 seconds until warm.
Q: Can I freeze them?
A: Yes, they freeze beautifully! Cool completely, then place them in a single layer on a baking sheet to “flash freeze” for an hour. This prevents them from sticking together. Then, transfer the frozen muffins to a freezer-safe bag or container. They’ll keep for up to 2 months. Reheat straight from frozen in the microwave for 60-90 seconds.
Q: Why did my egg muffins deflate?
A: This is totally normal! As they cool, the air pockets inside collapse, causing them to sink. It doesn’t affect the taste one bit. It’s just physics, not a mistake!
Q: My muffins are sticking to the pan! Help!
A: The two keys are: 1) REALLY grease that pan well. Don’t be stingy with the spray. 2) Let them cool in the pan for a solid 5-10 minutes before trying to remove them. This allows them to contract and pull away from the sides. Silicone liners are a foolproof solution.

Mini Muffin Tin Casseroles
- Total Time: 30 minutes
- Yield: 12 Muffins 1x
Description
These mini egg muffins are the ultimate customizable, portion-controlled breakfast! Baked in a muffin tin and packed with your favorite mix-ins—like bacon, cheese, and colorful veggies—they’re protein-rich, freezer-friendly, and ready to power your mornings one bite at a time.
Ingredients
8 large eggs
¼ cup milk (any kind)
Salt & pepper to taste
½ cup shredded cheese (cheddar, mozzarella, or feta)
½ cup cooked bacon bits or sausage crumbles
½ cup diced veggies (peppers, spinach, onion, mushrooms, etc.)
Olive oil spray (for greasing)
Instructions
Preheat oven to 375°F (190°C). Spray a 12-cup muffin tin with oil or use silicone liners.
In a bowl, whisk together eggs, milk, salt, and pepper.
Divide your mix-ins evenly among muffin cups—meat, cheese, then veggies.
Pour egg mixture into each cup, filling about ¾ full.
Bake for 18–22 minutes, or until eggs are set and tops are golden.
Cool slightly before removing. Store in fridge or freeze for later.
- Prep Time: 10 minutes
- Cook Time: 20 minutes
Nutrition
- Calories: 90 / Muffin
- Fat: 6g / Muffin
- Carbohydrates: 1g / Muffin
- Protein: 7g / Muffin
Nutritional Power-Up (Approximate, Per Muffin)
These mini casseroles are not just delicious; they’re a fantastic way to start your day with a solid protein punch. Based on the base recipe with whole milk, cheddar, bacon, and bell peppers, each muffin contains roughly:
- Calories: 90
- Protein: 7g
- Carbohydrates: 1g
- Fat: 6g
They are naturally low-carb, gluten-free, and keto-friendly. You can easily adjust the nutrition by using egg whites, skipping the meat, or using a lower-fat cheese. They are a blank canvas for your nutritional goals!
Prep Time: 10 mins | Cook Time: 20 mins | Servings: 12 muffins
Your New Morning Routine Awaits
And there you have it! Your complete guide to ditching the breakfast scramble (the stressful kind, not the delicious egg kind!) and embracing a morning filled with flavor, protein, and ease. These Mini Muffin Tin Casseroles are more than just a recipe; they’re a strategy for happier, more delicious mornings.
I hope you and your family love making (and devouring!) these as much as I do. They’ve been a total game-changer in my home, and I have a feeling they’ll be in yours, too. Remember, cooking is about joy, creativity, and feeding the people you love—including yourself!
Now I’d love to hear from you! What’s your favorite combination of mix-ins? Tag me on social @TastyChow with your creations and use the hashtag #TastyChowMiniCasseroles. Let’s inspire each other!
Happy cooking!
XOXO,
Emily
