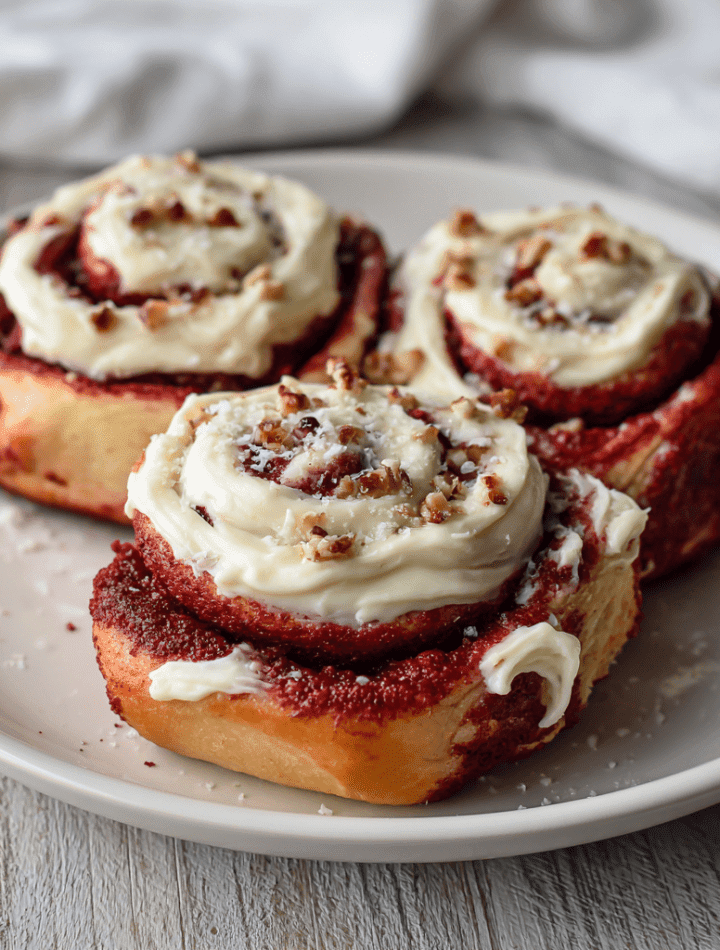
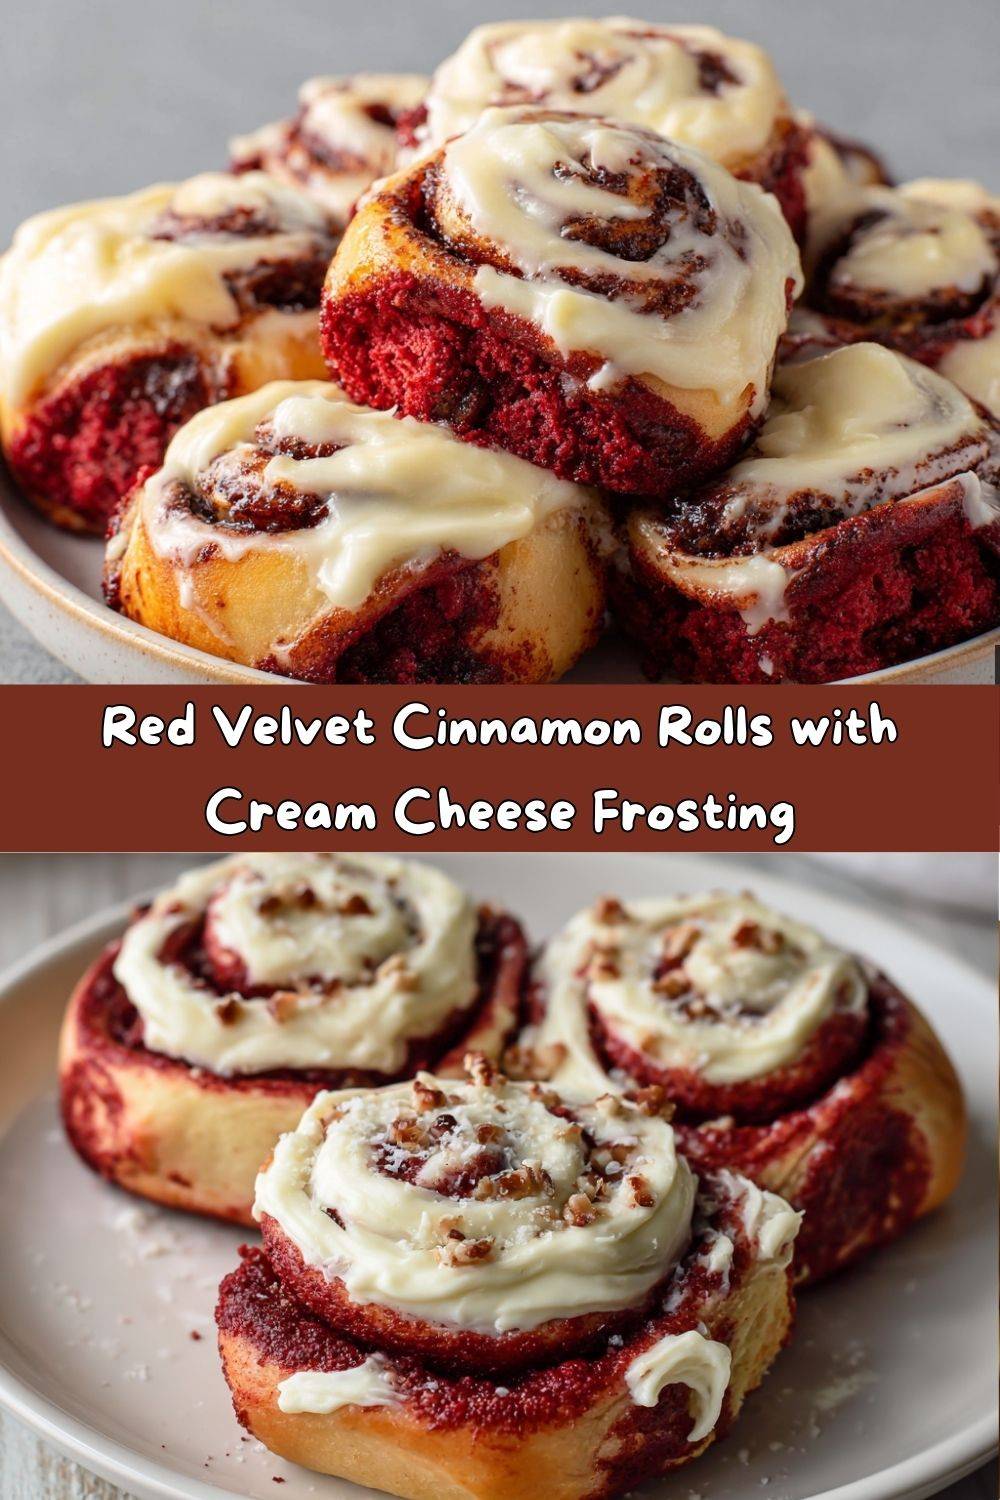
Red Velvet Cinnamon Rolls: A Swirl of Chocolatey, Cinnamony Heaven
Hey, friends! Chef Emily here, waving from my flour-dusted kitchen. Is there anything better than the smell of warm cinnamon rolls wafting through the house on a lazy weekend morning? It’s the universal signal for “cozy time is here.” But what if we took that beloved classic and gave it a glamorous, deliciously fun makeover? Enter: Red Velvet Cinnamon Rolls.
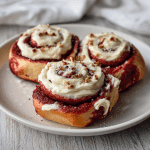
Imagine the softest, most buttery dough, rich with cocoa and that signature crimson hue, swirled with a gooey, spiced cinnamon filling, and all topped off with a luscious, tangy cream cheese frosting that melts into every nook and cranny. These aren’t just cinnamon rolls; they’re an experience. They’re perfect for holiday mornings, special brunches, or just because you deserve a treat that’s as joyful to make as it is to eat. So, tie on your favorite apron (the messy one is always the best!), and let’s bake up some magic together.
A Dash of Nostalgia: My First Kitchen Love
This recipe takes me right back to my grandma’s kitchen. It wasn’t fancy—just a small, sunny room with a well-loved oven that always seemed to be humming. She was the queen of from-scratch everything, but her cinnamon rolls were legendary. They were the centerpiece of every family gathering. I’d stand on a little stool next to her, mesmerized as she’d roll out the dough, her hands moving with a calm confidence I so admired.
One year, around Valentine’s Day, I had a “big idea.” I wanted to make them pink for the holiday. We didn’t have pink food coloring, but we did have a bottle of red and a scoop of cocoa powder. We experimented, and what emerged from the oven was a slightly marbled, rosy-hued, chocolate-kissed roll that had everyone at the table ooh-ing and aah-ing. It was a happy accident that stuck! This recipe is my homage to her—a little more refined, but carrying all the love and warmth of her original. Every time I make them, I feel like she’s right there with me, smiling.
Gathering Your Ingredients: A Chef’s Guide
Baking is a science, but it’s also an art. Using quality ingredients and understanding their role is the first step to success. Here’s what you’ll need to create these stunning rolls.
For the Dough:
- 1 cup warm milk (around 110°F): This activates the yeast. It should feel warm to the touch, not hot. Too hot, and you’ll kill the yeast! Chef’s Tip: No milk? Whole milk is best for richness, but 2% works. For a dairy-free version, unsweetened almond or oat milk are great substitutes.
- ½ cup granulated sugar: Food for the yeast and a touch of sweetness for the dough.
- 2 large eggs, at room temperature: They add structure and richness. Pro Hack: To quickly bring eggs to room temp, place them in a bowl of warm water for 5-10 minutes.
- ⅓ cup unsalted butter, melted: For that irresistible, tender crumb. Using unsalted lets you control the salt level.
- 2½ tsp instant yeast: Our leavening hero! Instant yeast can be mixed right in with the dry ingredients, no proofing needed.
- 3¾ cups all-purpose flour: The backbone of our dough. I always fluff my flour with a spoon before measuring to avoid dense rolls.
- ¼ cup unsweetened cocoa powder: The secret to that subtle, chocolatey red velvet flavor. Use natural cocoa, not Dutch-process, for the right chemical reaction with the other ingredients.
- 2 tbsp red food coloring: For that vibrant, iconic color. Gel food coloring gives a more intense color without adding extra liquid, but liquid works too!
- 1 tsp salt: Balances the sweetness and enhances all the other flavors. Never skip it!
For the Filling:
- ½ cup unsalted butter, softened: Softened is key! It should be spreadable, not melted. This creates a rich, sticky base for the sugar to cling to.
- 1 cup packed brown sugar: Dark or light brown sugar works—dark will give a deeper, more molasses-like flavor. Pack it firmly into your measuring cup.
- 2 tbsp ground cinnamon: The star of the swirl! For the best flavor, make sure your cinnamon is fresh.
- Optional: 1 tbsp cocoa powder: My little twist! It deepens the chocolate flavor in every bite.
For the Cream Cheese Frosting:
- 8 oz cream cheese, softened: Full-fat is best for that classic tangy, creamy texture.
- ¼ cup unsalted butter, softened: Combined with the cream cheese for a perfectly spreadable, rich frosting.
- 1½ cups powdered sugar: Sift it! This prevents lumps in your otherwise silky-smooth frosting.
- 1 tsp pure vanilla extract: The flavor enhancer. Always use pure vanilla for the best taste.
- Splash of milk or cream: Just enough to reach your desired drizzling consistency.
Let’s Get Baking: Step-by-Step Instructions
Don’t let the yeast scare you! This process is a beautiful, therapeutic journey. Follow these steps, and you’ll be a cinnamon roll pro in no time.
- Wake Up the Yeast: In the bowl of your stand mixer fitted with a paddle attachment, combine the warm milk, granulated sugar, eggs, melted butter, cocoa powder, and red food coloring. Give it a good mix on low until it’s a homogenous, beautifully red liquid. Now, sprinkle the yeast over the top and let it sit for just a minute. You might see it start to get foamy—that’s the yeast saying hello!
- Make the Dough: Switch to the dough hook attachment. Add the flour and salt to the wet ingredients. Mix on low speed until the flour is incorporated, then increase the speed to medium and knead for 6-8 minutes. The dough will be sticky at first but should become smooth and pull away from the sides of the bowl. Chef’s Hack: If it’s too sticky, add a tablespoon of flour at a time. If you’re kneading by hand, turn the dough onto a floured surface and knead for about 10 minutes until smooth and elastic.
- First Rise: Place the beautiful red dough in a lightly greased bowl, turning it once to coat. Cover the bowl with plastic wrap or a clean kitchen towel and let it rise in a warm, draft-free place for 1 to 1.5 hours, or until doubled in size. My favorite warm spot? On top of the oven while it preheats to a low temperature.
- Create the Filling & Roll Out: While the dough is rising, make the filling by mashing together the softened butter, brown sugar, cinnamon, and optional cocoa powder until it forms a spreadable paste. Once the dough has doubled, punch it down to release the air. On a lightly floured surface, roll the dough out into a large rectangle, about 16×20 inches.
- Spread and Roll: Spread the cinnamon filling evenly over the entire surface of the dough, all the way to the edges. Now, starting from the long side closest to you, tightly roll the dough into a log. Try to roll it as evenly as possible for uniform rolls. Pro Tip: A bench scraper is your best friend here for loosening any sticky dough from the surface.
- Slice and Second Rise: Using a sharp serrated knife, dental floss, or a bench scraper, cut the log into 12 equal rolls. Place them cut-side up in a greased 9×13 inch baking dish. Cover the dish and let the rolls rise again for 30-45 minutes. They will become nice and puffy.
- Bake to Perfection: Preheat your oven to 350°F (175°C). Bake the rolls for 20-25 minutes, or until the tops are set and the edges are just starting to turn golden. You want them baked through but still soft. Chef’s Test: Give them a gentle tap; they should sound hollow.
- Frost and Devour: While the rolls are baking, beat all the frosting ingredients together until smooth and creamy. As soon as the rolls come out of the oven, spread that glorious cream cheese frosting over the top. Watch it melt into every swirl—this is the best part! Let them cool for about 10 minutes before serving. They are best enjoyed warm!
How to Serve These Beautiful Rolls
Presentation is part of the fun! While they are absolutely magnificent straight from the pan, here’s how I like to make them extra special.
For a family-style brunch, place the whole baking dish right in the center of the table with a stack of plates and let everyone dig in. The gooey, communal feel is just so welcoming. If you’re plating individually, use a spatula to carefully lift each warm roll onto a plate. Drizzle a little extra frosting over the top and around the plate for a professional bakery touch. A light dusting of extra cocoa powder or a few festive red sprinkles makes them perfect for Christmas or Valentine’s Day.
What to serve with them? A hot cup of strong coffee or a tall glass of cold milk is non-negotiable. For a full brunch spread, pair them with some crispy bacon or savory breakfast sausage to balance the sweetness, and maybe a fresh fruit salad to add a bright, light element.
Get Creative: Recipe Variations
Once you’ve mastered the classic, the world of red velvet rolls is your oyster! Here are a few of my favorite twists.
- White Chocolate Chip: Sprinkle ½ cup of white chocolate chips over the cinnamon-sugar filling before rolling. The creamy white chocolate is a dream with the red velvet.
- Nutty Delight: Add a layer of chopped pecans or walnuts over the filling for a wonderful crunch and toasty flavor.
- Orange Zest Twist: Add the zest of one orange to the cream cheese frosting. The citrusy note cuts through the sweetness and pairs amazingly with chocolate.
- Gluten-Free Version: Substitute the all-purpose flour with a 1:1 gluten-free baking blend. The texture might be slightly more delicate, but just as delicious!
- Vegan Version: Use plant-based milk and butter, a flax egg (1 tbsp ground flax + 3 tbsp water per egg), and vegan cream cheese. The dough might be stickier, so you may need a bit more flour.
Chef Emily’s Kitchen Notes
This recipe has evolved so much since that first marbled batch with my grandma! I’ve found that using gel food coloring gives the most vibrant red without affecting the liquid balance. And a little secret? A teaspoon of vinegar is traditional in red velvet for tang, but I find the cream cheese frosting provides plenty, so I left it out to keep the recipe simple.
One of my favorite kitchen fails was the time I was so excited to bring these to a party that I forgot the sugar in the filling. I ended up with beautifully red, utterly bland rolls! I had to quickly whip up a glaze, mix in some cinnamon, and drizzle it over the top. It was a save, but lesson learned: always taste your filling! Now, I always set out my ingredients in little bowls before I start (mise en place!) to avoid any frantic mistakes.
FAQs & Troubleshooting
Q: My dough didn’t rise. What happened?
A: The most common culprit is yeast that was killed by milk that was too hot. Remember, it should be warm (110°F), not hot. Another reason could be an old yeast packet. Always check the expiration date! If your kitchen is cold, let the dough rise in an oven that has been turned off but was warmed by the pilot light or by a brief preheat.
Q: My dough is too sticky to handle. Help!
A: Don’t panic! All flour absorbs liquid differently. Simply add more flour, one tablespoon at a time, while kneading until the dough becomes smooth and only slightly tacky. Also, lightly flour your work surface and rolling pin well before rolling out the dough.
Q: Can I make these the night before?
A> Absolutely! This is a great make-ahead brunch trick. After placing the sliced rolls in the pan, cover them tightly and refrigerate overnight. The next morning, take them out and let them sit on the counter for about an hour to come to room temperature and finish rising, then bake as directed.
Q: My frosting is too runny/thick. How can I fix it?
A> For runny frosting: Your cream cheese or butter may have been too soft. Pop the whole bowl in the fridge for 15-20 minutes to firm up, then re-whip. For thick frosting: Simply add a splash of milk or cream, a teaspoon at a time, until it reaches your desired drizzling consistency.
Red Velvet Cinnamon Rolls
- Total Time: v~2 hrs
- Yield: 12 Rolls
Description
Soft, buttery, and bursting with chocolatey red velvet flavor, these cinnamon rolls take your favorite brunch treat to the next level. Swirled with brown sugar and cinnamon and topped with tangy cream cheese frosting, they’re perfect for holidays, brunches, or anytime you want to impress.
Ingredients
Dough:
• 1 cup warm milk
• ½ cup granulated sugar
• 2 eggs
• ⅓ cup unsalted butter, melted
• 2½ tsp instant yeast
• 3¾ cups all-purpose flour
• ¼ cup unsweetened cocoa powder
• 2 tbsp red food coloring
• 1 tsp salt
Filling:
• ½ cup unsalted butter, softened
• 1 cup brown sugar
• 2 tbsp cinnamon
• Optional: 1 tbsp cocoa powder for a richer swirl
Cream Cheese Frosting:
• 8 oz cream cheese, softened
• ¼ cup unsalted butter, softened
• 1½ cups powdered sugar
• 1 tsp vanilla extract
• Splash of milk, to thin if needed
Instructions
In a mixing bowl, combine warm milk, sugar, eggs, butter, cocoa powder, food coloring, and yeast. Mix until well combined.
Add flour and salt. Knead until smooth. Cover and let rise until doubled (about 1 hour).
Roll dough into a rectangle. Spread with butter, then sprinkle with brown sugar, cinnamon, and cocoa if using.
Roll tightly and slice into 12 equal rolls. Place in a greased baking dish and let rise until puffy (30–45 min).
Bake at 350°F (175°C) for 20–25 minutes or until golden.
Beat frosting ingredients until smooth. Spread over warm rolls and serve.
- Prep Time: 90 minutes
- Cook Time: 25 minutes
Nutrition
- Calories: 340 / Roll
- Sugar: 22g / Roll
- Fat: 14g / Roll
- Carbohydrates: 48g / Roll
- Protein: 5g / Roll
Nutritional Information (Approximate, Per Roll)
Let’s be real—these are a treat, and they’re worth every single delicious bite! Here’s a rough nutritional breakdown for those who are curious. Remember, these values can vary based on specific ingredients and portion sizes.
- Calories: ~340
- Total Fat: 14g
- Saturated Fat: 9g
- Carbohydrates: 48g
- Fiber: 1g
- Sugar: 22g
- Protein: 5g
While they’re indulgent, you can make slight modifications like using a sugar substitute in the frosting or reducing the butter in the filling by a tablespoon or two if you’re looking for a slightly lighter version. But my philosophy? Enjoy every bite mindfully and savor the moment of joy it brings!
Final Thoughts from My Kitchen to Yours
Well, my fellow food lover, we’ve reached the end of our red velvet journey. I hope you feel inspired and empowered to bake a batch of these stunning, soul-warming rolls. Baking is about so much more than the final product; it’s about the love you pour into the process, the patience of watching dough rise, and the incredible joy of sharing something homemade with people you care about.
These Red Velvet Cinnamon Rolls are a celebration—of flavor, of tradition, and of the simple pleasure of a really, really good baked good. I’d love to see your masterpiece! Tag me on social @TastyChow so I can cheer you on. Now, go preheat that oven and get ready for your kitchen to smell like heaven. Happy baking!
With love and a full belly,
Emily