Your New Holiday Showstopper: The Peppermint Mocha Cake
Hey there, my fellow food lover! Is there anything better than the smell of chocolate cake baking in the oven? Now, imagine that warm, rich scent mingling with the cool, festive whisper of peppermint and the deep, inviting aroma of coffee. That, my friend, is the magic we’re whipping up today. This isn’t just any cake; this is the Peppermint Mocha Cake, and I’m telling you, it’s about to become the superstar of your holiday table.
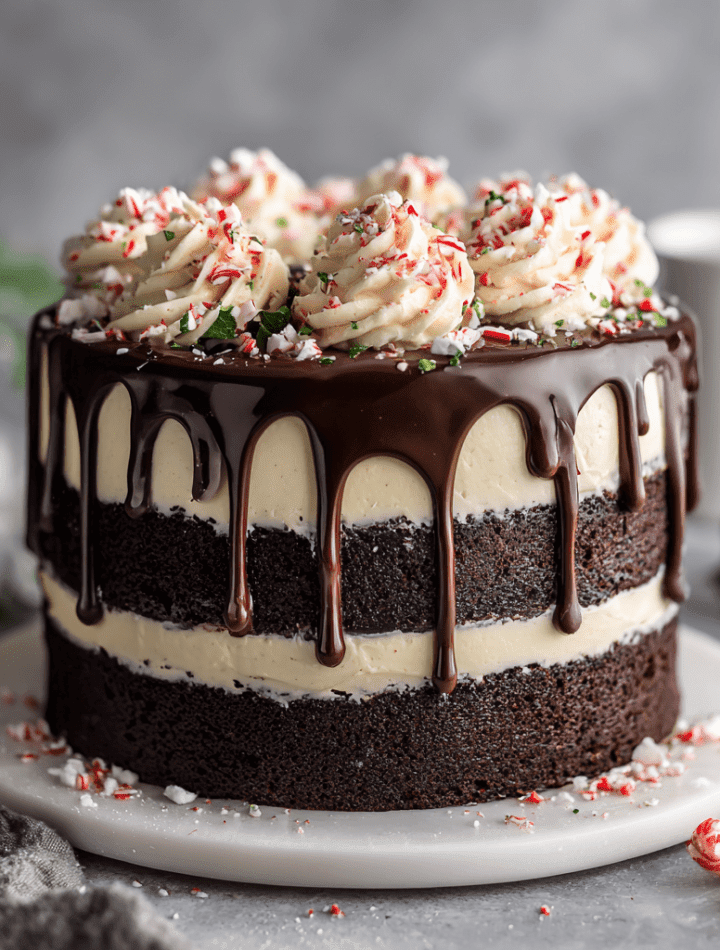
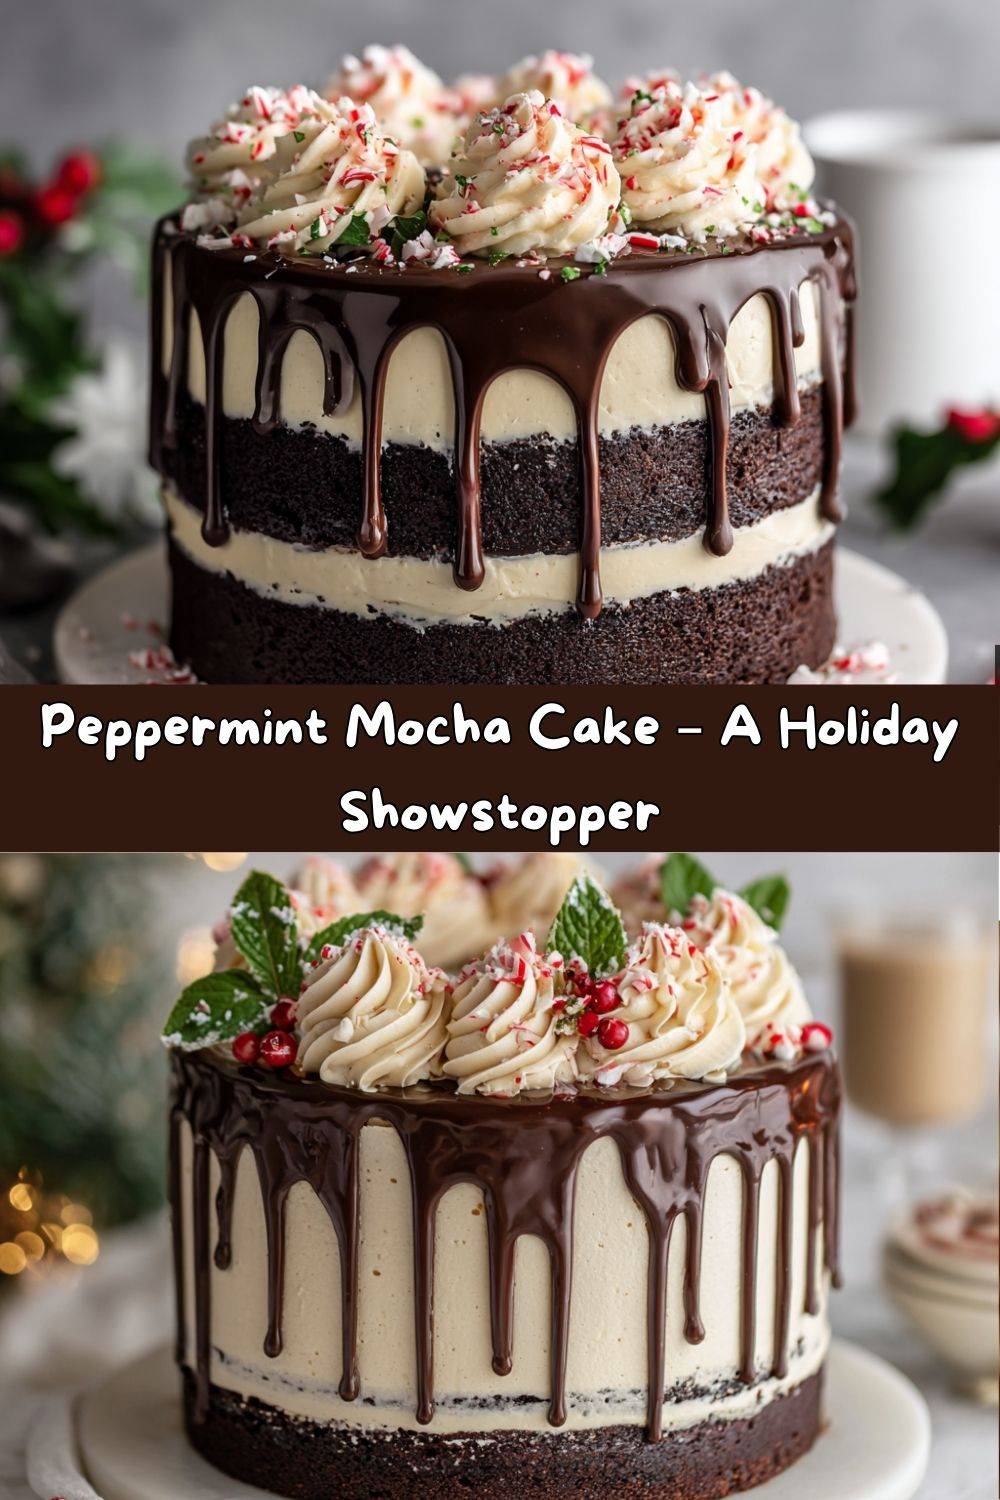
Picture this: incredibly moist, dark chocolate cake layers so soft they practically melt in your mouth. They’re hugged by a cloud of the creamiest, coolest peppermint buttercream you’ve ever tasted. And just when you think it can’t get any better, we crown it all with a glossy, decadent mocha ganache drip that’s as beautiful as it is delicious. It’s rich, it’s refreshing, and it’s dressed to impress. This cake is the edible equivalent of wearing your favorite cozy sweater while watching the first snowfall of the year—pure, unadulterated joy.
I know layered cakes can seem a little intimidating, but trust me, we’re going to walk through this together, step-by-step. I’ve packed this recipe with all my favorite chef hacks and tips to make sure you feel confident and have a blast in the kitchen. So, preheat that oven, put on your favorite festive playlist, and let’s make something absolutely delicious that will have everyone asking for seconds (and the recipe!).
A Pinch of Nostalgia: My First Holiday Baking Disaster (That Started It All!)
This cake takes me right back to my first-ever solo holiday baking attempt. I was maybe twelve years old, feeling wildly ambitious, and decided I was going to make a “fancy” chocolate peppermint layer cake for our Christmas Eve dinner. I had my grandma’s apron on (it was huge on me), and all the confidence in the world.
Well, let’s just say it was a learning experience. I misread “baking soda” as “baking powder,” used mint extract that was about a decade old, and my “ganache” was a sad, grainy puddle. The cake layers were dense, the frosting was… questionable, and the whole thing listed to one side like the Leaning Tower of Pisa. My family, being the absolute saints they are, still ate it with smiles on their faces, declaring it “interesting!”
But that slightly hilarious failure lit a fire in me. I became obsessed with understanding the why behind baking. Why does hot coffee make chocolate cake so moist? Why do we cream butter for frosting? Years later, after culinary school and countless kitchen experiments, I finally perfected this dream cake. It’s everything that first cake wanted to be: balanced, beautiful, and bursting with flavor. It’s my way of taking that childhood memory and turning it into a sweet, sweet victory we can all share.
Gathering Your Ingredients: A Chef’s Shopping List
Here’s everything you’ll need to create this masterpiece. I’ve included some of my favorite insights and substitutions to make this recipe work for you!
For the Chocolate Cake:
- 1 ¾ cups All-Purpose Flour: The sturdy foundation of our cake. For a slightly lighter crumb, you can swap it for cake flour, but all-purpose works beautifully here.
- ¾ cup Unsweetened Cocoa Powder: Use a good-quality cocoa powder for a deep, rich chocolate flavor. I’m a huge fan of Dutch-processed for its smoothness, but natural unsweetened works great, too!
- 2 cups Sugar: Plain granulated sugar sweetens the deal and helps create a tender texture.
- 2 tsp Baking Soda: Our main leavening agent! It reacts with the acidic buttermilk and coffee to give the cake its wonderful rise.
- 1 tsp Baking Powder: A little extra help to make sure our layers are nice and tall.
- ½ tsp Salt: Crucial! Salt enhances all the other flavors and balances the sweetness. Don’t skip it.
- 2 large Eggs: They bind the batter and add structure. Make sure they’re at room temperature for best mixing.
- 1 cup Buttermilk: The secret to an incredibly moist and tender crumb! No buttermilk? No problem! Make a quick substitute by adding 1 tbsp of lemon juice or white vinegar to a cup of regular milk and let it sit for 5 minutes.
- ½ cup Vegetable Oil: Oil keeps the cake moist for days, much longer than butter would. I use a neutral oil like canola or avocado.
- 1 tsp Pure Vanilla Extract: The flavor backbone that makes everything taste more like itself.
- 1 cup Hot Coffee (freshly brewed): Chef’s secret weapon! The coffee doesn’t make the cake taste like coffee; it amplifies the chocolate flavor, making it incredibly rich and deep. If you’re anti-coffee, you can use hot water, but I highly recommend trying it with coffee first—you won’t taste it, I promise!
For the Peppermint Buttercream:
- 1 cup Unsalted Butter (softened): Unsalted lets us control the salt level. Softened is key! It should leave a slight indent when you press it. If it’s too soft or melted, your frosting won’t hold its shape.
- 3 ½ cups Powdered Sugar: Also known as confectioners’ sugar. It dissolves easily for a smooth, not gritty, frosting.
- 1 ½ tsp Peppermint Extract: Start here and taste! Peppermint can be powerful, so add a little more if you want a stronger kick. Be sure to use extract, not peppermint oil, which is far more concentrated.
- 2–3 tbsp Heavy Cream: This loosens the frosting to a spreadable, creamy consistency. Milk works in a pinch, but cream gives it a richer flavor and better stability.
- Optional: Red gel coloring: Gel food coloring gives a vibrant color without thinning out the frosting like liquid dyes can. It’s perfect for creating those festive swirls!
For the Mocha Ganache Drip:
- ½ cup Heavy Cream: Heating the cream is what melts the chocolate into a silky-smooth ganache.
- ½ cup Semisweet Chocolate Chips: You can use high-quality baking chocolate chopped small, but good ol’ chocolate chips work perfectly and melt like a dream.
- 1 tsp Instant Espresso Powder (optional but highly recommended): This is what gives the “mocha” flavor. It dissolves right into the hot cream and makes the chocolate taste even more chocolatey.
Let’s Get Baking: Building Your Masterpiece, Step-by-Step
Alright, apron on! Let’s do this. Read through all the steps once before you start—it’s my number one tip for stress-free baking.
Step 1: Prep Like a Pro
Preheat your oven to 350°F (175°C). Now, grab your three 8-inch cake pans. Grease the bottoms and sides with a little butter or non-stick spray, then line the bottoms with a circle of parchment paper. This guarantees your cakes will release perfectly without a single crumb left behind. Trust me, this simple step is a total game-changer.
Step 2: Mix the Dry Team
In a large bowl, whisk together your flour, cocoa powder, sugar, baking soda, baking powder, and salt. Whisk it really well! This not only combines everything but also aerates the dry ingredients, leading to a lighter cake. No one wants a pocket of baking soda in their slice, so take 30 seconds to make sure it’s fully incorporated.
Step 3: Combine the Wet Team
In a separate medium bowl, whisk the eggs, buttermilk, vegetable oil, and vanilla extract until they’re smooth and beautifully combined.
Step 4: The Big Merge (And The Secret Weapon)
Pour your wet ingredients into the dry ingredients. Using a hand mixer or a sturdy whisk, mix on medium speed until everything is just combined. The batter will be thick and luxurious. Now, here comes the magic: slowly pour in the hot coffee while mixing on low speed. Chef’s Hack: The batter will look super thin and almost watery. This is exactly what we want! Don’t panic. This thin batter is the secret to those ultra-moist, restaurant-quality cake layers.
Step 5: Bake to Perfection
Evenly divide the batter between your three prepared pans. I like to use a kitchen scale for absolute precision, but eyeballing it works too. Pop them in the preheated oven and bake for 28-32 minutes. You’ll know they’re done when a toothpick inserted into the center comes out with a few moist crumbs attached, not wet batter. Do not overbake!
Step 6: The Patience Game (Cooling!)
Let the cakes cool in their pans on a wire rack for about 15 minutes. Then, run a knife around the edge of each pan, invert the cakes onto the rack, and peel off the parchment paper. Let them cool completely before you even think about frosting. I know it’s hard to wait, but frosting a warm cake is a fast track to a melted, sliding mess. This is the perfect time to clean up and start your frosting!
Step 7: Whip Up the Peppermint Buttercream
In a large bowl, beat the softened butter with an electric mixer on medium-high speed for about 3-4 minutes until it’s super light, pale, and fluffy. This step incorporates air, making your frosting light and not dense. Gradually add the powdered sugar, about a cup at a time, mixing on low speed at first so you don’t get a sugar cloud in your kitchen! Once incorporated, add the peppermint extract and 2 tablespoons of heavy cream. Beat on high for another 2 minutes until it’s wonderfully smooth and spreadable. If it’s too thick, add more cream, one teaspoon at a time. If you want that festive look, add a little red gel coloring and swirl it through with a knife without fully mixing it in.
Step 8: Assemble & Frost
Place your first cake layer on a plate or cake stand. Spread a generous, even layer of buttercream on top. Add the next layer and repeat. Place the final layer on top, bottom-side up, for an perfectly flat top. Now, apply a thin layer of frosting all over the cake—this is called a “crumb coat.” It traps any loose crumbs. Pop the cake in the fridge for 15 minutes to set this layer. This makes the final frosting step so much easier and cleaner! Once chilled, frost the outside of the cake with the remaining buttercream, using a spatula or bench scraper to make it as smooth as you like.
Step 9: The Glamorous Ganache Drip
Place the chocolate chips and espresso powder in a small heatproof bowl. Heat the heavy cream in a saucepan over medium heat until it just begins to simmer (small bubbles around the edges). Immediately pour the hot cream over the chocolate, let it sit for one minute, then whisk until it’s completely smooth and glossy. Let it cool for about 5-10 minutes—you want it warm enough to be pourable but not so hot that it melts the frosting. Test the consistency by dripping a little down the side of a glass. Chef’s Hack: Pour the ganache onto the center of the chilled cake and use an offset spatula to gently push it towards the edges, encouraging it to drip down naturally. Use the remaining ganache to fill in the top of the cake. Immediately decorate with crushed candy canes or peppermint bark before the ganache sets.
How to Serve This Holiday Beauty
This cake is a total showstopper, so presentation is part of the fun! I love to place it on a simple, elegant cake stand to let its beauty shine. For slicing, use a long, sharp knife. To get those picture-perfect clean slices, dip your knife in hot water, wipe it dry, and then make your cut. The heat will glide right through the ganache and frosting.
This cake is rich, so a modest slice is plenty. I love serving it with a hot cup of coffee, a glass of cold milk, or even a little mug of hot chocolate for the ultimate chocolate experience. It’s the perfect grand finale to your holiday feast, but honestly, it’s also a spectacular reason to have friends over just because.
Get Creative: Fun Variations to Try
Love this recipe but want to mix it up? Here are a few of my favorite twists:
- Peppermint Oreo Crunch: Add ½ cup of finely crushed Oreos (cream filling and all!) to your buttercream for a cookies-and-cream peppermint situation. Press whole Oreos onto the sides of the cake for a stunning look.
- Dark Chocolate Ganache: For a deeper, less sweet ganache, use ½ cup of heavy cream and ¾ cup of dark chocolate chips.
- Dairy-Free Delight: Use your favorite plant-based milk mixed with lemon juice for the buttermilk substitute, vegan butter, and dairy-free chocolate chips. The cake will still be incredibly moist and delicious!
- Mint Chocolate Chip: Fold ⅓ cup of mini chocolate chips into your buttercream for a fun, textured frosting.
- Cupcake Version: Turn this into about 24 cupcakes! Fill liners ⅔ full and bake for 18-22 minutes. Frost and drizzle with ganache.
Chef Emily’s Notebook: My Extra Thoughts
This recipe has evolved so much over the years. The biggest game-changer was finally conquering my fear of the ganache drip! My advice? Don’t be scared. If your first drip isn’t perfect, just call it “abstract art” and pile on some extra crushed candy canes. No one will know, and it will still taste incredible.
I also used to always make this with two 9-inch layers, but switching to three 8-inch layers felt so much more elegant and professional. It gives you that beautiful height and a better frosting-to-cake ratio in every bite. This cake actually tastes even better the next day, as the flavors have more time to mingle and get to know each other. Making it a day ahead is a fantastic stress-saving strategy for your holiday party!