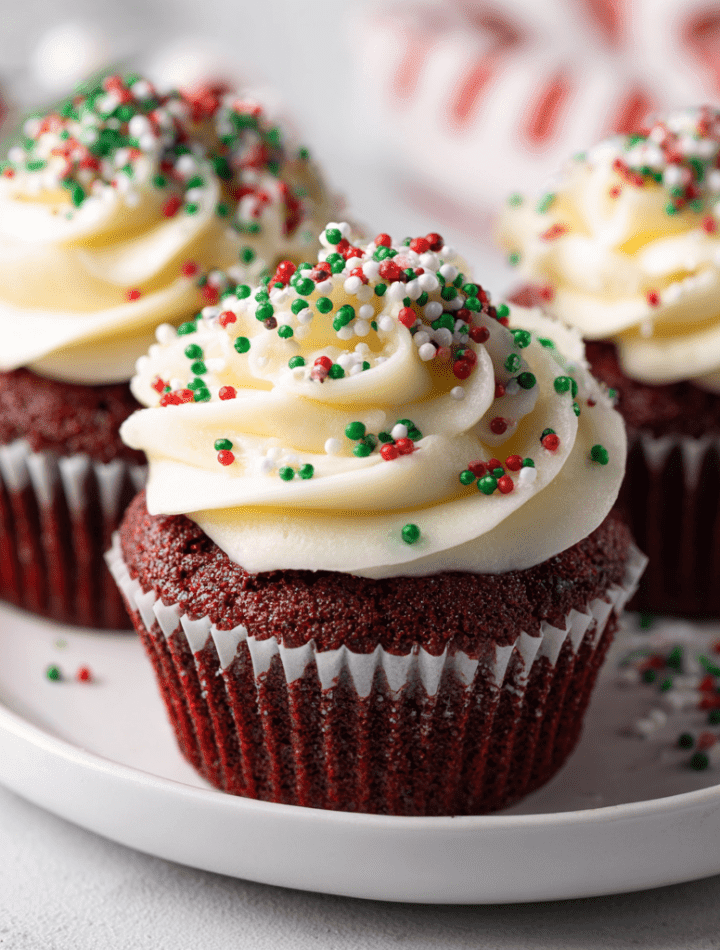
❤️ The Ultimate Red Velvet Cupcakes: A Festive Hug in a Cupcake Liner ❤️
Hey there, my fellow flavor-chaser! Is there anything that screams “celebration” quite like a classic Red Velvet Cupcake? That striking crimson color, that whisper of cocoa, that impossibly soft crumb, all swirled high with the tangy, creamy dream that is cream cheese frosting. Just looking at one makes me smile, and biting into one? Pure, unadulterated joy.
I’m a firm believer that baking is an act of love, and these cupcakes are my love letter to the holiday season—or really, to any Tuesday that needs a little extra sparkle. They’re the star of every cookie swap, the hero of the potluck dessert table, and the secret weapon for turning a regular afternoon into something special. But here’s the real secret I’m bursting to share with you: they’re surprisingly simple to make! No fancy techniques, no hard-to-find ingredients. Just good, honest baking that delivers a spectacular result every single time.
So, tie on your favorite messy apron (the one with the cookie stains tells the best stories, I swear), preheat that oven, and let’s bake up a batch of these gorgeous, festive cupcakes together. I promise, your kitchen is about to become the happiest, most delicious-smelling place on earth.
A Splash of Red & A Dash of Grandma’s Wisdom
My love affair with Red Velvet started long before culinary school, in my grandma’s warm, always-bustling kitchen. It was the weekend before Christmas, and the air was thick with the scent of gingerbread and pine. My grandma, a woman who believed a wooden spoon could fix most problems, was whipping up her famous Red Velvet cake. I remember watching, utterly mesmerized, as she poured that entire little bottle of shocking red food coloring into the batter. To my young eyes, it was pure magic.
She saw my wide-eyed amazement and chuckled, handing me the vanilla bottle to smell. “Remember, Emily,” she said, her voice warm like the oven, “the color gets everyone to the table, but it’s the love and the buttermilk that keeps them there.” She let me lick the spoon, and that first taste was a revelation—slightly tangy, subtly chocolatey, and impossibly moist. It wasn’t just cake; it was a feeling. It was tradition, warmth, and the magic of the holidays all baked into one perfect red slice. Every time I bake these cupcakes, I’m right back in that kitchen, surrounded by love and the promise of something wonderful. That’s the spirit I want to share with you today.
Gathering Your Culinary Rainbow: The Ingredients
Let’s talk ingredients! This is where the magic begins. Using quality stuff makes a difference, but I’ve also got your back with some easy swaps. Here’s exactly what you’ll need to create these little masterpieces.
For the Cupcakes:
- 1 ½ cups All-Purpose Flour: The trusty foundation of our cupcake. For a slightly lighter crumb, you can swap in cake flour, but all-purpose works beautifully.
- 1 tbsp Cocoa Powder: Not for a deep chocolate flavor, but for that signature rich, complex undertone that makes Red Velvet so unique. Use natural, not Dutch-process, for the right chemical reaction with our other ingredients.
- 1 cup Sugar: Sweetness and tenderness, all in one granulated package.
- ½ tsp Baking Soda: Our leavening agent! It’s going to react with the acidic ingredients (buttermilk, vinegar) to give our cupcakes a beautiful, airy rise.
- ½ tsp Salt: The ultimate flavor enhancer. It balances the sweetness and makes every other ingredient sing. Don’t you dare skip it!
- 1 cup Buttermilk: The SECRET WEAPON! Buttermilk is responsible for the iconic tender texture and that slight tang. Chef’s Swap: No buttermilk? No panic! Add 1 tbsp of white vinegar or lemon juice to a measuring cup, then fill it to the 1-cup line with regular milk. Let it sit for 5 minutes until it curdles. Good to go!
- ½ cup Vegetable Oil: Oil keeps our cupcakes incredibly moist and tender long after they’ve cooled—much more reliably than butter would. I use neutral oils like canola or vegetable.
- 2 Eggs: They provide structure and richness. Make sure they’re at room temperature to help them incorporate smoothly into the batter.
- 1 tsp Vanilla Extract: The aromatic soul of any good baked good. Use the real stuff—your taste buds will thank you.
- 1 tsp White Vinegar: This teams up with the baking soda for that perfect rise and enhances the tang from the buttermilk. You won’t taste it, I promise!
- 1 tbsp Red Food Coloring (gel preferred): For that iconic, vibrant red hue. Gel food coloring is more concentrated than liquid, so you get intense color without watering down your batter.
For the Cream Cheese Frosting:
- 8 oz Cream Cheese (softened): Full-fat, brick-style cream cheese is non-negotiable for the best texture and flavor. Let it soften on the counter for a few hours for the creamiest, lump-free frosting.
- ½ cup Unsalted Butter (softened): Butter adds structure and a rich, creamy flavor that balances the tang of the cream cheese. Unsalted lets you control the salt level.
- 3 ½ cups Powdered Sugar: Also known as confectioners’ sugar. It sweetens and gives the frosting its stable, fluffy body. Sift it if it’s lumpy!
- 1 tsp Vanilla Extract: A must for rounding out the flavors.
- Pinch of Salt: This tiny pinch cuts the overwhelming sweetness and makes the frosting taste infinitely more complex.
For Decoration:
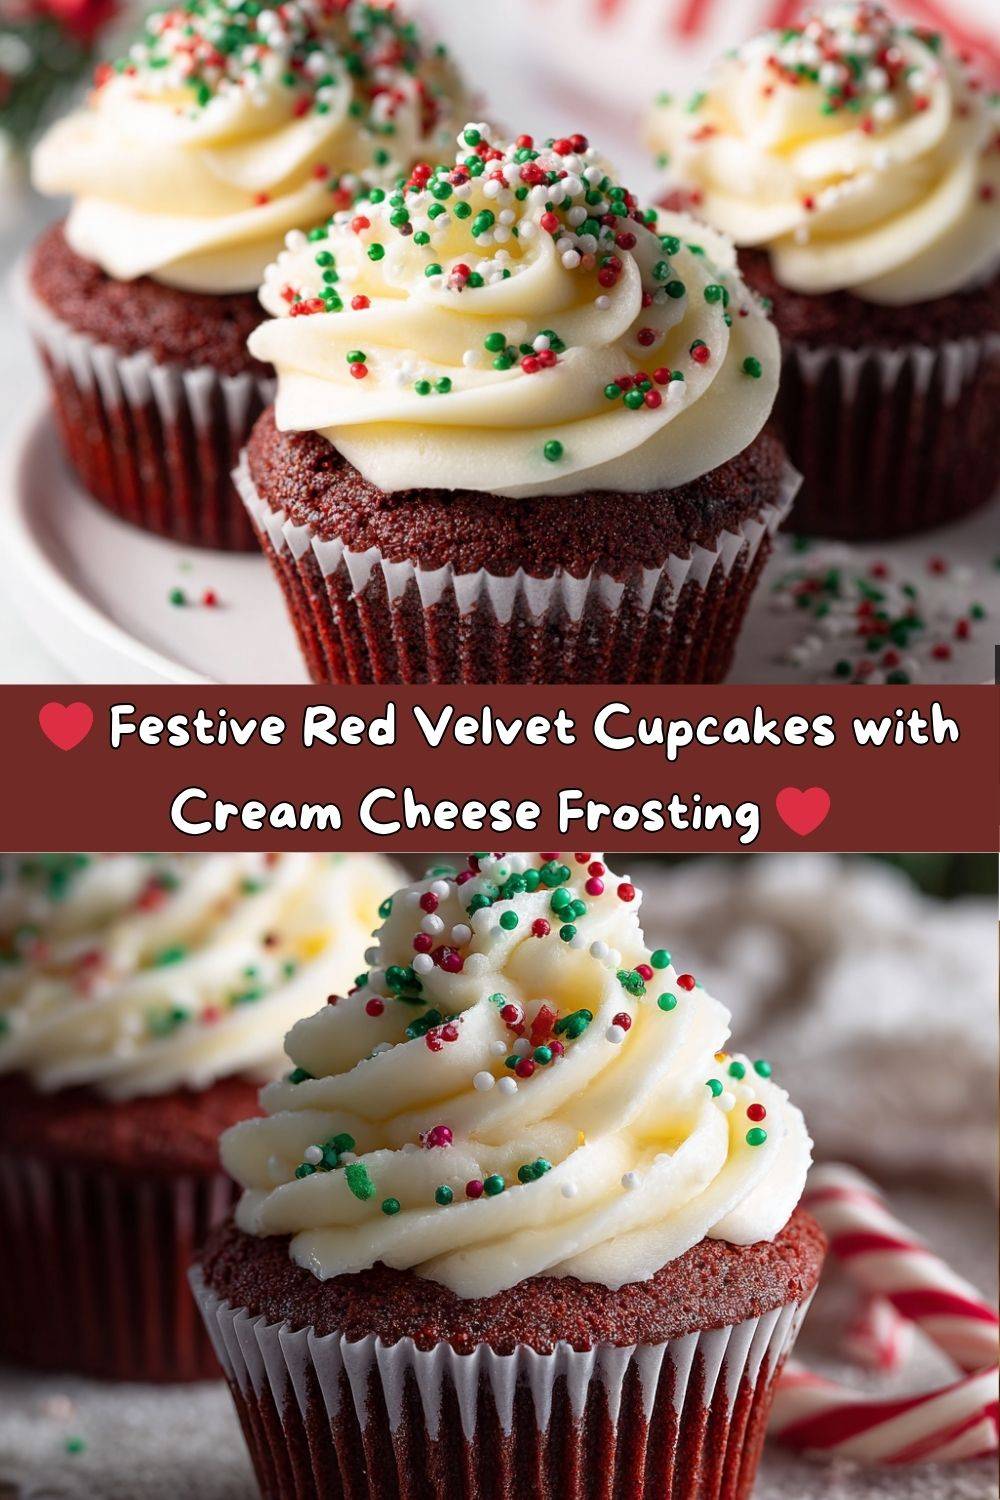
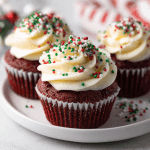
- Holiday Sprinkles: Go wild! Red, green, white, festive shapes—this is where your personality shines.
- Optional: Mini candy canes or edible glitter: Because more is more when it comes to holiday cheer!
Let’s Get Baking: The Step-by-Step Fun
Okay, team! Time to turn these ingredients into something magical. Follow these steps, and you’ll be a Red Velvet pro in no time. I’ve packed each step with my favorite chef hacks to ensure your success.
- Preheat and Prep: Fire up your oven to 350°F (175°C). This is crucial for even baking. Line your cupcake pan with those festive liners—this is non-stick insurance and adds to the fun!
- Whisk the Dry Team: In a medium bowl, whisk together your flour, cocoa powder, sugar, baking soda, and salt. Chef’s Tip: Whisking, instead of sifting, is my lazy-girl hack to aerate the flour and break up any lumps while ensuring everything is evenly distributed. No one wants a pocket of baking soda!
- Unite the Wet Team: In a larger bowl, combine the buttermilk, vegetable oil, eggs, vanilla extract, vinegar, and that glorious red food coloring. Whisk it until it’s completely smooth and a vibrant, uniform red. Chef’s Hack: If you’re using gel coloring, I like to add it to the wet ingredients first and whisk it in before adding anything else. It incorporates much more evenly this way!
- The Grand Merge: Here’s the key: gradually add your dry ingredients to the wet ingredients. I add about a third at a time, whisking just until it’s incorporated before adding the next. Mix until you can no longer see streaks of flour, but do not overmix! A few small lumps are totally fine. Overmixing develops gluten and leads to tough, dense cupcakes, and we want cloud-like fluffiness!
- Portion with Care: Using a spoon or a spring-loaded ice cream scoop (my absolute favorite tool for this job!), fill each cupcake liner about ⅔ of the way full. This gives the cupcakes the perfect amount of space to rise into beautiful domes without spilling over the edges.
- Bake to Perfection: Slide the pan into your preheated oven and bake for 18-20 minutes. Chef’s Secret: Ovens lie! They all have hot spots. Rotate your pan halfway through baking for even color. They’re done when a toothpick inserted into the center of a cupcake comes out with a few moist crumbs clinging to it, not wet batter. The tops should spring back lightly when touched.
- The All-Important Cool Down: This is the hardest part—waiting! Let the cupcakes cool in the pan for about 5 minutes, then transfer them to a wire rack to cool completely. I’m serious about completely. If you frost a warm cupcake, that gorgeous cream cheese frosting will melt into a sad, runny puddle. Let’s avoid dessert heartbreak!
- Make the Frosting: While the cupcakes cool, make your frosting. In a large bowl, beat the softened cream cheese and butter together with an electric mixer on medium speed until it’s perfectly smooth, creamy, and lump-free. This should take about 2 minutes. Gradually add the powdered sugar, about a cup at a time, beating on low speed first to avoid a sugar dust storm, then increasing to high. Finally, beat in the vanilla and pinch of salt. Whip it on high for another 2-3 minutes until it’s light, fluffy, and dreamily spreadable.
- Frost and Decorate! Your cupcakes are cool, your frosting is fluffy. It’s go time! You can spread the frosting on with a knife for a rustic look, but for that classic bakery-style swirl, fit a piping bag with a large star tip (I use a 1M tip) and pipe away. Start from the outside and swirl inward. Then, immediately shower them with all the holiday sprinkles your heart desires!
How to Serve These Beauties
Presentation is part of the fun! These cupcakes are a showstopper all on their own, but a little extra flair never hurt anybody.
I love serving them on a beautiful cake stand or a rustic wooden board for that homey, festive feel. Pair them with a tall glass of cold milk for the ultimate classic combo, or a hot cup of coffee to balance the sweetness. For a truly decadent holiday dessert, crumble a cupcake over a bowl of vanilla ice cream—trust me on this one.
If you’re taking them to a party, these cupcakes are incredibly travel-friendly. Just pop them into a cupcake carrier or a sturdy container where they can’t get jostled and ruin your beautiful frosting swirls. They’re guaranteed to be the first dessert to disappear!
Mix It Up! Delicious Recipe Variations
Once you’ve mastered the classic, the world is your oyster! Here are a few of my favorite ways to play with this recipe:
- Chocolate Lover’s Dream: Fold ½ cup of mini chocolate chips into the batter before portioning. The melty pockets of chocolate take it to another level.
- Orange Zest Twist: Add the zest of one orange to the cupcake batter and a teaspoon of orange zest to the frosting. The citrus brightens everything up beautifully.
- Peppermint Patty: Add ½ teaspoon of peppermint extract (not mint!) to the frosting and top with crushed candy canes for a cool, festive flavor.
- Gluten-Free Goodness: Swap the all-purpose flour for a 1:1 gluten-free baking blend. The results are fantastic!
- Naked Cupcakes: For a less sweet option, skip the frosting altogether (I know, blasphemy!) and just dust the tops with a little powdered sugar. They’re still incredibly delicious.
Chef Emily’s Notebook Scribbles
This recipe has been my go-to for years, and it’s evolved from a few kitchen experiments (and yes, a few failures!). I once, in a frantic pre-holiday baking session, used Dutch-process cocoa powder and wondered why my cupcakes were so flat. Science lesson learned! I also learned the hard way that “softened” butter does not mean “melted in the microwave for 30 seconds.” That led to a soupy frosting disaster that we now laugh about. The best recipes always come with a few stories, right?
These cupcakes also freeze like a dream. I often bake a double batch, freeze the unfrosted cupcakes in a single layer on a baking sheet, then toss them in a freezer bag. Then, whenever a cupcake craving strikes (or an unexpected guest pops by), I can thaw them and whip up a quick batch of frosting. Instant hero moment!
Your Questions, Answered!
Q: Can I use liquid food coloring instead of gel?
A: You can, but you’ll need a lot more to achieve the same vibrant red color (think 2-3 tablespoons), and that extra liquid can slightly throw off the consistency of your batter. Gel is highly recommended!
Q: My frosting is too runny. What happened?
A: This usually means your cream cheese or butter was too warm. Pop the whole bowl of frosting into the refrigerator for 20-30 minutes to firm up, then re-whip it. Also, ensure you’re using full-fat, brick-style cream cheese—the spreadable kind in tubs has more water and will lead to a softer frosting.
Q: Why did my cupcakes sink in the middle?
A: This is typically an issue of underbaking or opening the oven door too early. The structure hasn’t set yet, so it collapses. Make sure your oven is fully preheated and use that toothpick test! Also, ensure your baking soda is fresh.
Q: Can I make this into a layer cake?
A: Absolutely! This batter is perfect for two 8-inch round cake pans. Just grease and line the pans with parchment paper. The baking time will be longer, around 25-30 minutes. Always use the toothpick test to be sure.
Red Velvet Cupcakes with Cream Cheese Frosting
- Total Time: 40 minutes
- Yield: 12 cupcakes 1x
Description
Classic, cozy, and colorfully festive — these Red Velvet Cupcakes are holiday perfection in every bite. Soft, cocoa-kissed cake topped with luscious cream cheese frosting and finished with cheerful holiday sprinkles. Whether you’re baking for a party, cookie swap, or just because — these cupcakes deliver joy with a swirl.
Ingredients
For the Cupcakes:
1 ½ cups All-Purpose Flour
1 tbsp Cocoa Powder
1 cup Sugar
½ tsp Baking Soda
½ tsp Salt
1 cup Buttermilk
½ cup Vegetable Oil
2 Eggs
1 tsp Vanilla Extract
1 tsp White Vinegar
1 tbsp Red Food Coloring (gel preferred)
For the Cream Cheese Frosting:
8 oz Cream Cheese (softened)
½ cup Unsalted Butter (softened)
3 ½ cups Powdered Sugar
1 tsp Vanilla Extract
Pinch of Salt
Decoration:
Red, green, and white holiday sprinkles
Optional: Mini candy canes or edible glitter
Instructions
Preheat oven to 350°F (175°C). Line a cupcake pan with festive liners.
In a bowl, whisk together flour, cocoa powder, baking soda, and salt.
In another bowl, combine sugar, oil, eggs, buttermilk, vanilla, vinegar, and food coloring. Mix well.
Gradually add dry ingredients to wet, mixing until smooth.
Fill cupcake liners ⅔ full and bake for 18–20 minutes or until a toothpick comes out clean.
Cool completely before frosting.
For frosting, beat cream cheese and butter until creamy. Add powdered sugar, vanilla, and salt. Beat until fluffy.
Pipe or spread onto cooled cupcakes. Top with holiday sprinkles and serve with a smile!
- Prep Time: 20 minutes
- Cook Time: 20 minutes
Nutrition
- Calories: 310 per cupcake
Nutritional Information*
*Please note: These values are estimates calculated using an online nutrition calculator and will vary based on specific ingredients and portion sizes.
Serving Size: 1 frosted cupcake
Calories: ~310
Fat: 14g
Saturated Fat: 6g
Carbohydrates: 45g
Fiber: 0.5g
Sugar: 36g
Protein: 3g
Remember, treats like these are all about balance and joy! Savor every delicious bite.
Final Sweet Thoughts
Well, my friend, we’ve done it! You’re now officially equipped to whip up the softest, most festive Red Velvet Cupcakes crowned with dreamy cream cheese frosting. These beauties are more than just a dessert—they’re a hug in a cupcake liner, a bite of nostalgia, and a guaranteed way to spread holiday cheer.
Remember, the magic isn’t just in the red color or the swirl of frosting—it’s in the laughter, the love, and the memories made while baking and sharing them. So go ahead, bake a batch for the holidays, for a birthday, or just because Tuesday needs a little sparkle. From my kitchen to yours, may your cupcakes rise tall, your frosting swirl high, and your celebrations always be delicious.