The Best Deviled Eggs – Your New Go-To Party Star!
Hey there, friend! Come on in, pull up a stool, and let’s talk about one of the most beloved, crowd-pleasing appetizers of all time: the humble, yet utterly magnificent, deviled egg. Is there any dish that screams “gathering” quite like a platter of these creamy, tangy delights? I don’t think so. They’re the first to disappear at picnics, potlucks, and holiday feasts, and for good reason. When done right, they are absolute perfection in a bite-sized package.
But here’s the secret I’ve learned after years of culinary school and countless family dinners: the best deviled eggs aren’t about fancy, complicated ingredients. Nope. They’re about nailing the basics. It’s about achieving that impossibly smooth, creamy filling that’s balanced with just the right amount of tang and a little savory kick, all tucked into a tender egg white boat and finished with that iconic sprinkle of paprika. It’s a simple equation for guaranteed success.
I’m so excited to share my ultimate, foolproof recipe with you today. This is the one I’ve refined over years, the one my family and friends now demand at every single event. We’re going to walk through every step together, from boiling the perfect easy-to-peel egg to my little chef’s trick for a filling so smooth it’s like silk. Get ready to make the best deviled eggs of your life. Let’s get cooking!

A Sunday Tradition & The Great Deviled Egg Debate
My love affair with deviled eggs started not in a fancy restaurant, but at my grandma’s linoleum-topped kitchen table. Every single Sunday after church, without fail, a huge platter of deviled eggs would appear next to a glistening roast chicken or a hearty meatloaf. It was a non-negotiable part of the meal. My brother and I would hover nearby, trying to sneak one before dinner was officially called, always getting a playful swat from Grandma’s dish towel.
But the real magic happened in the making of them. My grandma, a woman of few words but immense culinary wisdom, would let me be her official “yolk masher.” I’d stand there on a step-stool, focusing all my childhood energy on crushing those yolks into the finest powder imaginable with just a fork. She’d then add her “pinch of this and dash of that,” and I’d watch in awe as the yellow powder transformed into this magical, creamy filling. The best part? The great family debate: smooth filling piped neatly vs. rustic filling spooned in with a casual swoop. I was Team Piped. My uncle was fiercely Team Spooned. It’s a debate that continues at my own table to this day! This recipe is an homage to her—simple, reliable, and made with so much love.
Gathering Your Dream Team: The Ingredients
Here’s everything you need to create this classic masterpiece. Remember, with so few ingredients, quality really shines through!
- 6 large eggs: The star of the show! I highly recommend using eggs that are a week or so old—they peel much easier than super fresh ones. If you only have fresh, add a tablespoon of baking soda to the boiling water to help with peeling.
- 3 tbsp mayonnaise: This is the base of our creamy filling. Use a good-quality, full-fat mayo for the richest flavor and texture. For a tangier twist, you can substitute half with sour cream or Greek yogurt.
- 1 tsp Dijon mustard: This is our flavor secret weapon! Dijon adds a complex tang and a slight sharpness that plain yellow mustard can’t match. It truly makes the filling sing.
- 1 tsp white vinegar or apple cider vinegar: A little acid is crucial for cutting through the richness. White vinegar is classic and clean, while apple cider vinegar adds a very subtle fruity note. Your choice!
- Salt and black pepper, to taste: Don’t you dare forget to season your filling! I always use fine sea salt and freshly cracked black pepper for the best flavor.
- Paprika, for garnish: The classic finishing touch. Sweet paprika is traditional, but feel free to get creative here (see variations below!). It adds a pop of color and a hint of warmth.
- Optional: fresh chives or parsley, finely chopped: I almost always add a sprinkle of something green. Chives give a mild oniony bite, while parsley adds a fresh, clean finish. It’s the perfect garnish.
Let’s Get Cooking: Step-by-Step to Deviled Egg Heaven
Follow these steps, and you’ll have perfectly cooked, easy-to-peel eggs and a filling that’s smoother than a jazz record every single time.
Step 1: Boil the eggs to perfection. Place your eggs in a single layer in a saucepan. Cover them with cold water by about an inch—this ensures they heat evenly. Bring the water to a full, rolling boil. Then, and this is the key part, turn off the heat, cover the pot, and let them sit for exactly 12 minutes. This method gently cooks the eggs without making the whites rubbery. Immediately transfer the hot eggs to a large bowl filled with ice water (an “ice bath”) and let them chill for at least 5 minutes. This stops the cooking process and makes peeling a dream.
Step 2: Peel and prep like a pro. Gently tap each cooled egg on the counter to crackle the shell all over. I like to roll it gently under my palm to loosen it. Peel under a slow trickle of cool running water—the water helps get under the shell and separates it from the egg white beautifully. Slice each peeled egg in half lengthwise. Gently pop out the yolks into a small bowl and arrange your pristine white halves on your serving platter. (Chef’s Hack: If a white tears a little, don’t stress! It will be hidden by the glorious filling.)
Step 3: Make the dreamy, creamy filling. Now, for the transformation! Using a fork, mash the yolks until they form a fine, powdery crumb. For an ultra-silky texture, you can press them through a fine-mesh sieve—it’s a extra step but oh-so-worth it for fancy occasions. To the mashed yolks, add the mayonnaise, Dijon mustard, and vinegar. Mix until it’s incredibly smooth and creamy. Season with salt and pepper. Taste it! This is your moment to adjust. Want more tang? Add a touch more vinegar. Need more zip? Another half-teaspoon of Dijon. The texture should be pipeable—if it’s too thick, add a teensy bit more mayo.
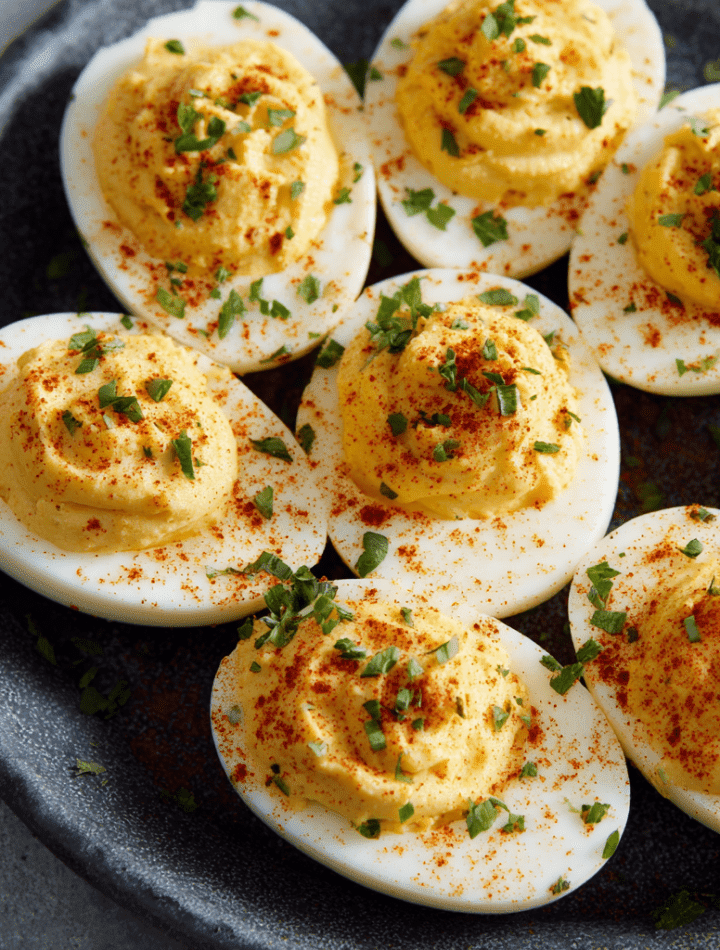
Step 4: Assemble with flair. You have two choices here: rustic or refined. For rustic, simply spoon the filling back into the egg white wells. For a fancy touch, spoon the filling into a zip-top bag, snip off a corner, and pipe it in. I love the pretty swirled look you get from piping. Once all your eggs are filled, give them their signature finish: a generous sprinkle of paprika and a scattering of fresh chives or parsley.
Step 5: The final, crucial step: CHILL. I know it’s tempting to dig in right away, but patience is a virtue here. Cover the platter with plastic wrap and refrigerate your deviled eggs for at least 30 minutes before serving. This allows the flavors to meld together beautifully and gives them that perfect, cool temperature that is just so refreshing.
How to Serve Your Masterpiece
Presentation is part of the fun! While a simple white platter always looks elegant, don’t be afraid to get creative. I have a beautiful deviled egg tray with little divots for each half that keeps them from sliding around, and it’s my go-to for parties. If you don’t have one, a simple serving plate works perfectly—just arrange them in a beautiful sunburst pattern or two neat rows.
To make them really stand out, garnish the whole platter with a few extra sprigs of fresh herbs or a ring of lettuce leaves underneath the eggs for a pop of color. These are the ultimate finger food, so just set them out with some cute napkins and watch them vanish. They pair wonderfully with so many things: a cold beer, crisp white wine, iced tea, or even a fizzy cocktail. They’re the perfect start to any meal!
Get Creative: Flavor Twists & Dietary Swaps
The basic recipe is a classic for a reason, but playing with flavors is where the real fun begins! Here are a few of my favorite riffs:
- Spicy Sriracha: Add 1 tablespoon of sriracha and a teaspoon of lime juice to the filling. Top with a tiny slice of jalapeño for an extra kick.
- Everything Bagel: Mix a teaspoon of everything bagel seasoning into the filling and sprinkle a little more on top. So savory, so good!
- Bacon & Cheddar: Fold 2 tablespoons of finely shredded sharp cheddar and 1 tablespoon of cooked, crumbled bacon into the filling. Garnish with more bacon. Because bacon makes everything better.
- Green Goddess: Replace the mayo with green goddess dressing and add a tablespoon of finely chopped fresh tarragon. So fresh and herby!
- Avocado Lime (A healthier twist!): Replace half of the mayo with the flesh of one ripe avocado and add an extra teaspoon of lime juice. You’ll get a wonderfully creamy, vibrant green filling that’s slightly lighter.
Chef Emily’s Notes & Kitchen Confessions
This recipe has evolved so much over the years! My grandma’s original recipe was just mayo, mustard, and a sprinkle of paprika. In culinary school, I was taught to add vinegar for balance, and it was a total game-changer. I also used to be firmly against piping, thinking it was too fussy. But then I catered a wedding and had to pipe 200 deviled eggs… and I finally understood the appeal of that beautiful, professional look. Now I pipe them for parties and spoon them for family dinners. The best kitchen tip I ever received? The ice bath. It truly is the difference between a frustrating peeling session and a peaceful one. And my funniest kitchen story? The time I accidentally used cayenne pepper instead of paprika for the garnish. Let’s just say those eggs had a much, much bigger kick than anyone was expecting! We still laugh about it.
FAQs & Troubleshooting: Your Questions, Answered!
Q: Why are my eggs so hard to peel?
A: This is the #1 question! The most common culprit is using very fresh eggs. Slightly older eggs peel better. Also, ensure you are using the ice bath method to shock them. Peeling under running water can also work wonders.
Q: Can I make deviled eggs ahead of time?
A: Absolutely! You can hard-boil and peel the eggs up to 2 days in advance, storing them in an airtight container in the fridge. You can also make the filling 1 day ahead and store it in a separate container. Wait to assemble until a few hours before serving for the best texture.
Q: My filling is too runny. How can I fix it?
A: No worries! If your filling is a bit loose, you can thicken it up by adding a sprinkle of finely grated Parmesan cheese, a few more mashed egg yolks (if you have extras), or even a tiny pinch of cornstarch. Chill it for a bit longer to help it firm up.
Q: How long do deviled eggs last in the refrigerator?
A: For food safety, enjoy your deviled eggs within 2 days. Keep them covered in the fridge until you’re ready to serve them.

The Best Deviled Eggs
- Total Time: 52 minutes
- Yield: 12 Halves 1x
Description
These deviled eggs are smooth, tangy, and just the right amount of creamy. They’re a staple at any gathering – from picnics to holiday spreads. Simple ingredients, balanced flavor, and that perfect sprinkle of paprika make these irresistible every time.
Ingredients
6 large eggs
3 tbsp mayonnaise
1 tsp Dijon mustard
1 tsp white vinegar or apple cider vinegar
Salt and black pepper, to taste
Paprika, for garnish
Optional: fresh chives or parsley, finely chopped
Instructions
Boil the eggs
Place eggs in a single layer in a saucepan. Cover with cold water by 1 inch. Bring to a boil, then turn off the heat, cover, and let sit for 12 minutes. Transfer eggs to an ice bath and chill for at least 5 minutes.
Peel and prep
Gently peel the eggs and slice in half lengthwise. Remove yolks and place them in a small bowl. Arrange whites on a serving plate.
Make the filling
Mash yolks until smooth. Mix in mayonnaise, mustard, and vinegar. Season with salt and pepper to taste. The texture should be creamy and pipeable—adjust with a bit more mayo if needed.
Assemble
Spoon or pipe the yolk mixture back into the egg white halves. Sprinkle with paprika and any fresh herbs you like.
Chill and serve
Refrigerate for 30 minutes before serving to allow flavors to develop. Best served cold.
Optional Flavor Twists
Spicy Kick: Add ½ tsp hot sauce or a dash of cayenne pepper
Smoky Finish: Use smoked paprika instead of regular
Extra Creamy: Add 1 tbsp sour cream or cream cheese
Savory Boost: Top with crispy bacon bits or chopped olives
Fresh Herb Lift: Mix in dill, tarragon, or scallions
- Prep Time: 10 minutes
- Chill Time: 30 minutes
- Cook Time: 12 minutes
Nutrition
- Calories: 120 per 2 halves.
- Fat: 9g per 2 halves.
- Carbohydrates: 1g per 2 halves.
- Protein: 6g per 2 halves.
Nutritional Information*
Let’s be real—we’re not eating deviled eggs because they’re a “health food,” but it’s always good to know what’s in your food! This breakdown is for two deviled egg halves (one whole egg).
Estimated per serving (2 halves):
Calories: ~120 kcal | Total Fat: 9g | Saturated Fat: 2g | Cholesterol: 190mg | Sodium: 120mg | Total Carbohydrates: 1g | Dietary Fiber: 0g | Sugar: 0g | Protein: 6g
Eggs are a fantastic source of high-quality protein and essential nutrients like choline, which is great for brain health. The fat content comes primarily from the egg yolk and mayonnaise, providing energy and helping you feel satisfied. To lighten them up, you can use a light mayonnaise or substitute half with plain Greek yogurt, which will add a protein boost and reduce the fat and calories slightly.
*Please note: This is an estimate based on the specific ingredients I used. Values can vary depending on the brands and exact quantities you use.
Final Thoughts
And there you have it, my friend! My everything-I-know guide to making the absolute best, creamiest, most flavorful deviled eggs. This recipe is more than just a list of instructions; it’s a template for joy, for gathering, and for creating those little moments of happiness around the table. I hope it becomes a trusted favorite in your home, just like it is in mine.
Remember, cooking is an adventure. Don’t be afraid to make this recipe your own. Add your favorite flavors, get your kids to mash the yolks, and most importantly, share them with people you love. That’s what good food is all about. Now, I’d love to hear from you! Did you try a fun variation? Do you have a family secret for the perfect egg? Share your stories with me in the comments below. Happy cooking!
With love and a full plate,
Emily
