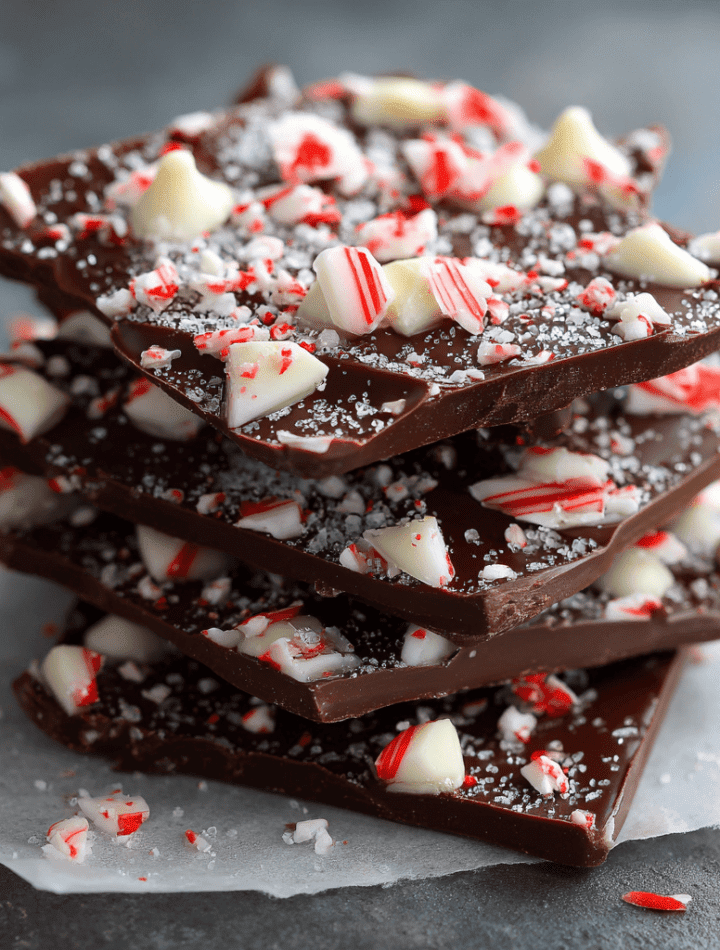
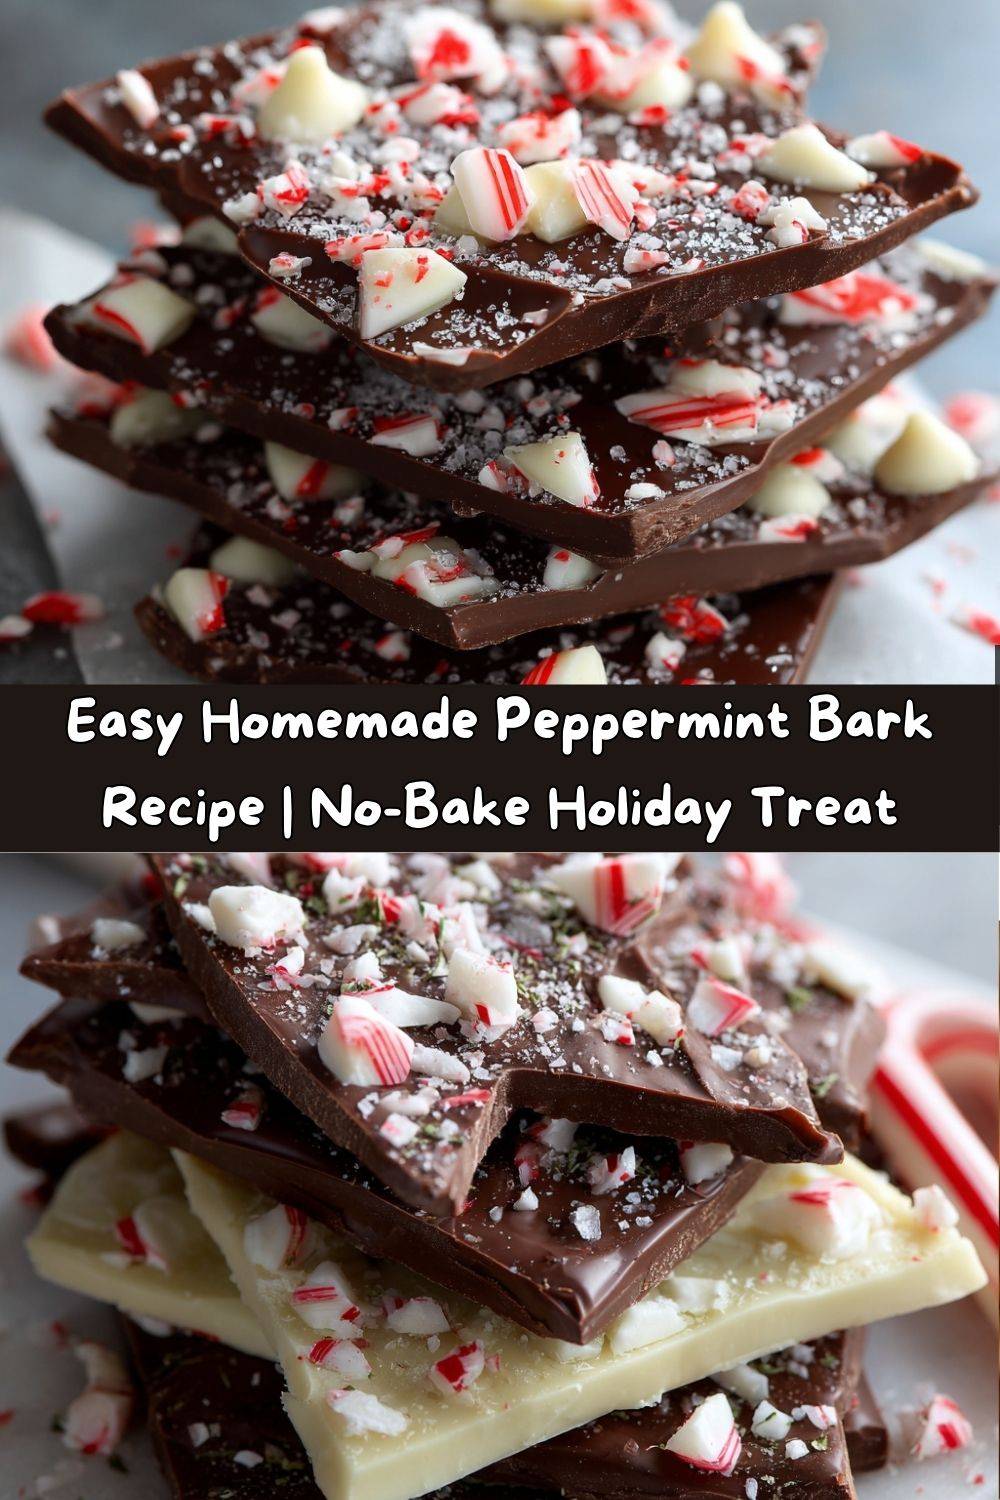
Your New Favorite Holiday Tradition: Easy Homemade Peppermint Bark
Hey there, my festive friend! Can you smell that in the air? It’s the unmistakable scent of the holidays: a little bit of pine, a hint of spiced cookies, and the crisp, refreshing whisper of peppermint. It’s the most wonderful time of the year, and my kitchen is officially buzzing with all the sweet, celebratory energy. And today, we’re whipping up something that is the absolute essence of a happy holiday—gorgeous, shatteringly delicious, and incredibly easy Homemade Peppermint Bark.
If you’ve ever stood in line at a fancy candy shop or eyed the beautifully packaged tins at the store, I’m here to let you in on a little secret: you can make something infinitely more delicious and made-with-love right on your own countertop. We’re talking about a stunning two-layer masterpiece of rich, dark chocolate and creamy, sweet white chocolate, all covered in a blanket of crunchy, festive peppermint candy. The best part? There’s zero baking involved. This is a melt, spread, sprinkle, and chill situation. It’s the perfect project for a cozy afternoon, a super fun activity to do with kids (or just your favorite holiday movie), and the most impressive edible gift you can give.
So, tie on your most festive apron (the messy one is always the best sign of a good time), and let’s create some magic. This isn’t just candy; it’s a holiday hug in edible form. Let’s get to it!
A Spoonful of Nostalgia: My First Bark
My love affair with peppermint bark started not in a culinary school kitchen, but on a wobbly stool in my Grandma Shirley’s cozy, overheated kitchen. Every December, she’d clear the table of its usual clutter and declare it “Candy Day.” The air would thicken with the smell of melting chocolate, and my job, the most important job in the world to my seven-year-old self, was to unwrap the candy canes and smash them into glittery red and white dust with a rolling pin (wrapped securely in a kitchen towel, of course—safety first, even in chaos!).
She never used a recipe. It was always “a handful of this chocolate chip bag” and “a glug of that extract.” Her bark was never perfectly layered or neatly broken. It was a chaotic, swirly, delicious mess of chocolate and joy, always packaged in tins lined with wax paper and given to every mail carrier, neighbor, and friend who stopped by. Making it with her taught me that the best holiday treats aren’t about perfection; they’re about the joy of creating something sweet to share. This recipe is my slightly refined version of her chaotic genius, and every time I make it, I’m right back on that stool, covered in chocolate, feeling the warm glow of holiday love.
Gathering Your Bark-Making Brigade
The beauty of this recipe is in its simplicity. You only need a handful of ingredients to create pure holiday magic. Here’s what you’ll need:
- 12 oz semi-sweet or dark chocolate chips: This is our rich, decadent base layer. I prefer a good quality semi-sweet for a perfect balance, but if you’re a dark chocolate fiend, go for a 60-70% cacao chip! Chef’s Insight: Using chips instead of bar chocolate is totally fine here—they’re formulated to melt smoothly and consistently.
- 12 oz white chocolate chips or melting wafers: For that classic, creamy top layer. Pro Substitution Tip: If you can find them, I highly recommend using high-quality white chocolate melting wafers (like Ghirardelli or Candiquik). They contain stabilizers that make them melt more smoothly and set with a beautiful snap, preventing any potential seizing.
- ½ tsp peppermint extract (optional, but highly recommended): This is our secret weapon for an extra punch of cool, refreshing flavor that infuses the chocolate itself. Heads up! Make sure it’s peppermint extract, not spearmint, for that classic candy cane taste.
- 1 cup crushed peppermint candies or candy canes: The star of the show for crunch and festive flair! You can buy pre-crushed, but smashing your own is incredibly therapeutic. Unwrap 8-10 standard candy canes and place them in a zip-top bag. Use a rolling pin or the bottom of a heavy pan to crush them into a mix of fine dust and small pieces.
- A pinch of flaky sea salt (optional): Don’t skip this if you love the sweet-salty contrast! A light sprinkle of Maldon salt or fleur de sel on top of the white chocolate before it sets takes this bark from great to absolutely legendary.
Let’s Make Some Magic: Step-by-Step Instructions
Ready? This comes together so fast, you’ll be amazed. Let’s create our chocolatey masterpiece, one simple step at a time.
- Prep Your Pan: Line a standard 9×13 inch baking sheet or a quarter sheet pan with parchment paper or a silicone baking mat. Smooth out any wrinkles so your bark has a nice, even back. This is your non-stick lifesaver! Chef’s Hack: You can use a larger or smaller pan depending on how thick you want your bark. A 9×13 gives you a perfect, classic thickness. A larger pan will yield a thinner, more delicate bark.
- Melt the Dark Chocolate: Pour your semi-sweet or dark chocolate chips into a microwave-safe bowl. Microwave on high in 20-second intervals, stirring vigorously with a dry spoon or spatula between each burst of heat. This is crucial! Microwaving in short bursts prevents the chocolate from burning. Stop when just a few small lumps remain—the residual heat will melt them as you stir. You’re aiming for perfectly smooth and glossy. Once melted, stir in the ½ teaspoon of peppermint extract if you’re using it. Little Chef Story: I cannot tell you how many bowls of chocolate I’ve scorched by being impatient. Trust me, 20 seconds is the sweet spot!
- Create the Base Layer: Pour the melted dark chocolate onto your prepared pan. Use an offset spatula or the back of a spoon to spread it into an even layer, almost to the edges of the pan. Don’t worry about it being perfect—rustic is charming! Once spread, pop the entire pan into the refrigerator to chill for 10-15 minutes, or until the chocolate is firm to the touch. This chilling step is key to getting those beautiful, distinct layers.
- Melt the White Chocolate: While the dark layer chills, wash and thoroughly dry your bowl. Any tiny drop of water can cause the white chocolate to “seize” and become a grainy mess. Add your white chocolate chips or wafers to the clean, dry bowl. Microwave again in 20-second intervals, stirring until completely smooth. Watch it closely! White chocolate is more delicate and burns even more easily than dark. Pro Tip: If your white chocolate seems too thick, you can stir in a teaspoon of coconut oil or vegetable shortening to help loosen it up to a perfect spreading consistency.
- Layer and Top: Take your chilled dark chocolate layer out of the fridge. It should be set. Pour the melted white chocolate over the top and use your spatula to gently spread it over the entire dark chocolate base, going all the way to the edges. Now, for the fun part! Immediately sprinkle your crushed peppermint candies all over the warm white chocolate, pressing down gently so they adhere. If you’re using sea salt, now is the time for a light, elegant sprinkle over the entire surface.
- The Final Chill: Carefully transfer the pan back to the refrigerator. Let it chill for at least 30 minutes, or until the bark is completely firm and set. You can even leave it in there for a few hours if you’re not in a rush. Patience, my friend!
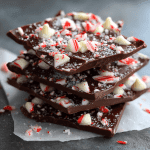
- Break and Revel: Once fully set, remove the pan from the fridge. Lift the entire slab of peppermint bark out using the edges of the parchment paper. Place it on a cutting board and, using your hands, break it into beautiful, irregular shards and pieces. Alternatively, you can use a sharp knife to cut it into neat squares. It’s ready to serve, package, or… you know… “quality test” a piece or three.
How to Serve Your Holiday Masterpiece
This bark is a star all on its own, but presentation is part of the fun! Here’s how I love to show it off:
On a Festive Platter: Pile the shards high on a beautiful ceramic platter or a rustic wooden board. It’s the perfect centerpiece for your holiday dessert table, right next to the cookies and pies.
The Ultimate Edible Gift: This is where it truly shines. Package pieces in clear cellophane bags tied with a pretty ribbon, or stack them in a festive tin lined with parchment paper. Add a handwritten tag, and you have a heartfelt, homemade gift that anyone would be thrilled to receive. It’s so much more personal than anything from a store.
With After-Dinner Coffee: Serve a piece alongside a mug of rich hot chocolate or a strong espresso. The combination of bitter coffee and sweet, minty chocolate is pure bliss.
As a Holiday Movie Snack: Forget popcorn! A plate of peppermint bark is the perfect companion for a marathon of your favorite holiday classics.
Get Creative: Delicious Recipe Variations
Once you’ve mastered the classic, the flavor world is your oyster! Here are a few of my favorite twists:
- The Marbled Swirl: For a gorgeous effect, skip the full chill after the dark chocolate layer. Pour the white chocolate over the dark while it’s still slightly soft. Use a toothpick or a knife to gently swirl the two layers together before adding the peppermint topping.
- Salty Crunch: Add a layer of flavor and texture by sprinkling a handful of crushed pretzels or roasted, salted almonds over the dark chocolate layer before you add the white chocolate. The sweet-salty-crunchy combo is unbelievable.
- Christmas Cheer: Mix your crushed peppermint with red and green sprinkles or sanding sugar for an extra dose of holiday color and sparkle.
- Mocha Magic: Stir ½ teaspoon of instant espresso powder or finely ground coffee into the melted dark chocolate for a sophisticated mocha flavor that pairs beautifully with the peppermint.
- Dairy-Free Delight: This recipe is easily adaptable! Use your favorite dairy-free dark chocolate and vegan white chocolate chips. Just check that your candy canes are vegan-friendly (many are!).
Chef Emily’s Notes from My Kitchen to Yours
This recipe has evolved from my grandma’s “a little of this, a little of that” method into this foolproof formula, but the spirit remains the same: have fun and don’t stress! I’ve had batches where the layers mixed a little, and batches where I maybe got a little overzealous with the rolling pin and had giant chunks of candy cane. They were all delicious. The goal is joy, not perfection.
One year, my dog, Biscuit, managed to snag a whole tray off the counter while it was setting (don’t worry, he was fine, just very happy). The moral of the story? Always chill your bark on a high shelf, away from sneaky, chocolate-loving pups! Now it’s a running joke in our house. Every time I make it, someone asks, “Is this batch for us, or for Biscuit?”
FAQs & Troubleshooting: Your Questions, Answered!
Q: My white chocolate got chunky and grainy when I melted it. What happened? Can I fix it?
A: Ah, you’ve experienced “seizing!” This usually happens if even a tiny bit of water or steam got into the chocolate. Unfortunately, it’s very hard to come back from. To prevent it, always ensure your bowl and utensils are completely dry. If it happens, sometimes adding a teaspoon of coconut oil and stirring like crazy can smooth it out, but prevention is best!
Q: Can I use chocolate bars instead of chips?
A: Absolutely! Just chop them into small, uniform pieces so they melt evenly. High-quality chocolate bars can actually give you an even richer flavor.
Q: How far in advance can I make this? How do I store it?
A: It keeps beautifully! Store your peppermint bark in an airtight container in the refrigerator for up to 2 weeks. You can also freeze it for up to 2 months. Just separate layers with parchment paper so it doesn’t stick together.
Q: Why did my layers separate when I broke it?
A: This likely means the first layer wasn’t completely chilled and set before you added the second, warm layer. The warm chocolate slightly melted the set layer, causing them to fuse. Just make sure that dark chocolate layer is totally firm before moving on!
Peppermint Bark
- Total Time: 40 minutes
- Yield: 20 Pieces 1x
Description
Layers of smooth chocolate and refreshing peppermint make this bark a go-to treat during the holidays. It’s beautiful, no-bake, and takes just minutes to make. Break into shards and share the joy!
Ingredients
12 oz semi-sweet or dark chocolate chips
12 oz white chocolate chips or melting wafers
½ tsp peppermint extract (optional, for extra flavor)
1 cup crushed peppermint candies or candy canes
Sea salt (optional, for contrast)
Instructions
Prep your pan
Line a baking sheet with parchment paper or a silicone mat.
Melt dark chocolate
In a microwave-safe bowl, melt dark chocolate in 20-second intervals, stirring between each, until smooth. Stir in peppermint extract (if using). Spread evenly onto the lined baking sheet. Chill for 10–15 minutes.
Melt white chocolate
In a clean bowl, melt white chocolate the same way. Be careful – it burns faster than dark chocolate. Stir until silky.
Layer and top
Pour white chocolate over chilled dark chocolate layer and spread gently to cover. Sprinkle crushed peppermint on top while still warm. Add a light dusting of sea salt if you love sweet-salty bites.
Chill and break
Refrigerate until completely set (about 30 minutes). Once firm, break into shards.
Tips & Twists
Swirl it: Before the white chocolate sets, use a toothpick to swirl into the dark chocolate for a marbled look.
Add crunch: Stir in chopped pretzels or roasted nuts.
Make it colorful: Use red and green sprinkles with the peppermint for extra holiday flair.
Go gourmet: Add a pinch of espresso powder to the dark chocolate layer for mocha magic.
- Prep Time: 10 minutes
- Chill Time: 30 minutes
Nutrition
- Calories: 140 / Piece
- Fat: 8g / Piece
- Carbohydrates: 16g / Piece
- Protein: 1g / Piece
Nutritional Information (Because Knowledge is Power!)
Okay, let’s be real—this is a holiday treat, and it’s meant to be enjoyed in all its indulgent glory! But I know many of you like to keep track, so here’s a general breakdown per piece (assuming the batch is broken into 20 pieces). Remember, these are estimates and can vary based on the specific brands of ingredients you use.
Estimated per piece: ~140 kcal | 8g fat | 16g carbs | 1g protein
This bark is a delightful source of quick energy and a little happiness. As with all good things, the best approach is to savor a piece or two mindfully, sharing the rest with people you love. That’s what the holidays are all about!
Final Sweet Thoughts
And there you have it, my friend! Your very own batch of homemade peppermint bark, ready to bring joy to your kitchen and to everyone lucky enough to get a piece. I hope this recipe becomes a part of your holiday traditions, just like it is for me. It’s more than just a recipe; it’s a reminder that the simplest things—melting chocolate, crushing candy, and sharing the results—often create the warmest memories.
I’d love to see your creations! If you make this (and I really hope you do), tag me on social @TastyChow and use the hashtag #TastyChowHoliday. Seeing your kitchen adventures absolutely makes my day.
From my messy, chocolate-splattered kitchen to yours, I wish you the happiest, most delicious holiday season. Now go break some bark and share the love!
With a full heart and a hungry belly,
Emily