Let’s Talk About the Ultimate Chocolate Experience 🍫
Hey there, my fellow flavor fanatic! Let’s be real for a second: have you ever had one of those days where only the deepest, darkest, most decadent piece of chocolate will do? I’m not talking about a quick candy bar fix. I’m talking about a moment of pure, unapologetic indulgence. A moment where you close your eyes, take a bite, and the world just… stops. That, my friend, is the magic of a homemade dark chocolate truffle.
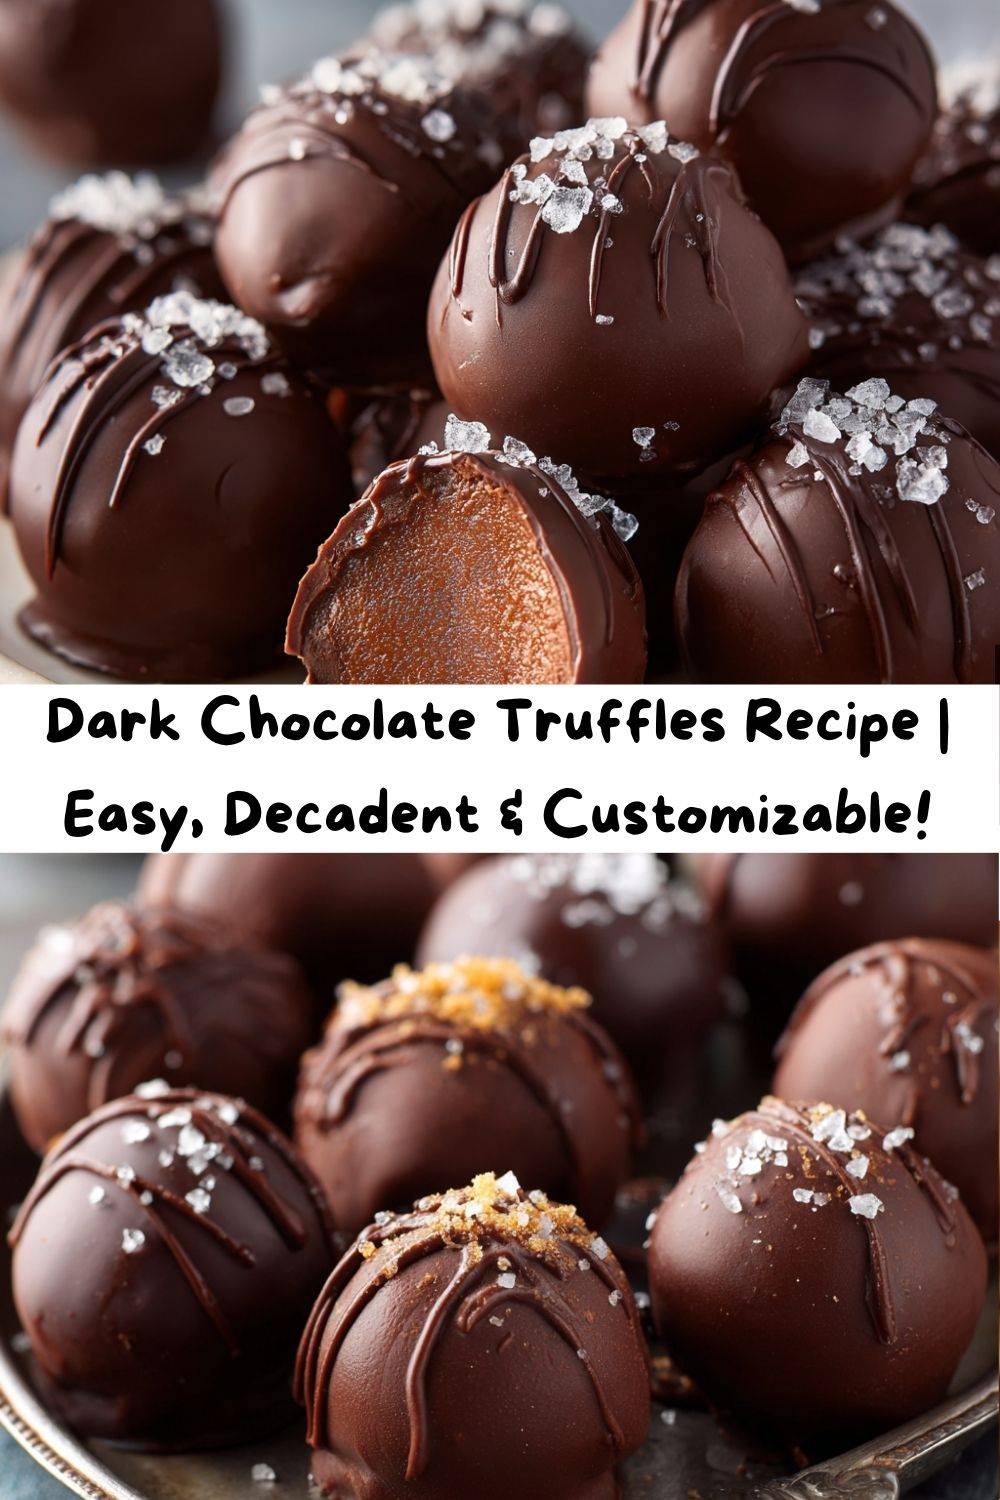
I’m Chef Emily, and I believe that creating incredible food shouldn’t be a complicated, stressful affair. These truffles are proof of that. With just a handful of simple ingredients and a little bit of patience (the hardest part, I know!), you can create a treat that rivals any fancy chocolate shop. We’re making a velvety-smooth ganache center that just melts on your tongue, then wrapping it up in a crisp, rich shell of dark chocolate. It’s a textural dream and a flavor explosion all in one tiny, elegant package.
Whether you’re whipping up a batch for a holiday party, a heartfelt gift, or just a well-deserved treat for yourself (my favorite reason!), this recipe is your new best friend. So, tie on that apron—it’s about to get a little messy, and a whole lot of delicious. Let’s make something amazing together!
A Sweet Start: My First Truffle Triumph
My love affair with truffles started not in a professional kitchen, but in my grandma’s cozy, flour-dusted one. I was about twelve, and she decided we were going to make Christmas gifts that year. Not cookies or fudge, but real chocolates. I remember watching, utterly mesmerized, as she poured hot cream over a mountain of chopped chocolate. It magically transformed into this glossy, beautiful pool of ganache.
My job was to roll the chilled centers. My hands were too warm, and I ended with more chocolate on my face and apron than on the truffles. We laughed until we cried. But when we finally dipped them and took that first bite? Pure bliss. They were a little lumpy, a little imperfect, but they were ours. That’s when I truly understood that the best recipes aren’t just about taste; they’re about the stories and the love you stir into them. Every time I make these, I’m right back in that kitchen with her, and it’s the best feeling.
Gathering Your Chocolatey Treasure
Here’s the beautiful part: you only need a few key players to create something extraordinary. Quality is your secret weapon here, especially with the chocolate. Since it’s the star of the show, make it a good one!
- 10 oz high-quality dark chocolate (60-70%), finely chopped – This is the heart and soul of your truffle! I like 70% for a perfect balance of bitter and sweet. Chef’s Tip: Chop it finely so it melts evenly. A serrated bread knife works wonders on chocolate bars! Don’t have a bar? High-quality chocolate chips work in a pinch, but they sometimes have additives that can make the texture less smooth.
- ½ cup heavy cream – Also called double cream or whipping cream. This is what creates the luscious, melt-in-your-mouth ganache center. For a dairy-free version, full-fat coconut cream is a fantastic swap!
- 2 tbsp unsalted butter, softened – This little addition adds an extra layer of richness and a gorgeous, shiny finish to your ganache. If you only have salted butter, that’s okay! Just skip the pinch of salt later.
- ½ tsp pure vanilla extract – The classic flavor enhancer. It rounds out the chocolate flavor beautifully. For a next-level twist, try using vanilla bean paste to see those beautiful little specks!
- Pinch of sea salt – Trust me on this! Salt is a flavor amplifier. It makes the chocolate taste more chocolaty and cuts through the sweetness perfectly.
- For Coating: 6 oz dark chocolate, melted – You’ll use this for the outer shell. You can use the same type as your ganache, or mix it up!
- Optional finishes: cocoa powder, crushed nuts, flaky sea salt, gold dust, or espresso powder – This is where your personality shines! Raid your pantry and have fun with it.
Let’s Make Some Magic: Step-by-Step Truffle Time!
Don’t let the fancy name intimidate you. Making truffles is a simple process. We’re just going to take it one delicious step at a time.
- Make the Ganache: Place your finely chopped chocolate in a medium, heat-safe bowl. In a small saucepan, heat the heavy cream and butter over medium heat. You want it to get just hot enough that it starts to simmer around the edges—you’ll see little bubbles form. Do not let it boil vigorously! Once it’s simmering, immediately pour the hot cream mixture over the chopped chocolate. Let it sit for a full 2-3 minutes. This is the “walk away and be patient” moment that allows the heat to gently melt the chocolate. After it’s sat, start stirring slowly from the center outwards. You’ll see it come together into a smooth, glossy, beautiful ganache. Now, stir in your vanilla extract and that all-important pinch of sea salt.
- Chill Out: Cover the bowl with plastic wrap, pressing the wrap directly onto the surface of the ganache. This prevents a skin from forming. Now, pop it into the refrigerator to firm up. This will take at least 1-2 hours. You want it to be firm enough to scoop but not rock solid. Chef’s Hack: If you’re in a hurry, you can spread the ganache onto a parchment-lined plate or baking sheet to help it chill faster!
- Shape the Truffles: Once your ganache is firm, use a small cookie scoop, a melon baller, or even a teaspoon to portion out the mixture. I aim for about 1-inch balls. The key here is to work quickly because the heat from your hands will melt the chocolate. Roll each portion quickly between your palms to smooth it into a ball. If it gets too messy, pop the balls back in the fridge for 10 minutes to firm up again. Place all your rolled truffles on a parchment-lined baking sheet and give them another 15-20 minute chill. This second chill is crucial for a clean dip later!
- The Big Dip (Coating!): Melt your coating chocolate. You can do this in a double boiler or in short bursts in the microwave, stirring well between each burst. Now, using a fork, a dipping tool, or even two forks, dip each chilled truffle center into the melted chocolate. Submerge it, lift it out, and gently tap the fork on the side of the bowl to let the excess chocolate drip off. Carefully place it back on the parchment paper. If you’re adding toppings like nuts or salt, do it immediately after dipping while the chocolate is still wet!
- Set and Forget: Allow the chocolate shell to set completely. You can leave them at room temperature if your kitchen isn’t too warm, or pop the tray back in the fridge for about 10 minutes to speed things up. Once set, they’re ready to devour or package up!
How to Serve These Little Gems
Presentation is part of the fun! You’ve made something gorgeous, now let it shine.
For a simple, elegant look, arrange them in a single layer in a pretty mini cupcake liner or a shallow glass dish. If you’re gifting them, a small cardboard gift box lined with parchment paper or festive shredded filler makes them look incredibly professional. Tie it with a ribbon, and you have a gift that says, “I’m an amazing friend who makes homemade chocolate.”
These truffles are perfect with a cup of strong black coffee, a bold red wine, or a glass of port. They’re the grand finale to a special dinner or the star of your next girls’ night in. Honestly, they’re also pretty perfect eaten straight from the fridge at midnight… not that I’ve ever done that.
Get Creative: Flavor Twists & Swaps
Once you’ve mastered the basic recipe, the chocolatey world is your oyster! Here are a few of my favorite ways to mix things up:
- Mocha Magic: Stir 1-2 teaspoons of instant espresso powder or very finely ground coffee into the hot cream before you pour it over the chocolate. It deepens the chocolate flavor and adds a wonderful coffee kick.
- Spiced & Nice: Add a pinch of warmth! A ¼ teaspoon of cinnamon, a tiny pinch of cayenne pepper (for a kick!), or a dash of cardamom stirred into the ganache creates a incredibly complex and cozy flavor.
- Boozy & Bold: For the adults, replace the vanilla extract with 1 tablespoon of your favorite spirit. Dark rum, bourbon, Grand Marnier, or even a cherry liqueur are all phenomenal choices.
- Nutty Professor: Fold 2-3 tablespoons of very finely chopped toasted nuts right into the ganache itself. Hazelnuts and pistachios are my top picks. The added crunch is divine.
- Peppermint Perfection: A holiday classic! Add ¼ teaspoon of peppermint extract (not peppermint oil, it’s too strong!) to the ganache and then roll the finished truffles in crushed candy canes.
Chef Emily’s Kitchen Confidential
This recipe has been with me for years, and it’s evolved from my lumpy first attempts to the smooth beauties we make today. My biggest lesson? Don’t fear the mess! Truffle-making is a hands-on, joyfully sticky process. I’ve had ganache splatter on the ceiling (true story), and I’ve definitely had to re-chill a batch that got too soft. It’s all part of the fun.
I also highly recommend making a double batch. They freeze incredibly well for up to a month! Just place them in a single layer on a parchment-lined tray to freeze solid, then transfer to an airtight container. Thaw in the fridge overnight. This means you’re always ready for a last-minute gift or a serious chocolate craving.
Truffle Troubles? We’ve Got Answers!
Q: My ganache is grainy/oily. What happened?
A: This usually means the chocolate got too hot or seized. If it’s oily, it may have split. To fix a split ganache, try whisking in a tablespoon of room temperature cream or even a little warm milk, one teaspoon at a time, until it comes back together. For grainy ganache, gently re-warm the bowl over a pot of simmering water and stir until smooth.
Q: The ganache is too soft to roll! Help!
A: No worries! Just chill it longer. If it’s still too soft after several hours, your fridge might be on the warmer side or your ratio might be off. You can firm it up more by stirring in a bit more finely chopped chocolate while it’s still slightly warm.
Q: What’s the best way to melt chocolate for dipping?
A: Low and slow is the key! A double boiler is best for control. If using a microwave, do it in 20-second bursts at 50% power, stirring thoroughly between each burst. Never let any water get into your melting chocolate, or it will seize up and become a thick, grainy mess.
Q: How long will these truffles keep?
A: Stored in an airtight container in the refrigerator, they’ll be perfect for up to two weeks. You can also freeze them for up to a month for best flavor.
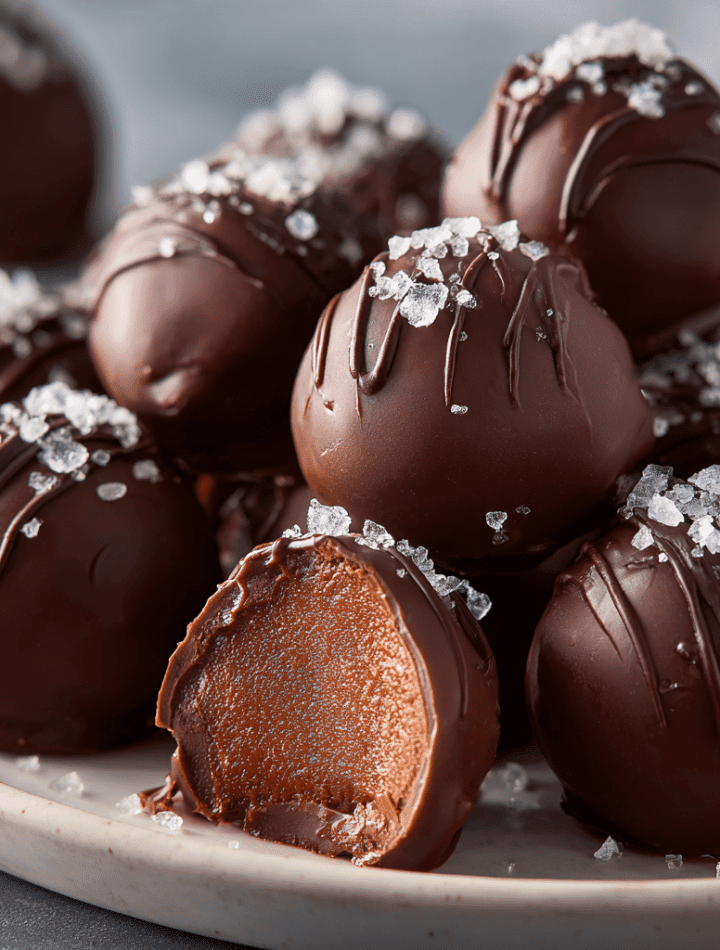
Dark Chocolate Truffles
- Total Time: 2 hours 20 minutes
- Yield: 24 Truffles 1x
Description
Velvety ganache centers wrapped in rich, dark chocolate make these truffles a luxurious treat. They’re the kind of indulgence that makes ordinary moments feel like a celebration. Easy to customize, elegant to serve – a must for your holiday sweet table.
Ingredients
10 oz high-quality dark chocolate (60–70%), finely chopped
½ cup heavy cream
2 tbsp unsalted butter
½ tsp pure vanilla extract
Pinch of sea salt
For Coating:
6 oz dark chocolate, melted
Optional finishes: cocoa powder, crushed nuts, flaky sea salt, gold dust, or espresso powder
Instructions
Make ganache
Heat cream and butter in a small saucepan until just simmering. Pour over chopped chocolate in a heat-safe bowl. Let sit for 2 minutes, then stir until smooth. Add vanilla and salt.
Chill
Cover and refrigerate for 1–2 hours, or until the ganache is firm enough to scoop.
Shape truffles
Scoop into 1-inch balls and roll quickly between your hands. Place on a parchment-lined tray and chill for another 15–20 minutes.
Coat
Dip chilled truffles into melted dark chocolate using a fork or dipping tool. Tap off excess and place back on the tray. While still wet, add your chosen toppings.
Set
Let truffles set at room temp or in the fridge. Store in an airtight container in a cool, dry spot.
Flavor Twists
Mocha Truffles: Add 1 tsp instant espresso to ganache
Spiced: Stir in cinnamon, cayenne, or cardamom for a warm kick
Boozy: Add 1 tbsp of dark rum, bourbon, or orange liqueur
Nutty: Add finely chopped hazelnuts or pistachios to the ganache
- Prep Time: 20 minutes
- Chill Time: 2 hours
Nutrition
- Calories: 140 / Truffle
- Fat: 10g / Truffle
- Carbohydrates: 12g / Truffle
- Protein: 1g / Truffle
A Note on Nutrition & Indulgence
Let’s keep it real: these are a treat, and that’s okay! Life is all about balance. While they are rich and decadent, dark chocolate itself has some redeeming qualities. It’s a source of antioxidants and flavonoids. Because we’re using high-quality dark chocolate, these truffles are lower in sugar than most store-bought milk chocolate options.
Each truffle is a small, intentional moment of indulgence. Savor it slowly! Estimated nutritional info per truffle (without extra toppings) is roughly: ~140 kcal | 10g fat | 12g carbs | 1g protein.
Your New Go-To Celebration Treat
And there you have it! Your complete guide to creating stunning, professional-level dark chocolate truffles right in your own kitchen. I hope this recipe empowers you to play, create, and share something truly special.
Remember, cooking is an adventure. It’s not about being perfect; it’s about the joy of creating something with your own two hands. So whether your truffles are perfectly spherical or charmingly rustic, they are going to be delicious because you made them with love.
I’d love to hear how your truffle-making goes! Tag me on social @emilywalker with #TastyChow so I can see your beautiful creations. Now, go forth and get your chocolate on!
With love and a full belly,
Emily