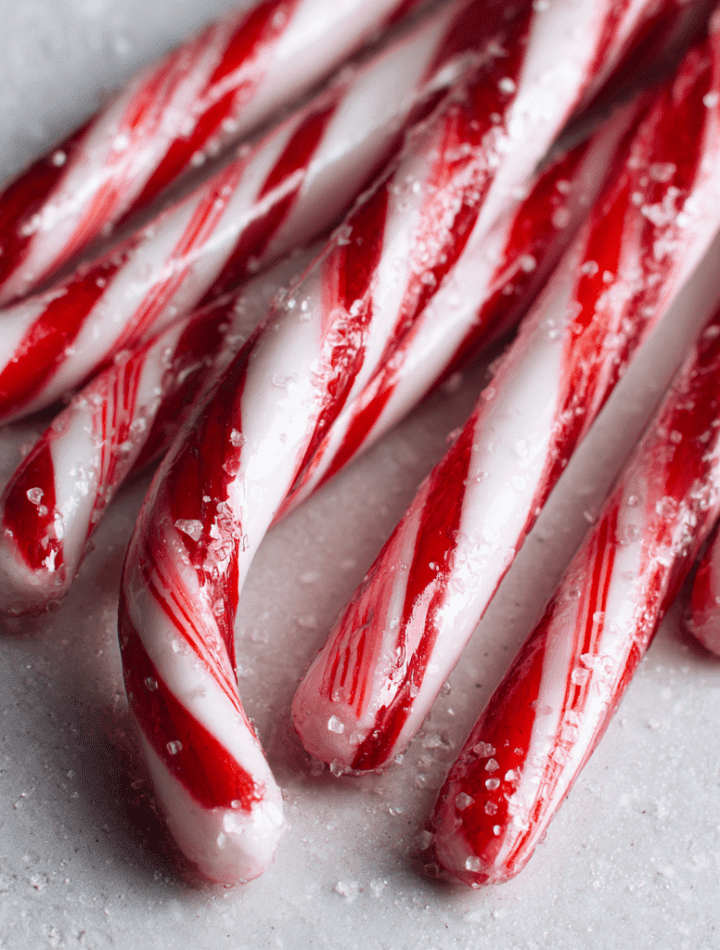
Ditch the Wrapper: Let’s Make Magical Handmade Candy Canes!
Hey there, my festive friend! 👋 Is there anything that screams “holiday magic” quite like the sight of a glossy, red-and-white striped candy cane? That classic peppermint snap, the way it slowly sweetens a cup of cocoa, the pure joy of seeing one dangling from the tree… it’s a whole vibe. But have you ever, while unwrapping one from a plastic sleeve, wondered, “Could I make these myself?”
I’m here to grab your hand, pull you into my flour-dusted, sugar-sprinkled kitchen, and shout a resounding, “YES, YOU ABSOLUTELY CAN!” Making handmade candy canes is one of my all-time favorite holiday traditions. It’s a little bit science, a whole lot of fun, and 100% pure, edible magic. Is it a project? You bet. But is it the kind of project that ends with you feeling like a confectionery wizard and your kitchen smelling like Santa’s workshop? Absolutely.
Forget complicated and intimidating. Think of it as a playful, hands-on adventure. We’re going to turn simple sugar into a pliable, glossy dough, twist it into those iconic stripes, and bend them into perfect canes. And the best part? We get to be the bosses of flavor and color. Peppermint classic? Done. How about a crimson-and-gold cinnamon stick? A pastel-hued lavender dream? Let’s do it! So tie on your most festive apron, channel your inner candy crafter, and let’s make something incredibly delicious—and unforgettable—together.

The Christmas I Almost Glued Myself to the Ceiling
My own candy cane journey started not in culinary school, but in my grandma’s kitchen one particularly ambitious December. I was maybe ten, and she decided we were going to make “old-fashioned” candy canes. Picture it: me, standing on a stool, wielding a giant copper pot like I was stirring a witch’s cauldron. We reached the crucial “hard crack” stage, and in my excitement, I gave the syrup a vigorous stir. A single, molten droplet flew out of the pot and hit a spoon, which sent it ricocheting… right onto my wrist.
Yelping, I shook my hand, and that tiny, super-heated sugar pearl flew… and stuck to the popcorn ceiling. It’s still there to this day. We called it our “Christmas asterisk.” We eventually got the candy pulled and twisted, and while our canes were more “abstract art” than “perfect stripes,” they tasted like victory. That day taught me that the best kitchen memories aren’t about perfection. They’re about the mess, the laughter, and the story you get to tell forever. So if a little sugar ends up somewhere weird, just consider it holiday decor.
Gathering Your Candy Crafting Toolkit
This isn’t a long list, but each ingredient plays a starring role. Here’s exactly what you’ll need and why it’s important:
- 2 cups granulated sugar: This is the foundation of our candy. It provides the structure and that satisfying, glass-like crunch. Make sure your sugar is fresh and free of any lumps for the smoothest syrup.
- ½ cup light corn syrup: This is our secret weapon against crystallization! It interferes with the sugar molecules forming big, gritty crystals, ensuring our candy canes are smooth and clear, not grainy and cloudy.
- ½ cup water: Simple, but crucial. It dissolves the sugar evenly so it can cook properly without burning. Use regular tap water—no need for anything fancy.
- ½ tsp cream of tartar: This acidic powder is another anti-crystallization hero, working alongside the corn syrup to guarantee a flawless, smooth texture. Don’t skip it!
- ½ tsp peppermint extract (or flavor of choice): This is where the personality comes in! Use a high-quality extract for the best flavor. Chef’s Insight: Add this after cooking to preserve its bright, volatile flavor notes. If you add it during cooking, much of the flavor will evaporate.
- Red food coloring (gel or liquid): I am a huge fan of gel food coloring for candy making. It’s more concentrated, so you need less, and it won’t thin out your syrup like liquid coloring can. But liquid will work in a pinch!
- Powdered sugar or neutral oil (for dusting): Your hands and work surface will thank you. A light dusting of powdered sugar or a swipe of a neutral oil (like vegetable or coconut) prevents the sticky candy from becoming your new gloves.
Let’s Get Pulling! Your Step-by-Step Candy Cane Guide
Ready for the fun part? Read through all the steps first, then let’s dive in. Safety first: molten sugar is extremely hot. Move with purpose and keep little helpers at a safe distance during the cooking and initial pouring stages.
- Prep Your Station Like a Pro. This is the most important step for a stress-free experience! Line a baking sheet with parchment paper. Lightly oil a heat-safe surface like a marble slab, granite countertop, or a large silicone baking mat. Have your food coloring, extract, oiled spatulas, kitchen scissors, and heat-resistant gloves (highly recommended!) all within arm’s reach. Chef’s Hack: Fill a large bowl with ice water and keep it nearby just in case of any accidental sugar drips on skin. A quick plunge can prevent a burn.
- Cook the Sugar Mixture to Perfection. In a heavy-bottomed saucepan (this ensures even heating), combine the sugar, corn syrup, water, and cream of tartar. Stir over medium heat only until the sugar dissolves. Once it starts simmering, STOP STIRRING. Brushing down the sides of the pot with a wet pastry brush can prevent crystals from forming. Attach your candy thermometer and cook without stirring until the mixture reaches exactly 300°F (150°C), the “hard crack” stage. This is non-negotiable! At this temp, a drop of syrup in cold water will form hard, brittle threads. Chef’s Commentary: Be patient. This can take 15-20 minutes. Don’t be tempted to turn up the heat to speed it up, or you risk burning the sugar.
- The Flavor & Color Sprint. As soon as it hits 300°F, immediately remove the pot from the heat. Working quickly but carefully, stir in the peppermint extract. It will sizzle and steam—that’s normal! Now, swiftly pour about half of the clear syrup onto your prepared oiled surface. To the remaining syrup still in the hot pot, add your red food coloring (start with a few drops; you can always add more). Stir quickly to incorporate, then pour the red syrup right next to the white pool on your surface. Little Chef Hack: If your pot has a handle, holding it with a towel-covered hand gives you better control for pouring.
- The Cool Down & The Pull. Let the two puddles of candy cool for just a few minutes. You need them to be cool enough to handle but still very pliable. Put on your heat-resistant gloves. Start with one color. Pick it up and begin to fold and pull it. You’ll see it transform from a clear golden color to an opaque, glossy, satiny white (for the uncolored batch) and a vibrant, opaque red. This process incorporates air, creating the classic texture and making it easier to work with. Pull, fold, and stretch until it’s glossy and firm but still pliable. Repeat with the other color.
- Form Your Iconic Ropes. Now, roll each color into a long, even rope, about ½ to ¾-inch thick. If the candy gets too hard to work with, you can gently warm it with a hair dryer on a low setting to soften it slightly. Lay the red and white ropes side-by-side. Now, gently twist them together. Once twisted, roll it lightly on the surface to help them adhere and create one unified, striped rope.
- Shape, Cut, and Bend! Using oiled kitchen scissors, cut your long twisted rope into smaller sections, about 6-8 inches long. Now, working quickly before they set, bend the top of each piece down to form the classic candy cane hook. Pro-Tip: If the ends are too pointy after cutting, you can pinch them to round them off for a more polished look.
- The Final Cool Down. Place your finished candy canes on the parchment-lined baking sheet to cool and harden completely. This usually takes about 20-30 minutes. Once they are completely cool and hard, they’re ready to enjoy or store!
How to Serve Your Sweet Masterpieces
You just made actual candy canes! Now, let’s show them off. Of course, they’re perfect all on their own, but here are a few of my favorite ways to make them the star of the show:
The Classic Cocoa Topper: This is their destiny. Dangle a homemade candy cane over the edge of a rich, steaming mug of hot chocolate. As it slowly melts, it stirs in a subtle peppermint sweetness. Pure bliss.
Festive Gift Giving: Wrap individual canes in clear cellophane bags, tie them with a gorgeous ribbon, and attach a gift tag. There is no more heartfelt (and delicious) homemade holiday gift. Tuck a few into Christmas cards for a sweet surprise.
The Ultimate Dessert Garnish: Crush a cane or two and sprinkle the pieces over peppermint ice cream, a decadent chocolate tart, or a festive cheesecake. It adds incredible texture, color, and flavor.
Tree Decorations: Hang them directly on your Christmas tree! They look beautiful and fill the room with a faint, sweet scent. Just be sure to keep them out of direct sunlight or heat so they don’t soften.
Get Creative! Flavor & Color Twists
The real fun begins when you start playing with flavors. This basic recipe is your blank canvas!
- Cinnamon Christmas: Swap the peppermint extract for cinnamon oil (use a little less, as it’s potent) and use red coloring for a classic look, or try a deep gold dusted with edible glitter for a “fireplace” vibe.
- Fruity Fun: Kids (and adults!) love this. Use lemon, orange, or strawberry extract. Pair a yellow rope with a white one for lemon, or orange and white for a creamsicle effect.
- Elegant Herbal: For a more sophisticated twist, try lavender extract (paired with purple and white stripes) or even a tiny bit of rosemary extract with green coloring.
- Chocolate Swirl: After pouring the clear syrup, sprinkle it with a few tablespoons of mini chocolate chips or shaved dark chocolate before it fully sets. As you pull and fold, it will create a beautiful marbled effect.
- Mini Canes for Parties: Make shorter ropes and create bite-sized candy canes. They’re perfect for scattering on dessert tables, topping cupcakes, or packaging in tiny jars as party favors.
Emily’s Kitchen Confidential
This recipe has evolved so much since my “ceiling asterisk” days. I’ve learned that a good candy thermometer is worth its weight in gold—don’t rely on the cold water test alone if you’re a beginner. I also never, ever make these alone anymore. It’s become a tradition to invite a friend or two over, put on a holiday playlist, and make an afternoon of it. We divide the tasks: one person on thermometer duty, two on pulling duty. It goes faster, and it’s infinitely more fun. The best kitchen failures and successes are always shared. Remember, your first batch might not be magazine-perfect, and that’s okay! They will still taste incredible, and you’ll have a fantastic story. Embrace the sticky, joyful chaos of it all.
Your Candy Cane Questions, Answered!
Q: My candy turned out grainy and sugary. What happened?
A: This is almost always caused by crystallization. Likely culprits are: stirring the syrup after it started boiling, sugar crystals on the side of the pot dissolving back in, or not using the corn syrup/cream of tartar. Next time, be sure to brush down the sides of the pot with a wet pastry brush at the beginning of cooking and resist the urge to stir!
Q: The candy hardened too fast and I couldn’t shape it! Help!
A: This is a common race against time! The key is to work quickly but safely. If one piece hardens before you can twist it, you can gently re-soften it with a hair dryer on a low, warm setting. Hold it a few inches away and warm it just until it becomes pliable again.
Q: Can I make these without a candy thermometer?
A: While you can use the “hard crack” cold water test (a drop of syrup forms hard, brittle threads that snap), I don’t recommend it for beginners. The thermometer takes the guesswork out and is much more reliable for getting the exact temperature needed for the right texture.
Q: How do I store homemade candy canes to keep them fresh?
A: The enemy here is moisture! Store them in a single layer, separated by parchment paper, in an absolutely airtight container at room temperature. They can last for several weeks this way, staying crisp and delicious.

Handmade Candy Canes
- Total Time: ~1 hr 15 min
- Yield: 16 candy canes 1x
Description
Making your own candy canes is a hands-on holiday tradition full of color, creativity, and cheer. These striped sweets deliver that classic crunch and peppermint snap, but you can flavor and tint them however you like for a personal touch.
Ingredients
2 cups granulated sugar
½ cup light corn syrup
½ cup water
½ tsp cream of tartar
½ tsp peppermint extract (or flavor of choice)
Red food coloring (gel or liquid)
Powdered sugar or oil (for dusting hands and surface)
Instructions
Prep your station
Line a baking sheet with parchment. Lightly oil a marble surface or large baking mat. Keep gloves, scissors, and oiled spatulas nearby.
Cook sugar mixture
In a heavy saucepan, combine sugar, corn syrup, water, and cream of tartar. Stir over medium heat until sugar dissolves. Stop stirring and cook until the mixture reaches 300°F (hard crack stage).
Flavor & color
Remove from heat. Quickly stir in peppermint extract. Pour half the syrup onto the prepared surface. To the remaining half in the pot, add red food coloring and pour beside the uncolored half.
Cool slightly & pull
Once cool enough to handle (wearing gloves), pull and stretch each batch until it turns glossy and opaque – white for one, red for the other.
Form ropes
Roll each color into long ropes. Twist together and pull into long strips. Cut into pieces and form the candy cane shape quickly before they harden.
Cool & store
Let set completely. Store in airtight containers with parchment between layers.
Tips & Flavor Twists
Flavor options: Swap peppermint for cinnamon, vanilla, lemon, or almond
Color combos: Try green & white, or red & gold for a unique twist
Mini canes: Make shorter ropes for bite-size gifts or cocoa toppers
Glitter touch: Dust with edible shimmer for a magical finish
- Prep Time: 45 minutes
- Cool Time: 30 minutes
Nutrition
- Calories: 70 / candy cane
- Sugar: 18g / candy cane
- Carbohydrates: 18g / candy cane
Nutritional Information (A Peek)
Okay, let’s be real—we’re making candy! This is a treat, through and through. But here’s a general breakdown per average-sized handmade candy cane (about the size of a standard store-bought one).
Estimated per cane: ~70 kcal | 0g fat | 18g carbs (18g sugars) | 0g protein
Since we’re using simple, whole ingredients (sugar, corn syrup, natural extracts), you know exactly what’s going into your treat. There are no artificial preservatives or mysterious ingredients. It’s a pure, homemade indulgence to be enjoyed mindfully and joyfully as part of your holiday celebrations.
You Did It! Now, Share the Sweetness.
Look at you, you candy-making champion! You took sugar, water, and a whole lot of heart and created something truly magical. I am so incredibly proud of you for taking on this kitchen adventure. Whether your canes are perfectly striped or wonderfully whimsical, you’ve created more than just candy; you’ve created a memory.
I’d love to see your beautiful creations! Tag me on social @TastyChow and use the hashtag #TastyChowHoliday so I can share in your triumph. Did you try a wild flavor combo? Did a little sugar end up somewhere hilarious? Tell me everything!
From my kitchen to yours, happy holidays, happy pulling, and happy chowing!
— Emily 🍭
