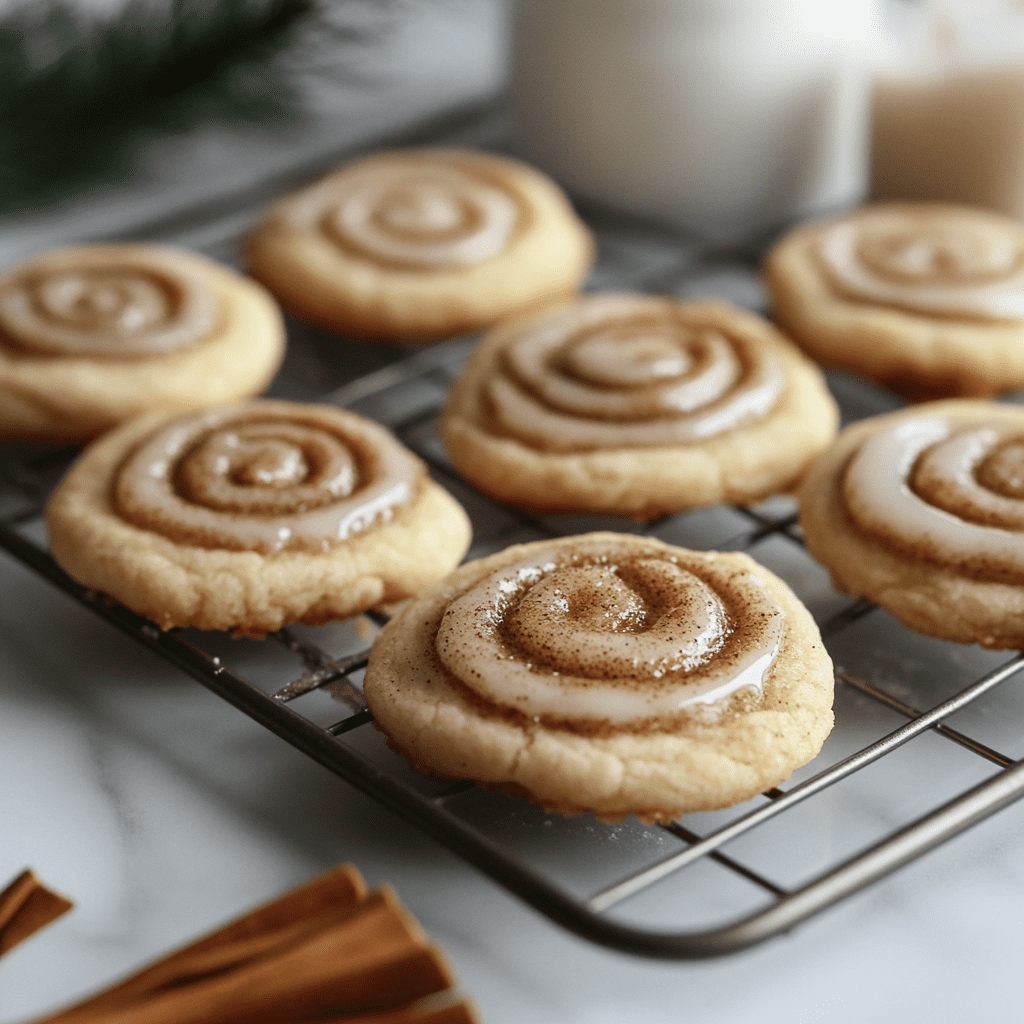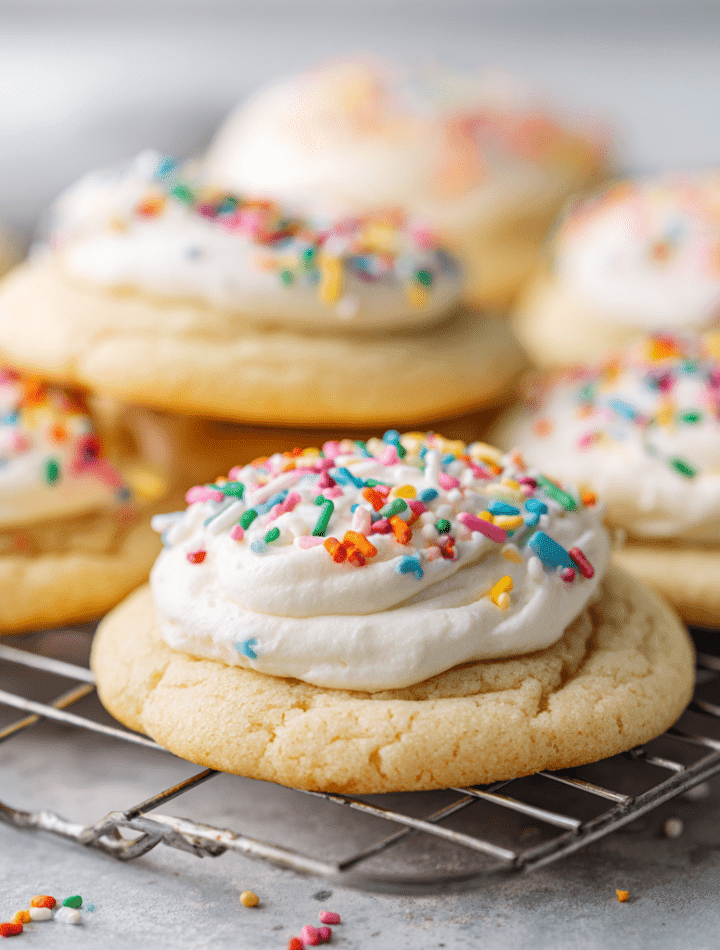
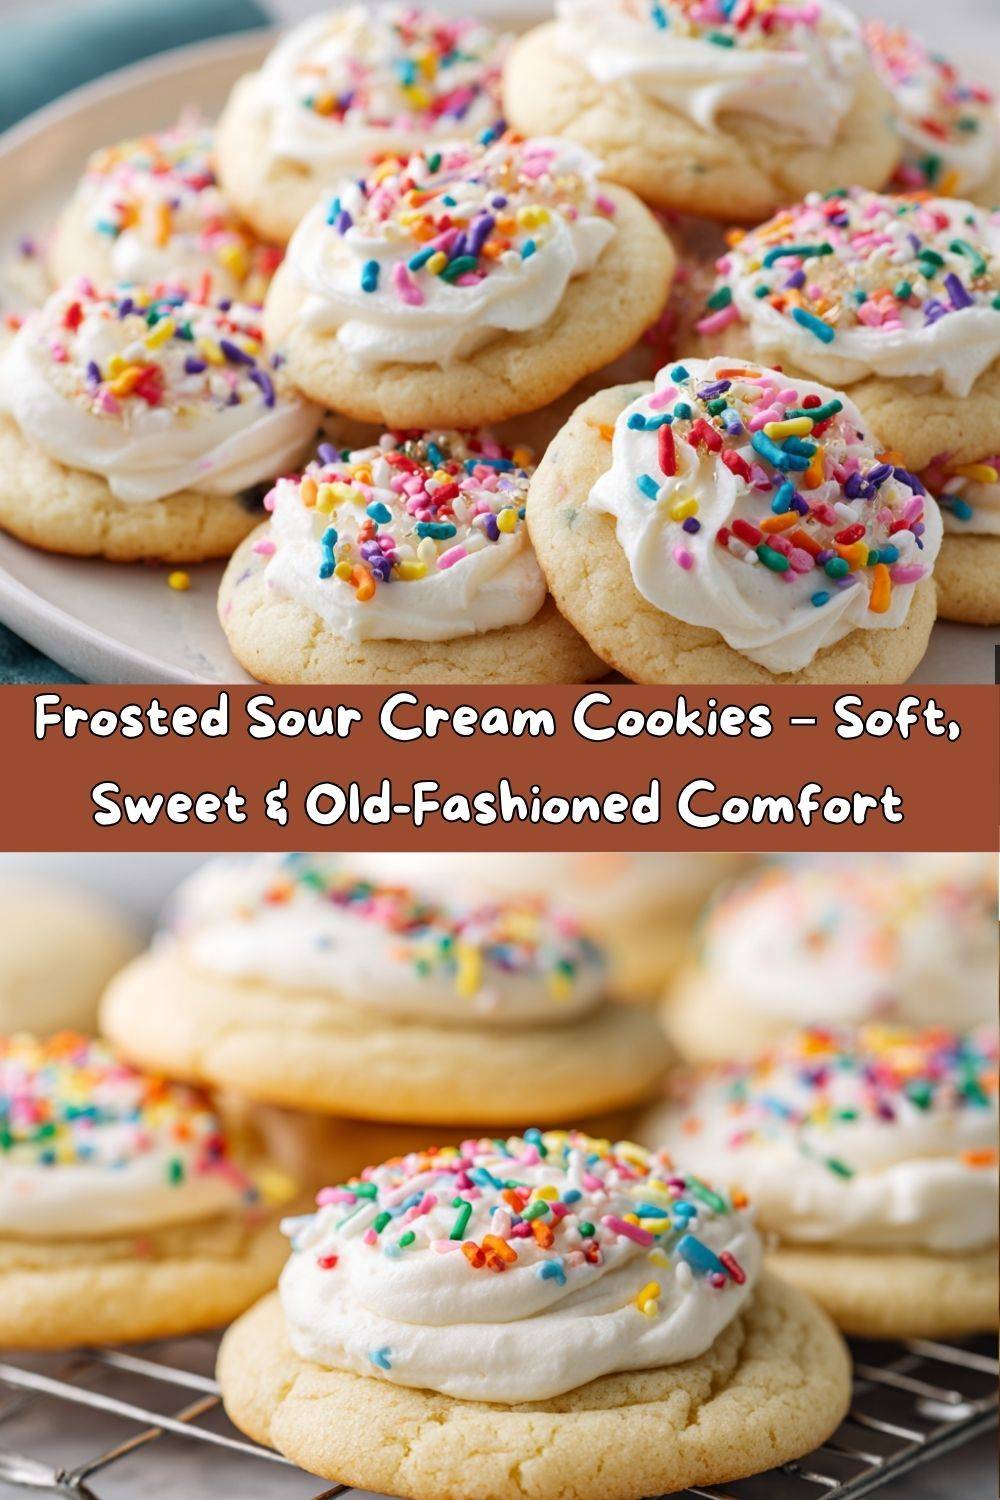
Your New Favorite Cookie: Frosted Sour Cream Cookies
Hey there, friend! Come on in, grab an apron, and get ready to fall head-over-heels for what might just become your new favorite cookie. We’re talking about Frosted Sour Cream Cookies today, and let me tell you, these aren’t your average, everyday treats. Imagine the softest, most pillowy cookie you’ve ever had—a cloud-like cakey texture that just melts in your mouth. Now, picture it topped with a sweet, creamy vanilla frosting and maybe a generous shower of colorful sprinkles. Yeah, you’re drooling a little. I get it! These cookies are the edible equivalent of a warm hug. They’re old-fashioned comfort in the very best way, perfect for bake sales, holiday platters, or just because it’s Tuesday. They’re sturdy enough to decorate but so tender they might just disappear before the frosting even sets. So, let’s preheat those ovens and make something delicious together!
A Spoonful of Nostalgia: My Grandma’s Secret Weapon
Every time I cream butter and sugar for these cookies, I’m instantly transported back to my grandma’s kitchen. It was a place of wonder, always smelling of yeast, cinnamon, and unconditional love. She wasn’t a fancy chef; she was a master of comfort. And her secret weapon for creating the most impossibly soft, cake-like cookies and cakes? Sour cream. I remember watching her, a mischievous glint in her eye, swirl a big dollop of the cool, tangy stuff into her batter. “This, my sweet Emily,” she’d whisper, “is the magic. It keeps everything tender.” She’d let me lick the spoon, and I was always amazed at how something so tangy on its own could create something so beautifully sweet and soft. That lesson stuck with me through culinary school and beyond. This recipe is my homage to her—a simple, humble cookie that’s elevated by a single, brilliant ingredient. It’s a taste of my childhood, and I’m so thrilled to share that feeling with you.
Gathering Your Cookie Crew: The Ingredients
One of the best things about this recipe is how simple the ingredient list is. You probably have most of this in your pantry right now! Here’s what you’ll need and why each one is a key player in our cookie masterpiece.
For the Cookies:
- ½ cup unsalted butter, softened: This is the base of our flavor and texture. Unsalted lets us control the salt level. Chef’s Tip: True “softened” butter should yield slightly to pressure but not be greasy or melted. If you forget to take it out, pop it in the microwave for 5-second bursts, flipping it each time!
- 1 cup granulated sugar: Sweetens the deal and helps creame with the butter to create a light, airy structure.
- 2 large eggs: They act as a binder, holding everything together and adding richness. Make sure they’re at room temperature to blend seamlessly into the batter!
- 1 tsp vanilla extract: The classic flavor enhancer. Use the real stuff—it makes a world of difference!
- ½ cup full-fat sour cream: Here she is, the STAR of the show! The fat content adds incredible moisture, while the tanginess balances the sweetness and creates that signature tender, cake-like crumb. Don’t use light or fat-free here; we need that fat for texture!
- 2¾ cups all-purpose flour: The foundation. I like to fluff my flour with a spoon, spoon it into the measuring cup, and level it off to avoid over-packing and ending up with dry cookies.
- 1 tsp baking powder & ½ tsp baking soda: Our leavening dream team. They work together to give these cookies their perfect rise and fluffy texture.
- ½ tsp salt: The flavor amplifier. It makes the sweet and vanilla notes pop!
For the Vanilla Frosting:
- ¼ cup unsalted butter, softened: The base for our creamy, spreadable frosting.
- 2 cups powdered sugar: Provides the sweetness and structure. Sift it if it’s lumpy for an ultra-smooth frosting.
- 1½–2 tbsp milk or cream: Cream will make it richer, but milk works perfectly. Add slowly to reach your desired consistency.
- 1 tsp vanilla extract: Because you can never have too much vanilla!
- Food coloring & sprinkles (optional): The fun part! Go wild with colors and sprinkles to match any season or mood.
Let’s Get Baking: The Step-by-Step Guide
Ready to make some magic? Follow these steps, and you’ll have a batch of perfect cookies in no time. I’ve packed this section with all my favorite chef hacks to set you up for success.
- Preheat and Prep: Preheat your oven to 350°F (175°C). Line your baking sheets with parchment paper. Chef’s Hack: This is non-negotiable! It prevents sticking and makes cleanup a dream. No parchment? A silicone baking mat works great too.
- Cream the Good Stuff: In a large bowl, cream together the softened butter and granulated sugar. Now, don’t just mix it—really cream it! Beat it on medium-high speed for a good 2-3 minutes until it’s light, pale yellow, and fluffy. This incorporates air, which is key for a soft texture.
- Combine the Wet Team: Beat in the eggs, one at a time, making sure each is fully incorporated before adding the next. Then, mix in the vanilla and the superstar, the sour cream. Scrape down the sides of the bowl to ensure everything is homogenous.
- Whisk the Dry Team: In a separate bowl, whisk together the flour, baking powder, baking soda, and salt. Whisking aerates the flour and evenly distributes the leaveners so you don’t get a bitter bite of baking soda.
- Bring It All Together: Gradually add the dry ingredients to the wet ingredients, mixing on low speed just until the flour disappears. Chef’s Warning: DO NOT OVERMIX! Overworking the dough is the number one way to end up with tough cookies. A few streaks of flour are okay; they’ll incorporate as you scoop.
- Scoop and Slightly Smoosh: The dough will be soft and sticky—that’s perfect! Drop rounded tablespoons of dough onto your prepared baking sheets, about 2 inches apart. Use the back of a spoon or your fingers dipped in water to gently flatten each mound just slightly. This helps them bake evenly instead of staying domed.
- Bake to Perfectly Pale Gold: Bake for 10-12 minutes. You’re looking for the edges to be set and just barely starting to turn a light golden brown. The tops should still look soft and pale. Chef’s Secret: They will continue to cook on the hot baking sheet. Overbaking is the enemy of softness!
- The Patience Test: Let the cookies cool on the baking sheet for 5 minutes before transferring them to a wire rack to cool completely. I know it’s hard, but you MUST let them cool entirely before frosting. Warm cookies will make your frosting melt into a sad, runny puddle.
- Whip Up the Frosting: While the cookies cool, make the frosting. Beat the softened butter until smooth. Gradually add the powdered sugar, milk, and vanilla, and beat on medium speed until it’s light and fluffy. Add a drop of food coloring if you’re feeling fancy!
- Frost and Decorate! Once the cookies are completely cool, spread a generous layer of frosting on each one. Immediately add sprinkles so they stick. Then, try to resist eating them all in one sitting. I believe in you.
How to Serve These Soft & Sweet Clouds
These cookies are a dream to serve! They’re beautiful on a simple plate, but let’s talk presentation. For a classic bakery look, stack them high on a vintage cake stand—the pastel frosting and sprinkles will look gorgeous. Heading to a potluck or giving them as a gift? Package them in a cellophane bag tied with a cute ribbon; they’re sturdy enough to travel without getting ruined. And what to serve with them? A cold glass of milk is the obvious (and perfect) pairing. For the adults, a hot cup of coffee or a latte beautifully complements the sweet vanilla flavor. They’re also fantastic crumbled over a scoop of vanilla ice cream for the ultimate indulgence. However you serve them, get ready for compliments!
Make It Your Own: Delicious Recipe Variations
I love this base recipe because it’s a fantastic canvas for your creativity! Here are a few of my favorite ways to mix it up:
- Lemon Bliss: Add the zest of one lemon to the cookie dough and replace the vanilla extract in the frosting with fresh lemon juice. It’s bright, zesty, and incredibly refreshing.
- Almond Joy: Swap the vanilla extract in both the cookie and frosting for almond extract. Top the frosted cookies with toasted sliced almonds for an elegant, nutty twist.
- Chocolate Swirl: Fold ½ cup of mini chocolate chips into the dough. For a decadent twist, make a simple chocolate frosting by adding ¼ cup of sifted cocoa powder to the powdered sugar.
- Funfetti Celebration: Fold ¼ cup of rainbow sprinkles (jimmies work best) right into the cookie dough before scooping. Then frost and add more sprinkles on top! Instant party.
- Gluten-Free Friendly: You can easily swap the all-purpose flour for a 1:1 gluten-free baking blend. I’ve had great success with brands like Bob’s Red Mill or King Arthur Measure for Measure.
Chef Emily’s Notes from My Kitchen to Yours
This recipe has evolved so much since my grandma’s days! I’ve tweaked the leavening ratios a dozen times to get that perfect rise without any chemical aftertaste. One of my favorite kitchen fails was the time I was filming a video for these and, in my excitement, I used a heaping cup of sour cream instead of a level one. The cookies spread into each other and created one giant, cake-like cookie sheet. It was a hilarious mess! We just broke it apart and called it “Sour Cream Cookie Brittle.” It was still delicious, proving that even mistakes can be tasty. The moral of the story? Don’t stress. Baking is supposed to be fun. Even if they’re not perfect, they’re made with love, and that’s the most important ingredient of all.
Frosted Sour Cream Cookie FAQs
Q: My cookies spread too much and came out flat. What happened?
A: This usually means your butter was too warm or you didn’t use enough flour. Make sure your butter is just softened, not melted. And always use the “spoon and level” method for measuring flour to avoid accidentally using too little.
Q: Can I make the dough ahead of time?
A: Absolutely! You can scoop the dough onto a baking sheet, freeze the mounds solid, and then transfer them to a freezer bag. Bake straight from the freezer, adding 1-2 minutes to the baking time. No need to thaw!
Q: Why is my frosting runny/grainy?
A: Runny frosting usually means you need more powdered sugar. Grainy frosting means your sugar wasn’t fully incorporated. If it’s runny, add more sifted powdered sugar a quarter cup at a time. If it’s grainy, just keep beating! It might take a few minutes for the sugar to fully dissolve into the butter.
Q: How should I store these cookies?
A: Because of the frosting, they are best stored in a single layer in an airtight container at room temperature. If you need to stack them, place a layer of parchment paper between them. They’ll stay soft for 3-4 days.
Nutritional Information
Okay, let’s be real—these are a treat, and we’re here for a good time, not a long time! But I know many of you like to keep track, so here’s a general breakdown per cookie (assuming the recipe yields 24 cookies). Please remember this is just an estimate, as ingredients and portion sizes can vary.
Calories: ~180 | Fat: 7g | Saturated Fat: 4g | Cholesterol: 30mg | Sodium: 85mg | Carbohydrates: 27g | Fiber: 0g | Sugar: 18g | Protein: 2g
The sour cream adds a bit of fat, but that’s what creates the incredible moisture and texture. As with all good things, enjoy them mindfully as part of a balanced diet!
Final Thoughts from My Kitchen
Well, friend, we’ve reached the end of our cookie journey! I hope you feel inspired, equipped, and ready to bake a batch of these utterly delightful frosted sour cream cookies. This recipe is more than just a list of ingredients; it’s a connection to my past, a staple in my present, and now, I hope, a beloved recipe in your future. There’s something so special about sharing a recipe that has been passed down and perfected with love. So, whether you’re baking these for a special occasion, a school event, or just a quiet afternoon treat, I hope they bring as much joy to your kitchen as they have to mine. Don’t forget to tag me @TastyChow if you share a photo—I love seeing your creations! Now, go preheat that oven and make something delicious.
With love and a full cookie jar,
Emily