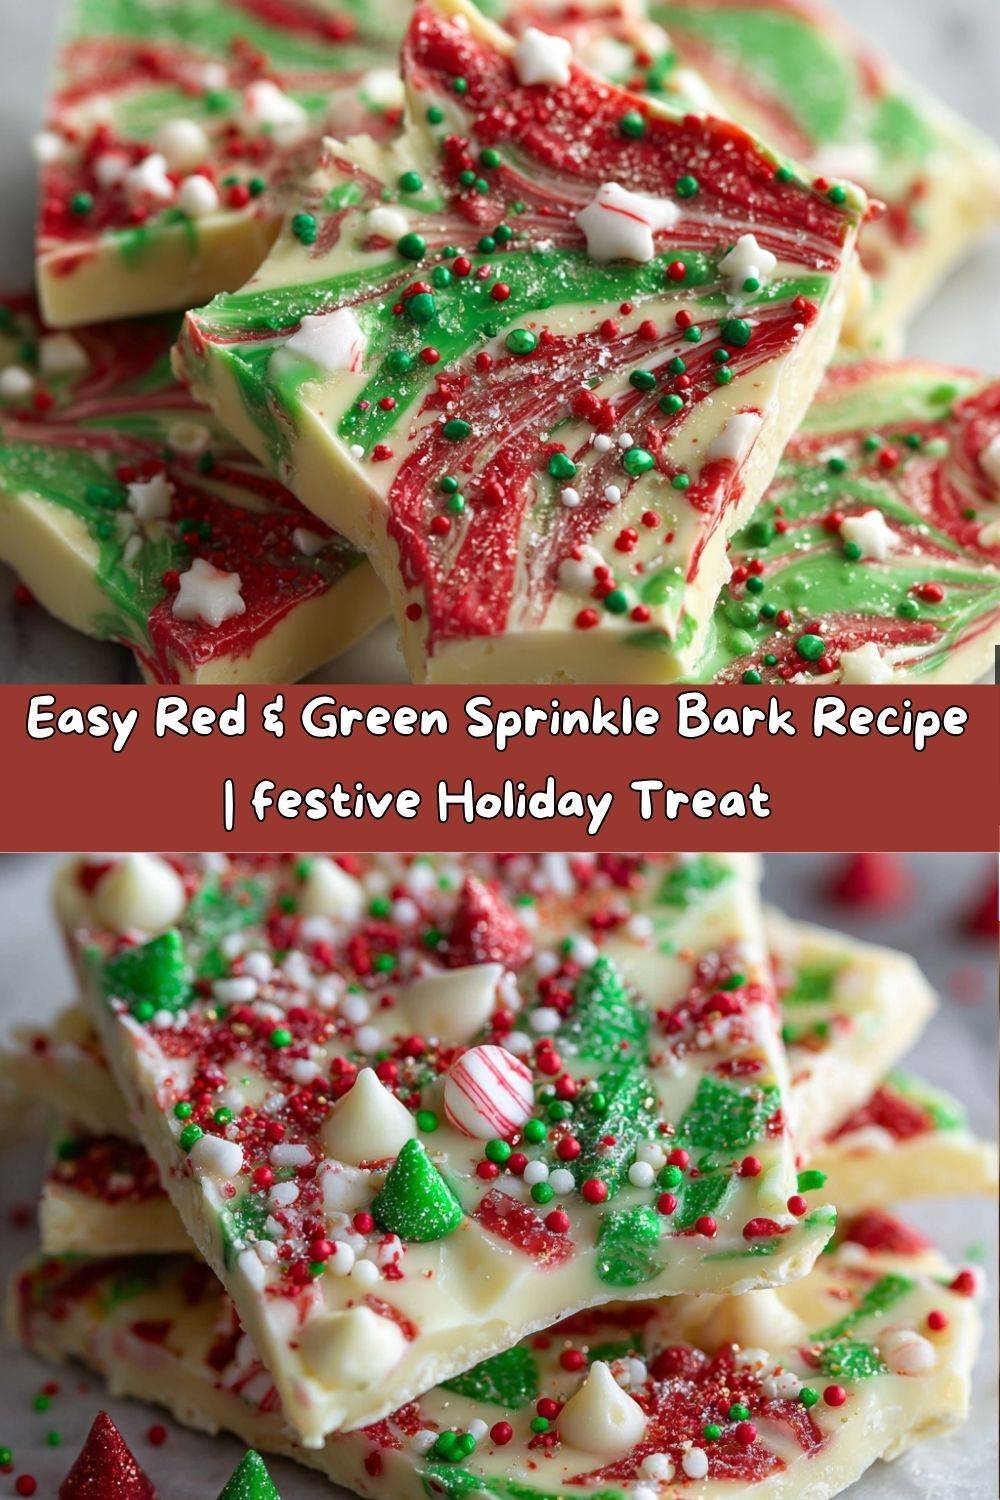
Let’s Make Some Holiday Magic: Red & Green Sprinkle Bark!
Hey there, my fellow foodie friend! Chef Emily here, waving at you from my wonderfully messy kitchen. Can you smell that? It’s the scent of melted chocolate and pure, unadulterated holiday joy. If you’ve ever found yourself scrolling through endless holiday recipes, feeling a little overwhelmed by the complexity of it all, I’ve got the absolute perfect solution for you. Today, we’re making my famous Red & Green Sprinkle Bark, and I promise you, it’s the easiest, most festive treat you’ll whip up all season.
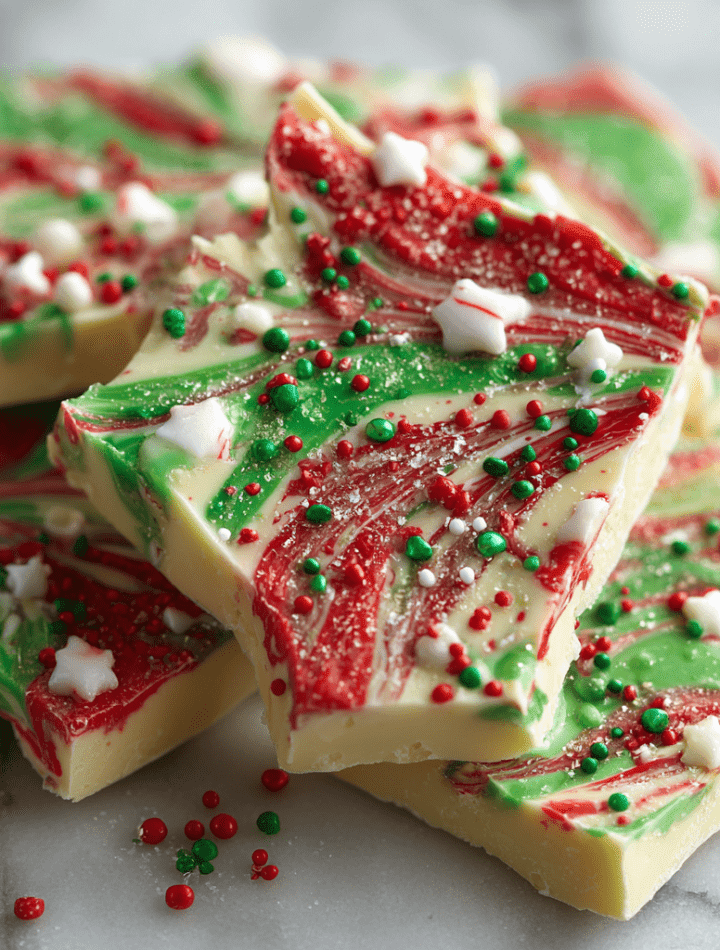
This isn’t just candy; it’s a holiday masterpiece in minutes. Imagine creamy, dreamy white chocolate swirled with vibrant red and green candy melts, all dressed up with a party of sparkly sprinkles. It’s the kind of treat that looks like you spent hours crafting, but our little secret is that it comes together faster than you can wrap a present. It’s perfect for gifting to neighbors, setting out for Santa, or just keeping on hand for when those sweet cravings hit during a holiday movie marathon. So, tie on your favorite apron (the one with the gingerbread man stain, we don’t judge here), and let’s create something deliciously fun together!
A Sprinkle of Nostalgia: My First Bark
This recipe takes me right back to my first tiny apartment after culinary school. My kitchen was about the size of a postage stamp, but my holiday spirit was massive. I wanted to make gifts for all my new friends and neighbors, but my budget was, well, let’s just say “creative.” I remember staring at a bag of chocolate chips and some leftover sprinkles from a baking project and having a lightbulb moment. What if I just melted it all together?
That first batch was far from perfect—I definitely seized some chocolate in the microwave—but when I broke it into shards and piled it into little cellophane bags tied with ribbon, the joy it brought was incredible. My friend Sarah called me and said, “This is the most professional-looking candy I’ve ever eaten!” That’s the magic of this bark. It’s not about perfection; it’s about the love and cheer you stir into every piece. It’s a recipe built on happy accidents and a whole lot of sprinkles, and that’s my favorite kind of recipe.
Gathering Your festive Arsenal
Here’s your shopping list for pure holiday happiness. The beauty of bark is its flexibility, so I’ve included my favorite chef-y insights and swaps to make it your own!
- 12 oz white chocolate chips or melting wafers: This is our glorious base! I highly recommend using high-quality melting wafers (like Ghirardelli or Candiquik) if you can find them. They contain stabilizers that make them melt smoother and set up with a beautiful snap, reducing the risk of seizing. If you use chips, add a teaspoon of coconut oil to help them melt smoothly.
- ½ cup red candy melts: These colorful melts are key for that vibrant swirl. They’re technically not chocolate, which means they melt like a dream and hold their brilliant color. Can’t find red? Use pink and call it festive!
- ½ cup green candy melts: Same goes for the green! Together, they create the ultimate holiday color palette.
- Holiday sprinkles (nonpareils, stars, sugar crystals, etc.): This is where the personality comes in! Go for a mix of shapes and sizes for maximum texture and fun. The tiny nonpareils add classic charm, while star-shaped sprinkles feel extra magical.
- Optional: crushed peppermint or edible glitter for extra flair: Want to take it over the top? A sprinkle of crushed candy canes adds a refreshing crunch and that classic Christmas flavor. Edible glitter makes it truly sparkle like freshly fallen snow.
Let’s Get Swirling: Your Step-by-Step Guide
Ready to create? Follow these steps, and you’ll be a bark-making pro in no time. I’ve tucked my best kitchen hacks into each step to ensure your success!
- Line a baking sheet with parchment paper. Do not skip this step! Parchment paper is your best friend here. It prevents sticking and makes cleanup a breeze. Pro Tip: Give the lined sheet a very light spritz of cooking spray. It helps the parchment lay perfectly flat and guarantees zero stickage.
- Melt white chocolate until smooth. This is the most crucial step. If using a microwave, do it in 30-second intervals on 50% power, stirring vigorously in between. Stop when there are just a few small lumps left and stir until they melt completely from the residual heat. This prevents overheating and seizing (which is when chocolate gets grainy and clumpy). If it does seize, a tiny splash of neutral oil (like vegetable or canola) can sometimes save it!
- Separately melt red and green candy melts in small bowls. These guys melt even easier. Microwave them in 15-second intervals, stirring each time. They will have a thicker consistency than the white chocolate, and that’s perfectly normal!
- Pour the white chocolate onto the parchment and spread evenly. Use an offset spatula or the back of a spoon to spread it into a rectangle about ¼-inch thick. You don’t want it too thin, or it will be fragile, or too thick, or it becomes a chocolate slab (which, honestly, still tastes amazing).
- Drop spoonfuls of red and green melts on top. Get artistic! Dot the surface randomly with little dollops of the colored candy. Don’t overthink it—random placement creates the best swirl patterns.
- Use a toothpick or skewer to swirl the colors into the white base. This is the fun part! Drag the toothpick through the dollops and the white base in zig-zags, figure-eights, or loose swirls. Don’t over-mix, or the colors will muddle into brown. A few gentle passes are all you need for a gorgeous marbled effect.
- Immediately sprinkle with holiday decorations. The key word is immediately! The sprinkles need wet chocolate to stick. Hold your hand up high and shower them down for even coverage. Gently press any larger sprinkles down slightly to ensure they adhere.
- Let set at room temperature or chill for 15–20 minutes until hardened. I’m impatient, so I pop mine in the fridge. The cool air helps it set quickly and gives it a satisfying snap when you break it.
- Break into pieces and serve or package. Use your hands to break it into organic, rustic pieces. For cleaner breaks, you can carefully score it lightly with a knife before it fully sets, but I love the random, jagged shapes!
How to Serve Your Festive Creation
You’ve made a masterpiece—now let’s show it off! This bark is incredibly versatile. Pile it high on a beautiful platter as the centerpiece of your holiday dessert table. It adds an instant pop of color and joy next to cookies and fudge. For gifting, my favorite thing to do is break it into large shards and stack them in clear cellophane treat bags. Tie them shut with a gorgeous ribbon or a twist of baker’s twine, and you have a gift that looks incredibly thoughtful and professional. It’s also the perfect sweet treat to include in cookie boxes or to leave out for your holiday guests with a pot of coffee. However you choose to serve it, it’s guaranteed to bring smiles.
Mix It Up! Fun Flavor Twists
The basic formula is your canvas—feel free to paint with all the flavors! Here are a few of my favorite ways to riff on this classic.
- Peppermint Crunch: Swap the red candy melts for melted dark chocolate. After swirling, top with a generous handful of crushed candy canes or peppermint candies instead of (or in addition to) sprinkles.
- Cookies & Cream: Use chocolate candy melts for your base instead of white. Swirl in the white chocolate, and then press broken pieces of Oreo cookies into the top before it sets.
- S’mores Bark: Use milk chocolate as your base. Swirl in the white chocolate, then immediately top with mini marshmallows, crushed graham cracker pieces, and a few chocolate chips.
- Nutty Buddy: Stir ½ cup of chopped toasted pecans or almonds into the melted white chocolate base before spreading it. Then proceed with the colored swirls and sprinkles for a crunchy, nutty version.
- “Fruity Pebbles” Bark: For a fun, non-traditional look, use pastel candy melts (pink, yellow, blue) and top with colorful cereal like Fruity Pebbles or crushed freeze-dried strawberries and raspberries.
Chef Emily’s Kitchen Confidential
This recipe has evolved so much from my first seized-chocolate attempt! One year, in a fit of holiday madness, I decided to make a batch for my nephew’s school party. I was so focused on getting the perfect swirl that I didn’t notice my cat, Whisk, had jumped on the counter. He was mesmerized by the jingle bell on a sprinkle shaker and, in one graceful (and disastrous) move, battted the entire container directly into the center of the wet bark. I gasped, then laughed. I carefully picked out the top layer of sprinkles (the ones that hadn’t sunk in!) and re-sprinkled. No one ever knew, and it was a hit. The moral of the story? Don’t stress the small stuff. Kitchen mishaps happen, and they almost always still taste delicious. This recipe is forgiving and fun—just like cooking should be.
Your Bark Questions, Answered!
Q: My chocolate got thick and clumpy when I melted it. What happened?
A: Ah, you’ve encountered the dreaded seize! This happens when even a tiny drop of water or steam gets into the melting chocolate, or if it’s overheated. To fix it, try stirring in a teaspoon of neutral vegetable oil or shortening until it smooths out. If it’s truly beyond repair, sadly, it’s best to start over. Remember: low and slow is the way to go when melting!
Q: Can I use chocolate chips instead of candy melts for the colors?
A: You can, but it’s trickier. colored chocolate chips will have a different viscosity and may not swirl as distinctly. If you do, be sure to add a tiny bit of oil to them as you melt to help them stay fluid. Candy melts are really the best tool for this job for vibrant, easy-swirling color.
Q: How far in advance can I make this? How do I store it?
A: This bark is a great make-ahead treat! Store it in an airtight container at cool room temperature for up to 2 weeks. You can layer it between sheets of parchment paper to prevent sticking. Avoid the fridge for long-term storage, as condensation can make the chocolate sticky and cause the sprinkles to bleed color.
Q: My bark is sticky after setting. Why?
A: This is usually caused by humidity. If you live in a humid climate, setting it in the fridge is your best bet. Sticky bark can also be a sign of not being fully set—give it a little more time. If all else fails, just enjoy it with a fork! It’ll still taste incredible.
A Note on Nutrition (Because Balance!)
Okay, let’s be real: this is a holiday treat, through and through. It’s meant to be enjoyed in celebration! While it’s not a health food, it’s nice to know what you’re enjoying. This nutritional information is an estimate per serving (based on breaking the bark into 12 pieces). Each piece contains approximately: 140 Calories, 8g Fat (5g of which is Saturated Fat), 16g Carbohydrates, 14g Sugar, and 1g Protein. It’s a sweet, indulgent bite that’s perfect for satisfying your sugar cravings during the festive season. Remember, friends, it’s all about balance. Enjoy a piece or two of bark with a cup of tea, and savor every delicious moment!
You Did It!
Look at you, you brilliant baker, you! You’ve just created a stunning, professional-looking holiday treat that’s bursting with color and cheer. I am so incredibly proud of you for taking the time to create something joyful and delicious. This Red & Green Sprinkle Bark is more than just candy; it’s a conversation starter, a heartfelt gift, and a testament to how simple ingredients can create pure magic.
I hope you have as much fun making this as I do. Remember, the best recipes are the ones made with a generous sprinkle of love and a dash of laughter. Now, go share your beautiful creation with someone you love. And from my kitchen to yours, happy holidays and happy baking!
With love and sprinkles,
Emily