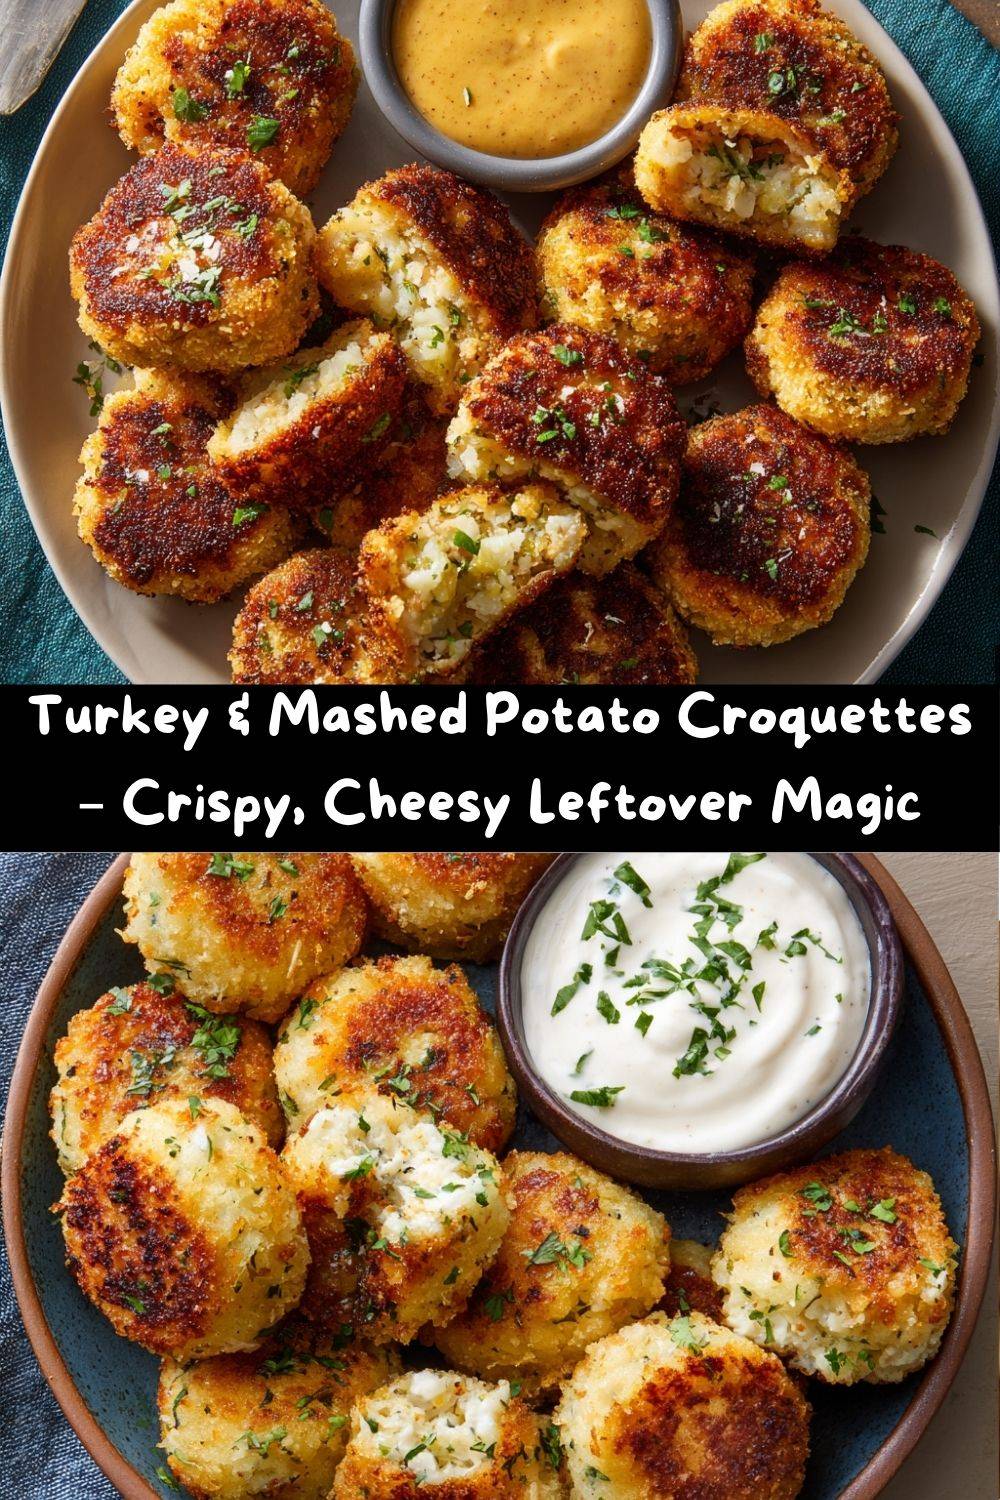
Leftover Magic: Meet Your New Favorite Snack, Turkey & Mashed Potato Croquettes!
Hey there, friend! Chef Emily here, waving at you from my wonderfully messy kitchen. Can we talk about leftovers for a second? I mean, really talk about them. We’ve all been there, right? You open the fridge after a big holiday feast or a hearty Sunday supper, and you’re greeted by a landscape of plastic-wrapped bowls. There’s the half-empty dish of mashed potatoes, a container with a few scoops of seasoned ground turkey, maybe some stray gravy. They’re delicious, but the thought of just reheating the same plate? It can feel a little… meh.
But what if I told you that hidden within those containers is the potential for something even more incredible? Something crispy, golden, and utterly addictive. I’m talking about a snack so good, your family might just start hoping you make extra mashed potatoes on purpose. Welcome to the glorious world of Turkey & Mashed Potato Croquettes!
Imagine this: a creamy, savory center packed with herby turkey and melty cheese, all encased in a perfectly crunchy, golden-brown shell. They’re like little flavor bombs you can pop in your mouth, perfect for a quick appetizer, a fun lunch, or a snack that’ll have everyone hovering around the kitchen island. The best part? They come together in less than 30 minutes and are a fantastic way to reduce food waste. So, grab those leftovers, put on your favorite apron (the messy one is always the best), and let’s transform your fridge finds into something truly magical. Trust me, this is one recipe you’ll want to chow down on again and again!
The Happy Accident That Started It All
This recipe has a special place in my heart because it was born from a classic “Emily-in-the-kitchen” moment. It was the day after Thanksgiving a few years back. My tiny apartment kitchen looked like a food bomb had gone off, and my fridge was overflowing. I had a grand total of about half a cup of mashed potatoes left, a small container of turkey from the breast I’d shredded, and a serious craving for something crunchy and satisfying. The thought of another turkey sandwich just wasn’t doing it for me.
I started playing. I mixed the potatoes and turkey together, threw in some cheese because, well, cheese, and an egg to bind it. I formed them into little patties, dredged them in some breadcrumbs I found in the pantry, and pan-fried them until they were gorgeously bronzed. The first bite was a revelation! It was like all the best parts of Thanksgiving, but reimagined into a fun, handheld, crispy package. My husband walked in, grabbed one, and his eyes lit up. “Whoa. What are these? These are incredible!” And just like that, a new tradition was born. Now, I intentionally make extra mashed potatoes and turkey, just so I can have an excuse to make these croquettes. It’s a little reminder that sometimes the most delicious creations come from a bit of kitchen chaos and a willingness to experiment!
Gathering Your Croquette Crew: The Ingredients
This is the fun part! Let’s take a look at what you’ll need. The beauty of this recipe is its flexibility, so I’ve included some of my favorite swaps and chef insights for each ingredient.
- 2 cups leftover mashed potatoes: This is your base! Creamy, buttery mashed potatoes work best. If your leftovers are a bit on the stiff side, that’s actually perfect—it helps the croquettes hold their shape. Chef’s Insight: If you’re using mashed potatoes that are heavy on garlic or herbs, that’s a bonus flavor boost!
- 1 cup cooked ground turkey: Plain, seasoned, or leftover from a roast—it all works! The key is that it’s finely crumbled or chopped. Substitution Tip: No turkey? Cooked ground chicken, beef, or even lentils for a vegetarian version are fantastic swaps.
- ½ cup shredded cheddar or mozzarella: Hello, cheesy goodness! Cheddar gives a sharper flavor, while mozzarella offers that wonderful stretchy pull. Chef’s Insight: For an extra kick, try pepper jack or a Italian cheese blend.
- 1 egg: This is our binding agent, the glue that holds our croquette dream team together. Don’t skip it!
- 2 tablespoons chopped parsley or chives: A pop of fresh color and flavor! Parsley is classic, but chives add a lovely, mild oniony note. Substitution Tip: No fresh herbs? A teaspoon of dried parsley or Italian seasoning works in a pinch.
- ½ teaspoon garlic powder: We’re adding a layer of savory, aromatic flavor that just works. Chef’s Insight: Onion powder is a great friend here, too. Add a ¼ teaspoon if you have it!
- Salt & pepper to taste: This is crucial! Remember, your leftovers might already be seasoned, so taste the mixture before adding more salt. Season in layers for the best flavor.
- ¾ cup breadcrumbs (plus more for coating): We mix some into the filling to help absorb moisture and add texture, and then we roll the croquettes in more for that essential crispy shell. Substitution Tip: Panko breadcrumbs will give you an extra-crunchy, lighter coating. Gluten-free breadcrumbs work perfectly too.
- Olive oil spray or cooking oil (for frying): For achieving that golden-brown perfection. I love using avocado oil for its high smoke point, but any neutral oil like canola or vegetable oil works great.
Let’s Get Cooking: Building Your Flavor Bombs
Okay, team! Hands-on time. This process is simple, fun, and a little messy—just the way I like it. Follow these steps for croquette success.
- Mix It Up! In a large bowl, combine the mashed potatoes, turkey, cheese, egg, herbs, garlic powder, salt, pepper, and that ¾ cup of breadcrumbs. Now, get in there with your hands! I know, I know, but trust me—using your hands is the best way to ensure everything is evenly distributed without overmixing. You want a uniform, slightly sticky mixture. Chef’s Hack: If the mixture feels too wet to hold a shape, add another tablespoon or two of breadcrumbs. If it’s too dry, a tiny splash of milk or another beaten egg will help.
- Shape Your Croquettes. Time to play with your food! Scoop up about two tablespoons of the mixture and roll it into a ball in your hands. You can leave them as balls for a more “pop-able” appetizer, or gently press them into small patties, which are great for sandwiches or easier flipping. Aim for about the size of a golf ball. Chef’s Hack: For perfectly uniform croquettes, use a small cookie scoop. And if the mixture is sticking to your hands, lightly wet them with a bit of water or oil.
- Create the Crispy Coat. Pour about a cup of additional breadcrumbs onto a plate. Gently roll each ball or patty in the breadcrumbs, ensuring they’re fully coated. This layer is what will transform into that magical, crunchy shell. Place the coated croquettes on a clean plate or baking sheet. Chef’s Hack: For an extra-secure coating, you can do a double dredge: after the first breadcrumb coat, dip them quickly in a beaten egg, then back into the breadcrumbs. This is optional but guarantees maximum crunch!
- Cook to Golden Perfection. You have two fantastic options here!
- Pan-Fry (My Classic Choice): Heat about ¼ inch of oil in a large skillet over medium heat. To test if the oil is ready, flick a tiny breadcrumb in—if it sizzles, you’re good to go! Carefully add the croquettes in a single layer (don’t crowd the pan!) and fry for 2-3 minutes per side, until deeply golden brown and gorgeous. Work in batches if needed.
- Air-Fry (The Lighter Option): My other favorite method! Preheat your air fryer to 375°F (190°C). Arrange the croquettes in the basket in a single layer—they need space for the air to circulate. Spray them generously with olive oil spray. This is key for browning! Cook for 10-12 minutes, flipping them halfway through.
- Drain and Serve. However you cook them, transfer the finished croquettes to a plate lined with a paper towel to absorb any excess oil. Then, serve them immediately while they’re hot and crispy! They are best enjoyed right away.
How to Serve These Golden Gems
Presentation is part of the fun! These croquettes are incredibly versatile. Here are a few ways I love to serve them up:
The Appetizer Platter: Pile them high on a wooden board or a pretty platter with small bowls of different dipping sauces in the center. It’s a surefire way to get the party started. Add some carrot sticks and celery for a colorful touch.
The Cozy Meal: Serve 3-4 croquettes per person alongside a simple, bright arugula salad with a lemon vinaigrette. The crisp, peppery salad is the perfect contrast to the rich, creamy croquettes. It makes for a wonderfully satisfying light lunch or dinner.
The Ultimate Snack Plate: For game day or a movie night, create a snack spread! Place the croquettes next to other finger foods like wings, veggie sticks, and a big bowl of your favorite dip. They’ll be the first to disappear!
Get Creative! Flavor Twists & Swaps
Once you’ve mastered the basic recipe, the world is your croquette! Here are some of my favorite variations to keep things exciting:
- Thanksgiving Leftover Style: Stir in ¼ cup of finely chopped leftover cranberry sauce and use stuffing crumbs instead of breadcrumbs for coating. The sweet and savory combo is unbelievable.
- Buffalo Chicken (or Turkey!) Swap: Use shredded cooked chicken or turkey and mix in 3 tablespoons of buffalo sauce and ¼ cup of crumbled blue cheese. Serve with ranch dressing for dipping. A total crowd-pleaser!
- Southwest Fiesta: Add ¼ cup of canned black beans (rinsed and drained), 2 tablespoons of chopped green chiles, and a teaspoon of cumin to the mixture. Use pepper jack cheese and serve with a spicy ranch or avocado crema.
- Vegetarian Delight: Omit the turkey and add ½ cup of finely chopped sautéed mushrooms and ½ cup of cooked, chopped spinach (squeezed very dry). The umami from the mushrooms is incredible.
- Pizza Party: Mix in 2 tablespoons of pizza sauce, use mozzarella cheese, and add some mini pepperoni slices if you like. Coat with breadcrumbs mixed with Italian seasoning. Serve with warm marinara for dipping!
Chef Emily’s Notebook: A Few Parting Thoughts
This recipe has evolved so much since that first post-Thanksgiving experiment. I’ve learned that the key to a non-stick shaping experience is cold hands! If the mixture is getting too soft, I’ll sometimes pop the whole bowl in the fridge for 15 minutes to firm up. It makes a world of difference. I also love making a double batch and freezing some before cooking. Just place the shaped, breaded croquettes on a parchment-lined baking sheet, freeze until solid, then transfer to a freezer bag. You can cook them straight from frozen—just add a few extra minutes to the cooking time. It’s like having a secret stash of deliciousness for a rainy day. Most importantly, have fun with it! Cooking should be joyful, not stressful. So put on some music, don’t worry about a little mess, and enjoy the process of creating something truly tasty.
Your Croquette Questions, Answered!
I’ve gotten a lot of questions about this recipe over the years, so here are answers to the most common ones!
- Q: My croquettes are falling apart in the pan! What did I do wrong?
A: This usually means the mixture is too wet. The fix is easy! Next time, add a few more tablespoons of breadcrumbs to the mixture to help absorb the moisture. Also, make sure your oil is hot enough before adding them. If it’s not, they’ll soak up oil and break apart instead of searing and forming a crust.
- Q: Can I bake these instead of frying or air-frying?
A: Absolutely! Preheat your oven to 400°F (200°C). Place the breaded croquettes on a parchment-lined baking sheet, spray generously with oil, and bake for 15-20 minutes, flipping halfway through, until golden and heated through. They won’t be quite as crispy as fried, but still delicious!
- Q: How long do leftovers last, and how do I reheat them?
A: Store any leftover cooked croquettes in an airtight container in the fridge for up to 3 days. To reheat, the air fryer is your best friend! A few minutes at 375°F will bring back the crunch. The oven (at 350°F for about 10 minutes) works well too. Avoid the microwave, as it will make them soft.
- Q: Can I use instant mashed potatoes?
A: You can, but make sure they are prepared to be quite thick and cool completely before using. Real leftover mashed potatoes have a better texture and flavor, but in a pinch, instant will work!
A Quick Note on Nutrition
While I’m all about the joy of eating first and foremost, I know many of you like to keep an eye on these things! Here’s a general breakdown. Remember, these are estimates and can vary based on your specific ingredients (like the fat content of your turkey, the cheese you use, etc.).
Nutrition & Prep Details (Per 2 Croquettes, approx.)
Calories: 220 | Protein: 15g | Carbs: 16g | Fat: 10g
Prep Time: 15 minutes
Cook Time: 10–12 minutes
Total Time: 25–30 minutes
Yields: 12–16 croquettes
These croquettes are a great source of protein, thanks to the turkey and egg. Using an air fryer instead of pan-frying can significantly reduce the fat content if you’re looking for a lighter option. Pairing them with a big green salad is a fantastic way to create a balanced, satisfying meal that doesn’t feel heavy.
Final Thoughts from My Kitchen to Yours
Well, there you have it! My not-so-secret recipe for turning humble leftovers into a superstar snack. I hope this recipe brings as much joy and crunch to your kitchen as it has to mine. It’s a testament to the fact that the best meals aren’t always the most complicated ones—they’re the ones made with a little creativity and a whole lot of love.
The next time your fridge is packed with mashed potatoes and turkey, don’t reheat the same plate—transform it. Fry, bake, or air-fry them, pair with your favorite dip, and watch them disappear faster than you can say, “pass me another.” Leftover magic, unlocked.