Chicken Pot Pie Skillet: Your New Favorite Weeknight Hug
Hey there, friend! Let’s talk about comfort food. I’m not talking about the fussy, takes-all-day kind of comfort. I’m talking about the kind that comes together in one pan, fills your kitchen with that unmistakable “everything is going to be okay” aroma, and lands on the table in under an hour. The kind that feels like a warm hug after a long day. If you’re nodding along, then you and I are on the exact same page, and this Chicken Pot Pie Skillet is about to become your new best friend.
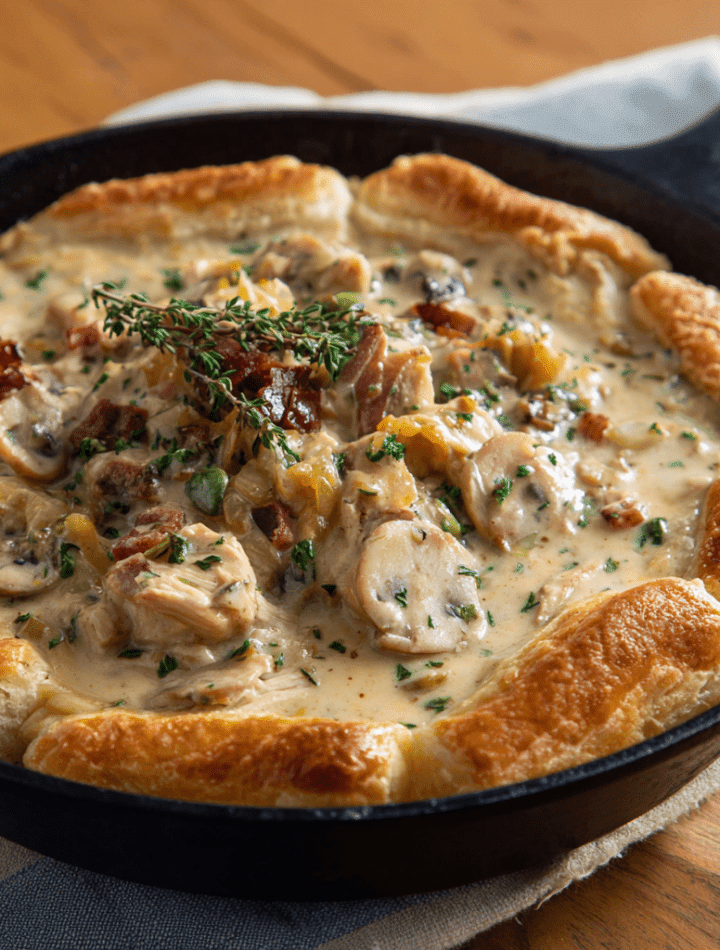
We all love a classic chicken pot pie, right? That flaky crust, the creamy, savory filling… it’s the stuff of dreams. But let’s be real: rolling out pastry on a busy Tuesday night? That’s a weekend project. This skillet version captures every single bit of that cozy magic but ditches the fuss entirely. We’re talking a rich, creamy chicken and veggie filling bubbling away in a trusty cast-iron skillet, all topped with golden, fluffy biscuit bites that bake up to perfection right on top.
It’s a one-pan wonder, my friend. It’s easy to make, even easier to clean up, and it’s absolutely perfect for portioning into meal prep containers so your future self can thank you all week long. This isn’t just dinner; it’s a plan for a happier, cozier week. So, grab your favorite skillet, and let’s make something delicious that’s big on flavor and low on stress.

A Tale of Two Pies: My Grandma’s Lesson in Comfort
This recipe always takes me right back to my grandma’s kitchen. She was the queen of pot pies, but she had two very different versions. There was the “Sunday Special”—a from-scratch masterpiece with a lard-based crust that could make an angel weep. It was an event. But then there was her “Wednesday Whim”—a throw-together skillet version that looked a lot like this one.
I remember watching her one evening. She had leftover roast chicken and a nearly empty bag of frozen vegetables. Instead of seeing scraps, she saw possibility. She whipped up a quick gravy right in her favorite black skillet, tossed everything in, and crowned it with the last few biscuits from a can she had in the fridge. In what felt like minutes, we were eating what might be one of the most satisfying meals of my childhood.
She winked at me and said, “Emily, good food doesn’t have to be complicated. It just has to be made with a little love.” That Wednesday Whim taught me more about cooking than any fancy technique. It taught me that comfort is adaptable, resourceful, and always, always served with joy. This skillet pot pie is my homage to that lesson.
Gathering Your Cozy Ingredients
This is where the magic starts! The beauty of this recipe is its simplicity. You probably have most of these ingredients hanging out in your kitchen right now. Let’s break them down.
For the Dreamy Filling:
- 1 lb cooked chicken breast, shredded or diced: This is your chance to be a kitchen hero! Use leftovers from a rotisserie chicken, or simply poach a couple of breasts. The shortcut here is your best friend. For extra flavor, try using shredded chicken thigh meat!
- 1 1/2 cups frozen mixed vegetables (peas, carrots, corn): The ultimate time-saver. No chopping required! I love this classic blend, but feel free to use a peas-and-carrots mix or even a California blend with broccoli and cauliflower.
- 1/2 cup diced onion & 2 cloves garlic, minced: The flavor foundation. They add a sweet, aromatic depth that makes the filling taste homemade and incredible.
- 2 tbsp butter & 2 tbsp flour: This dynamic duo is your roux—the secret to a luxuriously thick and creamy sauce. It’s the backbone of the gravy!
- 1 1/2 cups low-sodium chicken broth & 1/2 cup milk (or cream!): Using low-sodium broth lets you control the salt level. The milk makes a lovely creamy sauce, but if you’re feeling decadent, swap it for half-and-half or heavy cream for an extra-rich filling.
- Salt, pepper, and thyme to taste: Don’t be shy! Season as you go. I adore thyme with chicken, but a poultry seasoning blend or even a pinch of sage would be wonderful.
For the Golden, Fluffy Topping:
- 1 can refrigerated biscuit dough (or 6 homemade biscuits, quartered): The ultimate “chef’s kiss” shortcut. The biscuits puff up and turn golden brown, creating the perfect pot pie experience without any dough-rolling drama. If you’re a baking superstar, by all means, use your favorite drop biscuit recipe!
- Optional: egg wash or melted butter for brushing: This little extra step gives the biscuits a gorgeous, professional-looking golden sheen and a delightful crispness. Highly recommended!
Let’s Build Your Skillet Masterpiece: Step-by-Step
Okay, apron on! Let’s get cooking. This process is so straightforward and satisfying. Follow these steps, and you’ll have a perfect pot pie skillet in no time.
Step 1: Preheat and Prep. First things first, get that oven heating to a cozy 375°F (190°C). This is the perfect temperature to cook the filling through and get those biscuits beautifully golden without burning. While it’s warming, make sure your chicken is shredded and your onion is diced. A little prep now makes everything flow smoothly.
Step 2: Sauté the Aromatics. Grab your large, oven-safe skillet (cast iron is perfect for this!) and place it over medium heat. Melt the butter until it’s just starting to foam. Then, add your diced onion and minced garlic. Ahhh, smell that? That’s the sound of your kitchen becoming the best place in the house. Sauté for about 3-4 minutes, until the onion is soft and translucent. Chef’s Tip: Don’t let the garlic brown! It can turn bitter. We’re just waking up its flavors.
Step 3: Create the Roux. Sprinkle the 2 tablespoons of flour right over the onions and garlic. Now, stir, stir, stir! You’re making a roux. Cook this mixture for about a minute to get rid of the raw flour taste. It will look like a thick paste—that’s exactly what you want.
Step 4: Whisk in the Liquids. Here’s where the magic happens. Gradually pour in the chicken broth and milk while whisking constantly. I mean it—constant whisking is the key to a lump-free gravy! Once it’s all incorporated, let the mixture come up to a gentle simmer. You’ll see it start to thicken beautifully right before your eyes. This should take about 3-5 minutes.
Step 5: Bring it All Together. Now, stir in your star players: the cooked chicken and the frozen vegetables. The frozen veggies will cool the sauce down a bit, which is fine. Add your salt, pepper, and thyme. Let it all simmer together for another 2-3 minutes so the flavors can mingle and get happy. Give it a taste! Does it need more pepper? A pinch more salt? This is your moment to make it perfect for you.
Step 6: Top with Biscuit Love. Turn off the heat. Open that can of biscuits (that satisfying *pop* never gets old!) and quarter each biscuit. Scatter the pieces evenly over the top of the creamy filling. For that extra wow factor, brush the tops lightly with an egg wash (one egg beaten with a tbsp of water) or melted butter. This is the step that gives you that bakery-quality shine.
Step 7: Bake to Golden Perfection. Carefully transfer your loaded skillet to the preheated oven. Bake for 15-18 minutes. You’re looking for the biscuit topping to be puffed up and a deep, golden brown, and you should see the filling bubbling around the edges. Your house is going to smell absolutely incredible.
Step 8: The Hardest Part—Wait! I know, I know. You want to dive right in. But trust me on this: let the skillet cool for about 5-10 minutes before serving. This allows the filling to set slightly so it’s gloriously creamy, not soupy, when you scoop it out.
How to Serve Up This Comfort Classic
Presentation is part of the fun! I love serving this right from the skillet in the middle of the table—it’s so rustic and inviting. Use a big spoon to scoop down to the bottom, making sure you get a generous portion of the filling and one of those golden biscuit tops in every serving.
This dish is a complete meal in itself, but if you want to round it out, a simple, crisp green salad with a bright vinaigrette is the perfect contrast to the rich, creamy skillet. It’s also fantastic with a side of roasted Brussels sprouts or some simple steamed green beans.
And don’t forget the meal prep angle! This recipe is a champion for make-ahead lunches. Once the skillet has cooled completely, portion it into airtight containers. It will keep in the fridge for up to 4 days, ready to be reheated for a comforting lunch that feels like a treat.
Make It Your Own: Delicious Recipe Twists
One of the best things about this recipe is how adaptable it is. Feel free to get creative and make it suit your taste buds or what you have on hand!
- The Creamy Dream: Swap the milk for full-fat coconut milk and use a splash of soy sauce instead of salt for a subtly exotic, dairy-free version. It’s incredibly delicious!
- Everything But the Kitchen Sink: Add a cup of diced potatoes (parboil them first!) to the filling for a heartier pie. You could also throw in some chopped celery with the onions, or stir in a handful of fresh spinach right before adding the biscuit topping.
- Biscuit Bonanza: Instead of canned biscuits, try topping the skillet with dollops of store-bought puff pastry, or even a box of cornbread muffin mix prepared according to package directions. A cheesy drop biscuit topping would be phenomenal too!
- Spice It Up: Add a pinch of red pepper flakes to the filling with the other seasonings, or a dash of hot sauce to the gravy for a little kick.
- Turkey Time: This is the perfect way to use up leftover Thanksgiving turkey! Just swap the chicken for diced cooked turkey.
Chef Emily’s Kitchen Notes
This recipe has evolved so much in my kitchen over the years. I’ve made it for new parents, for grieving friends, and for potlucks where I need a guaranteed crowd-pleaser. It’s my go-to “I care about you” dish. One time, I was so distracted telling a story to my husband that I completely forgot the flour! I ended up with a delicious, soupy chicken and biscuit stew. It was a happy accident that proved even the “mistakes” are tasty. The moral of the story? Don’t stress. Cooking is an adventure. As long as you have good ingredients and a little love, it’s going to turn out wonderfully.
Your Questions, Answered!
Q: My sauce is a little thin. What did I do wrong?
A: This usually happens if the roux wasn’t cooked long enough or if the sauce didn’t have a chance to simmer and reduce sufficiently before adding the biscuits. No worries! You can mix a tablespoon of cornstarch with two tablespoons of cold water to create a slurry, stir it into the filling, and let it simmer for a minute or two until it thickens up before you add the biscuit topping.
Q: Can I make this ahead of time?
A: Absolutely! You can prepare the filling completely, let it cool, and store it in the fridge for up to two days. When you’re ready to bake, gently reheat the filling on the stovetop until it’s warm, then top with the biscuits and bake as directed. You might need to add a few extra minutes to the baking time since you’re starting with a cold filling.
Q: I don’t have an oven-safe skillet. What can I do?
A> No problem at all! Simply prepare the filling in any large pot or pan on the stovetop. Then, transfer the filling to a 9×13-inch baking dish or a deep pie dish, top with the biscuits, and bake as usual.
Q: Can I freeze this chicken pot pie skillet?
A> I recommend freezing just the filling for best results. The biscuit topping can become soggy when thawed and reheated. Freeze the cooled filling in an airtight container for up to 3 months. Thaw in the fridge overnight, reheat on the stovetop, transfer to a baking dish, add fresh biscuits, and bake.
Nutritional Information (Per Serving – Serves 6)
While this is comfort food at its finest, it’s also a balanced meal packed with protein and veggies! Here’s a breakdown per serving. Remember, these are estimates and can vary based on the specific ingredients you use (like using low-fat milk or a lighter biscuit option).
- Calories: 400
- Protein: 28g (Fantastic for keeping you full and satisfied!)
- Carbohydrates: 28g
- Fat: 20g
- Fiber: 3g
- Sugar: 4g
- Sodium: 520mg (Using low-sodium broth helps keep this in check!)
This dish is a great source of protein from the chicken and provides energy from the carbohydrates in the biscuits and vegetables. It’s a wholesome, satisfying meal that proves comfort food can be both nourishing and delicious.
Final Thoughts from My Kitchen to Yours
Well, friend, there you have it. My ultimate, no-fuss, weeknight-saving Chicken Pot Pie Skillet. It’s more than just a recipe; it’s a reminder that the best meals don’t have to be complicated. They just have to be made with a little intention and a whole lot of love.
I hope this recipe brings as much joy to your table as it has to mine. I hope it makes your busy nights a little easier and your meal prep a whole lot tastier. Most of all, I hope it gives you the confidence to get in the kitchen and make something wonderful for yourself and the people you love.
If you make it, I’d be absolutely thrilled to hear how it turned out! Tag me on social @TastyChow so I can see your beautiful creations. Now, go forth and get your cozy on!
With a full heart and a hungry belly,
Emily
**Prep Time:** 15 minutes | **Cook Time:** 20 minutes | **Total Time:** 35 minutes | **Servings:** 6