Your New Favorite Holiday Tradition: Easy Peanut Butter Christmas Truffles
Hey there, my festive friend! Can you smell that? It’s the scent of pine needles, cinnamon sticks, and… pure, unadulterated joy coming from the kitchen. The holiday season is officially here, and my apron is already dusted with powdered sugar. If you’re anything like me, your brain is buzzing with lists—gift lists, grocery lists, and the all-important *cookie platter* list. You want something that looks stunning, tastes incredible, but doesn’t require a culinary degree and three days of prep.
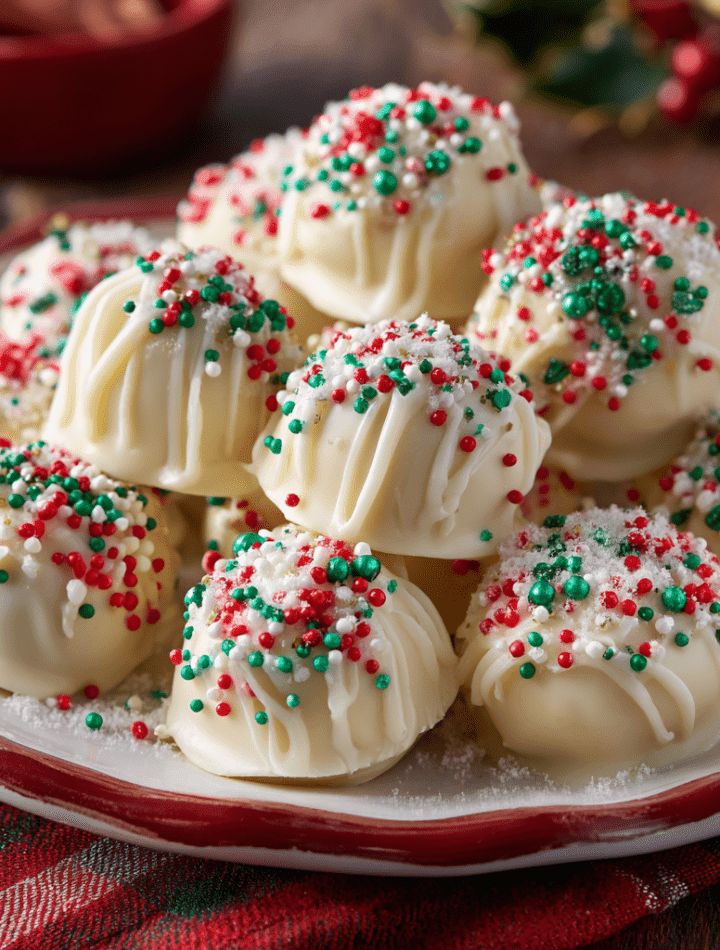
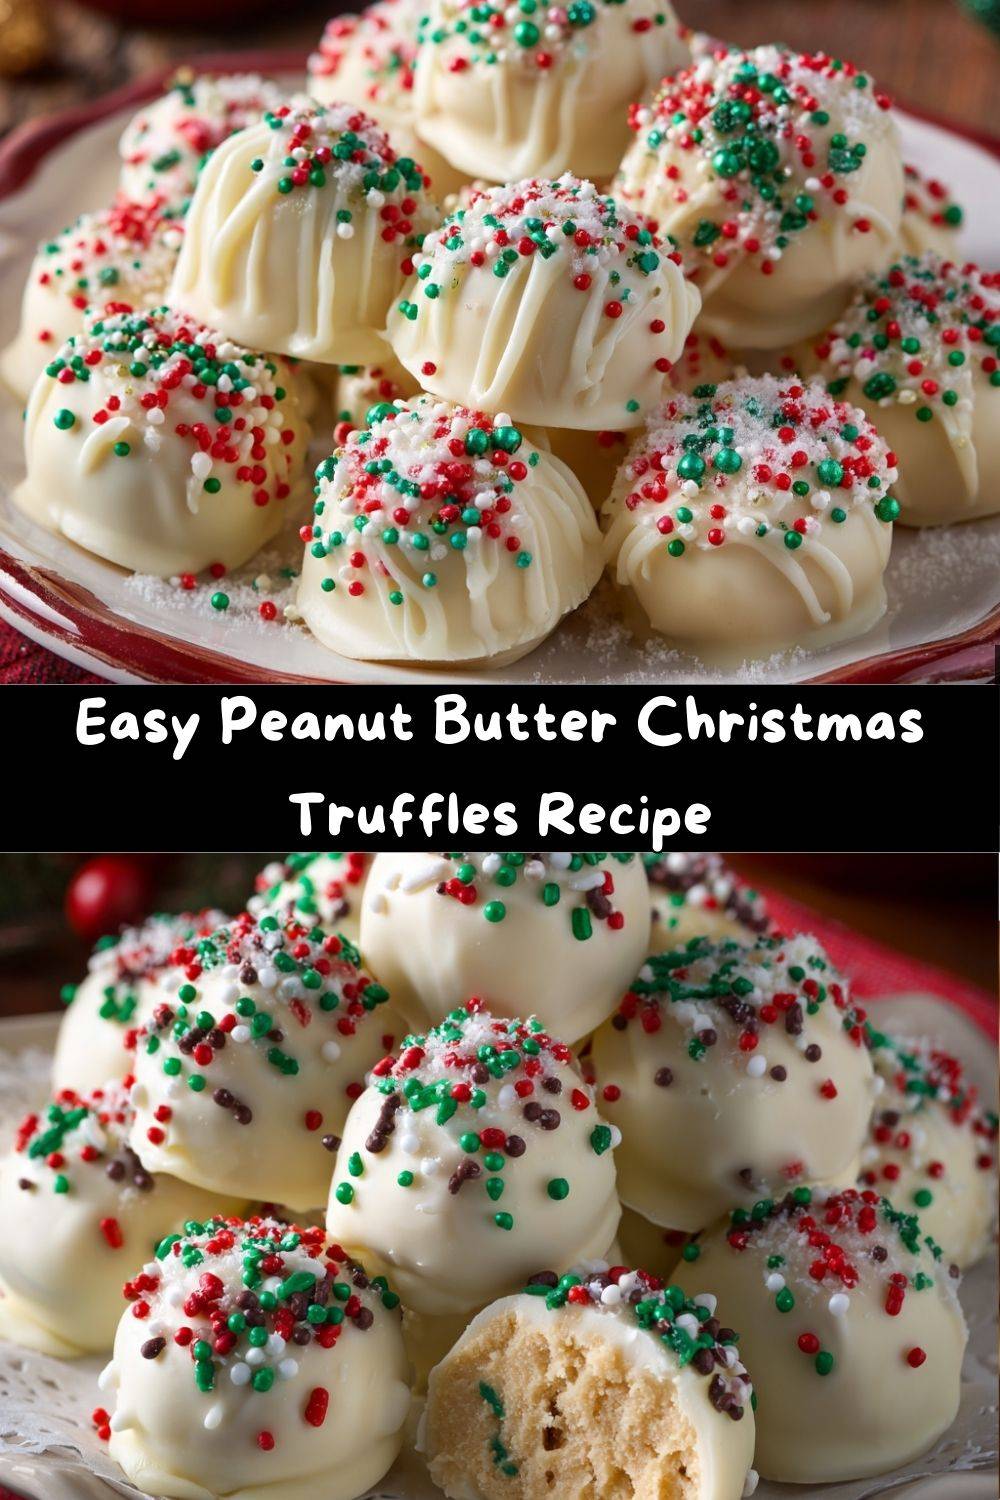
Well, pull up a stool, because I have the absolute perfect recipe for you. These Christmas Truffles are my little secret to holiday hosting success. Imagine this: a creamy, dreamy peanut butter center that’s just the right amount of sweet, hugged by a crisp, silky coat of white chocolate, and finished with a cheerful dash of holiday sprinkles. They look like they were delivered by a tiny, hardworking elf straight from the North Pole, but I promise, they are so incredibly simple to make.
Whether you’re building a cookie box for the neighbors, need a last-minute homemade gift for the hostess, or just want to treat yourself after a long day of wrapping presents, these truffles are your answer. They’re no-bake, which is a Christmas miracle in itself when the oven is already working overtime. So, let’s put on some holiday tunes, pour yourself a mug of something warm, and let’s make some magic happen. These aren’t just truffles; they’re tiny, edible pieces of holiday cheer.
A Sweet Start: My First Christmas Truffle Triumph
This recipe takes me right back to my first Christmas in my own little apartment. The kitchen was about the size of a postage stamp, but I was determined to host my family. I wanted everything to be perfect—especially the desserts. I’d spent hours on complicated pies and fussy cookies, and I was running out of time, energy, and counter space. Panic was starting to set in!
Then I remembered my grandma’s simple peanut butter balls. They were the one thing she could whip up with her eyes closed, and they were always the first treat to disappear from her holiday platter. I didn’t have her exact recipe, but I channeled her calm, “no-big-deal” attitude. I threw together some peanut butter, powdered sugar, and butter, rolled them into wobbly little balls, and gave them a quick dip in the only chocolate I had—a bag of white melting wafers. I sprinkled on some red and green sugar for spirit, fully expecting a messy disaster.
But when they set, they were perfect. Not *fancy-magazine* perfect, but *heartfelt-holiday* perfect. My family raved about them more than anything else I’d made! That’s when it clicked: the best holiday recipes aren’t about being complicated. They’re about being delicious, made with love, and shared with joy. That little kitchen triumph is the soul of this recipe, and I’m so excited to share it with you.
Gathering Your Truffle-Making Toolkit: The Ingredients
One of the best parts of this recipe is the short and sweet ingredient list. You probably have most of this in your pantry already! Here’s what you’ll need and a little “chef’s insight” on each one.
- 1 ½ cups powdered sugar: This is what gives our truffle center its smooth, melt-in-your-mouth texture without any graininess. Chef’s Tip: If your powdered sugar is lumpy, give it a quick sift for the silkiest truffle filling.
- ½ cup peanut butter: The star of the show! I recommend using a standard creamy, shelf-stable peanut butter (like Jif or Skippy) for the best consistency. The added oils help bind everything together perfectly. Natural peanut butter can sometimes be too oily or too thick, which can throw off the texture.
- 3 tbsp butter, softened: This adds richness and helps create a pliable “dough.” Substitution Tip: For a dairy-free version, a plant-based butter works wonderfully here. Just make sure it’s softened!
- 16 oz white melting chocolate (aka almond bark or candy melts): This is the key to a smooth, easy dip! I highly recommend using melting wafers instead of pure white chocolate chips. They are specifically formulated to melt smoothly and set with a firm, non-tacky finish. Chef’s Insight: If you must use chips, add a teaspoon of coconut oil to help thin them out for dipping.
- Christmas sprinkles: The festive finish! Use any holiday-themed sprinkles, jimmies, or nonpareils you love. This is where you can really let your personality shine.
Let’s Get Rolling: Your Step-by-Step Guide to Truffle Perfection
Ready to get your hands a little messy? This is the fun part! Follow these steps, and you’ll be a truffle-making pro in no time.
- Mix the Filling: In a medium-sized bowl, combine the powdered sugar, peanut butter, and softened butter. I like to start with a spatula, but don’t be afraid to dive in with clean hands once it starts to come together! You want to mix until it’s completely smooth and forms a soft, slightly crumbly dough that holds together when you squeeze it. Little Chef Hack: If the mixture seems too dry and won’t hold its shape, add another tablespoon of peanut butter. If it’s too sticky, add a bit more powdered sugar. Every brand of peanut butter is a little different, so trust your instincts!
- Roll the Balls: Line a baking sheet with parchment paper. Pinch off small amounts of the dough and roll them into 1-inch balls. The key here is consistency! Using a small cookie scoop (about 1 tablespoon size) makes this step lightning fast and ensures all your truffles are the same size, which means they’ll chill and dip evenly. Place each ball on the prepared tray. Don’t worry if they aren’t perfectly round—we call that “homemade charm!”
- The Essential Chill: This is the most important step for a successful dip! Pop the entire tray into the refrigerator for at least 30 minutes. This firms up the butter and peanut butter, making the balls much less likely to fall apart when you coat them in warm chocolate. Pro-Tip: If I’m in a real hurry, I’ll put them in the freezer for 15 minutes. Just don’t let them freeze solid!
- Melt the Chocolate: While the balls are chilling, melt your white chocolate. You can do this in a microwave-safe bowl in 30-second bursts, stirring well between each interval, or use a double boiler on the stove. The goal is to melt it gently until it’s completely smooth. Chef’s Warning: Be careful not to overheat the chocolate, or it can become thick and clumpy (this is called seizing). If this happens, it’s very hard to fix, so low and slow is the way to go!
- The Big Dip: Remove the tray of chilled peanut butter balls from the fridge. Using a fork or a specialty dipping tool, gently lower one ball into the melted chocolate. Swirl it around to coat it completely, then lift it out, tapping the fork gently on the edge of the bowl to let the excess chocolate drip off. Game-Changing Tip: Slide the bottom of the fork along the edge of the bowl as you lift the truffle out—this creates a smooth bottom!
- Add the Sprinkles & Set: Carefully place the chocolate-coated ball back onto the parchment-lined tray. Immediately, while the chocolate is still wet, shower it with your beautiful Christmas sprinkles. If you wait even a minute, the chocolate will start to set and the sprinkles won’t stick. Repeat with all the balls. Let the truffles set at room temperature in a cool spot, or pop the tray back in the fridge for about 15 minutes to speed things up.
Sharing the Joy: How to Serve Your Christmas Truffles
Now for the best part: enjoying your creations! Presentation is half the fun with these little gems. For a simple cookie platter, pile them high on a festive plate or in a rustic wooden bowl. They look gorgeous mixed in with other Christmas cookies.
If you’re giving them as gifts, you have so many adorable options. Tuck a few into a clear cellophane bag tied with a ribbon for a sweet treat for teachers, mail carriers, or neighbors. You can also place them in mini cupcake liners inside a small gift box—it looks incredibly professional and thoughtful. I love making a big batch and dividing them into small boxes; it’s my go-to homemade gift that always, always brings a smile.
Mix It Up! Fun Flavor Twists on the Classic
Once you’ve mastered the basic recipe, the kitchen playground opens up! Here are a few of my favorite ways to mix things up.
- Chocolate Peanut Butter Cup: Swap the white coating for semi-sweet or dark melting chocolate. It’s like a gourmet, upside-down peanut butter cup!
- Nutty Delight: Stir ¼ cup of finely chopped toasted peanuts, pecans, or almonds into the peanut butter filling for a delightful crunch.
- Cookie Dough Vibes: Add a tablespoon of brown sugar and ¼ teaspoon of vanilla extract to the filling mixture. Roll the completed truffles in crushed graham cracker crumbs instead of sprinkles for an edible cookie dough experience.
- Festive Flair: Add a holiday flavor to the filling itself by mixing in ½ teaspoon of cinnamon or a tiny pinch of nutmeg.
- Other Nut Butters: Feel free to experiment! Creamy almond butter or cashew butter work beautifully in place of peanut butter.
Chef Emily’s Corner: Notes from My Kitchen
This recipe has been my trusty holiday sidekick for years, and it’s evolved with me. One year, I decided to be “fancy” and use high-quality, tempered pure white chocolate. Let’s just say it was a stressful, sticky situation that ended with me vowing to always use the trusty melting wafers for peace of mind! They are truly the unsung hero of easy candy-making.
I also learned the hard way that skipping the chill time is a recipe for peanut butter soup in your chocolate. My husband still teases me about the “Great Truffle Collapse of 2018.” So learn from my mistakes—patience is a virtue, especially in the candy kitchen! The beauty of this recipe is its flexibility and forgiving nature. Don’t stress, have fun, and remember that even the lopsided ones taste just as delicious.
Your Questions, Answered: FAQs & Troubleshooting
Q: My peanut butter mixture is too dry and crumbly. What did I do wrong?
A: This is common! Different peanut butters have different moisture levels. Simply add more peanut butter, one tablespoon at a time, until the mixture holds together nicely when squeezed.
Q: Can I make these truffles ahead of time?
A: Absolutely! They are perfect for making ahead. Store them in an airtight container in the refrigerator for up to 2 weeks, or you can freeze them for up to 3 months. Just thaw in the fridge before serving.
Q: My chocolate coating is too thick and clumpy. How can I thin it out?
A: This usually means the chocolate got too hot. For melting wafers, you can try stirring in a tiny amount of solid vegetable shortening or paramount crystals (about ½ tsp at a time) to thin it. For chocolate chips, a teaspoon of coconut oil works wonders.
Q: Are there any nut-free alternatives?
A> Yes! You can try using SunButter (sunflower seed butter) for a nut-free version. The flavor will be different but still delicious. Just be aware that SunButter can sometimes cause the filling to turn a slightly green color over time due to a natural reaction—it’s perfectly safe to eat!
A Quick Note on Nutrition
While these are definitely a special holiday treat, I believe it’s always helpful to know what you’re enjoying. This nutritional information is an estimate per truffle (based on a batch of 24).
Per Truffle: Calories: 130, Fat: 8g, Saturated Fat: 4g, Carbohydrates: 14g, Sugars: 12g, Protein: 2g, Sodium: 45mg.
Remember, the holidays are about balance and joy. Savor one or two of these truffles with a cup of coffee or tea, and enjoy every single bite without guilt. It’s all part of the season’s celebration!
Final Thoughts from My Kitchen to Yours
And there you have it! Your guide to creating the most delightful, easy, and impressive Christmas Truffles. This recipe is more than just a list of ingredients; it’s an invitation to slow down, get a little messy, and create something beautiful and delicious to share.
I hope these truffles bring as much happiness to your kitchen as they have to mine over the years. They’re a reminder that the best part of the holidays isn’t the perfect decoration or the most expensive gift—it’s the connection, the laughter, and the love we share, often over something sweet made with our own two hands.
So, from my cozy, sprinkle-covered kitchen to yours, I wish you the merriest of holidays. Now, go on and make something delicious!
With love and a full heart,
Emily