Gingerbread Truffles: Your New Favorite No-Bake Holiday Bite!
Hey there, friend! Chef Emily here, coming to you from a kitchen that currently smells like a cozy holiday sweater made of sugar and spice. Is there anything better than the warm, inviting aroma of gingerbread wafting through the house? It’s the scent of laughter, of twinkling lights, and of sneaking bites of cookie dough when you think no one’s looking. But what if I told you we could capture all that magic in a no-bake, incredibly easy, and downright show-stopping treat that comes together in minutes?
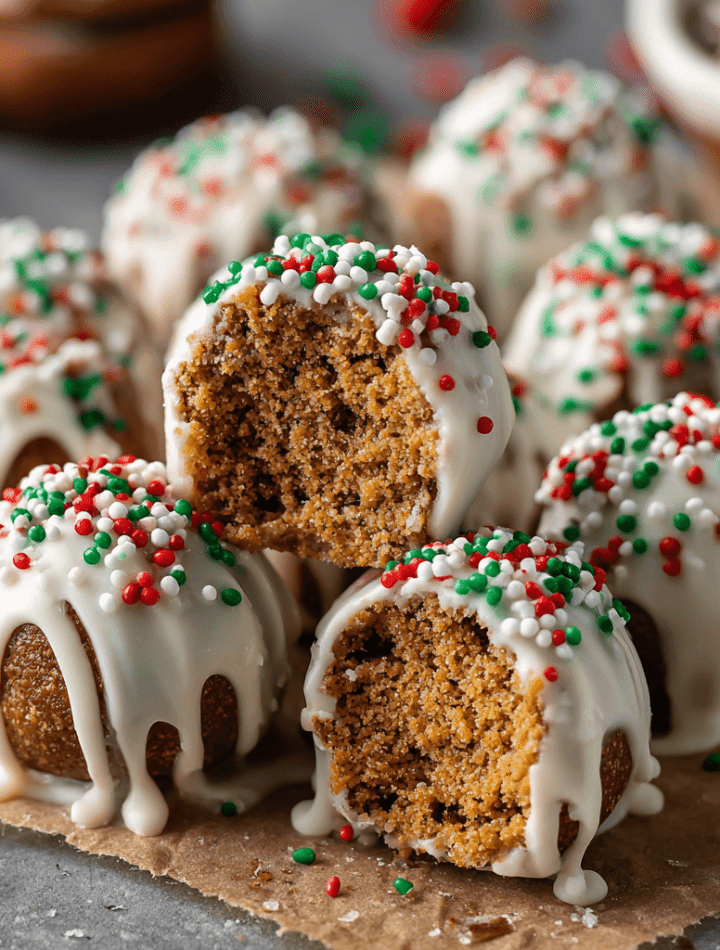
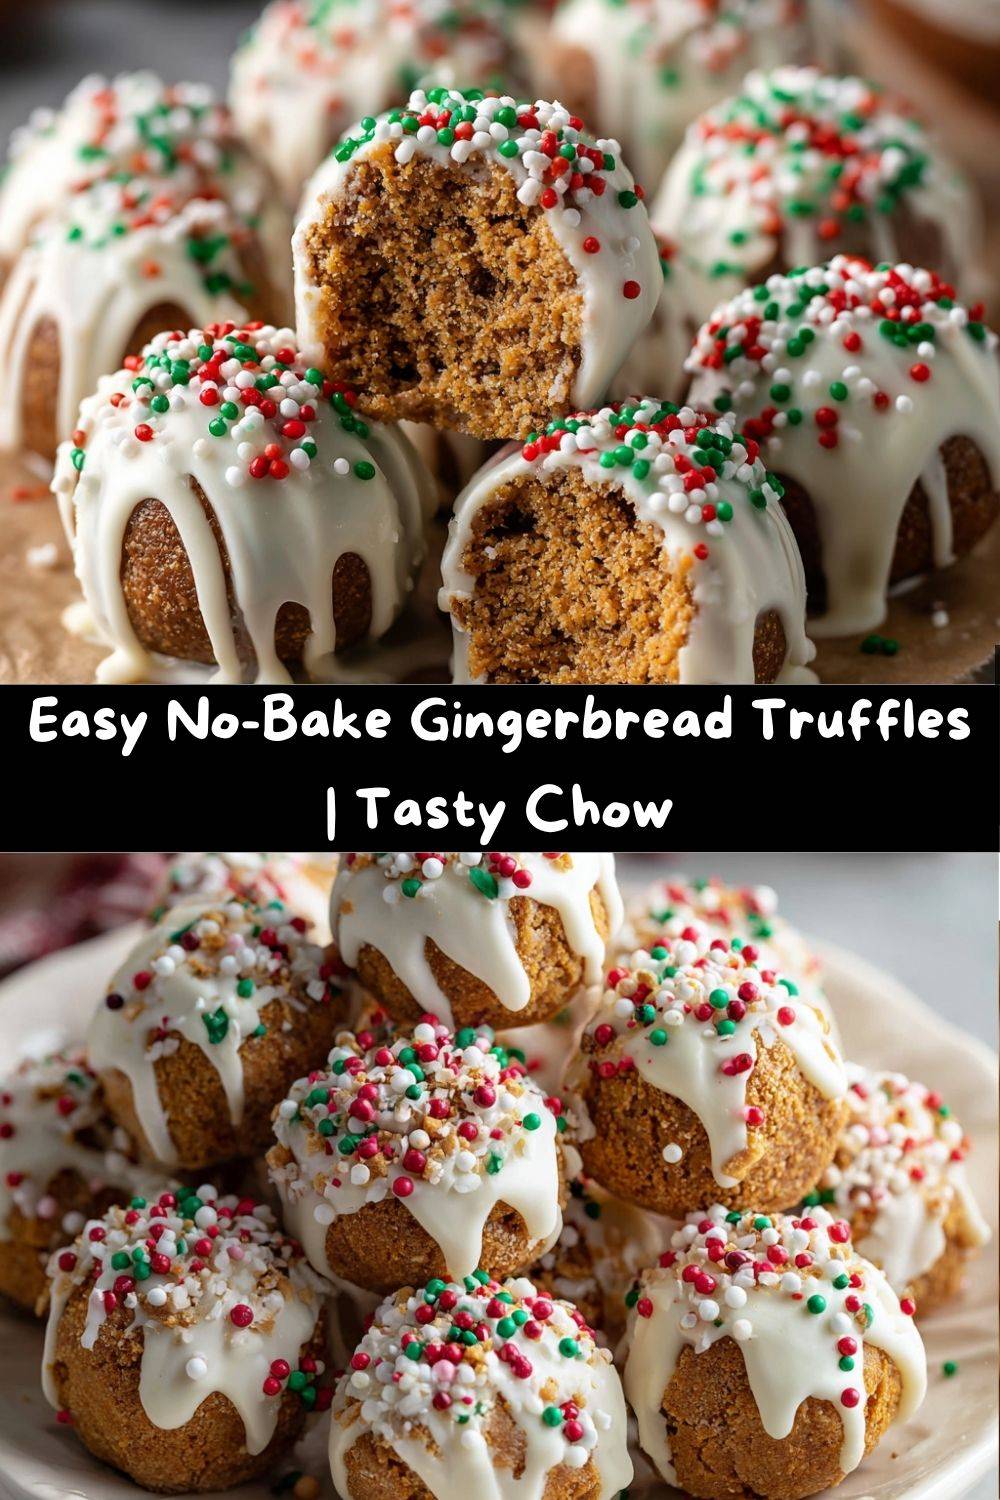
Let me introduce you to my Gingerbread Truffles. Imagine this: a soft, spiced center made from crushed gingersnap cookies and creamy cheesecake-like goodness, all enveloped in a smooth blanket of sweet white chocolate. They look like something from a fancy bakery case, but I promise you, they are so simple to make. These little bites are the heroes of busy holiday seasons. They’re perfect for cookie exchanges, gorgeous on a dessert platter, and absolutely essential for those moments when you need a quick, festive treat to bring to a party (or, you know, to enjoy solo with a mug of hot cocoa while binge-watching your favorite holiday movies).
We’re going to have so much fun making these together. I’ll share all my best tips and tricks, from getting that perfect round shape to achieving a flawlessly smooth chocolate coating. So, tie on your favorite apron (the one with the gingerbread man stain is totally acceptable), and let’s create some delicious, no-fuss holiday magic!
The Happy Accident That Started It All
This recipe holds a special place in my heart because it was born from a classic kitchen “oops” moment. A few years back, I was on a serious gingerbread house-making mission. I’d baked what felt like a thousand gingerbread bricks, determined to create a edible masterpiece. But, as fate would have it, I got a little overzealous with the royal icing and my architectural skills were… well, let’s just say the Leaning Tower of Pisa had nothing on my gingerbread cottage. It was a delicious, spicy disaster.
I was left with a giant container of broken gingerbread pieces. My grandma’s voice popped into my head: “Waste not, want not, Emily!” So, I started brainstorming. I blitzed those gingerbread scraps into fine crumbs, and inspiration struck. I remembered my classic Oreo truffles and thought, “Why not a gingerbread version?” I mixed the crumbs with some cream cheese, rolled them into balls, and dipped them in the only chocolate I had on hand—white almond bark. The result was nothing short of revolutionary in my kitchen. They were even better than the gingerbread house! They were creamy, intensely spiced, and the sweet white chocolate was the perfect contrast. It was a reminder that sometimes the most beloved recipes come from happy little accidents and a refusal to let good food go to waste.
Gathering Your Gingerbread Truffle Ingredients
One of the best things about this recipe is its simplicity. You only need a handful of ingredients to create something truly spectacular. Here’s what you’ll need, along with a few of my chef-y insights to help you understand the “why” behind each one.
- 12 oz Gingersnap Cookies: This is the star of the show! The cookies provide all that wonderful ginger, molasses, and spice flavor. I like to use a sturdy, spicy gingersnap for the best flavor. Chef’s Tip: If you can’t find gingersnaps, you can use any crisp gingerbread cookie. Graham crackers with a teaspoon of ground ginger and a half-teaspoon of cinnamon mixed in can work in a pinch, but the flavor won’t be as deep.
- 8 oz Cream Cheese, softened: This is our magic binder. It creates a luscious, smooth, and slightly tangy center that balances the sweetness of the cookie and coating. Please, please make sure it’s fully softened to room temperature! This is the secret to a lump-free, easy-to-roll truffle mixture. Cold cream cheese will make your life difficult.
- ½ tsp Vanilla Extract: A little splash of vanilla might seem simple, but it works wonders to round out all the flavors and add a warm, sweet aroma. I always recommend using pure vanilla extract for the best quality.
- 12 oz White Almond Bark (or White Chocolate Candy Melts): This is our coating. I specifically recommend almond bark or candy melts for this because they are formulated to melt smoothly and set up with a firm, non-tacky finish. They are much more forgiving than pure white chocolate, which can be temperamental and seize easily. Chef’s Insight: You can use pure white chocolate if you’re a pro at tempering, but for ease and guaranteed success, candy coating is my go-to.
- Holiday Sprinkles: The fun part! Sprinkles add a pop of color and a delightful crunch. Use whatever festive mix you love—jimmies, nonpareils, or even some crushed candy canes for a peppermint twist!
Step-by-Step: Let’s Make These Truffles!
Ready to get your hands a little messy? This is the fun part. Follow these steps, and you’ll be a truffle-making pro in no time.
- Crush Those Cookies! Place your gingersnap cookies in a food processor. Pulse until they turn into fine, even crumbs. You want them to look like sand. Little Chef Hack: No food processor? No problem! Place the cookies in a large zip-top bag, seal it tightly (get all the air out!), and use a rolling pin to crush them. It’s a great way to get out any pre-holiday stress!
- Create the Truffle “Dough.” Add the softened cream cheese and vanilla extract to the food processor with the cookie crumbs. Pulse until the mixture is completely combined and starts to clump together. It should look like a dark, fragrant dough. Chef’s Tip: You can also do this in a bowl with a hand mixer or even a sturdy spatula. Just make sure everything is evenly incorporated.
- Roll, Roll, Roll Your Balls. Using a small cookie scoop (about 1 tablespoon in size) or a measuring spoon, portion out the dough. Then, roll each portion between your palms to form a smooth, 1-inch ball. Place each ball on a baking sheet lined with parchment paper. Pro-Tip: If the mixture is too sticky to handle, pop it in the fridge for 15-20 minutes. This will firm up the cream cheese and make rolling much easier.
- The All-Important Chill. Once all your truffle balls are rolled, slide the entire baking sheet into the refrigerator for at least 30 minutes. Do not skip this step! Chilling firms up the balls, which is crucial for a smooth dipping process. A firm ball won’t fall apart in the warm chocolate.
- Melt Your Coating. While the truffles are chilling, melt your white almond bark according to the package directions. I prefer the double boiler method (a heatproof bowl set over a pot of simmering water, making sure the bottom of the bowl doesn’t touch the water) for the most controlled melt. If using the microwave, do it in short 30-second bursts, stirring well between each interval, to avoid scorching.
- The Dip! Now for the magic. Remove a few truffles from the fridge at a time (keeping the rest cold). Using a fork or a dipping tool, submerge a truffle ball completely into the melted coating. Gently lift it out, tap the fork against the edge of the bowl to allow the excess chocolate to drip off.
- Decorate and Set. Carefully slide the dipped truffle off the fork and back onto the parchment-lined baking sheet. Immediately, while the coating is still wet, shower it with your festive sprinkles. Repeat with the remaining truffles. Let them set at room temperature until the coating is firm, or pop them back in the fridge to speed up the process.
How to Serve Your Gingerbread Masterpieces
Presentation is part of the fun! These truffles are gorgeous all on their own, but a little styling goes a long way.
For a casual gathering, pile them high in a rustic wooden bowl or a festive holiday platter. They look absolutely stunning arranged on a tiered dessert stand alongside other Christmas cookies. For a more personalized touch, place each truffle in a mini paper candy cup—this not only looks adorable but also keeps them from sticking together.
These are the perfect treat to package up as gifts. Tuck a few into a clear cellophane bag, tie it with a pretty ribbon, and you have a heartfelt, homemade present for neighbors, teachers, or friends. They pair beautifully with a bag of gourmet coffee or a box of tea. And of course, they’re the ultimate companion to a steaming mug of hot apple cider, spiced chai, or a rich hot chocolate. Enjoy!
Get Creative! Fun Flavor Twists
Once you’ve mastered the classic, why not play around? Here are a few of my favorite variations to keep things exciting.
- Dark Chocolate Dream: Swap the white almond bark for dark chocolate coating. The bitterness of the dark chocolate creates a sophisticated, deep contrast to the sweet and spicy gingerbread center.
- Peppermint Swirl: Add ¼ teaspoon of peppermint extract to the truffle mixture along with the vanilla. Dip in white chocolate and garnish with crushed candy canes for the ultimate Christmas flavor combo.
- Salty-Sweet Sensation: After dipping, but before the chocolate sets, sprinkle a tiny pinch of flaky sea salt (like Maldon) on top. The salt makes the sweetness pop and adds a wonderful texture.
- Orange Zest Delight: Add the zest of one small orange to the truffle mixture. The bright, citrusy notes pair incredibly well with the warm spices.
- Dairy-Free/Darker Gingerbread: Use a vegan cream cheese alternative and dairy-free white chocolate. Ensure your gingersnaps are vegan-friendly (many are!), and you’ve got a fantastic plant-based treat.
Chef Emily’s Notes from the Kitchen
This recipe has become a non-negotiable part of my holiday baking lineup, and it’s evolved a bit over the years. I once tried to get fancy and added a tablespoon of molasses to the mixture for a deeper flavor. It worked… but it also made the truffles so soft they were nearly impossible to dip! We ended up eating them with a spoon, which was still delicious, but not the elegant bite I was going for. Lesson learned: sometimes simple is best.
I also highly recommend making a double batch. They disappear faster than you can say “ho ho ho!” And the best part? They freeze beautifully. Just layer them between parchment paper in an airtight container and freeze for up to 3 months. Thaw in the fridge overnight whenever you need a quick dose of holiday cheer.
FAQs & Troubleshooting
Q: My truffle mixture is too soft/sticky to roll. What did I do wrong?
A: This usually happens for one of two reasons: 1) The cream cheese was too warm, or 2) The cookies weren’t crushed finely enough. The fix is easy! Just pop the mixture into the fridge for 20-30 minutes to firm up. If the crumbs were coarse, you can try mixing in a tablespoon of powdered sugar to help absorb some moisture.
Q: My white chocolate coating is thick and clumpy. How can I fix it?
A: Ah, the dreaded seized chocolate! This happens if even a tiny drop of water gets into the melting chocolate. To save it, try stirring in a teaspoon of vegetable oil or melted coconut oil. This can often thin it out enough to be dippable. If it’s too far gone, it’s best to start over. Remember, keep everything completely dry!
Q: Can I make these ahead of time?
A: Absolutely! In fact, I encourage it. They keep wonderfully in an airtight container in the refrigerator for up to 2 weeks. They are also freezer-friendly for up to 3 months.
Q: Why did my coating crack after it set?
A: Cracking usually occurs when the cold truffle centers cause the warm coating to set too quickly and contract. To prevent this, let your chilled truffles sit on the counter for 5-10 minutes to take the deep chill off before dipping. The temperature difference shouldn’t be so extreme.
A Quick Note on Nutrition
While these are definitely a treat, I believe it’s always helpful to have the information. The nutritional values are approximate and can vary based on the specific brands of ingredients you use. Remember, enjoying food is about balance and celebration! The joy and connection that come from sharing homemade treats are just as important as the ingredients themselves.
Per Truffle (approx. 24 per batch):
Calories: 120 | Fat: 6g | Saturated Fat: 3.5g | Carbohydrates: 15g | Sugars: 10g | Protein: 1g | Sodium: 75mg
Final Thoughts from My Kitchen to Yours
Well, my friend, we’ve done it! You are now fully equipped to whip up a batch of these incredible Gingerbread Truffles. I hope this recipe brings as much joy and ease to your kitchen as it has to mine. They’re more than just a dessert; they’re a reminder that the best holiday memories are often made with simple ingredients, a little bit of love, and the willingness to embrace a happy accident or two.
I’d love to hear how your truffle-making adventure goes! Did you try one of the variations? Did your family go crazy for them? Tag me on social @TastyChow with your creations so I can see your beautiful work. From my messy, flour-dusted kitchen to yours, happy holidays and happy baking!
With love and a full plate,
Emily
