Peanut Butter Kiss Cookies: The Ultimate Hug in Cookie Form
Hey there, my fellow food lover! Can you smell that? It’s the warm, nutty, and unmistakably sweet aroma of peanut butter cookies baking in the oven, mingling with the promise of melted chocolate. If there’s one scent that instantly transports me back to cozy kitchens and happy, sugar-dusted afternoons, it’s this one. Welcome to my recipe for the one, the only, the legendary Peanut Butter Kiss Cookies.
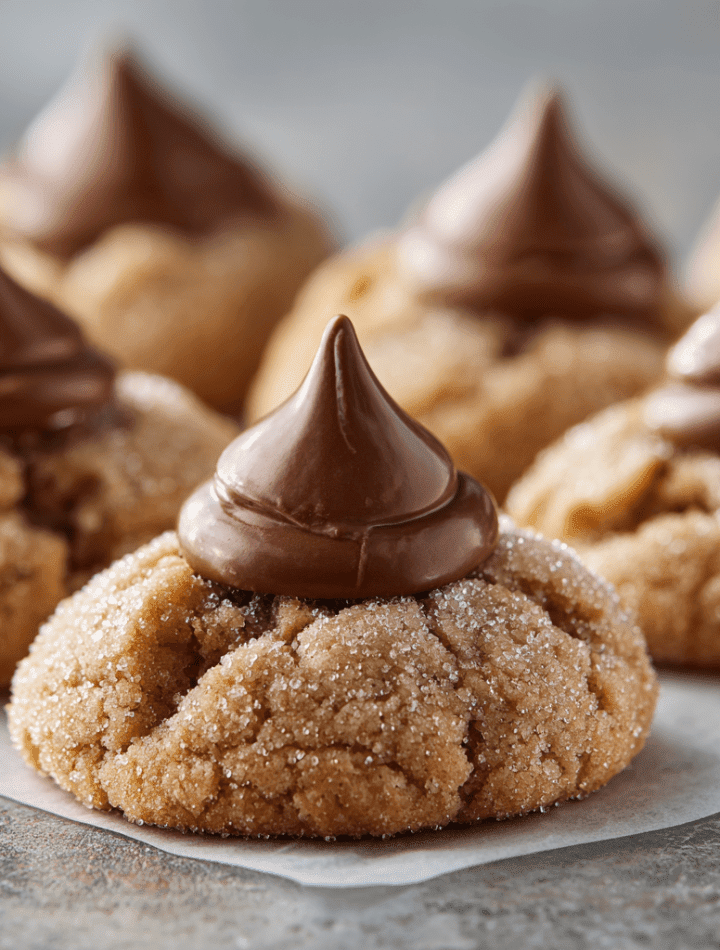
You know the ones I’m talking about. That soft, chewy, perfectly crinkled peanut butter cookie, still warm from the oven, with a Hershey’s Kiss pressed right into its heart. It’s a cookie that doesn’t just taste good; it feels good. It’s a cookie that says, “You’ve got this,” on a tough day and “Let’s celebrate!” on a good one. It’s the cookie you find at every potluck, school bake sale, and holiday cookie swap because it is, quite simply, a universal symbol of deliciousness.
Today, we’re not just making cookies; we’re creating little edible treasures. I’m going to walk you through my absolute favorite version of this classic. We’re aiming for that perfect balance—a cookie that’s soft and tender but still has a slight chew, with a rich peanut butter flavor that plays so nicely with the cool, creamy milk chocolate kiss. This recipe is foolproof, fun, and guaranteed to fill your kitchen with joy (and your cookie jar with irresistible treats). So, tie on your favorite apron, and let’s make some magic!

A Spoonful of Peanut Butter and a Whole Lot of Love
I think every great recipe has a story, and for me, this one starts with my Grandma Betty. Her kitchen was a place of wonder, always smelling of something wonderful, but it was during the Christmas season that it truly transformed into a cookie factory. Tins and tins of cookies lined her countertops, but the star of the show was always her Peanut Butter Blossoms.
My job, as her official little helper, was the most important one: unwrapping the Hershey’s Kisses. I’d sit at the kitchen table, a mountain of silver foil wrappers growing beside me, carefully making sure not a single chocolate was damaged. The rule was strict: no sneaking kisses until the cookies were done! The anticipation was part of the fun. When those warm cookies came out of the oven, Grandma would let me press the chocolate into the center. “Not too hard, Emily,” she’d say with a wink, “just a gentle push so it knows it’s home.” That first bite, when the chocolate was just barely starting to melt from the residual heat of the cookie, was pure bliss. It wasn’t just a cookie; it was a moment of connection, a tradition, a sweet memory in the making. Every time I bake these now, I think of her, and I hope this recipe becomes a part of your own family’s story.
Gathering Your Cookie Crew: The Ingredients
Part of what makes this recipe so wonderful is its simplicity. You probably have most of these ingredients in your pantry right now! Here’s what you’ll need, along with a few of my chef-y insights to help you understand the “why” behind each one.
- 1 ¾ cups all-purpose flour: This is the backbone of our cookie, giving it structure. For a slightly more tender cookie, you can fluff your flour with a spoon before lightly scooping it into the measuring cup and leveling it off. No packing it down!
- ¾ tsp baking soda: Our leavening agent! This is what gives the cookies their classic crinkly top and helps them spread just the right amount.
- ½ tsp salt: Do not skip this! Salt is a flavor enhancer. It makes the peanut butter taste richer and balances the sweetness of the chocolate perfectly.
- ¾ cup creamy peanut butter: Use a standard, shelf-stable brand like Jif or Skippy for the best texture and consistency. The oils in natural peanut butter can separate and lead to a greasy, spread-out cookie.
- ½ cup unsalted butter, softened: I prefer unsalted so I can control the salt level. “Softened” is key here! It should be cool to the touch but yield easily when you press it. This creams together beautifully with the sugars for a light and fluffy base.
- ⅓ cup granulated sugar (for the dough) + ½ cup granulated sugar (for rolling): We use a little sugar inside and then roll the dough balls generously. This creates that delightful sugary, crackly exterior that’s just so pretty.
- ½ cup light brown sugar, packed: Brown sugar brings moisture and a subtle molasses flavor that adds depth and makes the cookies extra chewy.
- 1 large egg: Our binder! It brings everything together and adds richness. Make sure it’s at room temperature for the smoothest dough.
- 2 tsp vanilla extract: A splash of vanilla is the secret weapon that makes all the flavors pop. Use the good stuff if you have it!
- 36 Hershey’s Kisses, unwrapped: The crowning glory! Unwrap them all before you start baking—trust me, you don’t want to be fumbling with foil when your hot cookies come out of the oven.
Let’s Get Baking: The Step-by-Step Fun
Okay, team! Let’s dive into the fun part. Follow these steps, and you’ll have perfect Peanut Butter Kiss Cookies in no time. I’ve sprinkled in all my best tips to ensure your success.
- Preheat and Prep: Preheat your oven to 350°F (175°C). Line your baking sheets with parchment paper. This is my number one tip for perfect cookies—it prevents sticking and makes cleanup an absolute dream. No parchment? A silicone baking mat works great, too.
- Whisk the Dry Team: In a medium bowl, whisk together the all-purpose flour, baking soda, and salt. Whisking is better than just stirring because it aerates the flour and ensures the baking soda and salt are evenly distributed. No one wants a bite with too much baking soda! Set this bowl aside.
- Cream the Good Stuff: In a large bowl, using a hand mixer or a stand mixer fitted with the paddle attachment, cream together the peanut butter, softened butter, ⅓ cup of granulated sugar, and the packed light brown sugar. Beat it on medium speed for about 2-3 minutes, until it’s light, fluffy, and pale in color. This step is crucial for incorporating air, which gives the cookies a lovely texture. Don’t rush it!
- Bring in the Wet Ingredients: Beat in the egg and vanilla extract until everything is smooth and well-combined. Scrape down the sides of the bowl with a spatula to make sure nothing is hiding.
- Combine with Care: Gradually add the dry flour mixture to the wet ingredients. Mix on low speed until *just* combined. The moment you no longer see streaks of flour, stop mixing! Overmixing is the enemy of a tender cookie, as it can develop the gluten in the flour and make them tough.
- Roll and Sugar-Coated: Place the remaining ½ cup of granulated sugar in a small bowl. Using a tablespoon or a small cookie scoop (about 1 inch in size), portion out the dough and roll it into smooth balls between your palms. Roll each ball generously in the sugar until it’s completely coated. This sugary jacket is what gives the cookie its signature sparkle and crackled top.
- Bake to Perfection: Place the sugar-coated dough balls on your prepared baking sheets, leaving about 2 inches between them as they will spread a bit. Bake for 8-10 minutes. You’re looking for the edges to be lightly golden and set, but the centers will still look a little soft and puffy. That’s perfect! They will continue to cook on the hot baking sheet as they cool. Remember, ovens can vary, so your first batch is your test batch.
- The Grand Finale: The Kiss! As soon as the cookies come out of the oven, gently but firmly press a Hershey’s Kiss into the center of each one. You’ll hear a little satisfying crackle. Don’t wait for the cookies to cool—the warmth is what slightly melts the chocolate and makes it stick.
- Cool and Conquer: Let the cookies cool on the baking sheet for about 5 minutes before transferring them to a wire rack to cool completely. This patience is key! The chocolate needs to set back up, and the cookie itself will firm up beautifully.
Sharing the Love: How to Serve These Beauties
Okay, the hardest part is over: waiting for them to cool! Now, how do we present these masterpieces?
For a simple, homey feel, just pile them high on a rustic wooden board or in a classic cookie jar. They look gorgeous all jumbled together. If you’re feeling a bit fancy, arrange them on a beautiful ceramic platter. The contrast of the golden cookie, the white sugar sparkle, and the dark chocolate kiss is just stunning.
These cookies are the ultimate sharable treat. They’re a must for holiday cookie trays, a wonderful gift for a neighbor (seriously, be the most popular person on your block), or the perfect sweet ending to a weeknight family dinner. And let’s be real, they also make for an absolutely elite midnight snack with a cold glass of milk. I won’t tell!
Get Creative! Fun Flavor Twists
Once you’ve mastered the classic, why not play around? Here are a few of my favorite ways to mix things up:
- Chocolate Lover’s Dream: Use a Dark Chocolate or Hugs (the white and milk chocolate swirled) Hershey’s Kiss for a different chocolatey experience. You could even press a mini Reese’s Peanut Butter Cup into the center instead!
- Peanut Butter Power: For an even more intense peanut flavor, use crunchy peanut butter in the dough, or roll the dough balls in crushed salted peanuts instead of (or in addition to!) the granulated sugar.
- Festive Fun: Roll the dough balls in red or green sparkling sugar for Christmas, or orange and black sprinkles for Halloween. It’s a simple way to make them party-ready.
- Gluten-Free Goodness: You can easily make these gluten-free by using a 1:1 gluten-free all-purpose flour blend. I’ve had great success with brands like Bob’s Red Mill or King Arthur.
- Shortcut Version: In a serious pinch, you can use a 16.5-ounce log of store-bought peanut butter cookie dough. Just roll into balls, coat in sugar, bake as directed, and add the kiss! It’s not *quite* as good as homemade, but it’s a fantastic quick fix.
Chef Emily’s Kitchen Confidential
This recipe has been my go-to for years, but it’s definitely evolved. I once, in a moment of “brilliance,” decided to press the Kisses in *before* baking. Let’s just say I ended up with puddles of chocolate and very sad, flat cookies. A classic case of a “hack” that was not a hack! Live and learn, right?
The other thing I’ve learned is the power of patience. Letting the butter soften properly, not overmixing the dough, and allowing the cookies to cool on the pan are small steps that make a huge difference. Baking is a science, but it’s also a practice in mindfulness. And the reward is a warm, peanut buttery, chocolatey cookie, which is pretty much the best reward I can think of.
Your Questions, Answered!
Q: My cookies spread too much and turned out flat. What happened?
A: This is usually caused by butter that was too warm. Make sure your butter is softened but still cool. Also, double-check that your baking soda is fresh! An old leavening agent won’t do its job. Chilling the dough for 30 minutes before baking can also help prevent overspreading.
Q: Can I make the dough ahead of time?
A: Absolutely! You can cover the bowl and refrigerate the dough for up to 2 days. Let it sit at room temperature for about 15-20 minutes before rolling so it’s easier to handle. You can also roll the dough balls, place them on a baking sheet, and freeze them solid. Then, transfer them to a freezer bag. Bake straight from the freezer, adding a minute or two to the baking time.
Q: My chocolate Kisses completely melted and lost their shape. Why?
A: The cookies were likely too hot when you added the chocolate. Make sure you press the Kiss in immediately after the cookies come out of the oven, but if your kitchen is very warm or the cookies baked a bit long, the residual heat can be too intense. You can also try popping the unwrapped Kisses in the freezer for 10 minutes before using them—this helps them hold their shape better.
Q: Can I use natural peanut butter?
A: I don’t recommend it for this specific recipe. Natural peanut butters often have a different oil content and can separate, leading to a greasy, inconsistent dough. Stick with conventional creamy peanut butter for the best, most reliable results.
Nutritional Information (Because Balance is Key!)
I’m a big believer in enjoying treats mindfully and without guilt! Here’s a general breakdown of the nutritional information per cookie (assuming the recipe yields 36 cookies). Please note that this is an estimate and can vary based on specific ingredients used.
- Calories: 140
- Fat: 8g
- Saturated Fat: 4g
- Carbohydrates: 16g
- Sugars: 10g
- Protein: 2g
- Sodium: 85mg
These cookies are a treat, and that’s exactly what they should be! Enjoy every single bite.
Final Thoughts from My Kitchen to Yours
Well, my friend, we’ve done it! We’ve created a batch of pure, unadulterated joy. I hope you’re feeling proud, your kitchen smells incredible, and you’ve already snuck a warm cookie (or two… I won’t judge!).
Recipes like this Peanut Butter Kiss Cookie are more than just a list of ingredients and steps. They’re a tradition. They’re a way to connect, to share love, and to create happy moments. I’m so grateful you chose to spend this time in the kitchen with me.
If you make these (and I really hope you do!), I’d love to hear about it. Tag me on social @TastyChow with your creations! Now, go forth, bake with love, and chow down.
With a full heart and a happy belly,
Emily