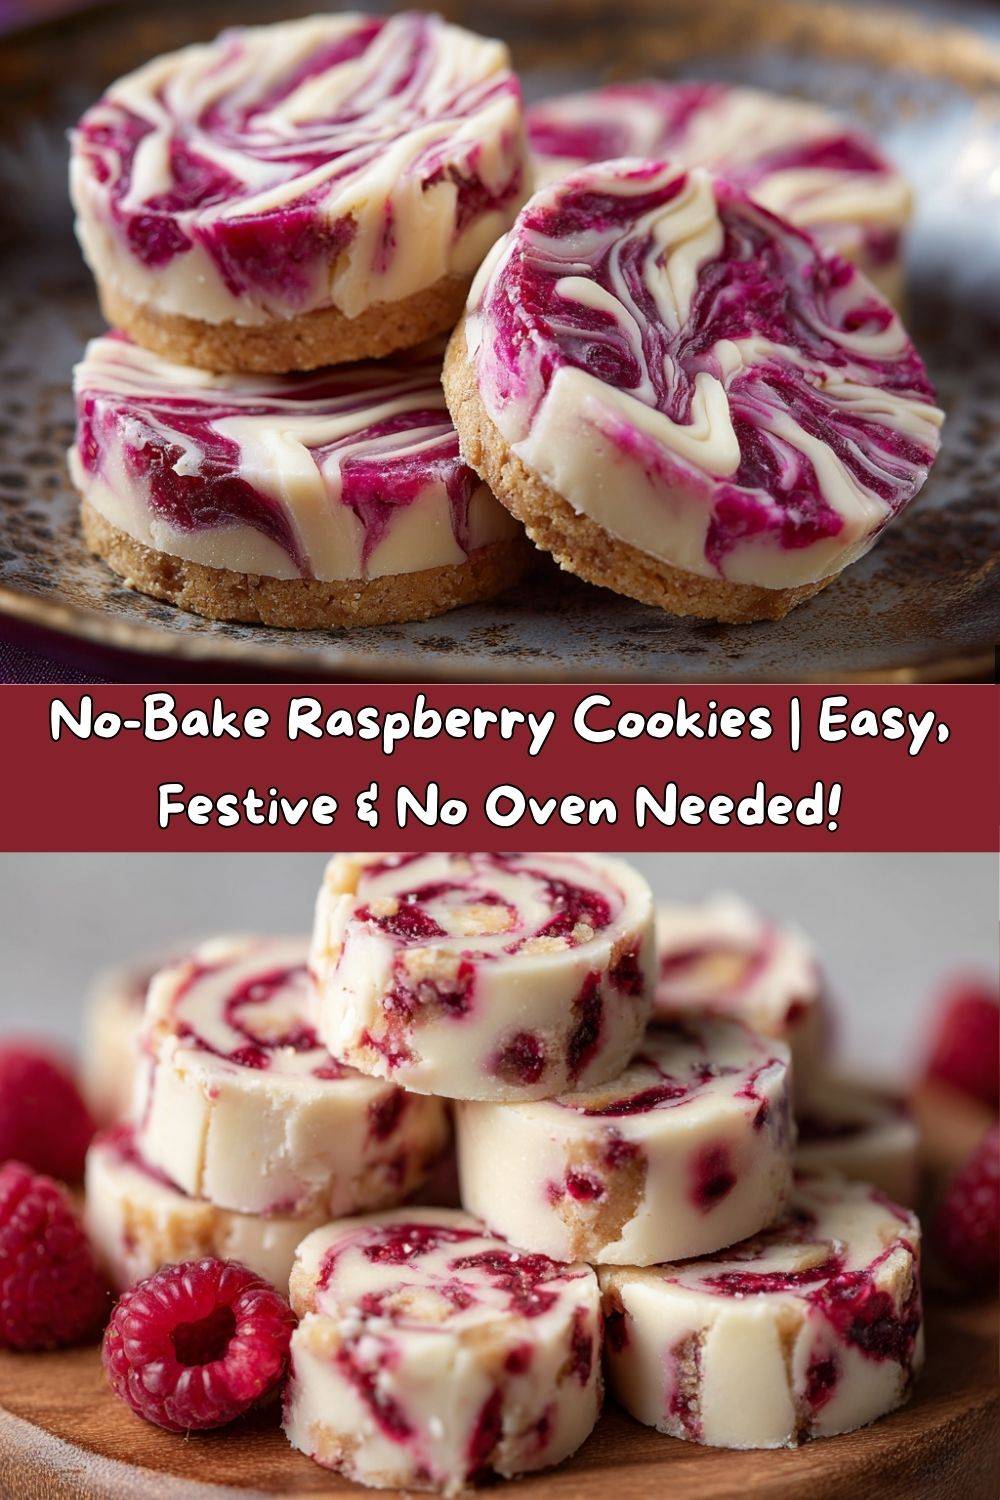
No-Bake Raspberry Cookies: Your New Favorite Bite of Sunshine
Hey there, my fellow flavor-chaser! Let’s be real for a second. Do you ever have those days where you’re just aching for something sweet, something a little fancy, something that feels like a celebration… but the thought of turning on the oven, preheating, and cleaning up a mountain of bowls makes you want to just lie down on the kitchen floor instead?
Yeah, me too. More often than I’d like to admit.
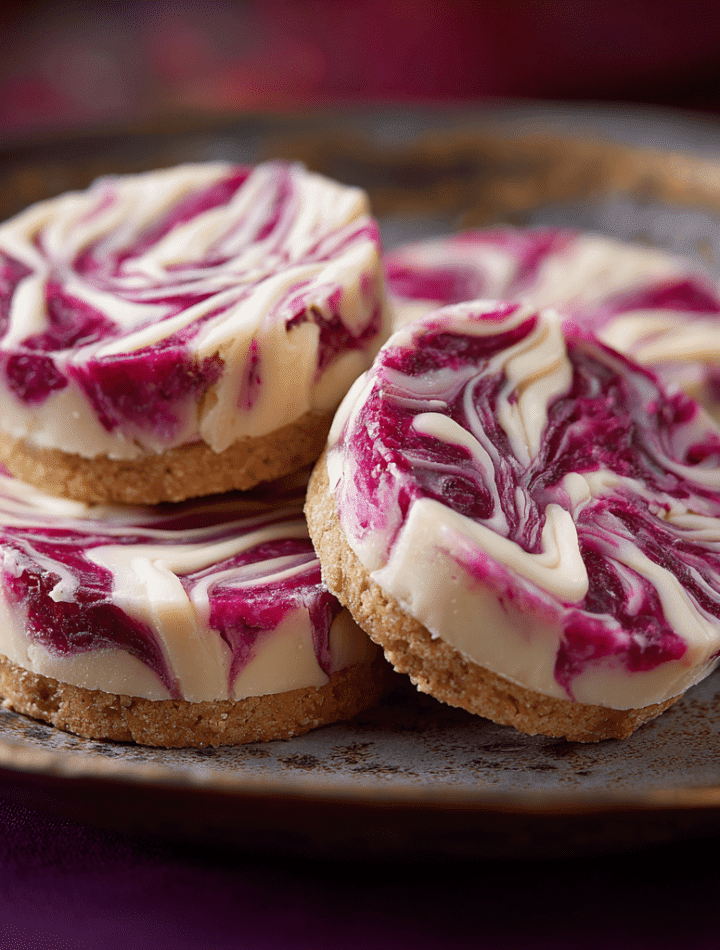
That’s precisely why I’m so utterly obsessed with these No-Bake Raspberry Cookies. They are my secret weapon, my go-to for instant kitchen glory. Imagine this: a buttery, crumbly biscuit base, a layer of the creamiest, dreamiest white chocolate filling swirled with a vibrant, tangy raspberry sauce, all finished with a gorgeous marbled topping that looks like a modern art masterpiece. They’re bright, they’re creamy, and they are effortlessly festive.
I originally dreamed these up for a last-minute Eid celebration a few years ago, and they were such a smash hit that they’ve since become my signature for everything from Ramadan iftars to summer picnics and holiday cookie swaps. The best part? They come together in less than 30 minutes of active time. No oven, no sweat, just pure, unadulterated joy in every single bite. So, grab your favorite mixing bowl and let’s make something magical together.
A Spark of Raspberry Inspiration
This recipe always takes me back to my grandma’s kitchen, though she’d probably laugh at the “no-bake” part. She was a firm believer that a warm oven was the heart of a home. But she also taught me that the best desserts aren’t about showing off; they’re about sharing a moment of pure happiness.
I remember one sweltering summer afternoon, the kind where even the flies were too lazy to buzz. I was visiting her, and we were both craving something sweet but the idea of baking was unbearable. With a mischievous twinkle in her eye, she pulled out a jar of her homemade raspberry jam and a bar of “fancy” white chocolate my uncle had sent her. We melted, we mixed, we layered it over some crushed graham crackers she had in the pantry, and we stuck the whole glorious mess in the icebox.
What emerged an hour later was a revelation. It was cool, creamy, fruity, and so much greater than the sum of its parts. These no-bake raspberry cookies are the direct, more elegant descendant of that happy kitchen accident. They’re a tribute to that lesson: that sometimes, the most wonderful things come from a little improvisation and a whole lot of love, no heat required.
Gathering Your Sunshine Brigade: The Ingredients
This is where the magic starts! One of the things I love most about this recipe is the simplicity of the ingredients. Let’s break them down, because knowing your ingredients is the first step to becoming a kitchen rockstar.
- 200g Frozen Raspberries: Don’t sleep on frozen berries! They’re often frozen at peak ripeness, which means maximum flavor. Using them here is a total game-changer for that intense, fruity punch. Chef’s Insight: If you’re using fresh, that’s great too! Just add a teaspoon of lemon juice to help brighten the flavor.
- 75g Granulated Sugar: This sweetens our raspberry mixture. The amount is perfect for balancing the natural tartness of the berries without making it cloying.
- 125g Tea Biscuits (like Digestives or Graham Crackers): This is the foundation of our cookie base! Their slightly sweet, malty flavor is the perfect textural contrast to the creamy filling. Substitution Tip: Any plain, slightly sweet biscuit or cookie will work. Even vanilla wafers or animal crackers are fantastic here!
- 80g Unsalted Butter, melted: This is the glue that holds our crumbly base together. Using unsalted lets you control the salt level perfectly. Chef’s Insight: For a hint of extra flavor, try browning your melted butter. It adds a deep, nutty note that is just incredible.
- 25g Powdered Sugar: A little extra sweetness for the base to make it truly cookie-like.
- 80ml Heavy Cream (or Double Cream): This is the key to our luxuriously smooth filling. When heated and poured over the chocolate, it creates a perfect ganache. Substitution Tip: For a slightly lighter version, full-fat coconut cream can work in a pinch, though the flavor will be different.
- 250g White Chocolate, chopped: Please, please use a good quality baking bar here, not chocolate chips! Chips have stabilizers that can prevent them from melting smoothly. We want that velvety texture. Chef’s Insight: The quality of your white chocolate directly impacts the final product. A higher cocoa butter content means a richer, smoother cookie.
- 125g White Chocolate, melted (for topping): A little extra for that beautiful, drippy, marbled finish. You can use the same bar as for the filling, just set some aside!
Let’s Build These Beauties: Step-by-Step
Okay, team! Aprons on? Let’s do this. I’ll walk you through every step with a few of my favorite kitchen hacks to ensure your no-bake raspberry cookies are absolutely perfect.
- Create the Raspberry Swirl. In a small saucepan, combine your frozen raspberries and granulated sugar. Cook this over medium heat, stirring often, until it’s bubbling away and has thickened slightly, about 5-7 minutes. It should coat the back of a spoon. Now, here’s a pro-tip: if you’re not a fan of raspberry seeds (I personally love the texture, but it’s a preference thing!), press the warm mixture through a fine-mesh sieve. You’ll get the most gorgeous, smooth, seedless raspberry coulis. Set this aside to cool completely. This is crucial—if it’s too warm, it’ll melt our creamy filling later!
- Craft the Buttery Base. While the raspberry mixture is cooling, let’s make the cookie crust. Toss your biscuits into a food processor and pulse until you have fine crumbs. No processor? No problem! Pop them in a zip-top bag and go to town with a rolling pin. It’s a fantastic way to work out any lingering frustration! In a bowl, mix the crumbs with the melted butter and powdered sugar until it resembles wet sand. It should hold together when you pinch it. My little hack: I like to use a small silicone muffin pan or mini tart tins for that perfect, professional shape. Press about a tablespoon of the mixture firmly into the bottom of each cavity. A small glass or the bottom of a measuring cup works great to press it down evenly.
- Whip Up the Dreamy Filling. This is the star of the show! Place your chopped white chocolate in a heatproof bowl. In that same little saucepan (see? fewer dishes!), heat the heavy cream until it’s just steaming—you’ll see little bubbles form around the edges. Do not let it boil! Pour the hot cream over the white chocolate, let it sit for a minute to melt, and then stir, stir, stir until it’s completely smooth and glorious. Now, take 75g (about 3 heaping tablespoons) of your cooled raspberry mixture and gently fold it in. Don’t overmix! We want beautiful, bold swirls of raspberry, not a uniformly pink filling.
- Assemble & Chill. Spoon or pipe the creamy filling over your prepared cookie bases. Tap the pan gently on the counter to settle everything. Now, the hardest part: patience. Pop the whole tray into the fridge for at least 1 hour, or until they’re completely firm to the touch. This is the perfect time to do a little victory dance and clean up the (minimal) mess.
- The Grand Finale: The Topping. Once your cookies are set, melt the remaining white chocolate. Carefully drizzle it over the top of each cookie. Then, take tiny dots of the remaining raspberry mixture and drop them onto the white chocolate. Now, take a toothpick or a skewer and gently drag it through the raspberry and chocolate to create that stunning marbled effect. It’s so easy and looks incredibly impressive!
How to Serve These Stunning Cookies
Presentation is part of the fun! These little gems are practically begging to be the center of attention. For a casual family treat, I just pop them out of the silicone mold and arrange them on a simple white platter—their vibrant color does all the talking.
If you’re feeling extra fancy (maybe for a holiday like Eid or a birthday brunch), try serving them on individual dessert plates garnished with a fresh mint leaf and a few whole, fresh raspberries. A light dusting of powdered sugar right before serving adds a beautiful snowy effect.
They pair wonderfully with a cup of hot coffee, a glass of cold milk, or even a sparkling Moscato. Honestly, they’re so versatile and always, always a hit. Just be sure to keep them refrigerated until you’re ready to serve to maintain that perfect, firm texture.
Make It Your Own: Fun Recipe Variations
Once you’ve mastered the classic, the kitchen playground opens up! Here are a few of my favorite twists on this no-bake wonder:
- Lemon Raspberry Zing: Add the zest of one lemon to the white chocolate filling for a bright, citrusy kick that cuts through the sweetness beautifully.
- Triple Berry Bliss: Swap the raspberries for a frozen mixed berry blend (strawberries, blueberries, raspberries) for a deeper, more complex berry flavor.
- Chocolate Lover’s Dream: Not a white chocolate fan? Use a good quality dark or milk chocolate for the filling and topping instead. It creates a wonderfully rich, almost black forest-like cookie.
- Coconut Paradise: Replace the heavy cream with full-fat coconut milk and add a tablespoon of toasted coconut to the biscuit base for a tropical twist.
- Nutty Crunch: Add 2-3 tablespoons of very finely chopped pistachios or almonds to the biscuit base for a lovely textural contrast and a nutty flavor.
Chef Emily’s Notebook Scribbles
This recipe has truly evolved in my kitchen. The first time I made them, I got a little overzealous and folded the entire raspberry mixture into the filling. They were delicious, but a murky pink color and too soft. Lesson learned: restraint with the swirl creates a more beautiful and structurally sound cookie!
I also once, in a frantic pre-party rush, tried to speed up the chilling process by putting them in the freezer. While it worked, I learned that if they freeze solid, you need to let them thaw for about 10 minutes at room temperature before eating, otherwise you’ll be chiseling away at them! The fridge is your friend for the perfect, biteable texture.
Your Questions, Answered!
Over the years, I’ve gotten a few repeat questions about these cookies. Here’s the scoop to ensure your success!
Q: My white chocolate seized up and became grainy when I added the cream! What happened?
A: Oh, I’ve been there! This usually means a drop of water or steam got into the chocolate, or the cream was too hot. White chocolate is very sensitive. To fix it, try adding a teaspoon of vegetable oil or melted coconut oil and stir vigorously. It should smooth right out. Prevention is key: ensure your bowl and utensils are completely dry.
Q: Can I make these ahead of time?
A: Absolutely! They are the perfect make-ahead dessert. You can assemble them completely (including the final drizzle) and store them in an airtight container in the fridge for up to 3 days.
Q: My filling is too soft, even after chilling. Why?
A> This typically points to the white chocolate. Lower-quality chocolate or chocolate chips don’t set as firmly. Another culprit could be not measuring the biscuit base ingredients correctly—if it’s too buttery, it can make the bottom soft. Finally, ensure you’re chilling them for the full hour, uninterrupted!
Q: Can I use a different fruit?
A> Of course! Strawberries, mangoes, or passion fruit puree would all be fantastic. Just aim for a similar thick, jam-like consistency after cooking.
A Little Note on Nutrition
I’m all about balance, friends! Life is too short not to enjoy a decadent cookie. These are a treat, through and through, and they’re meant to be savored. Each cookie (assuming you get 12 from the batch) packs a joyful punch of energy, perfect for a sweet ending to a meal or a special afternoon pick-me-up.
Approximate Nutrition per Cookie:
Calories: 210 | Fat: 13g | Carbs: 22g | Sugar: 15g | Protein: 2g
Remember, these are estimates and can vary based on your specific ingredients and portion sizes. My philosophy? Enjoy every single bite mindfully and without an ounce of guilt. Food is love, remember?
Final Thoughts from My Kitchen to Yours
Well, my friend, we’ve done it. We’ve created a little bite of pure, no-bake happiness. I hope you feel empowered, excited, and ready to whip up a batch of these stunning raspberry cookies. They prove that you don’t need fancy equipment or hours of time to create something truly special and delicious.
This recipe is a testament to everything I believe about cooking: it should be fun, approachable, and ultimately, shared. So, whether you’re making these for a quiet moment of self-care or a big, loud family gathering, I hope they bring as much joy to your table as they have to mine.
Now, I’d love to hear from you! Tag me on social @TastyChow with your beautiful creations. Happy no-baking!
With love and a full heart,
Emily