Your New Secret Weapon: The Only Bakery-Style Cookie Dough Base You’ll Ever Need
Hey there, friend! Let’s talk about a universal truth: there is absolutely nothing in this world quite like the smell of warm cookies wafting from your oven. It’s a scent that feels like home, like a hug, like a pure, unadulterated moment of joy. And that first bite? Oh, that’s the stuff of legends. A crisp, golden edge that gives way to a soft, chewy, and slightly gooey center. It’s the holy grail of cookie textures, the kind you pay a premium for at a fancy bakery.
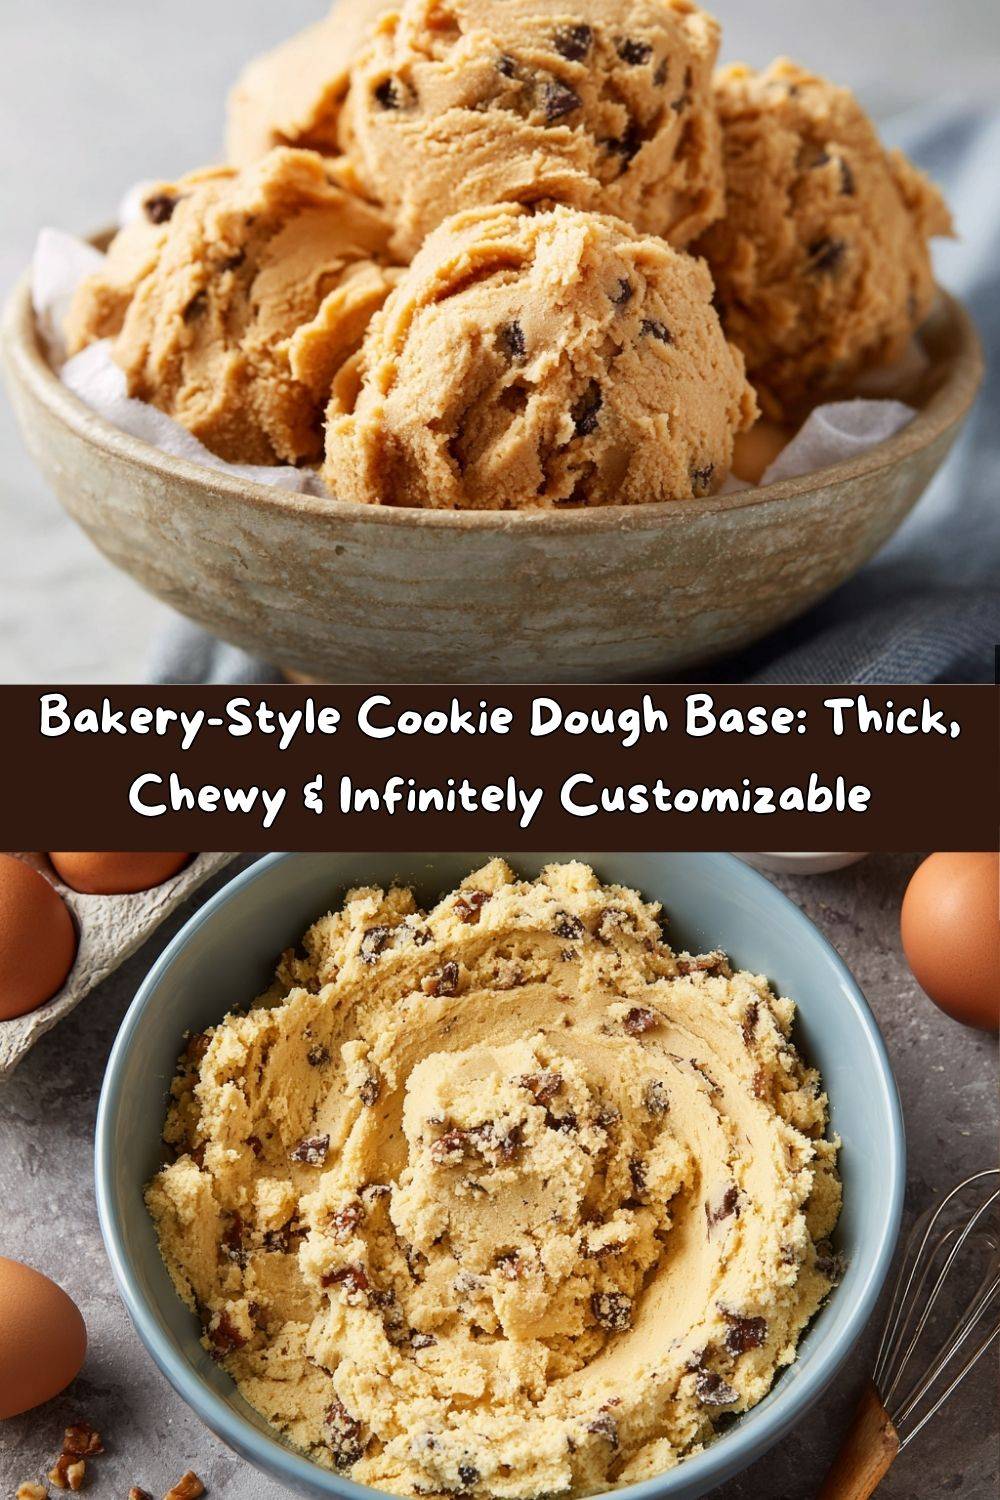
But what if I told you that you don’t need a bakery degree or a secret handshake to achieve that perfection? What if you had one, magical, go-to cookie dough base in your back pocket that you could whip up anytime the craving strikes? A dough so reliable, so thick, and so beautifully chewy that it becomes the foundation for every cookie dream you’ve ever had?
Well, consider your pantry officially blessed. This is that recipe. This is your new kitchen sidekick. We’re talking a thick, chewy, and endlessly customizable cookie base that guarantees soft centers, golden edges, and perfect texture every single time. Made with a few simple, smart tricks (hello, cold eggs and cornstarch!), this dough is a blank canvas ready for chocolate chips, chopped nuts, stuffed fillings, or whatever wild and wonderful flavor combo you’re craving today. So, tie on your favorite apron—the messy one with the stains of past kitchen victories—and let’s make some magic happen.
A Tale of Two Cookies: My Quest for the Perfect Chew
My love affair with the perfect cookie started, as many great stories do, with a kitchen failure. Picture a younger Emily, fresh out of culinary school, thinking I knew everything. I decided to impress my friends with the most epic chocolate chip cookies. I used all the “right” techniques I’d learned for fancy pastries. I creamed the butter for ages, used room-temperature everything, and baked them to a “perfect” golden brown all over.
The result? A tray of sad, flat, crispy wafers. They tasted fine, but they were a far cry from the puffy, soft-centered, bakery-style cookies I was dreaming of. My grandma, who was visiting, took one look and just chuckled. “Honey,” she said, “sometimes you gotta unlearn the fancy stuff to get to the good stuff.” She then told me about her “secret” for keeping her famous Sunday cookies thick: she’d pop the dough in the icebox for a bit before baking. It was a lightbulb moment. It wasn’t about being complicated; it was about understanding the science of simplicity. That little nugget of wisdom sent me down a rabbit hole of experimentation, leading directly to this very recipe. It’s a beautiful blend of culinary science and my grandma’s old-school, no-nonsense kitchen wisdom.
Gathering Your Cookie Crew: The Ingredients
Before we start, let’s get to know our all-star team. Every single one of these ingredients plays a crucial role in creating cookie nirvana. Trust me, knowing the “why” makes you a more confident baker!
- 2¼ cups (285g) All-Purpose Flour: The main structural backbone of our cookie. I highly recommend using a kitchen scale for accuracy (it’s a game-changer!), but if you’re using cups, fluff your flour with a spoon, spoon it into the cup, and level it off. No packing!
- 1½ tsp Baking Powder & 1 tsp Baking Soda: Our dynamic leavening duo! Baking soda helps with browning and spread, while baking powder gives us that lovely, airy lift. Using both is our secret for the perfect thickness and texture.
- 1 tsp Cornstarch: This is the stealth hero! Cornstarch is the key to an incredibly soft and tender chew. It makes the cookies stay softer for longer, giving them that melt-in-your-mouth quality.
- ¾ cup (150g) Dark Brown Sugar & ¼ cup (50g) Granulated Sugar: Here’s where the flavor magic happens. The dark brown sugar brings deep, molasses-y, caramel notes and, because it’s more acidic and hygroscopic (fancy word for moisture-loving), it creates that dreamy chew. The granulated sugar helps with spread and crispness on the edges. It’s the perfect balance!
- ¾ cup (170g) Unsalted Butter, softened or melted: The great debate! Softened butter,
creamed with the sugars, will give you a slightly cakier, thicker cookie. Melted (and then cooled) butter will give you a chewier, denser texture with more of those lovely chewy edges. For this bakery-style base, I personally adore the result with cooled, melted butter, but softened works beautifully too! The key is to let melted butter cool so it doesn’t cook the eggs. - 2 Cold Eggs: This is one of our secret weapons against flat cookies! Cold eggs help to keep the butter from melting too quickly in the oven, which minimizes spread. It gives the rest of the structure time to set, resulting in a taller, thicker cookie.
- Your Favorite Mix-Ins (1½ – 2 cups): This is your playground! Chocolate chips, chunks, M&Ms, toffee bits, chopped nuts, dried cranberries, pretzel pieces… the world is your oyster!
Let’s Get Baking: The Step-by-Step Magic
Okay, team. It’s go time. This is where we turn simple ingredients into legendary cookies. Read through all the steps first, and remember, baking is a feel-good science, so let’s have fun with it!
- Preheat and Prep. First things first, get that oven preheating to a steady 350°F (175°C). This ensures a consistent bake from the get-go. Line your baking sheets with parchment paper. Not only does this prevent sticking, but it also makes cleanup an absolute dream. Chef’s Hack: If you don’t have parchment, you can use a silicone baking mat or a light coating of butter and flour.
- Combine the Dry Team. In a medium-sized bowl, whisk together your all-purpose flour, baking powder, baking soda, and cornstarch. Whisking is key here—we want to evenly distribute our leaveners and that super-important cornstarch throughout the flour, so every cookie gets the same perfect lift and chew. Chef’s Insight: Think of this as introducing all the dry ingredients to each other so they can work together harmoniously in the oven.
- Cream the Butter and Sugars. In a separate, larger bowl, combine your cooled melted butter (or softened butter) with the dark brown and granulated sugars. Using a hand mixer or a sturdy whisk, beat them together for about 1-2 minutes until the mixture is smooth, well-combined, and has lightened slightly in color. You don’t need to cream it for 10 minutes like some recipes—we’re just looking for a homogenous, sandy-looking mixture. Chef’s Tip: If you’re using melted butter, you can just whisk it by hand. It’s a great arm workout!
- Incorporate the Eggs. Now, add your COLD eggs, one at a time, beating well after each addition. Make sure the first egg is fully incorporated before adding the second. This is crucial for creating a smooth, emulsified dough that won’t separate. The mixture might look a little gritty or split at first, but just keep mixing—it will come together.
- Bring It All Together. Now, with your mixer on a low speed (or using a sturdy spatula), gradually add the dry ingredient mixture to the wet ingredients. Mix just until the last bits of flour disappear. Do not overmix! Overmixing develops gluten, which can lead to tough cookies. A few stray flour patches are okay—they’ll get worked in during the next step.
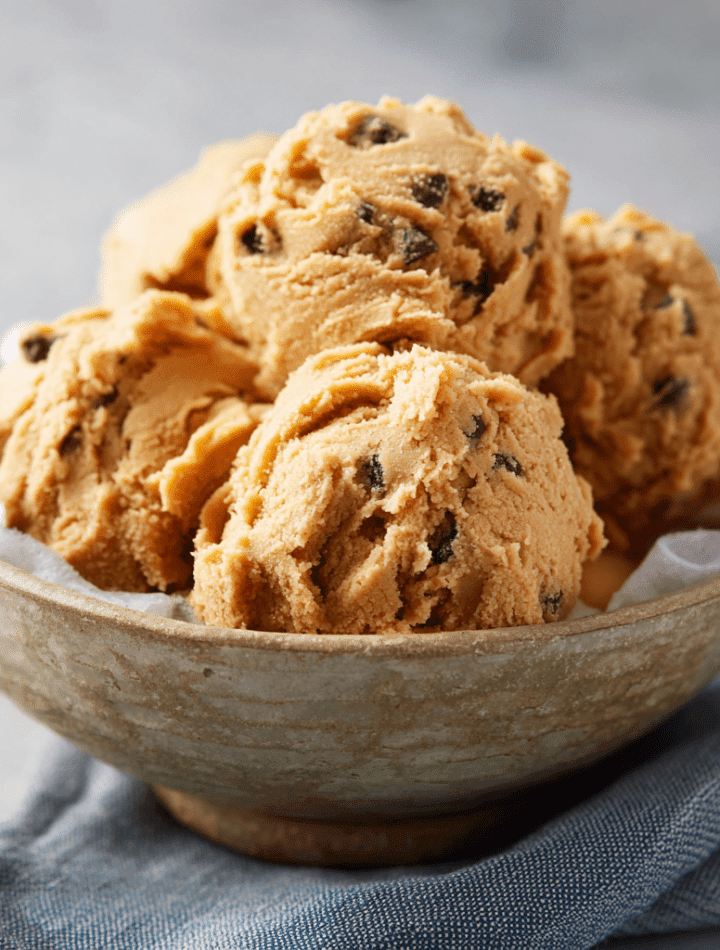
- Fold in the Fun! This is the best part! Add your 1½ to 2 cups of mix-ins. Using a spatula, gently fold them into the dough until they’re evenly distributed. Be generous! A cookie is just a vehicle for delicious add-ins, in my opinion.
- The Chill Factor (Optional but Highly Recommended). For the ultimate thick, bakery-style cookie, I strongly recommend chilling the dough for at least 30 minutes. Why? This solidifies the butter again, which means less spread in the oven. It also allows the flour to fully hydrate, leading to a more complex, caramelized flavor. Scoop the dough into balls (about 2 tablespoons each) onto a plate or baking sheet before chilling—this makes it so much easier to just pop them in the oven later!
- Bake to Perfection. Place your dough balls on the prepared baking sheet, leaving about 2 inches between them for a little spread. Bake for 10-12 minutes. Now, here’s the trick: the cookies will look underdone. The centers will still be soft and puffy, and the edges will be just set and lightly golden. This is exactly what you want! They continue to cook on the hot baking sheet after you take them out.
- The Cool Down. This is the final, crucial step for that perfect texture. Let the cookies cool on the hot baking sheet for a full 5-10 minutes. This allows them to set up properly without becoming overcooked and crumbly. After that, you can transfer them to a wire rack to cool completely… or, you know, do what I do and eat one immediately with a cold glass of milk.
Sharing the Love: How to Serve Your Masterpiece
You’ve done it! You’ve created a tray of sheer, unadulterated joy. Now, how to present these beauties? For that true bakery feel, I love piling them high on a rustic wooden board or a simple ceramic plate. Let their craggy, golden tops do all the talking.
And let’s talk about the ultimate pairing. A cold, frosty glass of whole milk is the classic, and for good reason—it’s a perfect match. But for the adults in the room, may I suggest a dark roast coffee, a cold brew, or even a glass of red wine? The bitterness beautifully offsets the sweetness of the cookie.
Feeling extra? Take a warm cookie, place a scoop of high-quality vanilla bean ice cream on top, and sandwich it with another cookie for an instant, mind-blowing ice cream sandwich. It’s a move that will make you a legend in your own household.
Mix It Up! Endless Flavor Twists
The beauty of this base is its versatility. Once you’ve mastered the classic, the flavor world is your oyster! Here are a few of my favorite riffs:
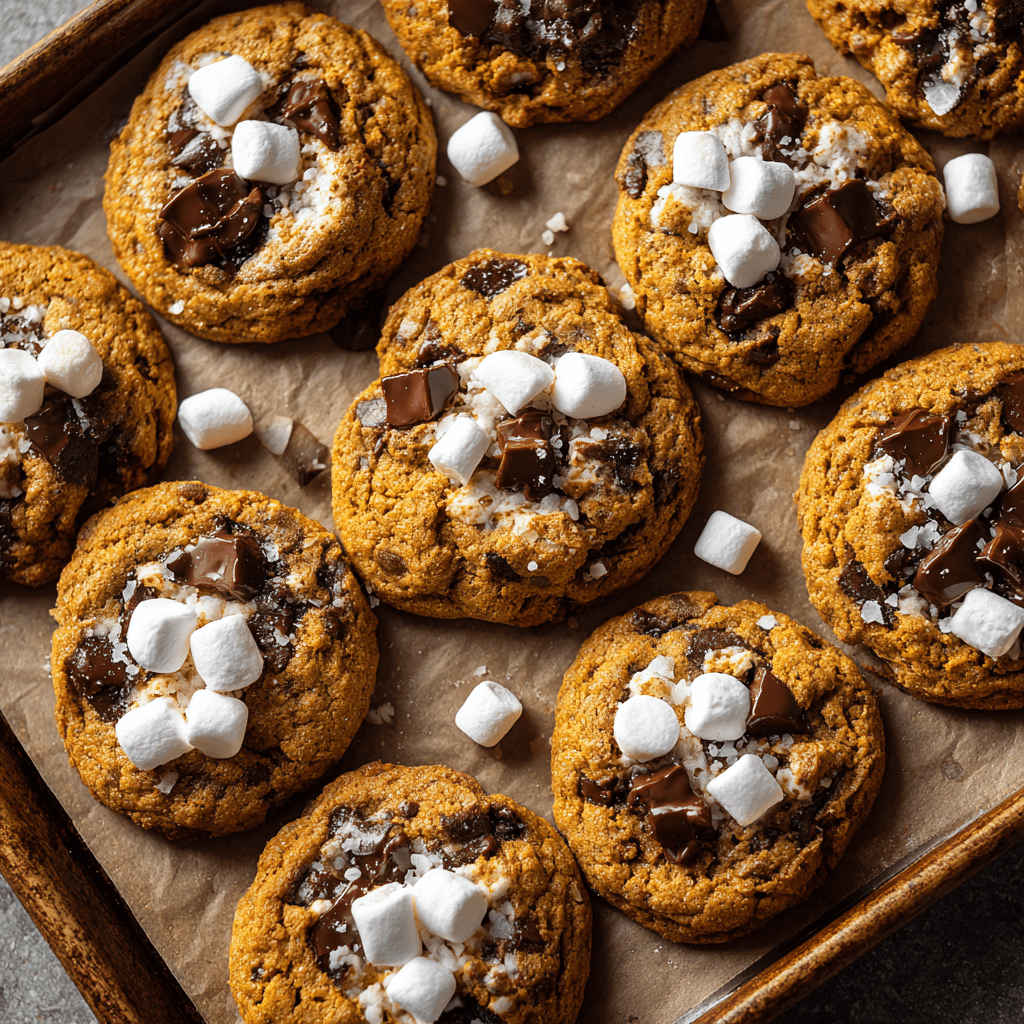
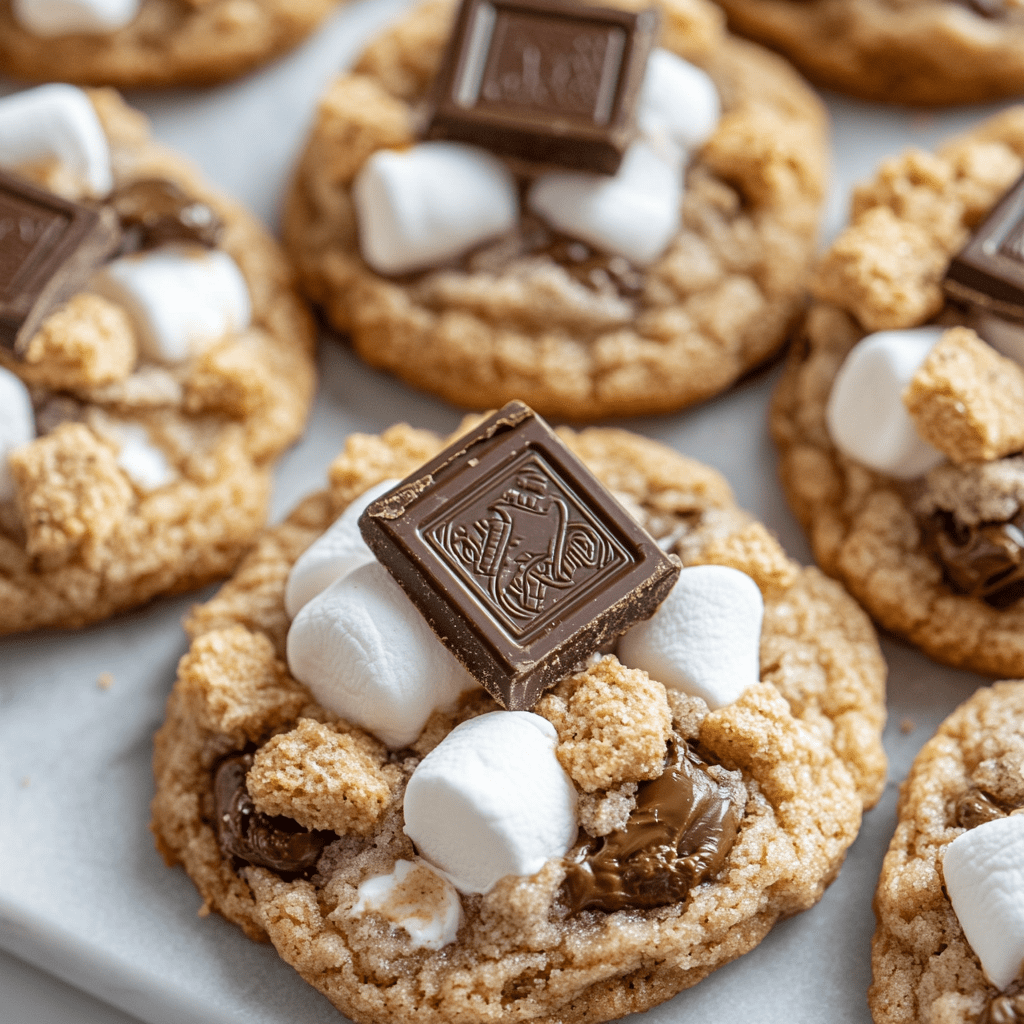
- The “S’mores Please”: Fold in 1 cup of semi-sweet chocolate chips, 1 cup of crushed graham crackers, and ½ cup of mini marshmallows. You’ll feel like you’re at a campfire!
- The Salty Sweet Supreme: Use 1 cup of milk chocolate chips and 1 cup of rough-chopped pretzel pieces. Finish the baked cookies with a light sprinkle of flaky sea salt right when they come out of the oven. *Chef’s kiss*.
- The Nutty Professor: Replace 1 cup of the mix-ins with a combination of toasted walnuts and pecans. Add a teaspoon of cinnamon to the dry ingredients for a warm, cozy flavor.
- Funfetti Celebration: Omit the brown sugar and use 1 cup of granulated sugar for a lighter-colored cookie. Fold in ½ cup of rainbow sprinkles. Perfect for birthdays!
- Gluten-Free & Dairy-Free Friend: Use a 1:1 gluten-free flour blend and replace the butter with an equal amount of vegan butter or refined coconut oil. The recipe is wonderfully adaptable!
From My Kitchen to Yours: A Few Parting Thoughts
This recipe has been a living, evolving thing in my kitchen. I’ve made it for heartbroken friends, for celebrating neighbors, and for those “I just need a cookie” Tuesday nights. I’ve even been known to keep a log of this dough in my freezer, ready to be sliced and baked at a moment’s notice for unexpected guests (or unexpected cravings).
The biggest lesson this cookie has taught me? Don’t stress about perfection. So what if one batch is slightly darker than the last? Or if you only have milk chocolate chips when the recipe calls for dark? It’s all part of the delicious, messy, wonderful journey of baking. The real magic is in the making and the sharing.
Your Cookie Questions, Answered!
I’ve gotten thousands of questions about cookies over the years. Here are the ones I hear most often:
Q: My cookies spread too much and got flat. What happened?
A: This is the #1 question! The most common culprits are: 1) Your butter was too warm. Make sure melted butter is cooled and softened butter is just cool to the touch. 2) You skipped the chill time. Chilling is non-negotiable for thick cookies! 3) Your baking soda or powder might be old. Check the expiration date!
Q: Can I make the dough ahead of time and freeze it?
A: Absolutely! This dough freezes like a dream. Scoop the balls onto a baking sheet, freeze them solid (about 1-2 hours), then transfer them to a freezer bag. You can bake them straight from frozen, just add 1-2 minutes to the bake time. Hello, instant fresh cookies anytime!
Q: My cookies are too cakey. How can I make them chewier?
A> For a denser, chewier cookie, try using melted and cooled butter instead of softened. Also, make sure you’re using more dark brown sugar than white sugar, as the molasses is key for chewiness.
Q: How do I get that perfect, soft center?
A> The secret is twofold: 1) Underbake them slightly! Take them out when the edges are set but the centers still look puffy and soft. 2) Let them cool on the baking sheet. They will continue to cook and set up without becoming dry.
Nutritional Information (A Quick Note!)
Hey, I’m all about balance! While these cookies are a treat, I believe in being transparent. This nutritional info is an estimate for one cookie from the base dough without any mix-ins, based on a yield of 18 cookies. Adding chocolate chips, nuts, or candy will change these values.
Per Cookie (Approximate):
Calories: 190 | Total Fat: 9g | Saturated Fat: 5g | Cholesterol: 45mg | Sodium: 115mg | Total Carbohydrates: 26g | Dietary Fiber: 0g | Sugars: 13g | Protein: 2g
Remember, friends, food is meant to be enjoyed—both the nourishing and the indulgent. So savor every last crumb!
Final Crumbs… Until Next Time!
Well, my fellow food lover, we’ve done it. We’ve taken simple ingredients and transformed them into a vehicle for pure happiness. This bakery-style cookie dough base is more than just a recipe; it’s a tool for creating memories, for sharing kindness, and for treating yourself after a long day.
I hope this recipe becomes a trusted friend in your kitchen, just like it is in mine. I hope you make it your own, add your favorite flavors, and share it with people you love. Don’t forget to tag me @TastyChow if you share a photo—seeing your creations absolutely makes my day.
Now, go forth and bake with confidence, with joy, and with a whole lot of love. Until next time, happy