Your New Go-To Party Appetizer: Mini Cheese Ball Bites!
Hey there, friend! Chef Emily here, waving from my flour-dusted kitchen. Tell me, does this sound familiar? You’re hosting a get-together, or maybe you’re signed up to bring an appetizer to the big holiday potluck. You want to bring something that screams “WOW,” something that looks like you fussed for hours, but secretly, you’re hoping for a recipe that’s more fun than fussy. You want those “oohs” and “aahs” without the stress. If you’re nodding your head, then you and I are about to become best kitchen buddies, because I’ve got the ultimate solution for you.
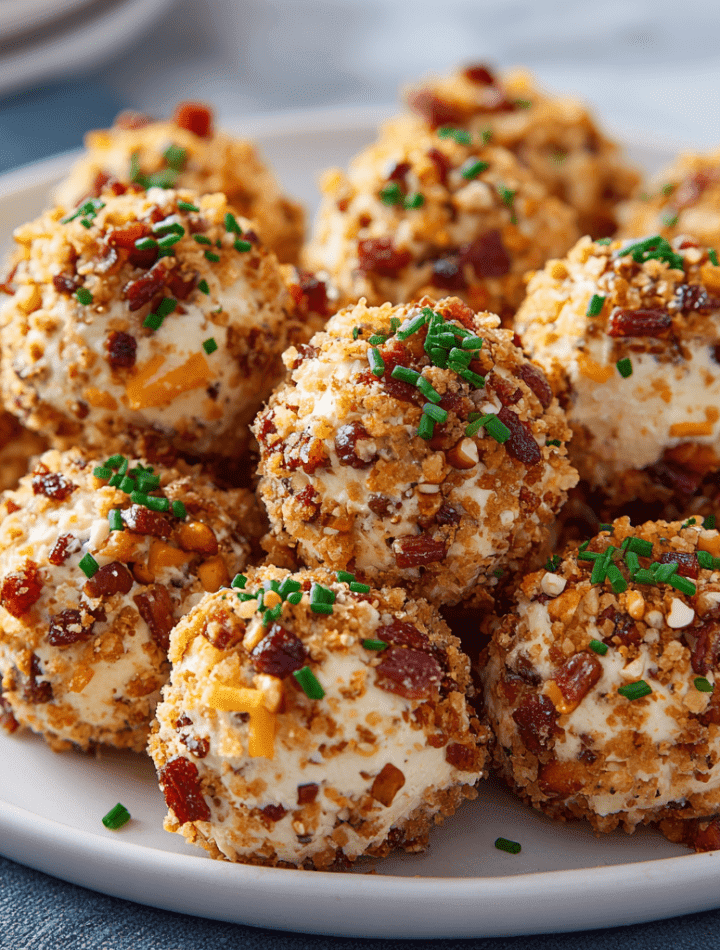
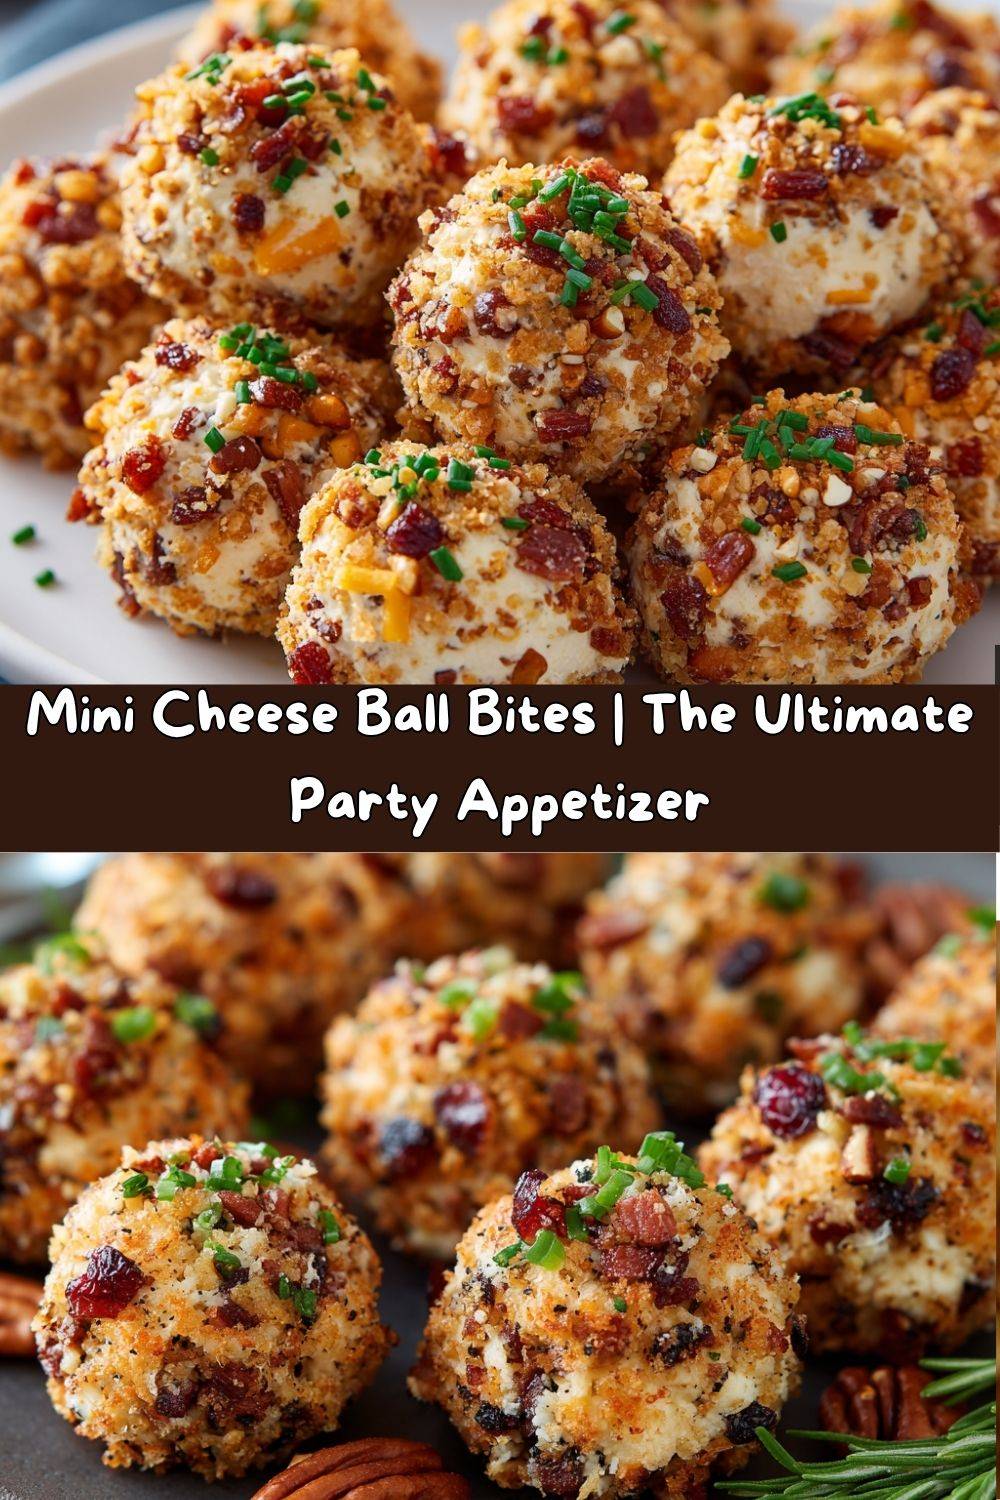
Let’s talk about these Mini Cheese Ball Bites. We’re taking the classic, crowd-pleasing cheese ball—that glorious sphere of creamy, cheesy, crunchy goodness—and we’re turning it into the most adorable, poppable, party-perfect finger food you’ve ever seen. Imagine it: a one-bite wonder that packs a serious flavor punch. We’ve got creamy, smoky cream cheese, sharp cheddar, crispy bacon, and a delightful crunch from toasted pecans and fresh chives, all held together with a cute little pretzel stick handle. They’re like flavor bombs of joy!
These little bites are the life of the party. They’re perfect for passing around on a platter, and they completely eliminate the sometimes-awkward “hovering around the big cheese ball with a cracker” situation. Everyone gets their own perfectly portioned bite of heaven. The best part? You can whip these up in advance, which means when your guests arrive, you can actually be a guest at your own party. So, tie on your favorite apron (the messy one is always the most loved), and let’s make something incredibly delicious together.
A Cheesy Trip Down Memory Lane
This recipe takes me right back to my grandma’s kitchen during the holidays. She was the queen of the “wow factor” appetizer. Every Christmas Eve, her big, classic cheese ball, studded with walnuts and served with a mountain of Ritz crackers, held a place of honor on the table. It was always the first thing to disappear. My brother and I would hover nearby, waiting for the moment the first cracker dug in so we could pounce.
But as much as I loved that cheese ball, I always remember the mess! The giant knife, the crumbling crackers, the race to get to the last bit before it was gone. One year, I decided to give her classic recipe a little “Emily” twist. I thought, “What if we made it mini? What if every single bite had the perfect ratio of creamy cheese to crunchy coating?” I started rolling them into tiny, poppable balls, and a star was born. It’s my grandma’s iconic flavor, reimagined for easy, modern entertaining. I think she’d get a real kick out of seeing her recipe living on in this fun, bite-sized way.
Gathering Your Flavor All-Stars
Here’s everything you’ll need to create these irresistible bites. I’ve included some of my favorite chef insights and substitutions so you can make this recipe your own!
- 3 (8-oz) blocks Cream Cheese, softened: This is the creamy, dreamy base of our cheese balls. Pro-Tip: Please, please let it soften to room temperature! This is the single most important step for a smooth, lump-free mixture that’s easy to roll. If you forget, you can remove the foil and microwave it on 50% power for 15-20 seconds, but room temp is best.
- 2 cups Shredded Sharp Cheddar Cheese: The sharpness cuts through the richness of the cream cheese beautifully. For a next-level flavor, try shredding your own cheddar from a block—it melts and incorporates much better than the pre-shredded kind (which has anti-caking agents).
- 2 tsp Garlic Powder & 2 tsp Smoked Paprika: This dynamic duo adds a deep, savory, and subtly smoky flavor base. The paprika gives it that gorgeous color, too! If you only have sweet paprika, that works, but the smoked version adds a wonderful depth.
- Kosher Salt & Freshly Ground Black Pepper: Season to taste! Don’t be shy here. The cheeses and bacon are salty, but a good pinch of salt and a few cracks of pepper will make all the flavors pop.
- 16 slices Bacon, cooked crisp and finely chopped: BACON. Need I say more? It provides a salty, smoky, crispy element. I like to bake my bacon on a sheet pan for perfectly even crispness without the splatter. We’ll use half inside the mixture and half in the coating for maximum bacon-y impact.
- 2/3 cup Roasted Salted Pecans, finely chopped: They add a buttery, toasty crunch that is just divine. If you have a nut allergy, sunflower seeds are a fantastic swap! If you can only find raw pecans, just toast them in a dry skillet for a few minutes until fragrant.
- 2/3 cup Fresh Chives, chopped: Their mild, oniony freshness is the perfect counterbalance to all the rich, smoky flavors. In a pinch, you could use the green parts of green onions.
- 36 Pretzel Sticks: Our adorable, edible handles! They add a nice salty crunch and make these bites super easy to pick up and eat. Grab a few extra, as some always break in the bag.
Optional Flavor Twists:
- 1/2 tsp Dijon Mustard: A little secret ingredient for a subtle tang that brightens everything up.
- 1/2 tsp Cayenne Pepper: Just a pinch for a gentle, warm kick in the background. It’s not about making it spicy, just more interesting!
- 1/4 cup Dried Cranberries, chopped: For a festive, sweet-and-salty vibe, mix these into your coating. They look so pretty and add a burst of chewy sweetness.
Let’s Get Rolling: Your Step-by-Step Guide
Ready to see how these little miracles come together? It’s so simple. I’ll walk you through each step with my best tips to ensure your cheese ball bites are absolutely perfect.
- The Big Mix-Down: In a large mixing bowl, combine your softened cream cheese, shredded cheddar, garlic powder, smoked paprika, and (if you’re using them) the Dijon mustard and cayenne pepper. Now, get your hands in there! I’m a firm believer that the best kitchen tool is a clean pair of hands. Squish and mix until everything is perfectly combined and no streaks of cream cheese remain. This is also the time to taste and season with your kosher salt and black pepper. Chef’s Hack: If you’re using a stand mixer, the paddle attachment on medium speed works like a dream for this and saves your arms!
- Bring in the Bacon: Now, stir in half of your finely chopped, crispy bacon. We’re saving the other half for the gorgeous outer coating. Mixing some bacon inside ensures every single bite is packed with smoky, salty flavor.
- The Essential Chill: This step is non-negotiable, my friend! Cover the bowl with plastic wrap and pop it into the refrigerator for at least 30 minutes. This firms up the mixture, making it a dream to roll. Trying to roll soft, sticky cheese is a frustrating mess—the chill is your best friend here.
- Create Your Coating Station: While the cheese is chilling, take this time to prepare your coating. In a shallow dish or pie plate, combine the remaining chopped bacon, the finely chopped pecans, the fresh chives, and the dried cranberries (if using). Mix them all together with a fork. This colorful, crunchy mixture is what gives our bites their beautiful, textured look and fantastic crunch.
- The Roll & Coat: Now for the fun part! Scoop out about a tablespoon of the chilled cheese mixture. I like to use a small cookie scoop for uniformity, but a spoon works just fine. Roll it quickly between your palms to form a smooth, 1-inch ball. Then, roll it gently in the coating mixture, pressing lightly to make sure all those goodies stick. Place the finished ball on a parchment-lined baking sheet. Pro-tip: If you find the cheese mixture getting too soft and sticky as you work, just pop the whole baking sheet back in the fridge for 10 minutes to firm up again.
- The Final Touch: Just before serving, gently press a pretzel stick into the top of each cheese ball bite. They are now ready for their grand debut!
How to Serve These Little Stars
Presentation is part of the fun! You’ve put in the work, now let’s make these bites shine. I love to arrange them on a large wooden board or a beautiful platter. For a really stunning effect, you can create a “tree” shape on a flat surface by arranging them in the shape of a Christmas tree—it’s a huge hit during the holidays!
Since these are rich and flavorful, you don’t need much else, but a little garnish goes a long way. Scatter a few extra whole pecans and a sprinkle of leftover chives around the platter for a professional, finished look. If you’re feeling fancy, a small bowl of pepper jelly or a tangy fruit chutney on the side for dipping is absolutely phenomenal. The sweet and spicy jam with the creamy, smoky cheese is a match made in appetizer heaven.
Get Creative! Flavor Variations & Swaps
One of the best things about this recipe is how adaptable it is. Don’t be afraid to play with the flavors and make it your own! Here are a few of my favorite twists:
- Everything Bagel Twist: Swap the coating for a mixture of everything bagel seasoning, toasted sesame seeds, and dried minced garlic and onion. It’s a savory lover’s dream!
- Jalapeño Popper Version: Add 1-2 finely minced jalapeños (seeds removed for less heat, kept for more!) and 1/4 cup of chopped cooked sausage to the cheese mixture. Use a coating of crushed pork rinds or panko breadcrumbs for that classic popper crunch.
- Mediterranean Magic: Skip the bacon and cheddar. Instead, use a base of cream cheese with crumbled feta, sun-dried tomatoes (chopped), and dried oregano. Roll the balls in a coating of finely chopped kalamata olives and toasted pine nuts.
- Sweet & Savory Cranberry Pecan: This is a holiday must-try. Omit the bacon and add 1/2 cup of finely chopped dried cranberries and a teaspoon of orange zest to the cheese mixture. Roll them in the chopped pecans and extra cranberries.
- Gluten-Free & Lower-Carb: This recipe is easily adaptable! Simply omit the pretzel stick handle. For the coating, just ensure your bacon and other ingredients are gluten-free. The bites themselves are naturally low in carbs.
Chef Emily’s Kitchen Notes
Over the years, I’ve made these bites more times than I can count, and they’ve evolved in the best ways. The Dijon mustard was a happy accident one day when I was out of paprika and started rummaging through the fridge—it’s now a permanent fixture in my version! I also learned the hard way that skipping the chill time is a recipe for sticky, melty disaster. Trust me on that one.
These bites are also the ultimate make-ahead appetizer. You can assemble them completely (minus the pretzel sticks) up to two days in advance. Just store them in a single layer in an airtight container in the fridge. I also love to double the batch and freeze half. They freeze beautifully! Place the un-coated balls on a parchment-lined sheet and freeze solid, then transfer to a freezer bag. Thaw in the fridge overnight before rolling in the coating and serving.
Your Questions, Answered!
Let’s tackle some common questions to make sure you’re feeling confident.
Q: My cheese mixture is too soft and sticky to roll. What did I do wrong?
A: This almost always means it needs more chill time! Pop the whole bowl back in the fridge for another 20-30 minutes. Also, double-check that your cream cheese was truly at room temperature, not warm or melted. Cold cream cheese is hard to mix, but warm cream cheese is impossible to roll.
Q: Can I make these gluten-free?
A> Absolutely! The recipe is naturally gluten-free except for the pretzel sticks. Simply omit them or find a gluten-free pretzel alternative. Just be sure to check that your bacon and any other processed ingredients are certified gluten-free.
Q: How far in advance can I make these?
A> They are fantastic for making ahead! You can form the balls and roll them in the coating up to 2 days before you need them. Store them in a single layer in an airtight container in the fridge. I recommend waiting to add the pretzel sticks until just before serving so they stay crisp.
Q: The coating isn’t sticking well to my cheese balls. Help!
A> If your cheese balls are very cold and firm, the coating might not adhere perfectly. You can try rolling them in the coating a second time right before serving, or very lightly dampen your hands with water when rolling the initial ball to create a slightly stickier surface for the coating to grip.
Nutritional Information*
I believe that all food fits into a happy, balanced life, and that includes these delightful, indulgent bites! Here’s a general breakdown so you can enjoy them mindfully.
Yields: ~36 bites | Serving Size: 2 bites
Per Serving (approx.):
Calories: 220 | Protein: 5g | Carbohydrates: 4g | Fat: 20g | Saturated Fat: 9g | Sugar: 2g | Sodium: 280mg
*Please note: This is an estimate provided by an online nutrition calculator. Values can vary significantly based on the specific brands of ingredients you use and any substitutions you make.
Let’s Chow Down!
And there you have it! Your complete guide to making the most irresistible, conversation-starting, party-perfect Mini Cheese Ball Bites. This recipe is built for sharing, for laughing over, and for creating those happy, full-belly moments that I live for.
I hope you feel empowered and excited to whip up a batch of these for your next gathering. Remember, cooking is about love and connection, not perfection. So if a few of your balls aren’t perfectly round, or if you sneak a couple for “quality control” before the guests arrive, you’re doing it right.
I’d love to hear how your cheesy creations turn out! Tag me on social @TastyChow with your photos and stories. Now, go forth and be the appetizer hero you were always meant to be.
With love and a full platter,
Chef Emily