Mongolian Beef & Rice Meal Prep: Your New Flavor-Packed Weeknight Hero
Ditch the Boring Lunch, Embrace the Flavor
Hey there, friend! Let me guess: you’re staring down another week, your stomach is already groaning at the thought of sad desk salads or another overpriced takeout salad, and you’re dreaming of something that’s actually… exciting. Sound familiar? I’ve been there more times than I’ve burnt garlic (which, trust me, is a lot). That’s why I’m practically buzzing to share this recipe with you today.
This isn’t just any meal prep. This is my Mongolian Beef & Rice – Meal Prep XL. We’re talking tender, thinly sliced steak, wok-tossed in a sauce that’s the perfect dance partner of sweet and savory, with just a hint of fire. It’s clinging to crisp-tender bell peppers and onions, all piled high on a fluffy bed of steaming jasmine rice. This dish is your golden ticket to a week of lunches you’ll actually look forward to. It’s macro-friendly, packed with protein to keep you fueled, and so incredibly delicious that “eating clean” feels like a celebration. So, tie on your favorite apron (the messy one with all the stains tells the best stories), and let’s make something amazing together.
The Day I Fell in Love with a Wok
This recipe takes me right back to my first tiny apartment after culinary school. My kitchen was about the size of a postage stamp, but I had this massive, slightly rusty wok that I’d scored at a thrift store. I was determined to master the art of the stir-fry. One particularly chaotic Tuesday, after a long day, I threw together a version of this Mongolian beef with what I had on hand. The scent of ginger and garlic sizzling in sesame oil filled my entire apartment, and when I took that first bite—the steak was tender, the sauce was sticky and perfect—I did a little happy dance right there in my kitchen. It was one of those moments where you realize that the best meals aren’t always the most complicated; they’re the ones that hit the spot exactly when you need them. This dish became my weekly ritual, my edible armor against a busy schedule.
Gathering Your Flavor All-Stars
Here’s the cast of characters that’s going to make this dish sing. Don’t stress if you’re missing an item or two—I’ve got your back with some easy swaps!
- 24 oz top sirloin or flank steak, thinly sliced: This is our star! Flank steak is lean and flavorful, while top sirloin is a bit more tender. The key is to slice it against the grain—it’s the number one secret to melt-in-your-mouth beef. Pro tip: pop the steak in the freezer for 15-20 minutes before slicing; it firms up and makes cutting paper-thin slices a breeze.
- 2 tbsp cornstarch (24g): This is our magic dust! Coating the beef in cornstarch gives it a wonderfully crispy, slightly textured edge when we sear it, and it helps the glorious sauce cling to every single piece.
- 2 red bell peppers & 1 large yellow onion, sliced: We’re adding color, crunch, and a touch of sweetness. Feel free to swap in green bell peppers, throw in some broccoli florets, or even some snap peas for a different veggie vibe.
- 4 cups cooked white rice (or jasmine rice): The perfect fluffy base to soak up all that saucy goodness. I’m a sucker for jasmine rice for its fragrant aroma, but brown rice or cauliflower rice work beautifully for a whole-grain or low-carb option.
- 1 tbsp sesame oil or avocado oil: Sesame oil adds a fantastic nutty flavor, but it has a low smoke point. For a super high-heat sear, avocado oil is my go-to. You can always finish with a drizzle of toasted sesame oil at the end for extra aroma!
- 2 tsp garlic, minced & 1 tsp fresh ginger, grated: The dynamic duo of flavor! Fresh is always best here—that pungent, aromatic kick is irreplaceable. No fresh ginger? A half-teaspoon of ground ginger can work in a pinch.
For That Irresistible Mongolian Sauce:
- 1/2 cup low-sodium soy sauce: The savory, salty backbone. Using low-sodium lets us control the salt level, especially since the sauce reduces.
- 1/4 cup hoisin sauce: This is the secret weapon for depth and a touch of sweetness. It’s like an Asian barbecue sauce—complex and delicious.
- 2 tbsp brown sugar or sugar-free sweetener: For that essential caramelized sweetness. I’ve made this with monk fruit sweetener, and it works like a dream!
- 1 tbsp rice vinegar: A splash of brightness to balance the rich flavors.
- 1/2 tsp red pepper flakes: Our gentle heat. Adjust this to your liking—add more for a kick or leave it out for a mild dish.
- Optional twist: splash of orange juice or zest: My little chef’s hack! A bit of citrus brightens everything up and adds a subtle, sophisticated layer.
Let’s Get Cooking: Your Step-by-Step Roadmap to Delicious
Ready to create some magic? Follow these steps, and you’ll have a restaurant-quality meal in less time than it takes to watch your favorite sitcom.
- Prep the Steak: Grab a large bowl and toss your thinly sliced steak with the cornstarch until every piece is evenly coated. It should look like the beef got a light, dusty snow coating. Let it sit for 5-10 minutes while your pan heats up. This rest time is key—it allows the cornstarch to adhere, which is what gives us that crave-worthy crispy texture. Chef’s Hack: I like to do this in a reusable zip-top bag. Less mess, more even coating!
- Sear the Steak: Place a large skillet or wok over medium-high heat and add your oil. Once the oil is shimmering (that’s your cue it’s hot enough!), add the steak in a single layer. Don’t crowd the pan! Cook in batches if you need to. We’re looking for a golden brown sear and a slightly crispy edge—about 2-3 minutes per side. No need to cook it through completely yet. Remove the steak and set it aside on a plate. It will finish cooking later. Chef’s Tip: This batch-cooking step is non-negotiable for a good sear. Overcrowding steams the meat, and we want crispiness!
- Sauté the Veggies: In that same glorious pan (with all the beefy, flavorful bits still in there!), toss in your sliced onions and bell peppers. Stir-fry them for 3-4 minutes until they’re just starting to soften but still have a satisfying crunch. We’re not making mush here—we want texture!
- Make the Sauce: Push the veggies to the side of the pan. Add the minced garlic and grated ginger to the center and let them sizzle for just 30 seconds until incredibly fragrant. Now, pour in your pre-mixed Mongolian sauce. It will bubble and thicken almost immediately as it hits the hot pan. Let it simmer for 2-3 minutes, stirring occasionally, until it becomes glossy and coats the back of a spoon.
- Combine Everything: Time for the grand reunion! Return the seared steak and any accumulated juices back to the skillet. Toss everything together—the steak, the veggies, that incredible sauce—until every single piece is gleaming and beautifully coated. Let it all simmer together for just 1-2 more minutes so the flavors can marry and the steak can heat through. Chef’s Commentary: This is the best part. That sound of the sizzle, that smell… you’re basically a rockstar now.
Plating Up & Prepping for the Week
You’ve done it! Now, let’s make it look as good as it tastes.
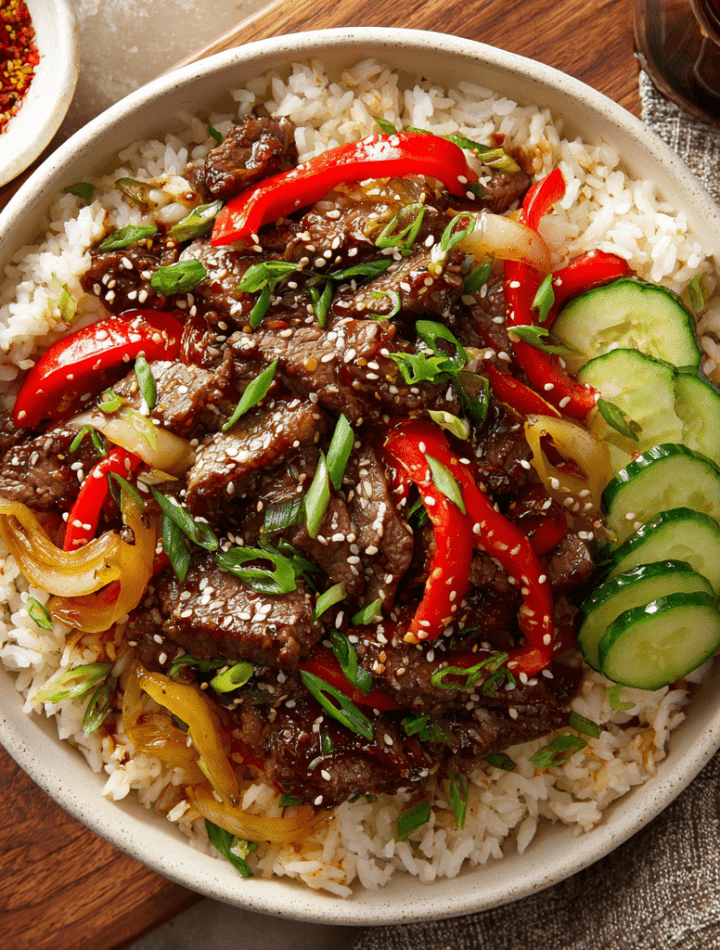
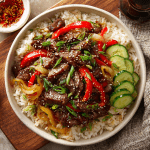
For a gorgeous dinner tonight, spoon a generous portion of fluffy rice into a shallow bowl. Top it with that glistening Mongolian beef and veggie mixture. Now, the fun part: the garnishes! A sprinkle of sliced green onions and a dash of sesame seeds add color and a nutty crunch. For a little extra heat and sheen, I love a final drizzle of chili oil. If you want to add a fresh, cool element, some quick cucumber ribbons or a small bed of shredded cabbage on the side is absolutely divine.
For meal prep, let the beef and rice cool completely to room temperature before dividing them evenly into your meal prep containers. This prevents condensation from making your crispy beef soggy. I like to pack the rice on the bottom and the beef mixture on top. It stays fresh and delicious in the fridge for up to 4 days.
Make It Your Own: Delicious Twists & Swaps
This recipe is a fantastic blueprint. Feel free to get creative and make it work for you!
- Spicy Garlic Lover’s Edition: Double the garlic and add a tablespoon of sriracha or a few dried arbol chiles to the sauce for a serious kick.
- Chicken or Pork Version: Not a beef fan? Thinly sliced chicken breast or thigh, or even pork tenderloin, work wonderfully here. Just adjust the cooking time accordingly until the meat is cooked through.
- Gluten-Free & Lower-Carb: Easy! Use tamari or coconut aminos instead of soy sauce, and ensure your hoisin is gluten-free. Serve it over cauliflower rice or zucchini noodles for a low-carb feast.
- Veggie-Packed Power Bowl: Load it up! Add broccoli florets, sliced carrots, mushrooms, or water chestnuts along with the peppers and onions. For a vegetarian version, use extra-firm tofu or tempeh, coated in cornstarch and pan-fried until crispy.
- Pineapple Sweet & Sour Twist: Add a cup of fresh pineapple chunks when you’re combining everything at the end. The sweet, tangy burst is absolutely incredible.
Chef Emily’s Kitchen Notes
This recipe has evolved so much from that first apartment experiment. I’ve learned that the cornstarch trick is a total game-changer, and that letting the sauce reduce just that little bit extra makes it stickier and more restaurant-style. One time, I was so distracted telling a story to my cat (don’t judge) that I almost burnt the garlic. I saved it just in time, but it was a good reminder to have all my ingredients pre-measured and ready to go—what we chefs call mise en place. It makes the process so smooth and stress-free. This dish is now a permanent part of my meal prep rotation, and I hope it becomes part of yours, too.
Your Questions, Answered!
Let’s tackle a few common questions to ensure your success.
- Q: My sauce didn’t thicken. What happened?
A: The most common culprit is not letting the sauce simmer for long enough after adding it to the pan. Give it a full 2-3 minutes to bubble and reduce. If it’s still too thin, you can make a quick slurry by mixing 1 teaspoon of cornstarch with 1 tablespoon of cold water and stirring it into the simmering sauce. It should thicken up almost instantly!
- Q: Can I freeze this Mongolian beef meal prep?
A: You can, but with a caveat. The beef itself freezes quite well for up to 3 months. However, the bell peppers can become a bit soft and watery upon thawing. I’d recommend freezing just the beef in its sauce, and then adding fresh-cooked veggies and rice when you’re ready to eat.
- Q: My steak got tough. How can I prevent that?
A: Two things: First, make sure you are slicing against the grain. This shortens the muscle fibers, making the meat much more tender. Second, avoid overcooking it. We’re just searing it initially, and it finishes cooking quickly in the sauce. A quick, hot sear is the goal!
- Q: What’s the best way to reheat it for meal prep?
A: For the best texture, I recommend reheating it gently in the microwave with a damp paper towel placed over the container. This helps steam it slightly and prevents the rice from drying out. You can also reheat it in a skillet over medium heat with a tiny splash of water.
MONGOLIAN BEEF & RICE – MEAL PREP XL
- Total Time: 25 minutes
- Yield: 4 1x
Description
This sweet-and-savory Mongolian beef is next-level. Think tender steak, caramelized sauce, and stir-fried veggies over fluffy rice — all meal-prep ready and macro-friendly. It’s got flavor, fire, and fuel. You’re not just eating clean — you’re eating smart.
Ingredients
24 oz top sirloin or flank steak, thinly sliced
2 tbsp cornstarch (24g)
2 red bell peppers, sliced
1 large yellow onion, sliced
4 cups cooked white rice (or jasmine rice)
1 tbsp sesame oil or avocado oil
2 tsp garlic, minced
1 tsp fresh ginger, grated
Mongolian Sauce (mix together):
1/2 cup low-sodium soy sauce
1/4 cup hoisin sauce
2 tbsp brown sugar or sugar-free sweetener
1 tbsp rice vinegar
1/2 tsp red pepper flakes (adjust to heat preference)
Optional twist: splash of orange juice or zest for citrusy kick
Optional Garnishes:
Sliced green onions
Sesame seeds
Chili oil drizzle
Cucumber ribbons or shredded cabbage for crunch
Instructions
Prep the Steak:
Toss steak slices with cornstarch until evenly coated. Let sit for 5–10 minutes for a crispy edge.
Sear the Steak:
In a large skillet over medium-high heat, add sesame oil. Cook steak in batches until browned and slightly crispy. Remove and set aside.
Sauté Veggies:
In the same pan, sauté onions and bell peppers until just softened, about 3–4 minutes.
Make the Sauce:
Add garlic and ginger, then pour in the Mongolian sauce mixture. Simmer for 2–3 minutes until thickened slightly.
Combine Everything:
Return steak to the pan. Toss to coat in sauce. Let simmer 1–2 more minutes until glossy and sticky.
Serve or Meal Prep:
Spoon over rice and top with garnishes. Let cool before sealing containers.
- Prep Time: 10 minutes
- Cook Time: 15 minutes
Nutrition
- Calories: 540 / Serving
- Fat: 18g / Serving
- Carbohydrates: 50g / Serving
- Protein: 40g / Serving
Fueling Your Body & Soul
I’m a firm believer that food should be both delicious and nourishing. This Mongolian Beef meal prep is a fantastic balance of all three macronutrients, making it a truly satisfying and sustaining meal. The lean steak provides a powerful punch of protein to keep you full and support muscle repair. The carbohydrates from the rice and veggies give you clean, long-lasting energy to power through your day. And the healthy fats from the oil help with nutrient absorption and keep everything feeling rich and satisfying. Remember, these are estimates and can vary based on your specific ingredients and portion sizes, but it’s a great guideline for a balanced, macro-conscious meal.
Per Serving (estimated):
Calories: ~540 | Protein: 40g | Carbs: 50g | Fat: 18g
You’ve Got This!
And there you have it! Your secret weapon for a week of incredible, flavor-packed meals that prove healthy eating doesn’t have to be boring. This Mongolian Beef is more than just a recipe; it’s a reminder that with a few simple techniques and a little bit of love, you can create something truly special in your own kitchen. I am so proud of you for taking the time to cook for yourself and your loved ones.
I’d love to hear how it turns out! Tag me on social @TastyChow with your beautiful creations or leave a comment below telling me what your favorite twist was. Now, go forth and chow down!
With a full heart and a hungry belly,
— Emily