Maple Pecan Green Bean Bundles: The Side Dish That Steals the Show
Hey there, friend! Chef Emily here, waving at you from my flour-dusted kitchen. Can we talk about side dishes for a second? I feel like they so often get the short end of the stick. They’re the quiet background singers to the turkey or ham’s rockstar solo. But what if I told you about a side dish so delicious, so packed with flavor and texture, that your guests might just forget about the main course entirely?
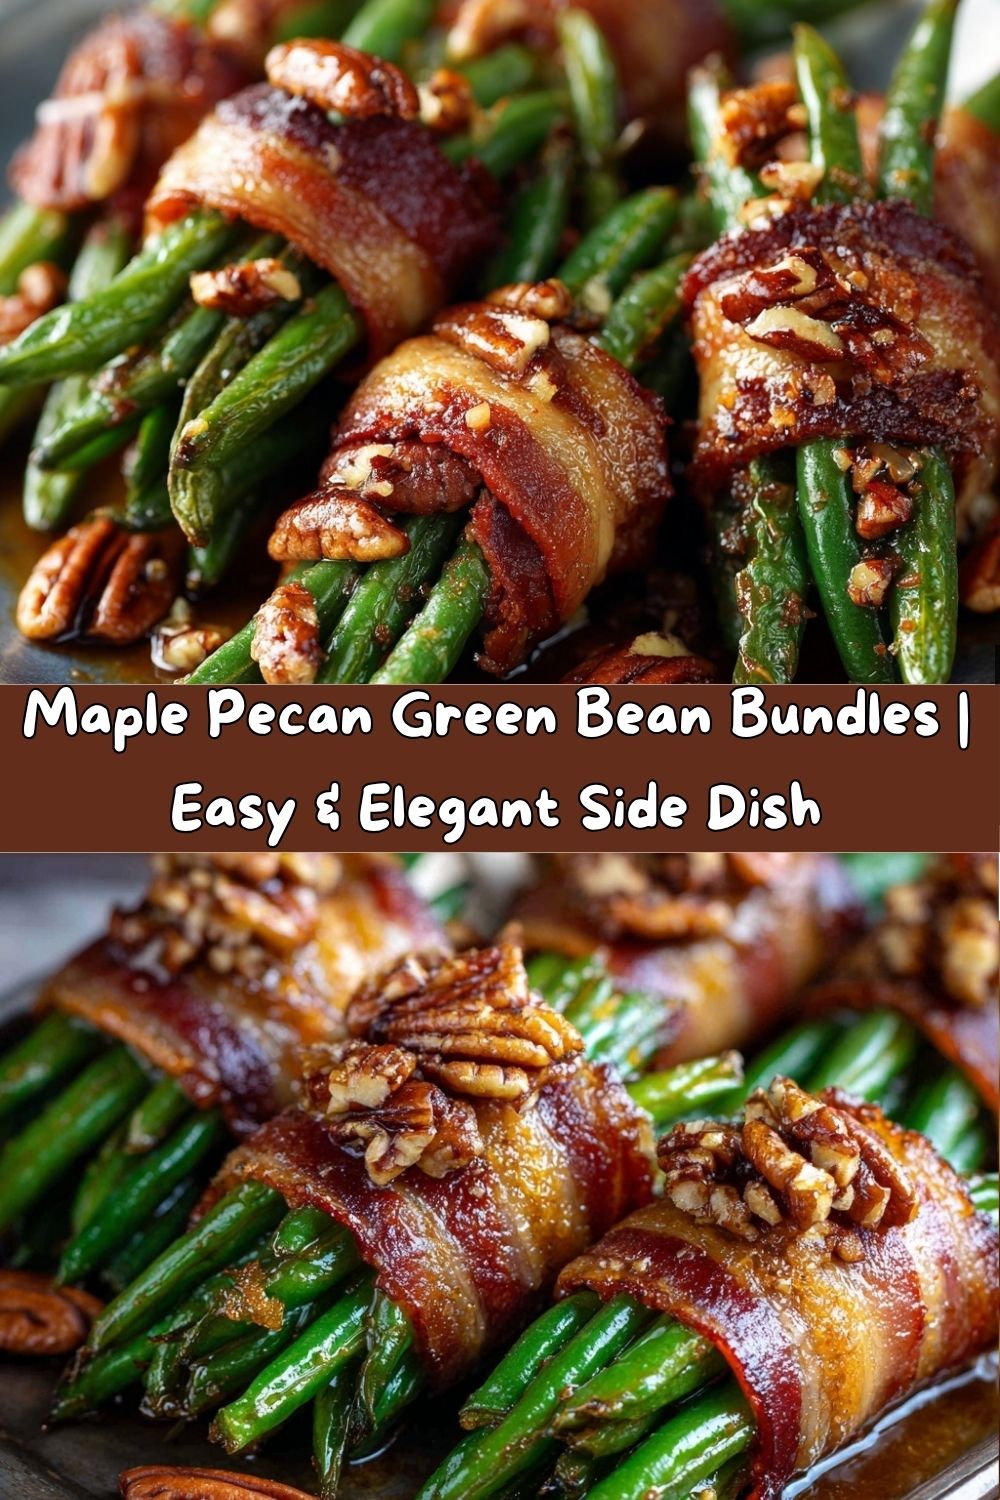
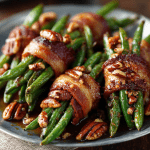
I’m talking about my Maple Pecan Green Bean Bundles. Just saying the name makes me smile. Imagine this: tender-crisp green beans, all snuggled up and wrapped in a cozy, smoky bacon blanket. Then, we paint them with a glossy, sweet-and-savory maple glaze that gets all sticky and caramelized in the oven. And just when you think it can’t get any better, we shower them with buttery, toasted pecans for the most incredible crunch.
This recipe is my everything. It’s elegant enough to earn a standing ovation at your holiday table, but it’s secretly so simple that you can whip it up for a fancy weeknight dinner without breaking a sweat. It’s the perfect balance of savory, sweet, and crisp. So, tie on your favorite apron (the messy one is always the best), and let’s make a side dish that’s anything but ordinary.
A Holiday Table & A Happy Kitchen Accident
This recipe, like so many of my favorites, has a story. It was born from a happy little kitchen accident a few Thanksgivings ago. I was in charge of the green bean casserole, the classic one with the crispy onions. But in my usual pre-holiday frenzy, I realized I’d forgotten the fried onions at the store. The panic was real!
I stood in my kitchen, staring into the fridge, praying for inspiration. I had a pile of gorgeous fresh green beans, a pack of bacon calling my name, and my prized bottle of dark maple syrup from a recent trip to Vermont. I thought, “Well, bacon makes everything better, right?” I started bundling the beans, glazing them with maple syrup and a dash of Dijon for a little zing, and crossing my fingers.
When I pulled them out of the oven, glistening and smelling like a sweet, smoky dream, I knew I was onto something. My grandma, who was visiting, took one bite and her eyes lit up. “Emily,” she said, “this is it. This is the new tradition.” That’s the magic of cooking—sometimes the best recipes come from a little bit of chaos and a whole lot of love.
Gathering Your Flavor All-Stars
This recipe is all about simple, high-quality ingredients working in perfect harmony. Here’s your shopping list, along with a few of my chef-y insights to help you along the way.
- 2 lbs Fresh Green Beans, trimmed: Look for beans that are bright green and snap when you bend them. They’re the fresh, crisp star of our show! Chef’s Tip: Don’t thaw frozen beans for this—their texture won’t hold up as well.
- 10 slices of Bacon, halved: I love using a standard-cut, smoky bacon. The fat renders beautifully and bastes the beans as they cook. For a twist, try applewood-smoked bacon!
- ⅓ cup Pure Maple Syrup: Please, for the love of all that is good and sticky, use the real stuff! The complex, caramel notes are irreplaceable. Pancake syrup just won’t give you the same depth of flavor.
- 1 tbsp Dijon Mustard: This is our secret weapon! It’s not about a mustardy taste; it adds a subtle tang that cuts the sweetness and makes the maple flavor pop. Trust me on this one.
- ½ tsp Black Pepper & ½ tsp Garlic Powder: Our savory foundation. Freshly cracked pepper is always my go-to for the best aroma.
- ½ cup Crushed Pecans: They bring that essential nutty, buttery crunch. Toasting them beforehand (just 5-7 minutes in a 350°F oven) will unlock their deepest flavor.
- Pinch of Cayenne or Smoked Paprika (optional): A tiny pinch! This is my pro move. It doesn’t make the dish spicy, but it adds a warm, lingering heat in the background that’s absolutely divine.
- Toothpicks for securing: Our little kitchen assistants, ensuring our bundles stay perfectly wrapped.
Let’s Build Some Beautiful Bundles!
Ready for the fun part? This is where we roll up our sleeves and create some magic. I’ll walk you through every step, and I promise, it’s easier than it looks.
- Preheat and Prep: First things first, get that oven heating to a cozy 375°F (190°C). Line a sturdy baking sheet with foil or parchment paper. This is a non-negotiable step for easy cleanup—because nobody wants to scrub bacon glaze off a pan later!
- The Blanching Step: Bring a large pot of salted water to a rolling boil. We’re going to give our green beans a quick 3-minute swim in that hot tub. This process, called blanching, sets their vibrant green color and gets them perfectly tender-crisp before they hit the oven. As soon as the timer goes off, drain them and immediately give them a cold shower (run them under cold water or plunge them into an ice bath). This stops the cooking and keeps them from getting mushy.
- Bundle & Wrap: Now, let’s get organized. Grab a small handful of green beans—about 6 to 8, depending on their size. You’re going for a cute, manageable little bundle. Wrap a half-slice of bacon around the center of the bundle, like you’re tucking them into bed. Secure the bacon’s end with a trusty toothpick. Place the bundle seam-side down on your prepared baking sheet. Repeat this until all your beans are bundled up and looking adorable.
- Make the Magic Glaze: In a small bowl, whisk together the maple syrup, Dijon mustard, black pepper, garlic powder, and that optional pinch of cayenne. Give it a taste. Isn’t that incredible? The sweet, the savory, the tang… it’s a flavor party already.
- Glaze and Get Ready: Using a pastry brush (or even just a spoon), generously paint each green bean bundle with the maple glaze. Get it into all the nooks and crannies! You want them to be well-coated because this glaze is what creates that gorgeous, sticky, caramelized exterior.
- Roast to Perfection: Slide your beautiful bundles into the preheated oven and let them roast for 25-30 minutes. You’re looking for the bacon to be fully cooked, crispy around the edges, and the glaze to be bubbling and darkening in spots. Your kitchen is going to smell absolutely heavenly right about now.
- The Nutty Finale: In the last 5 minutes of baking, pull the tray out and sprinkle the crushed pecans over the top of each bundle. This gives the nuts just enough time to toast in the oven’s heat and cling to the sticky glaze without burning.
- The Crucial Rest: Once they’re out of the oven, let your bundles rest for about 5 minutes before serving. This rest period is key—it allows the glaze to set a bit so it’s gloriously sticky instead of dangerously molten. If you have any extra glaze left in the bowl, you can warm it up and drizzle a little more over the top for extra drama.
How to Serve Your Masterpiece
Presentation is part of the fun! I love arranging these bundles on a long, elegant platter, slightly overlapping each other. It creates a stunning centerpiece for your table. Scatter any extra toasted pecans that might have fallen onto the platter around the bundles for a beautiful, finished look.
These bundles are the ultimate team player. They are a dream alongside a holiday roast turkey or a glazed ham. But don’t save them just for special occasions! They are fantastic with a simple weeknight roast chicken, a juicy pork tenderloin, or even a thick, pan-seared steak. The sweet and savory notes pair wonderfully with almost any protein.
Make It Your Own: Delicious Twists & Swaps
One of my favorite things about this recipe is how adaptable it is. Feel free to get creative and make it work for your taste buds and dietary needs!
- Pork-Free Perfection: For a vegetarian version, you can skip the bacon! Instead, brush the bundles with a little olive oil before the glaze, and add a sprinkle of smoked salt or smoked paprika to the maple mixture. The smoky flavor is still there, just without the bacon.
- Nutty Alternatives: Not a fan of pecans? No problem! Toasted walnuts or almonds would be absolutely delicious here. You could even use pumpkin seeds (pepitas) for a nut-free crunch.
- Spice It Up: If you’re a heat-seeker like me, amp up the cayenne or add a teaspoon of sriracha to the glaze. That sweet and spicy combo is a total winner.
- Herbaceous Touch: For a fresh, aromatic note, stir a tablespoon of finely chopped fresh rosemary or thyme into the maple glaze. It adds a wonderful, fragrant complexity.
- Balsamic Boost: Add a tablespoon of balsamic glaze to the maple mixture. The balsamic adds a lovely, tangy sweetness that is just next-level.
Chef Emily’s Kitchen Notes
Over the years, I’ve made these bundles more times than I can count, and they’ve evolved a little each time. The Dijon mustard was a later addition, and now I can’t imagine the recipe without it! One time, I was filming a recipe video and accidentally used whole green beans without bundling them first—it turned into a delicious “deconstructed” maple bacon green bean situation. It was a happy mess, and proof that even “mistakes” can be tasty.
My biggest piece of advice? Don’t stress about making the bundles look absolutely perfect. A little rustic charm is part of their appeal! The most important thing is that they’re wrapped securely so the bacon cooks evenly. Everything else is just delicious details.
Your Questions, Answered!
I’ve gotten so many wonderful questions about this recipe over the years. Here are answers to the most common ones.
Q: Can I make these ahead of time?
A: You bet! You can blanch the green beans and assemble the bundles a day in advance. Keep them covered in the fridge on the baking sheet. Let them sit at room temperature for 20-30 minutes before glazing and baking. You may need to add 2-3 extra minutes to the baking time since they’ll be going in cold.
Q: My bacon isn’t getting crispy. What did I do wrong?
A> This usually happens if the bundles are packed too tightly on the pan. Make sure there’s a little space between each one so the heat can circulate and crisp up the bacon. If you’re still worried, you can pop them under the broiler for the last minute or two—just watch them like a hawk!
Q: Can I use frozen green beans?
A: I really recommend fresh for this recipe. Frozen green beans have a much higher water content and tend to get soft and watery when roasted, so they won’t hold their satisfying crisp-tender texture.
Q: Is there a substitute for the maple syrup?
A> While real maple syrup is best, in a pinch, you could use honey. The flavor profile will be different—more floral than caramel—but it will still be delicious. I would not recommend pancake syrup, as it can be overly sweet and thin.
Maple Pecan Green Bean Bundles
- Total Time: 50 minutes
- Yield: 8 - 10 1x
Description
Elegant enough for the holidays, easy enough for a weeknight — these maple pecan green bean bundles strike the perfect balance of savory, sweet, and crisp. Smoky bacon wraps tender green beans, all glazed with rich maple syrup and topped with buttery crushed pecans for a show-stopping side that’s anything but ordinary.
Ingredients
2 lbs green beans, trimmed
10 slices of bacon, halved
⅓ cup pure maple syrup
1 tbsp Dijon mustard (optional twist: adds depth)
½ tsp black pepper
½ tsp garlic powder
½ cup crushed pecans (toasted if desired)
Pinch of cayenne or smoked paprika (optional for heat)
Toothpicks for securing
Instructions
Preheat oven to 375°F. Line a baking sheet with foil or parchment.
Blanch green beans in boiling water for 3 minutes, then drain and rinse under cold water.
Bundle 6–8 green beans together and wrap with half a slice of bacon. Secure with a toothpick.
In a small bowl, mix maple syrup, Dijon mustard, pepper, garlic powder, and cayenne or paprika if using.
Place bundles seam-side down on the baking sheet. Brush each generously with the maple glaze.
Roast for 25–30 minutes until bacon is crisp and caramelized.
Sprinkle crushed pecans over the bundles in the last 5 minutes of baking to toast slightly.
Let rest 5 minutes before serving. Drizzle with any remaining glaze if desired.
- Prep Time: 20 minutes
- Cook Time: 30 minutes
Nutrition
- Calories: 160 / Serving
- Fat: 10g / Serving
- Carbohydrates: 10g / Serving
- Protein: 6g / Serving
Nourishing Your Body & Soul
While I’m all about the joy and comfort of food, I also believe in knowing what’s going into our bodies. Here’s a little breakdown of what you’re enjoying in each bundle (this is an estimate and can vary based on specific ingredients used).
Each bundle is a good source of protein from the bacon and pecans, and it provides a nice dose of fiber and essential vitamins from the green beans. The maple syrup is a natural sweetener, and a little goes a long way in creating that incredible flavor. Remember, this is a side dish meant to be savored and enjoyed as part of a balanced meal. It’s all about that beautiful combination of flavor and texture that makes eating such a pleasure!
Per Bundle (Approximate):
Calories: ~160 | Fat: 10g | Carbs: 10g | Protein: 6g
Your New Go-To Side Dish Awaits
And there you have it, my friend! My all-time favorite, show-stopping, couldn’t-be-easier Maple Pecan Green Bean Bundles. This recipe is a perfect example of what I love most about cooking: taking simple, wholesome ingredients and turning them into something truly memorable and special.
I hope this recipe brings as much joy and flavor to your table as it has to mine. I can just picture you pulling these glistening, gorgeous bundles out of the oven to a chorus of “oohs” and “aahs” from your family and friends. That’s the sound of a meal made with love.
If you make them (and you totally should!), I’d be absolutely thrilled if you tagged me on social @TastyChowEmily so I can see your beautiful creation. Now, go forth and chow down!
With a full heart and a hungry belly,
Emily