Gingerbread Rice Krispie Treats: Your New Favorite Holiday Hug in a Bar
Hey there, my fellow flavor-chaser! Can we just take a moment to appreciate the absolute magic of gingerbread? That warm, spicy, deeply comforting aroma that fills your entire house and instantly feels like a holiday hug. It’s the scent of happy memories, of cozy socks, and of gathering with the people you love most.
But let’s be real for a second. Sometimes, the thought of rolling out dough, chilling it, cutting it, and decorating it feels… well, like a lot. Especially during this bustling season when your to-do list is longer than a grocery receipt the week before Thanksgiving.
That’s exactly why I’m so ridiculously excited to share this recipe with you today. We’re taking everything we adore about classic gingerbread—the warm spices, the rich molasses, that cozy feeling—and we’re packing it into the easiest, no-bake, one-bowl wonder you’ve ever met: Gingerbread Rice Krispie Treats.
And because I believe that delicious food should be for everyone, I’ve made sure this recipe is naturally gluten-free, refined sugar-free, and has a simple vegan swap. They’re chewy, they’re crispy, they’re packed with flavor, and they come together in about 15 minutes of active time. No oven required! So, tie on your favorite apron (the messy one is always the best), and let’s make a batch of pure, uncomplicated holiday joy.
The Day I Dropped the Gingerbread (And Found Something Better)
This recipe was born from a minor kitchen disaster that turned into a major “aha!” moment. A few years back, I was determined to make a show-stopping, elaborately decorated gingerbread house for a holiday party. I had the blueprint (yes, a real blueprint), the royal icing, and the ambition of a chef on a cooking competition show.
Long story short, my beautiful, painstakingly constructed gingerbread mansion suffered a structural failure of epic proportions. The roof slid off, a wall crumbled, and I was left with a counter full of broken gingerbread pieces and a slightly bruised ego.
Instead of crying over spiced milk, I looked at those pieces and thought, “What would make this better right now?” I wanted that gingerbread flavor, but I needed it to be fast, easy, and comforting. I started grabbing things from the pantry—rice cereal, nut butter, molasses, and all my favorite warming spices. What emerged from that pan an hour later was a revelation: all the soul-warming flavor of my grandma’s gingerbread, but in a fun, forgiving, no-fuss bar. Sometimes, the best recipes aren’t planned; they’re discovered in a happy little accident.
Let’s Gather Our Cozy Ingredients
Here’s the dream team of ingredients that makes these bars so special. I’ve included all my favorite chef insights and swaps so you can make them your own!
- 8 cups Gluten-Free Rice Krispie Cereal: The crispy, airy foundation of our treat. Using a gluten-free brand ensures everyone can enjoy them! Chef’s Tip: Give the box a good shake before measuring to break up any crumbs for maximum crispiness.
- 2 tsp Ground Cinnamon + 2 tsp Ground Ginger: The dynamic duo of warmth! Cinnamon brings the sweet, woody notes, while ginger delivers that signature spicy kick.
- 1 tsp Allspice + 1 tsp Nutmeg + 1 tsp Ground Cloves: This is our spice support squad. Allspice adds a complex hint of pepper and juniper, nutmeg gives a nutty warmth, and cloves provide that intense, aromatic depth. Together, they create that classic, unmistakable gingerbread flavor profile.
- ½ tsp Salt: Do not skip this! Salt is the ultimate flavor enhancer. It makes the spices pop and balances the sweetness perfectly. Substitution Tip: If your nut butter is already salted, you can reduce this to a tiny pinch.
- 2 cups Cashew Butter: I love cashew butter for its neutral, buttery richness that lets the spices shine. Substitution Tip: Almond butter works beautifully for a slightly nuttier flavor, or use sunflower seed butter for a nut-free version!
- 1 cup Honey: Our natural sweetener that binds everything together with its floral sweetness. Vegan Swap: Use pure maple syrup for a completely vegan-friendly treat! The flavor is incredible with the spices.
- 6 tbsp Molasses: This is the heart and soul of gingerbread! It provides that deep, robust, almost bitter-sweet flavor and gorgeous dark color. I prefer unsulphured molasses for the best taste.
- 2 tsp Vanilla Extract: The secret weapon that rounds out all the other flavors and adds a layer of warm, aromatic sweetness.
Let’s Make Some Magic: The Step-by-Step Guide
Ready? This is where the fun begins. I’ll walk you through every step, with all my best kitchen hacks to ensure your bars are absolutely perfect.
- Prep Your Pan. First things first, grab that 9×13-inch baking pan and line it with parchment paper. Let the paper hang over the sides a bit—this creates “handles” that will make lifting the whole slab of treats out later an absolute breeze. No wrestling, no sticking, just clean, easy slices. Chef’s Hack: A tiny dab of your nut butter on the corners of the pan will help the parchment paper stick in place while you press in the mixture.
- Combine the Dry Goods. In a large, and I mean LARGE mixing bowl, add your 8 cups of Rice Krispie cereal. Now, sprinkle in all those gorgeous, fragrant spices: the cinnamon, ginger, allspice, nutmeg, cloves, and that crucial ½ teaspoon of salt. Use a whisk or a fork to toss everything together until the cereal is evenly coated in a fine dusting of spice. Your kitchen is already starting to smell amazing, isn’t it?
- Create the Glue. Now, for the sticky, sweet binding agent. In a medium saucepan, combine the cashew butter, honey (or maple syrup), molasses, and vanilla extract. Place it over low heat. We’re not trying to cook it, just warm it through until it becomes smooth, pourable, and perfectly stir-able. This should only take 2-3 minutes. Stir constantly with a spatula to prevent it from sticking or burning. You’ll know it’s ready when it’s glossy and flows smoothly off your spatula.
- The Big Mix! Carefully pour the warm, liquid mixture over your waiting bowl of spiced cereal. Now, work quickly and decisively! Use that spatula to fold and stir until every single piece of cereal is thoroughly and lovingly coated in the sticky, spiced sauce. This is a great arm workout! Chef’s Tip: If you’re adding any of the optional mix-ins like orange zest, chocolate chips, or candied ginger, now is the time to fold them in, while the mixture is still warm and pliable.
- Press It Like You Mean It. Transfer the mixture into your prepared pan. Now, this is the most important step for getting the perfect texture. You need to press firmly. Use a spatula, the bottom of a measuring cup, or (my favorite method) clean, slightly damp hands to press the mixture into an even, compact layer. Pressing firmly is what gives you those satisfying, chewy bars that hold their shape instead of crumbling when you bite into them.
- The Chill Out. Pop the entire pan into the refrigerator for at least 1 hour, or until the bars are completely firm and set. This patience-testing step is non-negotiable for clean slicing. It allows the nut butter and sweetener to firm up, creating that perfect crispy-yet-chewy texture we’re after.
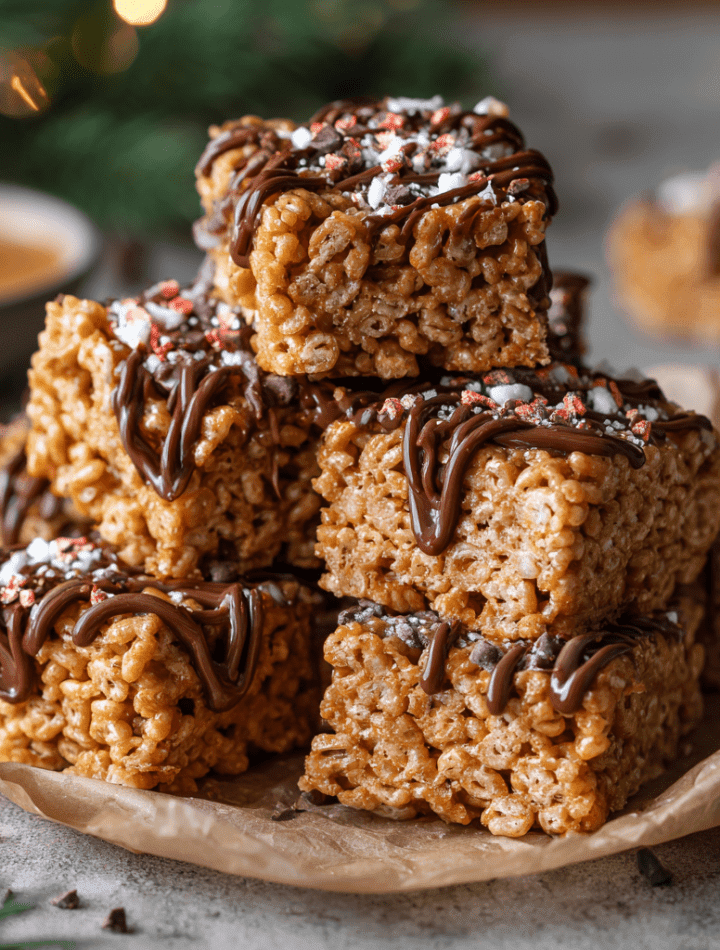
- Slice and Celebrate! Once fully set, use those parchment paper handles to lift the entire slab of treats out of the pan and onto a cutting board. Use a sharp knife to slice it into 24 bars (or 20 if you’re feeling generous!).
How to Serve These Spiced-Up Beauties
Okay, the hard part is over! Now, how do we make these already-delicious bars feel extra special?
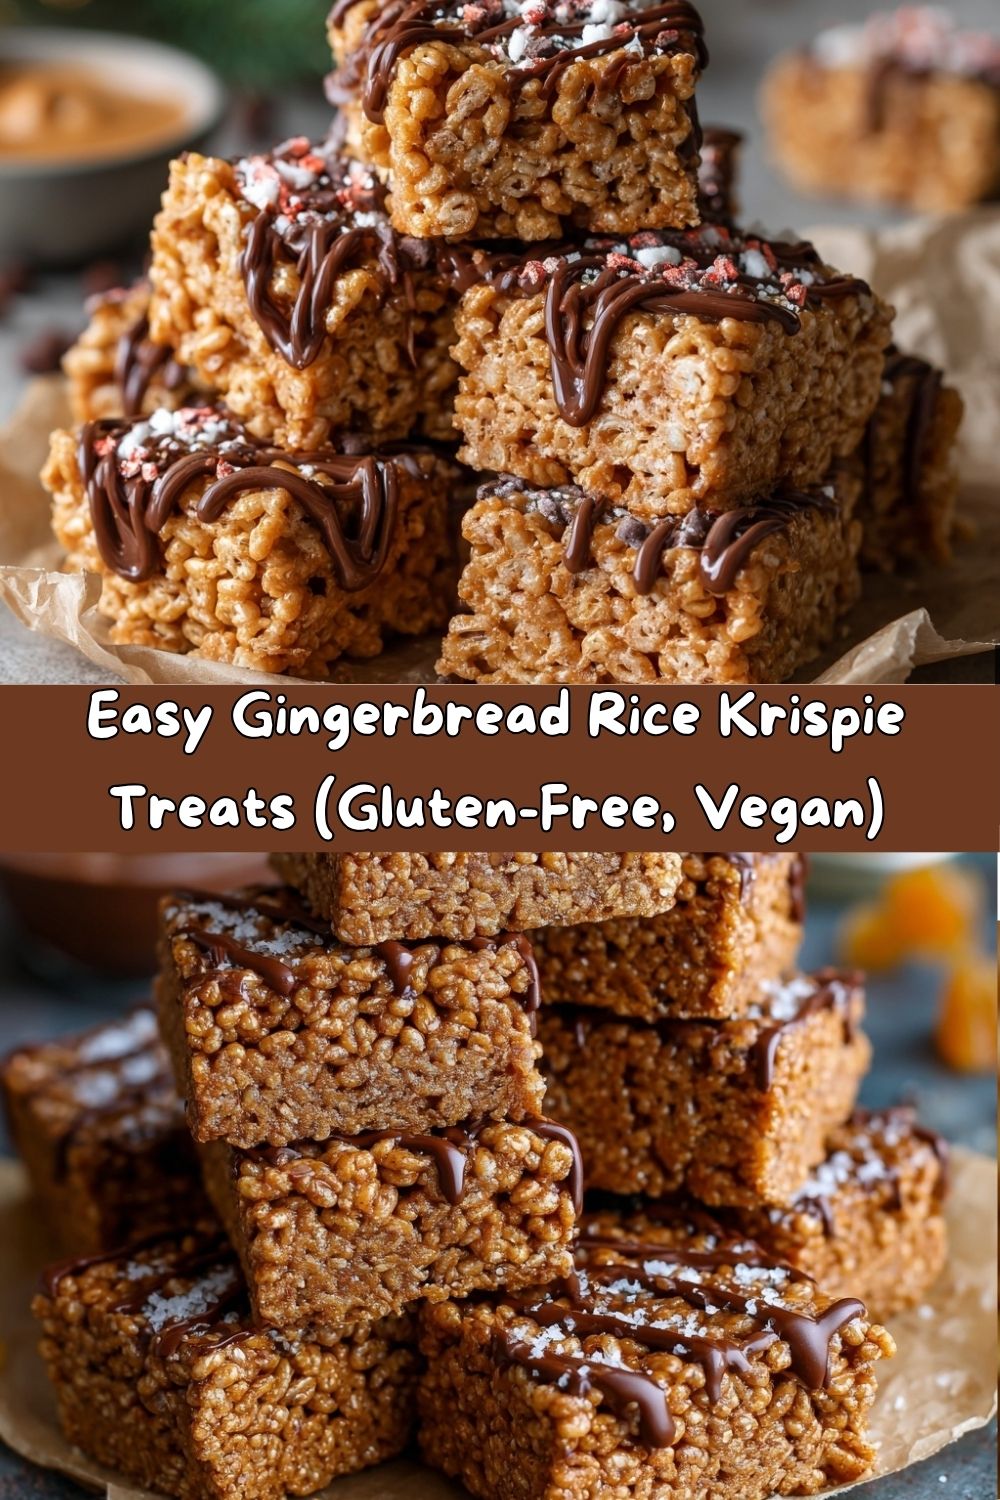
For a simple, elegant touch, I love to drizzle the tops with a little melted dark chocolate. Just melt ¼ cup of vegan chocolate chips with a teaspoon of coconut oil, then use a fork or a piping bag to create pretty zig-zags over the bars before you chill them.
Feeling festive? A sprinkle of holiday-colored sprinkles or even some crushed freeze-dried raspberries (for a gorgeous pop of red and a tangy flavor contrast) right after you press the mixture into the pan is just lovely.
These bars are the ultimate grab-and-go treat. I pack them in school lunches, stack them on a beautiful platter for holiday parties, or wrap them individually in cellophane with a cute ribbon for the most appreciated homemade food gift. Pair one with a hot cup of coffee, chai tea, or a tall glass of cold almond milk for the ultimate cozy snack.
Get Creative! Flavor Twists & Dietary Swaps
One of my favorite things about this recipe is how adaptable it is. Don’t be afraid to play with the flavors!
- Chocolate Orange Dream: Add the zest of one whole orange to the wet mixture and fold in ½ cup of mini chocolate chips. The bright citrus and rich chocolate are a match made in holiday heaven with the gingerbread spices.
- Ginger Lover’s Delight: For an extra spicy kick, fold in ¼ cup of finely chopped candied ginger. It gives you little pockets of intense, sweet heat that are absolutely addictive.
- Nut-Free Nirvana: Simply swap the cashew butter for sunflower seed butter. It works like a charm and has a lovely, mild flavor.
- Cacao Nib Crunch: For a less sweet, more sophisticated option with a delightful crunch, use ½ cup of cacao nibs instead of chocolate chips.
- Peanut Butter Twist: While it will change the flavor profile, using a natural, creamy peanut butter creates a delicious “gingerbread peanut butter cup” vibe that is seriously hard to resist.
Chef Emily’s Kitchen Notes
Over the years, this recipe has become a staple in my holiday lineup, and it’s evolved in little ways. I started with just cinnamon and ginger, but adding the allspice, nutmeg, and cloves was a game-changer—it tastes so much more like the real deal!
A funny story: I once, in a pre-coffee haze, accidentally used blackstrap molasses instead of the regular, milder kind. Whoa, mama! They were INTENSE. A little too bitter for my taste, but my friend who loves dark chocolate adored them. So, consider that your warning—stick with unsulphured molasses for the perfect balance.
The biggest lesson? Don’t be shy when you press the mixture into the pan. The firmer you press, the better the bars hold together. Trust me on this one!
Your Questions, Answered!
Q: My mixture seems too dry and isn’t sticking together. What happened?
A: This usually means the wet mixture wasn’t warm enough or wasn’t mixed thoroughly. Make sure you heat the nut butter/honey mixture until it’s very fluid and easy to pour. Next time, work a bit faster when mixing to ensure even coating before it starts to cool. If it’s already in the pan, you can try pressing it down even more firmly to help it bind.
Q: Can I make these ahead of time?
A: Absolutely! In fact, I think they taste even better the next day as the flavors have more time to meld. They will keep beautifully in an airtight container in the fridge for up to a week, or you can freeze them for up to 3 months.
Q: My bars are too hard to cut!/They’re falling apart! Help!
A: If they’re too hard, you may have over-chilled them. Let them sit at room temperature for 10-15 minutes before slicing. If they’re falling apart, it’s likely they weren’t pressed firmly enough into the pan or they needed more of the “glue” (the nut butter mixture). No worries—just call it “Gingerbread Krispie Crunch” and serve it in a bowl with a spoon! It still tastes incredible.
Q: Is the molasses really necessary?
A> For that authentic gingerbread flavor, yes, I highly recommend it. The molasses provides a depth and complexity that honey or maple syrup alone can’t achieve. It’s the soul of the recipe!
Nutritional Info (A Quick Peek!)
I’m all about balance, and I love knowing that I’m giving my body good fuel, even with a treat. Here’s a rough breakdown per bar (based on 24 bars, using cashew butter and honey):
- Calories: 221
- Fat: 10g (mostly healthy fats from the nut butter)
- Carbs: 28g
- Sugar: 13g (all naturally occurring from honey and molasses)
- Protein: 4g (a nice little boost!)
- Fiber: 2g
Remember, these are a treat, but they’re made with whole-food ingredients that provide more sustained energy and nutrients than a traditional, sugar-laden dessert. Using maple syrup will bring the sugar content down slightly. Enjoy them guilt-free!
Final Cozy Thoughts
And there you have it, my friend! Your new secret weapon for a stress-free, incredibly delicious holiday treat. These Gingerbread Rice Krispie Treats are proof that you don’t need to spend all day in the kitchen to create something that feels special and tastes like pure, unadulterated joy.
I hope this recipe brings as much warmth and happiness to your kitchen as it has to mine. It’s a reminder that sometimes the simplest things—a few good ingredients, a little bit of spice, and a whole lot of love—are what create the very best memories.
Now, I’d love to hear from you! Did you add orange zest? Go wild with the candied ginger? Snap a picture and tag me @TastyChow on social media so I can see your beautiful creations. Happy no-bake baking!
With a full heart and a happy kitchen,
— Emily