No-Bake Mint Squares: The Cool, Creamy, & Irresistibly Festive Treat
Your New Favorite Holiday Treat is Just a Chill Away!
Hey there, my fellow food lover! Let’s be real for a second. The holiday season is a magical, twinkly-light-filled whirlwind, but it can also be completely exhausting. Between the shopping, the wrapping, the party-hopping, and trying to remember where you stored your sanity, the last thing you need is a complicated dessert recipe demanding your attention and heating up your already chaotic kitchen.
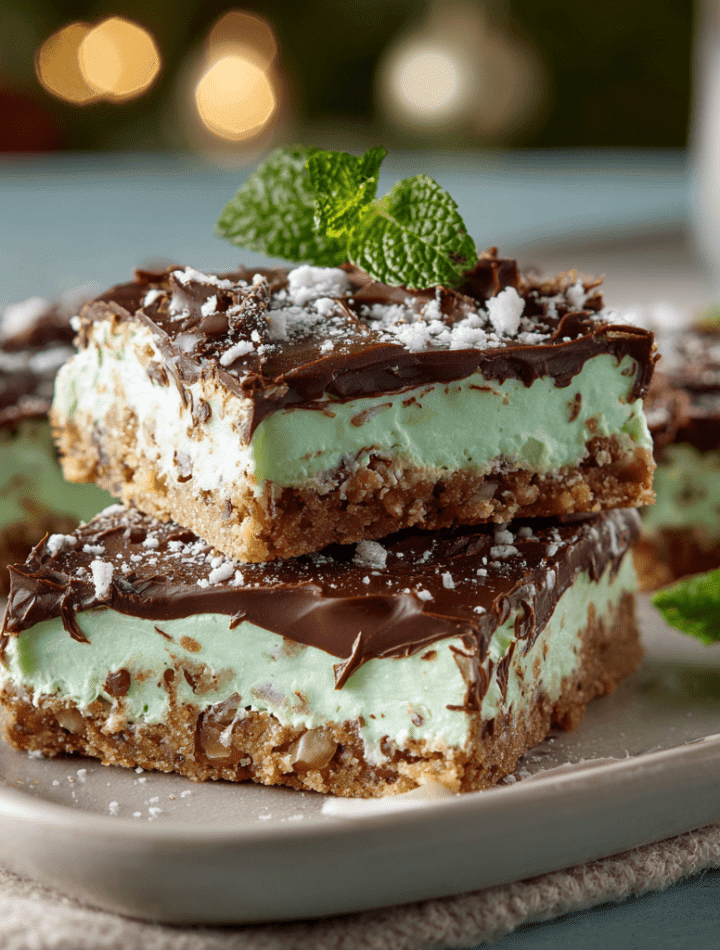
That’s exactly why I’m swooping in today with your new best friend: these unbelievably delicious No-Bake Mint Squares. We’re talking about a treat that brings all the festive, joyful vibes without ever turning on your oven. Imagine this: a crunchy, nutty, graham cracker base, a layer of cloud-like, perfectly minty cream, and a slick, rich chocolate topping that cracks satisfyingly when you bite into it. It’s a textural dream and a flavor explosion all in one beautiful, handheld square.
This is the dessert you proudly bring to the cookie exchange, the one you sneak a piece of at 10 PM with a glass of cold milk, and the one that people will absolutely beg you for the recipe. It’s simple, it’s stunning, and it’s about to become a non-negotiable part of your holiday traditions. So, let’s put on our favorite festive apron, clear a little counter space, and make some magic happen. No oven required!
A Spoonful of Nostalgia: My Minty Memory
This recipe always sends me right back to my Grandma Lorraine’s kitchen. She wasn’t a fancy chef, but she was a wizard with simple, comforting ingredients. Every December, her fridge would become a treasure trove of chilled delights, and her version of these mint squares was the crown jewel. I remember standing on a wobbly step-stool, “helping” her press the crumbly base into the pan with my small, eager hands. She’d always let me have the first taste of the mint filling straight from the bowl—a sweet, cool, creamy cloud that felt like tasting winter itself.
For me, the flavor of peppermint isn’t just a flavor; it’s the sound of her laugh, the feeling of her floured apron against my cheek, and the anticipation of sharing something we made together. I’ve tweaked her original recipe just a touch (a little more coconut here, a dash of vanilla in the filling there), but the soul of it remains exactly the same. It’s a recipe built on love, simplicity, and the pure joy of making something wonderful for the people you cherish. Now, let’s create some delicious memories in your kitchen.
Gathering Your Magical Ingredients
One of the best things about this recipe is that you probably have most of these ingredients hanging out in your pantry right now! Here’s everything you’ll need to create this triple-layered masterpiece.
For the Nutty, Crunchy Base:
- 1½ cups graham cracker crumbs: This is our foundation! That honey-kissed, toasty flavor is pure comfort. Chef’s Insight: You can buy pre-crumbled crumbs or simply pulse whole graham crackers in a food processor or place them in a zip-top bag and roll with a rolling pin for a fun, therapeutic stress-reliever!
- 1 cup sweetened shredded coconut: It adds a wonderful chew and tropical sweetness that pairs magically with mint and chocolate. Substitution Tip: If you’re not a coconut fan, you can replace it with an additional 1 cup of graham cracker crumbs for a more straightforward base.
- ½ cup finely chopped walnuts: They bring a toasty, earthy crunch that balances the sweetness. Substitution Tip: Pecans or almonds work beautifully here, or you can simply omit them for a nut-free version.
- ½ cup unsalted butter, melted: This is the glue that holds our delicious base together. Using unsalted butter lets us control the salt level perfectly.
- ¼ cup granulated sugar: Just a little bit to sweeten the deal and help the base crisp up as it chills.
For the Dreamy Mint Layer:
- ¼ cup unsalted butter, softened: Not melted! Softened butter will whip up into a light and fluffy filling. Leave it on the counter for about 30-60 minutes before you start.
- 2 cups powdered sugar: This gives us that smooth, melt-in-your-mouth texture that defines the perfect mint layer.
- 2 Tbsp milk or cream: Milk works great, but heavy cream will make the filling even richer and creamier. Your choice!
- 1 tsp peppermint extract: The star of the show! I prefer peppermint over mint extract for that classic, cool, candy-cane-like flavor. Chef’s Insight: Start with 1 tsp and taste! You can always add another ¼ tsp if you want a more powerful mint punch.
- Green food coloring (optional): This is purely for festive fun! A drop or two gives that classic holiday look, but leaving it white is just as delicious.
For the Glossy Chocolate Topping:
- 1 cup semi-sweet chocolate chips: The perfect rich, bittersweet contrast to the sweet mint layer. Substitution Tip: Feel free to use dark chocolate chips for a deeper flavor or milk chocolate for a sweeter finish.
- 2 Tbsp unsalted butter: Adding butter to the melted chocolate makes it smoother, glossier, and easier to slice once set.
Let’s Build Our No-Bake Masterpiece!
Ready for the easiest dessert assembly of your life? Follow these steps, and you’ll be a no-bake hero in no time. I’ve packed each one with my favorite chef hacks to ensure your success.
- Prep Your Pan. First things first, line an 8×8-inch baking pan with parchment paper, leaving some overhang on two opposite sides. Why do this? This little step is a game-changer! It creates a “sling” that lets you lift the entire block of squares out of the pan effortlessly for clean, crumb-free slicing. No more digging out the first tragic piece!
- Create the Crunchy Base. In a medium bowl, combine the graham cracker crumbs, shredded coconut, chopped walnuts, and granulated sugar. Pour the melted butter over everything and stir until the mixture looks like wet sand and every dry ingredient is beautifully coated. Chef’s Hack: Use a fork to mix—it helps break up any clumps and ensures even distribution. Now, dump this mixture into your prepared pan and press it down into a firm, even layer. I like to use the bottom of a flat measuring cup to really compact it. A solid base is key! Pop the pan in the fridge to chill while you make the next layer.
- Whip Up the Minty Cloud. In another bowl, beat the softened butter with an electric mixer (or a whole lot of forearm strength and a whisk!) until it’s smooth. Gradually add in the powdered sugar, milk, and peppermint extract. Start mixing on low speed unless you want a blizzard of powdered sugar in your kitchen! Once combined, beat on medium-high for 1-2 minutes until the filling is light, fluffy, and dreamy. If you’re using food coloring, add it now and beat until the color is uniform. Chef’s Tip: Taste it! This is the best part. Adjust the mint level to your liking.
- Layer on the Mint. Pull your chilled base out of the fridge. Spread the mint filling evenly over the top. An offset spatula is the perfect tool for this, but the back of a spoon works just fine. The goal is a smooth, inviting layer. Once it’s spread, give the pan a gentle tap on the counter to settle everything. Back into the fridge it goes for a solid 15-20 minutes. This sets the mint layer so the chocolate won’t sink in and create a messy swirl.
- The Grand Chocolate Finale. Now for the pièce de résistance! Combine the chocolate chips and butter in a microwave-safe bowl. Heat in 20-second bursts, stirring vigorously after each one, until the chocolate is completely melted and smooth. DO NOT over-microwave! Burnt chocolate is a sad thing. Alternatively, you can melt them together in a heatproof bowl set over a pot of simmering water (a double boiler). Once smooth, carefully pour the chocolate over the chilled mint layer. Tilt the pan to help it spread into a thin, even, gorgeous blanket of chocolate.
- The Final Chill. This is the hardest part: waiting. Return the pan to the fridge and let it chill completely until the chocolate top is firm to the touch. This usually takes at least 1-2 hours. For the cleanest cuts, I sometimes let it set up overnight.
- Slice and Serve! Use the parchment paper sling to lift the entire block out of the pan and onto a cutting board. Using a large, sharp knife, slice into squares. Pro Tip for Clean Cuts: Run your knife under very hot water, wipe it dry, and then make your cut. The heat glides through the chocolate without cracking it. Repeat for every cut for picture-perfect squares!
How to Serve These Minty Marvels
Presentation is part of the fun! You can keep it casual and pile these squares high on a rustic wooden board for a homey feel. For a more elegant touch, arrange them on a beautiful platter, maybe with a dusting of extra powdered sugar or some crushed candy canes for a pop of red. They are the perfect addition to any holiday cookie tray, bringing a cool, creamy element next to all the baked goods.
I love serving these with a hot cup of coffee after a big holiday meal—it’s such a refreshing and light-tasting way to end the feast. They also pair wonderfully with a cold glass of milk for the kids (and kids-at-heart!). Store any leftovers (a mythical concept in my house) in an airtight container in the fridge for up to a week.
Get Creative! Fun Flavor Twists & Swaps
Once you’ve mastered the classic, feel free to play with the formula! This recipe is a fantastic canvas for your creativity. Here are a few of my favorite variations:
- Chocolate Mint Cookie Crunch: Replace the graham cracker crumbs with crushed-up Oreo cookies (filling included!) for an intensely chocolatey base.
- Peppermint Patty Explosion: Add ¼ cup of crushed peppermint candies or candy canes to the mint filling for a delightful crunch and extra burst of peppermint flavor.
- Orange Dreamsicle: Swap the peppermint extract for orange extract and use orange food coloring (or none!). The chocolate-orange combo is a timeless, sophisticated winner.
- Almond Joy Vibe: Use almonds instead of walnuts in the base and add a ½ teaspoon of almond extract to the mint layer. It’ll taste just like the famous candy bar!
- Dairy-Free Delight: Use vegan butter and full-fat coconut milk. For the chocolate topping, ensure you use dairy-free chocolate chips. It works like a charm!
From My Messy Kitchen to Yours: A Few Final Thoughts
This recipe has been on quite a journey with me. I remember one year, in a pre-holiday frenzy, I accidentally used salted butter and added a full *tablespoon* of peppermint extract instead of a teaspoon. Let’s just say those squares could clear your sinuses from across the room! We laughed about it for days. The beauty of cooking is that even the “mistakes” can become fond, funny memories.
Over time, I’ve found that toasting the coconut and walnuts for the base adds a incredible depth of flavor, but it’s a completely optional extra step. The original, straight-from-the-pantry version is still absolutely perfect. Don’t let the pursuit of perfection stop you from making something simply wonderful.
Your Questions, Answered!
Here are answers to some common questions to make sure your no-bake squares are flawless.
Q: My chocolate topping cracked when I cut the squares. What did I do wrong?
A: This usually happens if the chocolate layer got too cold and hard. The best fix is the hot knife trick! Run your knife under hot water, wipe it dry, and make your cut. The heat will glide through the firm chocolate. Also, adding the butter to the chocolate helps keep it a bit more pliable.
Q: Can I freeze these mint squares?
A: Absolutely! They freeze beautifully. After slicing, place them in a single layer on a parchment-lined baking sheet to freeze solid (about 2 hours), then transfer to a freezer bag or container. They’ll keep for up to 3 months. Thaw in the fridge for an hour or so before serving.
Q: My mint layer is too soft and doesn’t seem to set. How can I fix it?
A: This typically means there was a bit too much liquid (milk/cream) or your kitchen was very warm. Don’t worry! Just make sure you give it a good, long chill—sometimes 30-45 minutes—before adding the chocolate. The filling will firm up in the cold. You can also try reducing the milk by one tablespoon next time.
Q: Is there a substitute for the peppermint extract?
A> You can use mint extract, but note that it often has a milder, spearmint-like flavor compared to the sharper, cooler profile of peppermint. If it’s all you have, it will still be delicious! Start with ¾ tsp and taste.
Nutritional Information*
I believe in treating ourselves, especially during the holidays! But I also believe in transparency. Here’s a general breakdown of what you can expect per square (based on a yield of 24 squares).
- Calories: ~210
- Fat: 13g
- Carbohydrates: 22g
- Sugar: 17g
- Protein: 2g
*Please note: This is an estimate generated from an online nutrition calculator. Values can vary significantly based on the specific brands of ingredients you use and your actual portion sizes. For precise dietary information, I recommend using your preferred nutritional analysis tool with your exact ingredients.
You Did It! Now, Go Enjoy the Fruits (or Sweets!) of Your Labor
Look at you, you no-bake rockstar! You’ve just created a dessert that is guaranteed to bring smiles and holiday cheer. I am so incredibly proud of you for taking the time to make something special from scratch. This is what Tasty Chow is all about—sharing recipes that are fun, flavorful, and totally doable for amazing home cooks like you.
I really hope these No-Bake Mint Squares find a spot on your holiday table and in your heart. They are a little piece of my kitchen story, and I’d be thrilled if they became part of yours. Now, go grab a square, pour yourself a well-deserved drink, and savor every cool, creamy, chocolatey bite. You’ve earned it!
With love and a fully stocked fridge,
Emily