Your New Favorite Healthy Obsession is Here!
Hey there, my fellow flavor-chaser! Let’s get real for a hot second. Do you ever have those moments where your sweet tooth is screaming for a thick, decadent slice of cheesecake, but your brain (and maybe your gym schedule) is whispering something about protein and being a responsible adult?
Yeah, me too. All. The. Time.
For the longest time, I felt like I had to choose. I could either have the blissful, creamy, cinnamon-kissed joy of a snickerdoodle cheesecake, OR I could have a healthy, protein-packed snack that fueled my body. It was a culinary tug-of-war in my heart.
But what if I told you that you don’t have to choose? What if I let you in on my absolute favorite kitchen secret—a recipe that has become my go-to for post-workout refueling, a satisfying afternoon pick-me-up, and even a sneaky late-night dessert that feels downright indulgent?
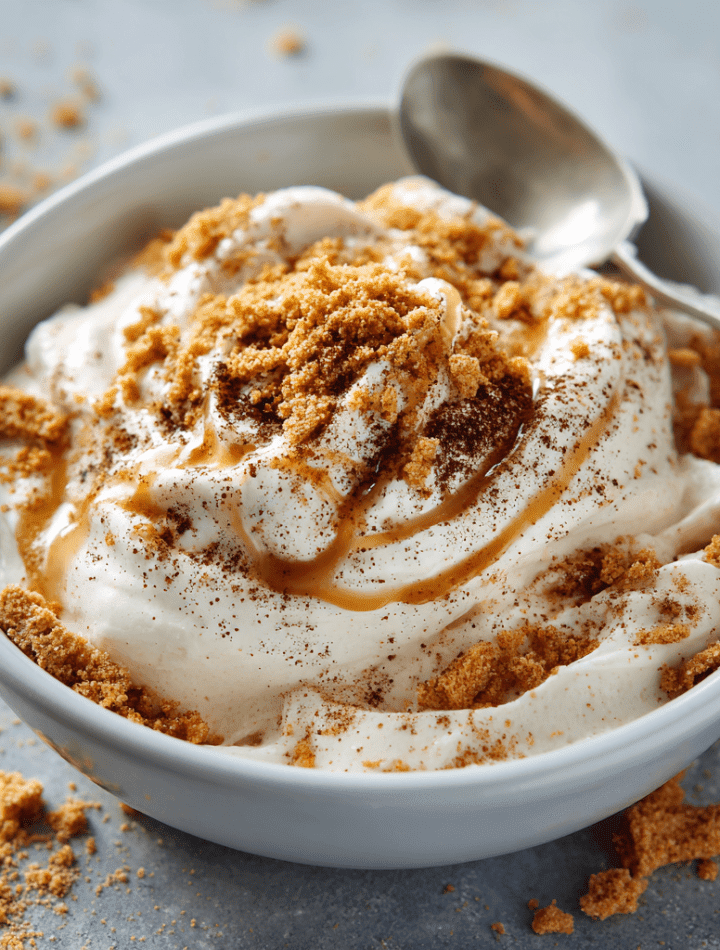
Friends, meet your new obsession: my High-Protein Snickerdoodle Cheesecake Yogurt Bowl.
This isn’t just a bowl of yogurt. Oh no. This is a creamy, fluffy, impossibly delicious miracle that tastes like you’re digging into the filling of the best snickerdoodle cheesecake you’ve ever had. It’s packed with protein to keep you full and energized, comes together in about five minutes flat, and requires exactly zero baking. It’s the ultimate “have your cake and eat it too” moment, and I am so ridiculously excited to share it with you. So, grab your favorite bowl and your trusty spoon. We’re about to make some magic.
The Day My Cravings and My Goals Finally Shook Hands
This recipe was born out of a serious craving and a little bit of kitchen desperation. It was a few years back, deep into recipe testing for the blog. I had been on my feet all day, developing a complicated layered cake (that, spoiler alert, ended up leaning like the Tower of Pisa). I was tired, hungry, and my body was begging for something substantial.
But my heart? My heart was dreaming of my Grandma Dot’s snickerdoodle cookies. She always said the secret was a touch of cream of tartar for that signature tang, and she’d let me sprinkle the cinnamon-sugar coating on top. That warm, comforting, sweet-and-spicy aroma is one of my core childhood memories.
Staring into my fridge, I saw the usual suspects: a big tub of Greek yogurt, some cream cheese, and my trusty vanilla protein powder. In a moment of “what if?” I started throwing them together. A dash of cinnamon for that snickerdoodle soul, a glug of vanilla for warmth, and a drizzle of maple syrup for sweetness. I gave it a furious whisk, topped it with a crushed-up graham cracker I found in the pantry, and took a bite.
You guys. The angels sang. It was creamy, tangy, sweet, and spiced—it was the love child of a snickerdoodle cookie and a New York cheesecake, all dressed up in a protein-packed gown. It was the moment my cravings and my wellness goals finally, beautifully, shook hands. And I’ve been making it ever since.
Gathering Your Flavor All-Stars
The beauty of this bowl is in its simplicity. You probably have most of this in your kitchen right now! Here’s what you’ll need and why each ingredient is a total rockstar.
- ¾ cup Greek Yogurt: This is our protein-packed base! I use full-fat (2% or 5%) for maximum creaminess and that authentic cheesecake richness. Chef’s Insight: The thickness of Greek yogurt is key for that luxurious texture. If you’re dairy-free, a thick coconut or almond-based yogurt works wonderfully.
- 1 Scoop Vanilla Protein Powder: This is our flavor and protein powerhouse. It sweetens and thickens the mixture perfectly. Substitution Tip: If you only have unflavored protein powder, just add an extra ½ tsp of vanilla extract and a touch more sweetener.
- 1 Tbsp Cream Cheese (softened): Don’t skip this! This is the secret weapon that gives us that genuine, tangy cheesecake flavor. Chef’s Insight: Let it sit at room temperature for 10 minutes before mixing—it will blend in seamlessly without any lumps. For a dairy-free version, use your favorite plant-based cream cheese spread.
- ½ Tsp Cinnamon: The soul of the “snickerdoodle”! We’re using just enough to infuse every bite with warm, cozy spice.
- ½ Tsp Vanilla Extract: The other half of our dynamic flavor duo. Vanilla adds a beautiful depth and warmth that makes the whole bowl taste more decadent.
- 1–2 Tsp Maple Syrup (or sweetener of choice): This is our finetuner! The protein powder adds sweetness, but this little extra drizzle balances the tang from the yogurt and cream cheese. Substitution Tip: Honey, agave, or a few drops of liquid stevia all work great here. Start with 1 tsp, mix, taste, and add more if you like it sweeter!
- Pinch of Sea Salt: This might seem small, but it’s a game-changer. Salt makes the vanilla and cinnamon pop and cuts through the sweetness, creating a perfectly balanced flavor profile.
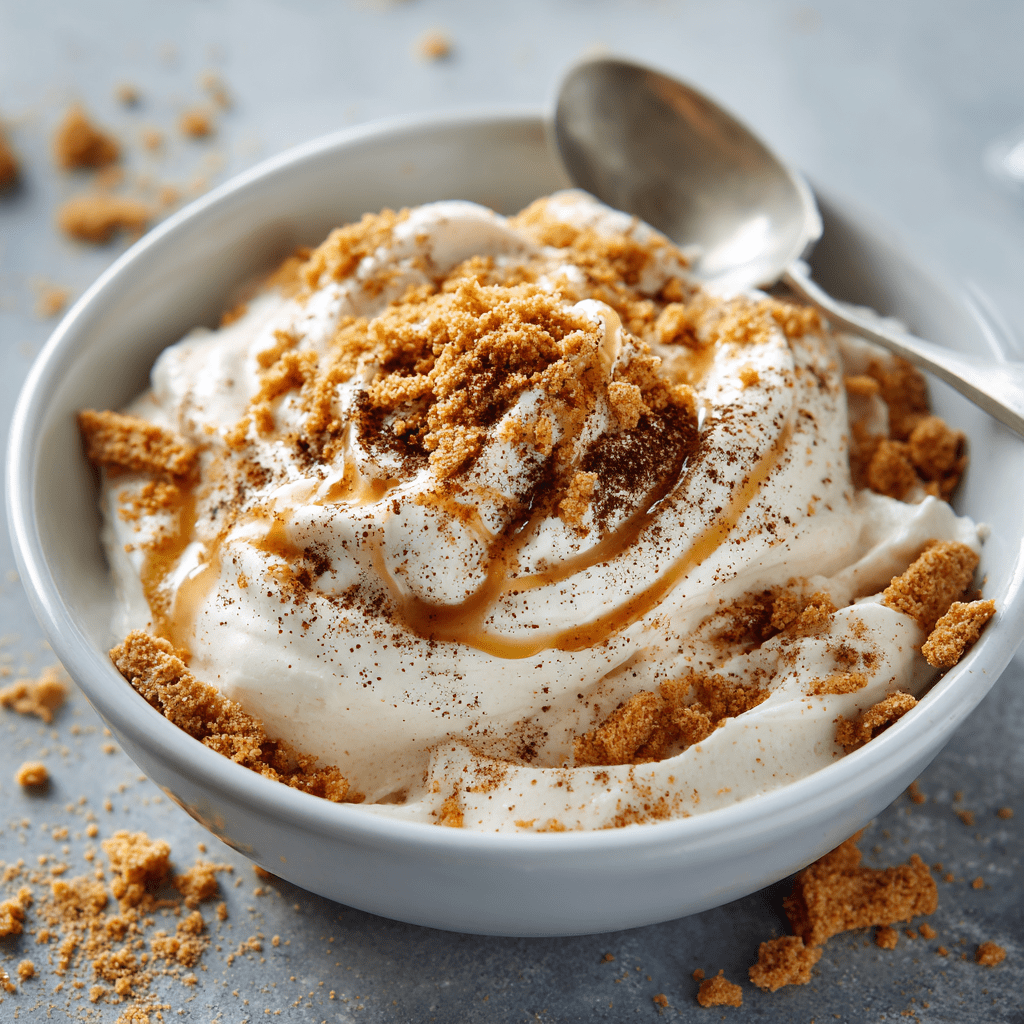
- Crushed Graham Crackers or Cinnamon Cereal (for topping): This is our “crust”! It adds a delightful crunch and that final, authentic cheesecake touch. Fun Swap: Try crushed-up cinnamon granola, chopped nuts, or even a few cacao nibs for a chocolatey twist!
Let’s Build the Dream Bowl: A Step-by-Step Guide
Ready to become a yogurt bowl wizard? It could not be easier. I’ll walk you through each step with my favorite little chef hacks to ensure creamy, lump-free perfection every single time.
- Start with a Soft Base. Take your cream cheese out of the fridge and let it soften on the counter while you gather your other ingredients. This is my number one tip for a silky-smooth bowl! If you forget (I do all the time), you can pop it in the microwave for 5-7 seconds. Chef’s Hack: Scoop it into your bowl first so it’s already waiting and softening in the bowl.
- The Grand Whisking. To your bowl with the softened cream cheese, add the Greek yogurt, vanilla protein powder, cinnamon, vanilla extract, maple syrup, and that all-important pinch of sea salt. Now, take a whisk or a fork and go to town! I like to start with a stirring motion to incorporate everything, then switch to a vigorous whisking motion, getting my wrist into it, until the mixture is completely smooth, thick, and wonderfully fluffy. You should see no streaks of protein powder or little lumps of cream cheese. Chef’s Commentary: This is the arm workout for the day! Whisking incorporates air, which is what gives us that light, mousse-like, cheesecake texture. Don’t be shy with it!
- The All-Important Taste Test. This is the best part of being the chef! Dip a clean spoon in and have a taste. Is it sweet enough for you? Maybe it needs another tiny drizzle of maple syrup. Want more cinnamon spice? Add another pinch! This is your bowl, so make it perfect for your palate.
- The Topping Triumph. Now for the fun part—the crunch! Sprinkle your crushed graham crackers or cinnamon cereal generously over the top. I love creating a little texture landscape, so I’ll do a fine sprinkle over one half and a few bigger chunks on the other. Chef’s Hack: For an extra “cookie” feel, mix a tiny pinch of cinnamon into your graham cracker crumbs before sprinkling.
- The Patience Game (Optional, but Worth It). You can absolutely eat it right now—it’s delicious. BUT, if you have 10 extra minutes, cover the bowl and pop it in the fridge. This allows the flavors to meld together even more and the whole mixture thickens up just a bit more, giving you an even more authentic, dense cheesecake experience. It’s a pro-move, I promise.
How to Serve Your Masterpiece
This bowl is a star no matter how you serve it, but a little presentation flair makes it feel even more special! Here are a few of my favorite ways to plate it up:
- The Classic Cheesecake Vibe: Serve it in a wide, shallow bowl. Smooth the top with the back of your spoon, then create a beautiful, even layer of your graham cracker “crust” over the entire surface. Finish with one perfect, tiny sprinkle of cinnamon right in the center. Elegant and simple!
- The “Everything but the Kitchen Sink” Sundae: Feeling extra? Turn this into a full-blown yogurt sundae! Drizzle it with a little almond butter or sugar-free caramel sauce. Add some fresh apple slices or a handful of berries for a fruity contrast. A few dark chocolate chips never hurt anybody, either.
- On-the-Go Power Pot: This is my go-zero-waste, meal-prep hack. Mix everything (except the crunchy topping) in a sealed container or a mason jar the night before. In the morning, or when you’re ready to eat, just give it a stir, add your crunchy topping from a separate little bag, and you have a perfect, portable, protein-packed meal anywhere, anytime.
Get Creative! 5 Delicious Twists to Try
Once you’ve mastered the classic, the kitchen playground is yours! This recipe is a fantastic base for so many flavor adventures. Here are a few of my favorite variations:
- Lemon Berry Cheesecake: Omit the cinnamon. Add the zest of one small lemon to the yogurt mixture and fold in a handful of fresh raspberries or blueberries. Top with a crushed-up lemon cookie or more berries.
- Chocolate Peanut Butter Cup: Use chocolate protein powder instead of vanilla. Swirl in one tablespoon of creamy peanut butter (don’t fully mix it—leave pretty streaks!). Top with crushed sugar-free peanut butter cups or chopped peanuts.
- Pumpkin Pie Spice: Perfect for fall! Add two tablespoons of canned pumpkin puree and replace the cinnamon with pumpkin pie spice. It’s like eating a no-bake pumpkin pie!
- Tropical Coconut: Use coconut-flavored protein powder or add ¼ tsp of coconut extract. Mix in some unsweetened shredded coconut and top with chopped mango or pineapple.
- Cookie Dough Delight: This is a reader favorite! Add one tablespoon of almond flour to the base mixture to give it a dough-like texture. Stir in a handful of sugar-free chocolate chips and a sprinkle of flaky sea salt on top.
From My Kitchen to Yours: A Few Parting Thoughts
This humble little yogurt bowl has truly become a legend in my own kitchen. It’s the recipe I text to friends when they’re in a food rut and the one I make for myself when I need a guaranteed smile. It’s evolved a bit over time—I started without the cream cheese, but adding it was a total revelation. I’ve also learned that the type of protein powder you use can slightly change the texture; whey/casein blends tend to make it extra thick and mousse-like, which I adore.
One of my favorite kitchen memories is of my partner, who is notoriously skeptical of my “healthy dessert” experiments, taking a bite of this and his eyes going wide. “Okay,” he said, “You’ve finally done it. This is actually better than the real thing.” High praise from a certified cheesecake connoisseur! So, don’t be afraid to make it your own. That’s the true joy of cooking.
Your Questions, Answered!
I’ve gotten so many wonderful messages about this recipe, and a few common questions pop up. Here’s the scoop to make sure your bowl is perfect!
- My mixture is too thick! What can I do? No worries! This can happen with certain protein powders. Simply add a teaspoon of milk (dairy or plant-based) at a time and whisk again until it reaches your desired consistency. Easy fix!
- Can I make this into a dip? ABSOLUTELY! It makes a fantastic fruit dip. Just follow the recipe as is, and serve it with apple slices, banana chips, and strawberries for dipping. It’s a huge hit at parties.
- I don’t have a whisk. Will a fork work? Yes, a fork will work just fine! It might take a little more elbow grease to get it perfectly smooth, but it’s absolutely doable. For the creamiest results, you can even use a small electric hand mixer for about 30 seconds.
- How long will this keep in the fridge? The prepared yogurt mixture (without the crunchy topping) will keep beautifully in an airtight container in the fridge for 1-2 days. The texture might thicken a bit more, which I personally love. Just add your topping right before you eat it to keep it crunchy.
Nourishing Your Body & Soul
While I’m all about the flavor first, I know it feels amazing to fuel your body with goodness. This isn’t just an empty-calorie treat; it’s a powerhouse of nutrition that truly satisfies.
This single bowl delivers a whopping 25-30 grams of protein, which is essential for muscle repair, keeping you full and satisfied, and supporting a healthy metabolism. The Greek yogurt provides gut-friendly probiotics and calcium. By controlling the sweetener, you’re avoiding the refined sugars found in most desserts, and the healthy fats from the yogurt and cream cheese help with nutrient absorption and keep your energy levels stable.
Think of this not as a “diet food,” but as a delicious, intelligent choice that makes you feel as good as it tastes. It’s a celebration of what food can be: joyful, comforting, and deeply nourishing, all at once.
Approximate Nutritional Breakdown (will vary with your specific ingredients):
- Calories: 250–300
- Protein: 25–30g
- Carbohydrates: 10–15g
- Sugar: 6g
- Fat: 7–9g
- Fiber: 1–2g
Go Forth and Create Your Own Kitchen Magic
And there you have it, my friend! Your complete guide to the yogurt bowl that changed my snack game forever. It’s proof that you don’t need complicated techniques or a pantry full of obscure ingredients to create something truly magical and satisfying.
This recipe is a love letter to comfort food, to convenience, and to feeling fantastic about what you’re eating. It’s about taking five minutes for yourself to create a little moment of joy in a busy day.