Peppermint Gift Bowl: Your New Favorite Edible Holiday Craft!
Let’s Make Some Holiday Magic!
Hey there, my festive friend! 👋 Is your kitchen starting to smell like gingerbread and pine yet? Mine sure is, and I am living for it. Today, we’re stepping away from the cookie sheets for a moment and diving into a project that’s equal parts kitchen craft and pure, unadulterated holiday joy. We’re making a stunning, completely edible Peppermint Gift Bowl.
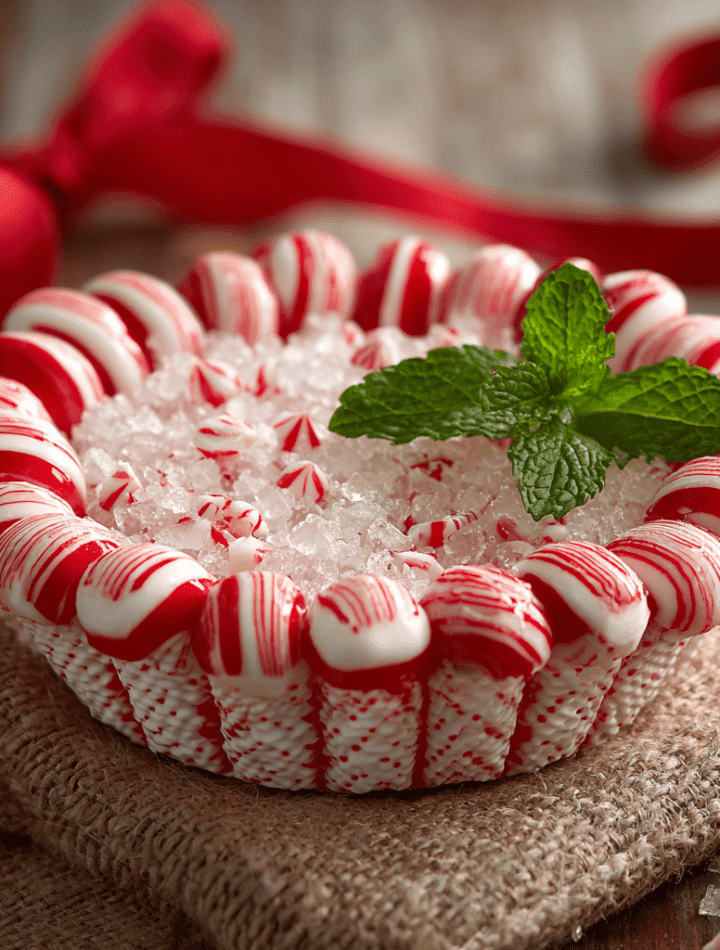
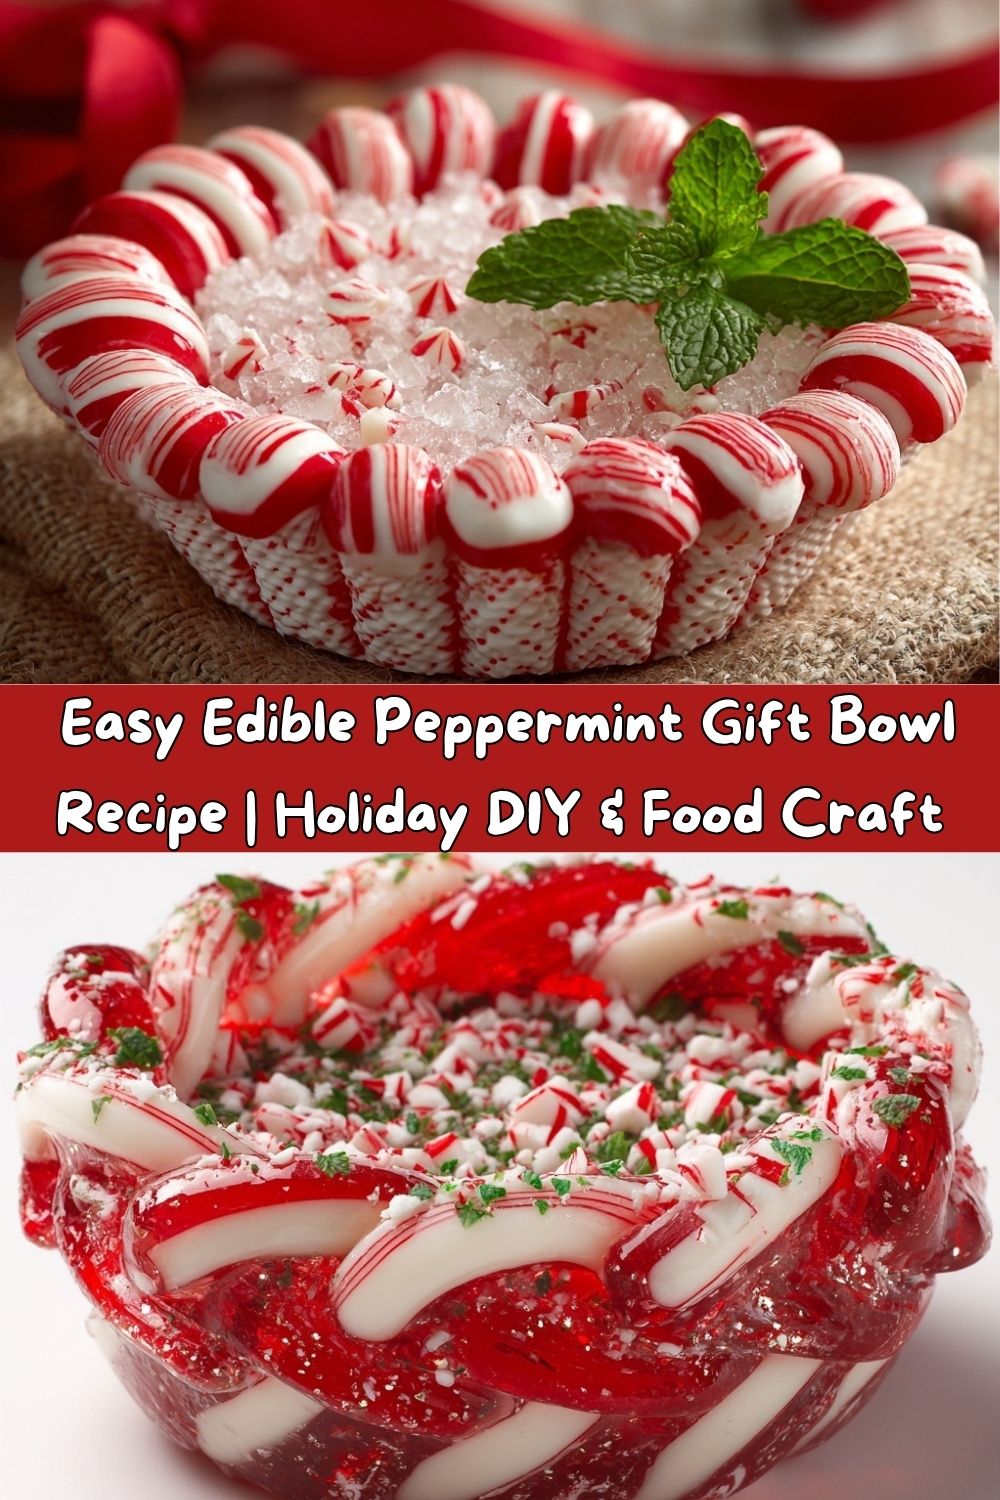
Imagine this: a beautiful, glass-like bowl made entirely from melted peppermint candies, sitting proudly on your holiday table. It’s filled to the brim with your famous fudge, a pile of chocolate-dipped pretzels, or even more colorful candies. It’s a conversation starter, a gorgeous centerpiece, and a delicious, functional work of art that you made with your own two hands. The best part? It’s surprisingly simple. If you can arrange candies on a pan, you can absolutely create this showstopper. So, tie on that messy apron (the sign of a true creator!), and let’s turn a bag of simple peppermints into your most memorable holiday gift yet.
The Sweet Smell of (Slightly Burnt) Nostalgia
This recipe takes me right back to my grandma’s kitchen, a place where magic and a little bit of mess always coexisted. One particularly snowy December, she decided we weren’t just baking cookies; we were “crafting with confection.” She pulled out her old, warped baking sheet and a giant bag of strawberry hard candies (peppermint was for the grown-ups’ cocoa, she declared). I remember watching, wide-eyed, as those vibrant red circles melted in the oven, swirling together into a single, glossy sheet. When she draped it over an upside-down teacup, it was like watching a stained-glass window for cookies come to life. My first attempt was… lopsided. Maybe a little too “caramelized” around the edges. But the pride I felt handing that slightly-smoked, strawberry-scented bowl to my mom? Unbeatable. That’s the spirit I want to bring to you today. It’s not about perfection; it’s about the fun, the memory, and the sweet, sweet result.
Gathering Your Sweet Supplies
You’ll be shocked at how few ingredients you need for this project. It’s all about the technique and a little bit of kitchen courage!
- 1 (10-12 oz) bag of Hard Peppermint Candies – About 25-30 candies per bowl. You can use the classic red-and-white starlight mints or any hard, round peppermints. Chef’s Insight: I love using a mix of red-and-white and all-red candies for a more dynamic, festive look. If you can find them, the clear, swirly peppermints create a gorgeous, stained-glass effect!
- Non-Stick Cooking Spray or a sheet of Parchment Paper – This is non-negotiable for a stress-free release. Substitution Tip: A silicone baking mat is a fantastic, reusable alternative to parchment paper and works like a dream.
- A Heatproof Bowl (for molding) – The star of the show! A sturdy glass or metal mixing bowl is perfect. Chef’s Insight: Make sure to use a bowl that is truly heatproof. We’re placing a very hot, melted sugar disk over it, and the last thing we want is a cracked bowl! The outside of this bowl will determine the final shape of your peppermint bowl, so choose one with a curve you like.
Let’s Create Your Peppermint Masterpiece: A Step-by-Step Guide
Ready? Let’s do this! I’ll walk you through every step, complete with my favorite little hacks to ensure your peppermint bowl is a smashing success.
- Preheat and Prep. First things first, get that oven heating to a steady 300°F (150°C). This lower temperature is key—it melts the candy slowly without burning the sugar. While it warms up, line a large, rimmed baking sheet with your parchment paper or silicone mat. This is your canvas! Now, take your heatproof bowl and give the *outside* a very light but thorough spritz with cooking spray. This will help us release the hardened candy later. Place this bowl, right-side-up, nearby so it’s ready for its big moment.
- Arrange Your Candy Circle. Here’s where the artistry begins! Unwrap your peppermints and arrange them in a single, tight layer on the prepared baking sheet. Form a circle about 8-9 inches in diameter. The candies should be touching each other, but it’s okay if there are tiny gaps—they’ll melt and fill them in. Chef’s Hack: For a truly stunning, mosaic-like bowl, you can also use a plastic bag and a rolling pin to gently crush some of the candies first. Arrange the crushed pieces in your circle for a beautiful, speckled, abstract look when melted.
- The Big Melt. Carefully slide your baking sheet into the preheated oven. Now, this is the most critical part: WATCH IT CLOSELY. Do not walk away to wrap a present! The candies will need about 7-9 minutes to melt. You’ll know they’re ready when they are completely liquefied, bubbling slightly, and the individual candy shapes have disappeared into a single, glossy disk. If you see any unmelted bits, give it another minute. But be vigilant—sugar goes from perfectly melted to burnt and bitter in a flash.
- The Swift and Confident Shape. Put on an oven mitt! This part is a race against the clock, but don’t panic. You’ve got this. Pull the baking sheet out of the oven. Working quickly but carefully, take your pre-sprayed heatproof bowl and turn it upside down. Gently lift the hot, melted peppermint disk (it will be flexible, like a flat piece of glass) and drape it directly over the bottom of the upside-down bowl. Chef’s Hack: Use a flat spatula to help you lift and drape the candy if it feels too delicate. Now, gently press and mold the soft candy down the sides of the bowl to form your beautiful bowl shape. Don’t press too hard or you’ll make a hole, but a confident shaping hand is your best friend here.
- The Patient Cool-Down. Walk away. I mean it! This is the hardest step. Let your beautiful creation cool and harden completely at room temperature. This will take a good 30-45 minutes. Don’t be tempted to speed it up in the fridge, as the sudden temperature change can cause the sugar to crack. When it’s ready, it will feel solid and will make a light “ting” sound when you tap it. Gently twist and lift the peppermint bowl off the mold. Voilà! You are a sugar-artist extraordinaire!
How to Show Off Your Gorgeous Creation
Now for the fun part—what to do with your stunning new bowl! The possibilities are as endless as your holiday spirit.
For gifting, this is the ultimate “wow” factor. Nestle it in a clear cellophane bag, fill it with homemade chocolate truffles, gingerbread cookies, or festive popcorn, and tie it all together with a big, beautiful ribbon. The gift is the *bowl and the treats inside*—a true two-for-one delight that shows you put in that extra-special effort.
For your holiday table, use it as a breathtaking centerpiece. Fill it with shiny, foil-wrapped chocolates, colorful gumdrops, or even a mix of unshelled nuts and clementines for a pop of color. It catches the light from your Christmas tree and twinkles like a jewel. It’s also the perfect vessel for serving holiday candies or mints to guests throughout the party.
Get Creative! Fun Flavor & Style Twists
Once you’ve mastered the classic peppermint bowl, why not play with the formula? Here are a few of my favorite ways to mix it up.
- The Chocolate-Lined Crunch: After your bowl has cooled and hardened, gently melt some dark, milk, or white chocolate. Use a pastry brush or a spoon to coat the entire *inside* of the peppermint bowl with a thin layer. Let it set. This not only adds a delicious flavor contrast but also adds a ton of structural integrity, making your bowl a little less fragile.
- Rainbow Riot: Who says it has to be just peppermint? Use a mix of hard candies like Jolly Ranchers or Life Savers in different colors. Create a beautiful pattern or just go for a fun, confetti-style mix. The result is a vibrant, modern take that kids absolutely adore.
- Mini Treat Bowls: Don’t have a big gathering? Use an upside-down ramekin or a muffin tin as your mold! Create adorable mini peppermint bowls that are perfect for holding individual portions of mousse, a small scoop of ice cream, or as a place-setting favor for each of your guests.
- The “Grinch” Bowl: Use all green peppermints (or a mix of green and white) for a fun, Dr. Seuss-inspired theme. It’s a whimsical touch that’s perfect for a kids’ holiday party.
A Few Sweet Words from My Kitchen to Yours
I’ll let you in on a little secret: my first few peppermint bowls were… let’s call them “artisanal” and “rustic.” Translation: they had holes, they were lopsided, and one time I definitely burned the candy so badly my kitchen smelled like a campfire for hours. But you know what? I learned from every single one. The “holes” became a design feature when I drizzled chocolate over them to seal them up. The “rustic” ones were broken into pieces and used as a gorgeous garnish for ice cream sundaes. There are no true failures in the kitchen, my friend—only delicious learning opportunities. So, embrace the process. Laugh if it cracks. And know that no matter what, you’re creating something wonderfully unique and full of love.
Your Peppermint Bowl Questions, Answered!
Let’s tackle some common questions before you get started!
- Q: My bowl cracked! What did I do wrong?
A: Oh, this is the most common “oops!” and it happens to the best of us. Cracking is usually caused by one of two things: 1) The candy cooled too quickly. Always let it cool at room temperature. 2) The candy was too thick in some spots and thin in others. Try to arrange your candies in as even a layer as possible. But don’t despair! A cracked bowl is a perfect candidate for the chocolate-lining trick, or you can break it up and use the shards as a beautiful topping for cupcakes. - Q: Can I make this ahead of time? How do I store it?
A: Absolutely! This is a great make-ahead project. Store your finished peppermint bowl in a cool, dry place (not the fridge, as it can get sticky from condensation). I like to place mine in a large, airtight container with a paper towel at the bottom to absorb any ambient moisture. Stored properly, it will last for weeks! - Q: The candy stuck to my bowl mold. Help!
A: This usually means the mold wasn’t greased enough. Next time, be a little more generous with that cooking spray. To salvage this one, you can try gently warming the outside of the mold with a hairdryer for a few seconds to slightly soften the candy and help release it. - Q: Can I use candy canes?
A: You can! Simply break or cut the curved ends off to create straight-ish pieces. The baking time might be slightly different, so keep an even closer eye on them. The result will have a lovely, striped pattern.
A Little Note on the Sweet Stuff
Let’s be real, friends—this is a decorative treat made almost entirely of sugar. It’s a fun, edible craft, not a health food! The primary ingredient is sucrose from the peppermint candies. While it’s a fantastic, gluten-free and fat-free (on its own) project, it’s all about enjoying it in the spirit of holiday fun. The real “nourishment” here is the joy of creating something beautiful with your own hands and sharing it with people you love. So, fill it with your favorite treats, admire its sparkle, and savor the magic of the season.
You Did It! Now, Share the Sweetness.
Look at you, you brilliant kitchen crafter! You’ve just transformed simple ingredients into a stunning holiday masterpiece. Whether you’re keeping it for your own table, gifting it to a loved one, or already planning your next rainbow-colored version, I am so incredibly proud of you.
This is what Tasty Chow is all about—taking those fun, flavorful ideas and making them totally doable for you in your own kitchen. I hope this peppermint bowl brings as much light and laughter to your home as it does to mine.
Now, I’d love to see your creations! Tag me on social @TastyChow with your beautiful bowls. You’re inspiring me and our whole community of food lovers. Happy holidays, and happy crafting!
— Emily 🎄