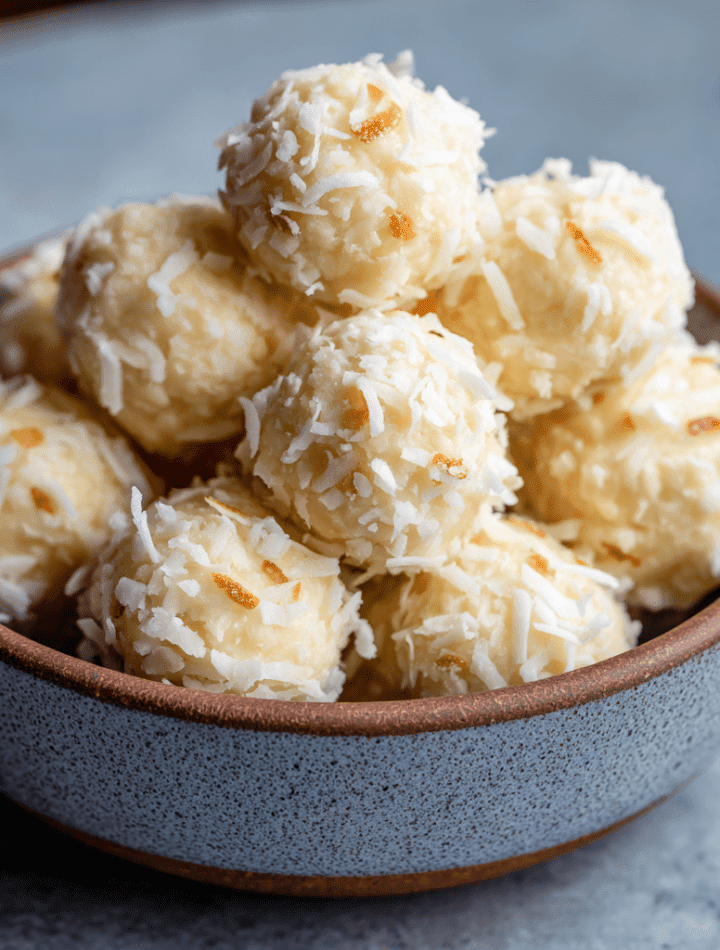
Creamy Coconut Candies: Your New Favorite Bite of Bliss
Hey there, friend! Pull up a stool and get ready for a little secret: you are about to become a candy-making rockstar. I’m not talking about complex sugar thermometers or fancy equipment. I’m talking about the kind of simple, magical recipe that makes you look at your pantry and think, “Wait, I can make that?” Yes. Yes, you absolutely can.
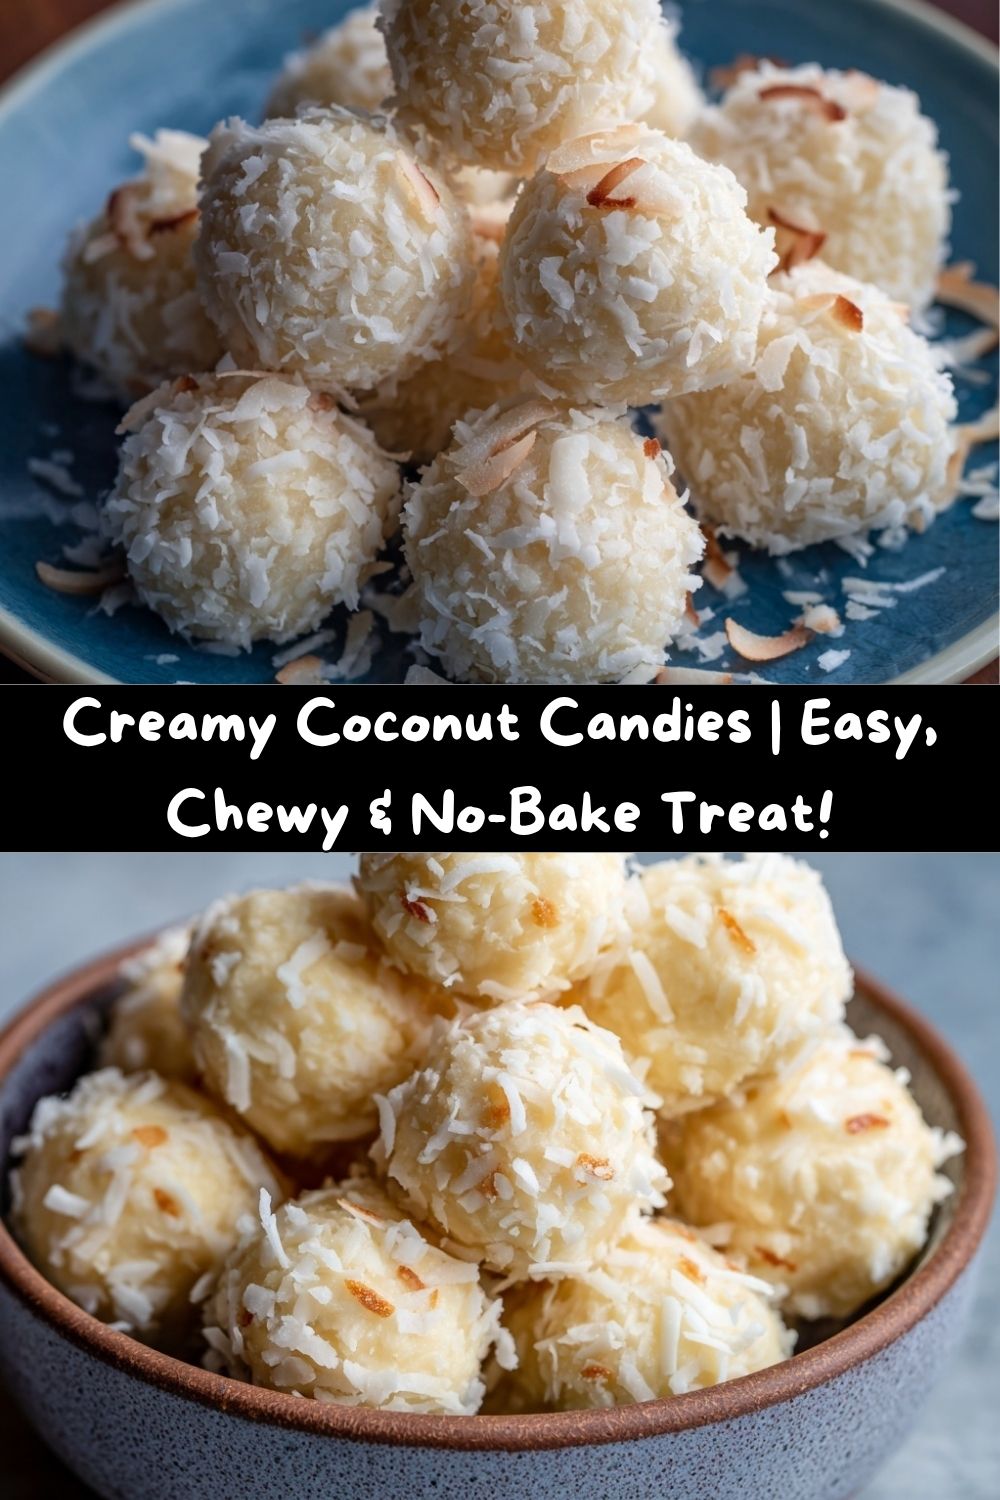
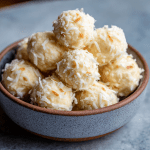
These Creamy Coconut Candies are my go-to for so many occasions. Need a last-minute treat for a potluck? Check. Craving a little something sweet with your afternoon coffee? Double-check. Want to whip up a homemade gift that actually tastes like you fussed over it for hours? Oh, you better believe that’s a check. These little guys are soft, incredibly chewy, and bursting with pure, tropical coconut flavor. They’re like little snowballs of happiness, and they are blissfully simple to make.
This recipe is a doubled batch, because trust me, one batch just disappears. They keep beautifully in the fridge, making them the perfect make-ahead treat. So, tie on your favorite apron (the messy one is always the best), and let’s make something delicious that will have everyone asking for the recipe.
A Spoonful of Sweetness: My Coconut Candy Origin Story
My love affair with these candies started long before culinary school, in my Grandma Eleanor’s kitchen. Her house always had a certain smell—a mix of fresh-brewed tea, old books, and, without fail, something sweet tucked away in a Tupperware container. One rainy afternoon, I remember her pulling out a plate of these mysterious white candies, dusted with even more coconut. They looked so elegant, like something from a fancy bakery.
I took one bite, and my eyes went wide. It was creamy, chewy, and so intensely coconutty. “Grandma,” I whispered, in that hushed tone kids reserve for truly important discoveries, “these are the best.” She just winked, her hands dusted with coconut, and said, “The secret, Em, is that the best things in life are often the simplest.” She was right. That day, she showed me how just a few humble ingredients could transform into pure magic. Now, every time I make these, I think of her, that rainy day, and the powerful, sweet connection that food can create. It’s a feeling I hope these candies bring to your kitchen, too.
Gathering Your Coconut Crew: The Ingredients
Here’s the beautiful part: you only need a handful of simple ingredients to create this coconut wonderland. Let’s break them down, because knowing your ingredients is the first step to cooking with confidence!
- 28 oz Sweetened Condensed Milk (2 cans): This is the superstar, the base of our candy, and what gives it that legendary creamy, chewy texture. It’s milk that has been sweetened and cooked down until it’s thick and luscious. Chef’s Insight: Don’t try to substitute evaporated milk here—it’s much thinner and won’t give you the same result!
- 1 tablespoon Butter: Just a pat adds a subtle richness and helps prevent the mixture from sticking too much. I use unsalted, but salted would work fine and add a nice salty-sweet contrast.
- 8 tablespoons Finely Shredded Coconut (plus more for rolling): This is where the big flavor comes from! I highly recommend using finely shredded coconut for this recipe. It blends into the mixture more seamlessly, creating a smoother, more uniform candy. The extra for rolling gives that classic, snowy look.
- 1 teaspoon Vanilla Extract (Optional): This is my “secret” for elevating the flavor. A little vanilla rounds out the sweetness and adds a warm, complex note that makes the coconut pop even more. I almost always add it!
- Pinch of Sea Salt (Optional): Another pro-trick! A tiny pinch of salt doesn’t make the candy taste salty; it actually enhances all the other flavors and cuts through the sweetness, making each bite even more balanced and delicious.
- Melted Dark Chocolate for Dipping (Optional): For when you want to get fancy! A dark chocolate shell creates an incredible “Mounds Bar” effect that is downright irresistible.
Let’s Get Rolling: Your Step-by-Step Guide to Coconut Bliss
Ready to see the magic happen? Follow these steps, and you’ll have perfect candies every single time. I’ve packed this section with all my favorite chef hacks to make the process smooth and fun.
- The Slow Simmer: Grab a good, heavy-bottomed, non-stick saucepan. Place it over medium-low heat and combine the sweetened condensed milk and butter. Now, here is the most important step: stir constantly. I’m not kidding—grab a spatula and don’t stop moving it around the bottom and sides of the pan. This prevents the milk from scorching and ensures it thickens evenly. You’ll cook it for about 8-10 minutes, until it visibly thickens and pulls away from the sides of the pan as you stir. Chef’s Hack: To test if it’s ready, drag your spatula through the middle of the pan. If it leaves a clean path that takes a second to fill back in, you’re golden!
- The Coconut Party: Take the pan off the heat. Now, stir in the 8 tablespoons of finely shredded coconut. If you’re using the vanilla and/or salt, now is the time to add them! Stir everything for a good minute or two until it’s completely combined and the mixture looks like a thick, cohesive paste.
- The Patient Chill: This is a crucial step for easy handling! Scrape the mixture into a bowl and let it cool on the counter for about 10-15 minutes. Then, pop it into the refrigerator, uncovered, for 30-40 minutes. You’re looking for it to be firm enough to handle but still pliable. Chef’s Hack: Don’t skip this chill! A warm mixture will be super sticky and hard to roll. If you’re impatient (no judgment!), you can spread it on a parchment-lined plate to speed up the cooling process.
- The Rolling Station: Place some extra shredded coconut in a small bowl. Using a teaspoon or a small cookie scoop, portion out the mixture and roll it between your palms into 1-inch balls. Then, roll each ball in the extra shredded coconut, pressing gently to make sure it adheres. Chef’s Hack: If your hands are getting sticky, lightly dampen them with a bit of water. It works like a charm!
- The Chocolate Dip (Optional, but Highly Recommended): If you’re going for the chocolate-covered version, let your coconut balls chill for another 15 minutes to firm up. Then, using a fork or dipping tools, dunk each ball into melted dark chocolate, let the excess drip off, and place it on a parchment-lined baking sheet. You can leave them plain or sprinkle a little extra coconut on top before the chocolate sets.
- The Final Set: Once all your candies are shaped (and dipped), refrigerate them for at least 15 minutes to let them set completely. This makes the texture absolutely perfect—firm on the outside, soft and chewy on the inside.
Sharing the Joy: How to Serve These Coconut Gems
Okay, the hard part is over (wait, was any of it actually hard?). Now for the fun part: serving! I love presenting these on a beautiful platter for parties. Stack them up like a little pyramid for a real “wow” effect.
For a cozy night in, I keep a container of them in the fridge and grab a couple to enjoy with a hot cup of chai tea or a rich cup of coffee—the combination is divine. They also make the most wonderful homemade gifts. Pack them into a cute cellophane bag, tie them with a ribbon, and you’ve got a present that comes straight from the heart (and the kitchen!).
Mix It Up! Fun & Flavorful Recipe Variations
Once you’ve mastered the classic, the kitchen playground opens up! Here are a few of my favorite ways to twist this recipe:
- Chocolate Chip Coconut: Fold in ¼ cup of mini chocolate chips after you take the mixture off the heat. It’s like a coconut-y chocolate chip cookie in candy form!
- Tropical Dream: Add 2-3 tablespoons of finely chopped dried pineapple or mango along with the coconut for a true taste of the tropics.
- Almond Joy Upgrade: Before rolling, press a whole, roasted almond into the center of each candy ball. Then, roll as usual or dip in chocolate. You’ve just made a homemade Almond Joy!
- Matcha Green Tea: For a stunning and sophisticated twist, whisk 1-2 teaspoons of high-quality matcha powder into the shredded coconut before adding it to the warm milk mixture. The earthy flavor pairs beautifully with the sweetness.
- Vegan/Dairy-Free Version: You can make this vegan! Use vegan butter and a plant-based sweetened condensed coconut milk (you can find it online or in well-stocked health food stores).
From My Kitchen to Yours: A Few Chef’s Notes
This recipe has evolved so much since that first batch in my grandma’s kitchen. I’ve learned a few things along the way! For the longest time, I was impatient and would try to roll the candies before they were properly chilled. Let’s just say I ended up with more coconut candy on my hands than on the plate—it was a sticky, delicious mess. The chill time is non-negotiable, my friends!
I also started adding the vanilla and salt after a reader suggested it in a comment years ago, and it was a total game-changer. It just goes to show that we’re all in this together, learning and sharing as we go. That’s the heart of Tasty Chow!
Your Questions, Answered! FAQs & Troubleshooting
I’ve made these a million times, and I’ve heard from thousands of you. Here are the most common questions and how to solve them!
- My mixture is too sticky to roll! What did I do wrong? This almost always means it needs more chilling time. Pop it back in the fridge for another 15-20 minutes. If you’re in a real pinch, you can even stick it in the freezer for 10 minutes. Also, remember the damp hands trick—it’s a lifesaver!
- Can I use desiccated coconut instead of shredded? You can, but the texture will be different. Desiccated coconut is drier and finer, which will result in a less chewy, more crumbly candy. I personally love the texture that finely shredded coconut provides.
- How long do these candies keep? Stored in an airtight container in the refrigerator, they will stay fresh and delicious for up to 2 weeks. They also freeze beautifully for up to 3 months! Just thaw in the fridge before serving.
- My candy mixture scorched a little on the bottom. Can I save it? Oh, the perils of constant stirring! If it’s just a few dark bits, you can quickly transfer the un-scorched mixture to a new bowl, being careful not to scrape the burnt part from the bottom of the pan. The flavor should still be okay. For next time, just remember: medium-low heat and keep that spatula moving!
Creamy Coconut Candies : Chewy, Sweet, and Blissfully Simple
- Total Time: 1 hour 15 minutes
- Yield: 48 candies 1x
Description
These Creamy Coconut Candies are little bites of tropical joy—soft, chewy, and full of rich coconut flavor. Made with just a few pantry staples like sweetened condensed milk and butter, they come together quickly and chill into perfection. This doubled batch is perfect for gifting, snacking, or keeping stashed in the fridge for coconut cravings. Want to elevate them? Add a touch of vanilla or dip them in chocolate for a decadent twist.
Ingredients
28 oz sweetened condensed milk (2 cans)
1 tablespoon butter
8 tablespoons finely shredded coconut (plus more for rolling)
Optional twists:
1 teaspoon vanilla extract
Pinch of sea salt
Melted dark chocolate for dipping
Instructions
In a non-stick saucepan over medium-low heat, combine sweetened condensed milk and butter. Stir constantly until thickened, about 8–10 minutes.
Stir in shredded coconut and optional vanilla or salt if using. Cook for 1–2 more minutes until mixture pulls away from the sides.
Let cool slightly, then chill in the fridge for 30–40 minutes.
Roll mixture into 1-inch balls and coat in additional shredded coconut.
For a twist, dip some of the chilled balls in melted dark chocolate and let set on parchment.
Refrigerate for at least 15 minutes before serving.
- Prep Time: 15 minutes
- Chill Time: 50 minutes
- Cook Time: 10 minutes
Nutrition
- Calories: 90 / Candy
- Sugar: 11g / Candy
- Sodium: 25mg / Candy
- Fat: 4g / Candy
- Carbohydrates: 12g / Candy
- Protein: 1g / Candy
Let’s Talk Nutrition & Prep Info
I’m a big believer in balance. Life is about nourishing your body with wholesome foods and also treating your soul with a little something sweet! Here’s the nutritional breakdown so you can enjoy these candies mindfully.
Prep Time: 15 minutes | Cook Time: 10 minutes | Chill Time: 50 minutes | Total Time: 1 hour 15 minutes | Servings: 48 candies
Approximate nutrition per candy (without chocolate dip):
- Calories: ~90
- Fat: 4g
- Carbohydrates: 12g
- Sugar: 11g
- Protein: 1g
- Sodium: ~25mg
Remember, these are a treat! Their small size makes them perfect for satisfying a sweet craving without going overboard.
Your Next Kitchen Adventure Awaits
And there you have it! Your complete guide to making the most delicious, creamy, and chewy coconut candies right in your own kitchen. I hope this recipe brings you as much joy to make as it does to eat. It’s a reminder that some of the best things in life—and in the kitchen—are wonderfully simple.
I would absolutely love to see your creations! Tag me on social @TastyChow with #TastyChow so I can see your beautiful coconut candies and share in the fun. Now, go forth and make something delicious! Your next bite of bliss is just a recipe away.
With love and a full container of coconut candies,
Emily