The Best Fudgy Chewy Brookies: Your New Favorite Dessert Mash-Up
When a Brownie and a Cookie Fall in Love…
Hey there, fellow chowhound! Let’s cut right to the chase: have you ever stood in your kitchen, torn between the dense, fudgy decadence of a brownie and the soft, chewy satisfaction of a chocolate chip cookie? I’ve been there more times than I can count, usually with a smudge of chocolate on my apron and a serious craving in my heart. It’s a delicious dilemma, but what if I told you that you don’t have to choose?
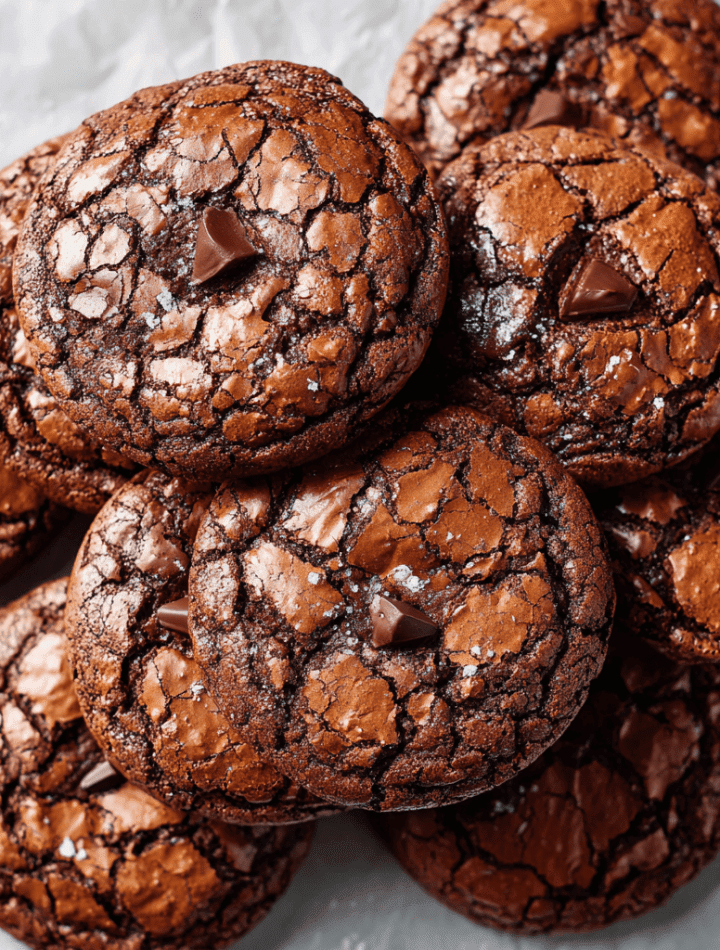
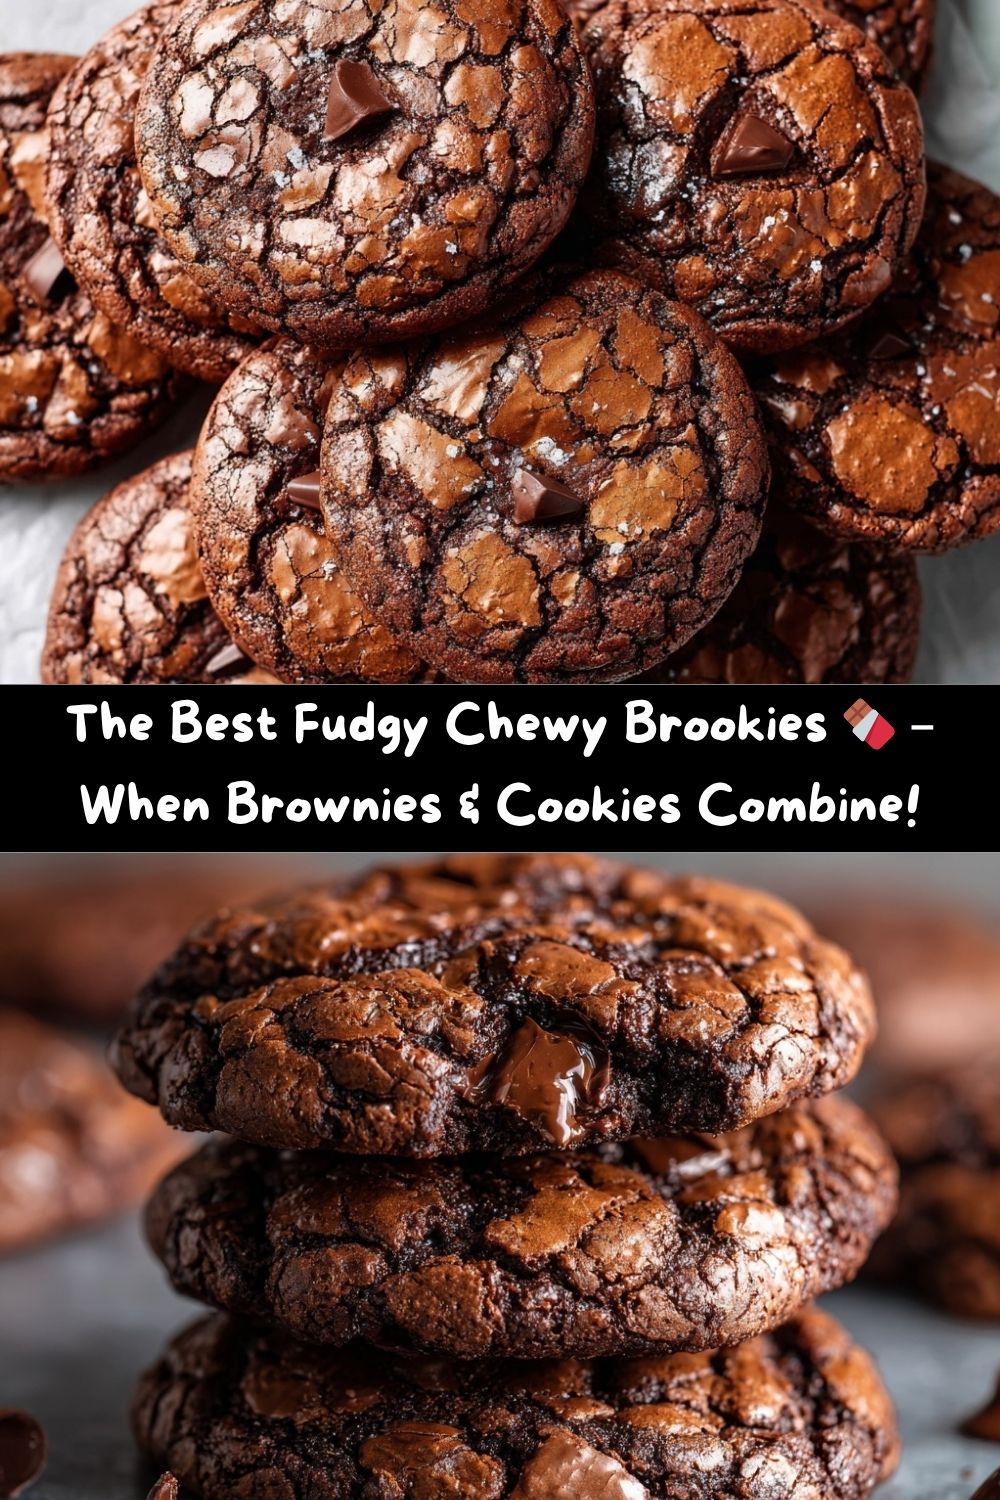
Welcome to the glorious world of Brookies—the ultimate dessert hybrid that’s about to rock your world. Imagine this: a cookie that boasts the crackly, paper-thin top of a perfect brownie, giving way to a center that’s simultaneously chewy, fudgy, and studded with pockets of melted chocolate. It’s the best of both worlds, all wrapped up in one irresistible, handheld treat.
This isn’t just another cookie recipe. This is my kitchen-tested, friend-approved, “I-need-to-make-these-again-immediately” masterpiece. We’re talking deep chocolate flavor, a texture that’s pure magic, and a recipe so straightforward you can whip it up on a whim. So, tie on your messiest apron (the sign of a great time in the kitchen, I say!), and let’s make something truly unforgettable together.
Print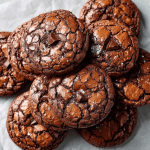
The Best Fudgy Chewy Brookies (Brownie Cookies)
- Total Time: 30 minutes
- Yield: 12 - 14 Cookies 1x
Description
Brookies are the ultimate dessert mash-up—where the rich decadence of a brownie meets the soft chew of a cookie. Deep chocolate flavor, gooey centers, and crisp edges make these the perfect treat for any chocolate lover. Quick to whip up and impossible to resist, this recipe is your new go-to for sweet satisfaction.
Ingredients
200g dark chocolate (semi-sweet, chopped)
120g unsalted butter
200g brown sugar
100g white sugar
2 large eggs
1 teaspoon vanilla extract
100g all-purpose flour
30g unsweetened cocoa powder
½ teaspoon baking powder
½ teaspoon salt
150g chocolate chips or chunks
Instructions
Preheat oven to 175°C (350°F). Line a baking tray with parchment paper.
Melt chocolate and butter together in a heatproof bowl. Stir until smooth and let cool slightly.
In a large bowl, whisk sugars, eggs, and vanilla until thick and pale.
Mix in the melted chocolate until fully incorporated.
Sift in flour, cocoa, baking powder, and salt. Fold gently until just combined.
Stir in the chocolate chips or chunks.
Scoop dough onto tray (about 2 tablespoons per cookie), spaced apart.
Bake for 10 to 12 minutes, until tops are crinkly and edges set.
Cool on tray for 5 minutes, then transfer to a wire rack.
- Prep Time: 15 minutes
- Cook Time: 15 minutes
Nutrition
- Calories: 220 / Cookie
- Fat: 11g / Cookie
- Carbohydrates: 28g / Cookie
- Protein: 3g / Cookie
The Accidental Kitchen Victory
I’ll never forget the first time a brookie came to life in my kitchen. It was a rainy Sunday, and my then-boyfriend (now husband), Mark, was having one of those “I need something chocolatey but I don’t know what” kind of days. I had a half-made batch of brownie batter in one bowl and some cookie dough scraps in another. In a moment of “what’s the worst that could happen?” inspiration, I decided to just… combine them.
The result was a little messy, a little ugly, but oh-my-goodness delicious. They spread into these lacy, craggy puddles of chocolate, with edges that snapped and centers that stayed gloriously gooey for days. Mark took one bite, his eyes went wide, and he declared, “This is it. This is the one.” That messy, unplanned experiment became a staple in our home, and after years of tweaking and perfecting, I’m so thrilled to finally share the final, foolproof version with you. It’s a recipe born from love, a little chaos, and a deep, unwavering belief that more chocolate is always the answer.
Gather Your Ingredients: The Dream Team
Here’s your shopping list for fudgy-chewy perfection. I’ve included a few of my chef-y insights and easy swaps to make this recipe work for you!
- 200g Dark Chocolate (semi-sweet, chopped): This is the flavor foundation! I prefer using a bar of chocolate I’d happily eat on its own, chopped up, rather than pre-made chocolate chips for melting. It melts smoother and delivers a richer, more complex chocolate flavor. Chef’s Tip: No dark chocolate? Milk chocolate works, but your brookies will be sweeter. For a intense hit, use 70% dark!
- 120g Unsalted Butter: Butter adds that irreplaceable rich flavor and helps create that beautifully crisp edge. Using unsalted lets you control the salt level perfectly. Substitution Tip: For a dairy-free version, a high-quality plant-based butter works wonderfully.
- 200g Brown Sugar & 100g White Sugar: This is the dynamic duo for texture! The molasses in the brown sugar is the secret to a chewy, moist cookie, while the white sugar helps create those lovely crisp edges and that iconic crackly top. Don’t skip this combo!
- 2 Large Eggs: Make sure your eggs are at room temperature! They incorporate into the batter much more easily, creating a smoother, more emulsified dough that rises better. Quick Tip: To quickly bring eggs to room temp, place them in a bowl of warm water for 5-10 minutes.
- 1 Teaspoon Vanilla Extract: The flavor enhancer! Vanilla might seem simple, but it rounds out all the chocolate notes and adds a warm, aromatic depth. Use the real stuff if you can—it makes a difference.
- 100g All-Purpose Flour: The structural backbone. We’re using just enough to hold everything together without making the brookies cakey. Chef’s Insight: For a slightly nuttier flavor, you can swap 50g of the AP flour for whole wheat pastry flour.
- 30g Unsweetened Cocoa Powder: This is what doubles down on the chocolate and gives it that classic brownie soul. I use a natural unsweetened cocoa powder for this recipe.
- ½ Teaspoon Baking Powder: Our little leavening agent! It gives the brookies just a bit of lift, preventing them from being too dense.
- ½ Teaspoon Salt: Do not underestimate the power of salt! It cuts through the sweetness and makes the chocolate flavor pop. It’s the difference between “sweet” and “complex.”
- 150g Chocolate Chips or Chunks: The glorious, melty pockets! I’m a sucker for a mix of semi-sweet chips and dark chocolate chunks for varied texture. Fun Swap: Try peanut butter chips, white chocolate chunks, or even chopped toasted walnuts for a crunch!
Let’s Get Baking: Your Step-by-Step Guide to Brookie Bliss
Ready to create some magic? Follow these steps, and you’ll be a brookie master in no time. I’ve sprinkled in my best tips to ensure your success!
- Preheat and Prep. Fire up your oven to 175°C (350°F). This gives it plenty of time to reach a consistent, even temperature. Line your baking tray with parchment paper. Trust me, this is non-negotiable for easy cleanup and preventing any sticking disasters! Chef’s Hack: If you don’t have parchment, a light coating of butter and flour will do in a pinch.
- Melt the Chocolate & Butter. In a heatproof bowl, combine your chopped dark chocolate and butter. You can melt this gently over a pot of simmering water (a double boiler) or in short 20-second bursts in the microwave, stirring well after each blast. The goal is smooth and glossy. Let this cool for a few minutes—if it’s too hot, it’ll cook the eggs when we add it later! Watchpoint: Be patient! Burnt chocolate is bitter, and we don’t want that.
- Whisk the Sugars and Eggs. In a large bowl, add your brown sugar, white sugar, eggs, and vanilla extract. Now, grab your whisk and go to town! You want to whisk for a good 1-2 minutes until the mixture becomes thick, pale, and falls off the whisk in a smooth “ribbon.” This step is KEY for that crackly brownie-top texture. You’re aerating the eggs and dissolving the sugar.
- Combine the Wet Ingredients. Pour the slightly cooled chocolate and butter mixture into the egg and sugar mixture. Gently fold it in with a spatula until it’s fully incorporated and you have a gorgeous, dark, shiny batter.
- Incorporate the Dry Ingredients. Place a sieve over the bowl and sift in your flour, cocoa powder, baking powder, and salt. Sifting is important here to avoid lumps of cocoa or flour! Now, fold everything together gently. Stop as soon as you no longer see streaks of dry flour. Overmixing is the enemy of a fudgy texture—it develops the gluten in the flour and can make things tough.
- Add the Chocolate Goodies. Toss in your chocolate chips or chunks and give the dough a few final folds to distribute them evenly.
- Scoop and Space. Using a cookie scoop or two tablespoons, drop mounds of dough onto your prepared baking sheet, leaving about 2 inches (5 cm) between each one. These brookies spread! For a thicker, chunkier brookie, you can chill the dough for 30 minutes before baking, but I love the lacy, thin-and-chewy result you get from baking them right away.
- Bake to Perfection. Slide the tray into your preheated oven and bake for 10-12 minutes. You’re looking for puffed-up tops with a beautiful crinkly surface and set edges. The center might still look a tiny bit soft—that’s exactly what you want! They will continue to cook as they cool. Doneness Test: A toothpick inserted into the edge should come out with moist crumbs, not wet batter.
- The Most Important Step: COOL! I know, the temptation is real. But you must let the brookies cool on the baking sheet for at least 5-10 minutes. They are incredibly fragile straight out of the oven. This resting period allows them to set up properly. After that, you can transfer them to a wire rack to cool completely… or, you know, grab a glass of milk and enjoy one warm and gooey. I won’t judge.
How to Serve These Heavenly Circles of Joy
Okay, you’ve baked the perfect batch. Now, how do you serve them? The beauty of a brookie is its versatility.
For the ultimate experience, serve them slightly warm. The chocolate chips will be gloriously melty. Plating is simple: stack a couple on a cute napkin or a rustic wooden board. I love dusting them with a tiny flaky sea salt right as they come out of the oven—it elevates the chocolate to a whole new level.
These are a dream with a tall, ice-cold glass of milk, a hot cup of coffee to balance the sweetness, or even a scoop of vanilla bean ice cream sandwiched between two for the most epic ice cream sandwich of your life. Taking them to a party? Just pile them high on a plate and watch them disappear. They are the ultimate crowd-pleaser.
Get Creative! Brookie Flavor Variations
Once you’ve mastered the classic, the fun really begins! Here are a few of my favorite ways to mix things up:
- Salted Caramel Pretzel: Fold in ½ cup of crushed salted pretzel pieces and ½ cup of caramel bits. The sweet-salty-crunchy combo is a game-changer.
- Mint Chocolate Chip: Add 1 teaspoon of peppermint extract along with the vanilla, and use dark chocolate AND mint chocolate chips. It’s like your favorite ice cream, in cookie form.
- Orange Zest & Dark Chocolate: Add the zest of one large orange to the sugar before you whisk it with the eggs. The citrus brightens the deep chocolate flavor beautifully.
- Rocky Road: Swap the chocolate chips for a mix of mini marshmallows and chopped walnuts. You might need to bake them a minute or two longer as the marshmallows can cause more spreading.
- Gluten-Free Swap: Simply replace the all-purpose flour with a 1:1 gluten-free flour blend. The texture might be a tad more delicate, but just as delicious!
Chef Emily’s Notebook Scribbles
This recipe has been a living, evolving thing in my kitchen. I once, in a sleepy haze, accidentally used melted coconut oil instead of butter, and you know what? They were fantastic—a little lighter with a subtle tropical note. Don’t be afraid to make this recipe your own!
The biggest lesson I’ve learned is to trust the process. That moment when you pull them out of the oven and they look a bit underdone is the moment of truth. Have faith! Letting them cool on the tray is what transforms them from puddles of batter into chewy, fudgy masterpieces. It’s a lesson in patience that pays off in spades (or, in this case, in brookies).
Your Brookie Questions, Answered!
Let’s tackle some common kitchen conundrums to make sure your brookies are perfect every single time.
Q: My brookies spread too much and turned out flat. What happened?
A: This usually points to two things: 1) Your oven might not have been hot enough. An oven thermometer is a baker’s best friend! Or 2) Your baking sheet was too warm. Always use a cool baking sheet for each batch. If it’s a hot day, chilling the dough for 20-30 minutes can also help.
Q: Can I make the brookie dough ahead of time?
A: Absolutely! You can scoop the dough onto a parchment-lined tray, freeze the balls solid, and then transfer them to a freezer bag. When a craving hits, just bake them straight from the freezer, adding 1-2 minutes to the baking time. Fresh, warm brookies on demand!
Q: My brookies are too cakey, not fudgy. Why?
A> The most common culprit is overmixing once the flour is added. Remember, fold gently until *just* combined. Also, check your baking powder to make sure it’s still active. And finally, be careful not to over-bake them. A soft center is your goal.
Q: Can I use all brown sugar or all white sugar?
A: I don’t recommend it. The combination is what creates the perfect texture. All brown sugar will make them too moist and potentially greasy; all white sugar will make them crisp and thin, like a classic chocolate chip cookie, and you’ll lose that brownie-like chew.
Nutritional Information (For Your Info!)
Okay, let’s be real—we’re not eating brookies for their health benefits. We’re eating them for pure, unadulterated joy! But I know many of you like to keep track, so here’s a rough estimate based on one brookie from a batch of 14. Remember, this can vary based on the specific brands of ingredients you use.
Per Brookie (approx.):
Calories: 220 | Total Fat: 11g | Saturated Fat: 7g | Carbohydrates: 28g | Fiber: 2g | Sugar: 20g | Protein: 3g
Think of it as a little boost of happiness for your soul. Life is all about balance, and a homemade brookie shared with someone you love is one of the best parts of that balance.
Final, Delicious Thoughts
And there you have it, my friends! My heart and soul, poured into one perfect brookie recipe. This is more than just a list of ingredients and steps; it’s an invitation to create a little bit of magic in your own kitchen. It’s about the smell of melting chocolate filling your home, the satisfaction of pulling a tray of something beautiful from the oven, and the shared smiles when you pass the plate around.
I hope this recipe becomes a staple in your home, just like it is in mine. A go-to for potlucks, a treat for a tough day, a celebration for a good one. So, from my messy apron to yours, happy baking!