Your New Go-To Sandwich Is Here: The Crispy Chicken Caesar
Hey there, friend! Let me ask you a question. Have you ever been staring into your fridge, dreaming of something that hits that perfect trifecta? You know the one: crave-worthy, comforting, but also somehow feels a little bit fancy? Maybe you’re craving the satisfying crunch of a great Caesar salad, but you need something a little more… substantial. Something you can actually hold in your hands.
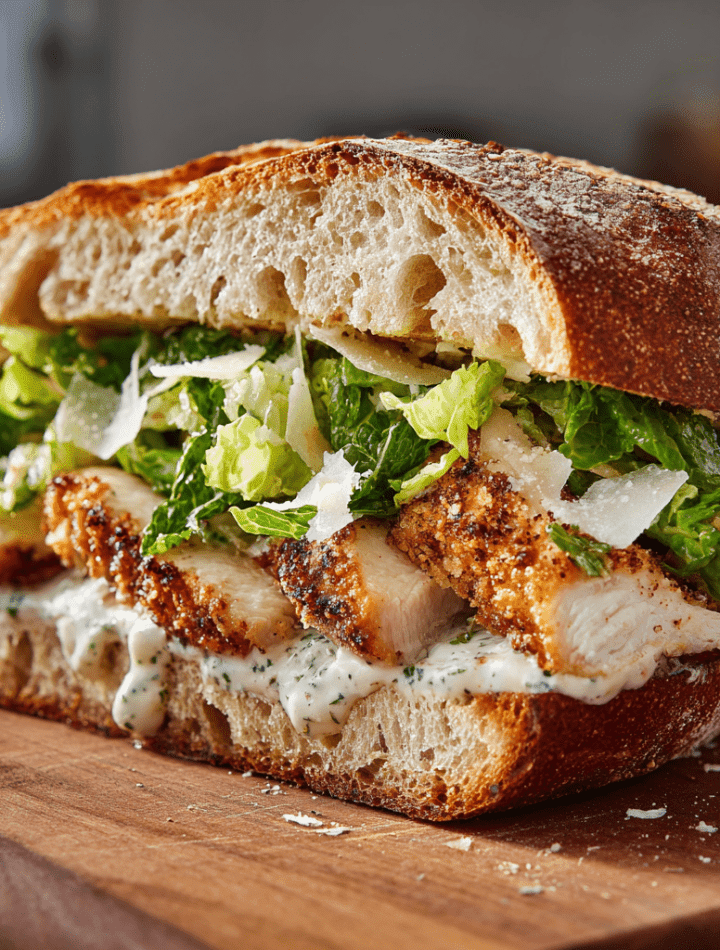
Well, pull up a chair and let’s talk about the sandwich that has single-handedly solved my “what’s for dinner?” dilemma more times than I can count. This, my friend, is the Crispy Chicken Caesar Sandwich. We’re talking about juicy, golden-brown chicken cutlets, breaded to absolute perfection, meeting the bold, creamy, garlicky punch of a classic Caesar dressing. All of it is tucked into a gloriously toasted, crusty piece of bread with fresh, crisp romaine and those delicate, salty shavings of Parmesan cheese.
This isn’t just a sandwich; it’s an experience. It’s everything you adore about a stellar Caesar salad, but hugged by warm, crispy chicken and fantastic bread. It’s the ideal solution for a busy weeknight when you want flavor fast, for a weekend lunch that feels special, or for those days when you just deserve a seriously delicious handheld meal. I promise you, one bite of this beauty, and your regular sandwich rotation might just get a permanent, and very welcome, upgrade. Let’s make it!

A Salad, Reimagined: My Love Affair with Caesar
My obsession with this sandwich started, funnily enough, with a salad. Picture a much younger me, maybe 12 years old, sitting in a bustling Italian restaurant with my family. I was a notoriously picky eater, but I was feeling adventurous that night. I ordered a Caesar salad, and when it arrived, the server performed this magical tableside ritual—grating anchovies, whisking the dressing with a flourish. I was mesmerized.
That first bite was a revelation. The creamy, umami-rich dressing, the crisp romaine, the sharp Parmesan, the crunchy croutons… it was a symphony of textures and bold flavors. It felt grown-up and exciting. From that day on, I was hooked. I’d beg my mom to buy the ingredients so I could practice making the dressing myself at home (my poor family were the taste-testers for many, many failed attempts!).
Years later, while fiddling in my culinary school dorm with some leftover roasted chicken and a heel of good bread, I had the idea to slap my homemade Caesar dressing on it. It was a messy, glorious, open-faced situation. The epiphany hit me: “This is it. This is the feeling of that salad, but heartier.” Over time, that messy experiment evolved, the roasted chicken got swapped for a crispy, pan-fried cutlet for that essential textural contrast, and the legendary Crispy Chicken Caesar Sandwich was officially born in my kitchen. It’s my little tribute to that first magical bite, all those years ago.
Gathering Your A-Team: The Ingredients
Great food starts with great ingredients, and the magic of this sandwich is how simple, quality components come together to create something truly spectacular. Here’s your shopping list, complete with my favorite chef-y insights and swaps.
- 2 boneless, skinless chicken breasts, halved lengthwise: This is our star! Halving them (butterflying) creates thinner cutlets that cook quickly and evenly. Chef’s Tip: If they’re still a bit thick, place them between two pieces of plastic wrap and gently pound them with a rolling pin or pan until they’re an even ½-inch thickness. No stress, no mess!
- ½ cup all-purpose flour: Our first layer of the crispy-coating trifecta. The flour helps the egg adhere, creating a perfect glue for the breadcrumbs.
- 2 eggs, beaten: The all-important “glue”! Give them a good whisk until they’re uniform. A splash of water or milk can make the egg layer a tad lighter.
- 1 cup panko breadcrumbs: The secret to an ultra-crunchy, non-greasy crust! Panko are Japanese-style breadcrumbs that are airier and flakier than traditional ones. They create a wonderfully light and shatteringly crisp texture. Substitution: Regular breadcrumbs work in a pinch, but you’ll lose some of that fantastic crunch.
- ½ teaspoon garlic powder: We’re adding a subtle, savory garlic flavor right into the breading. It’s a little flavor bomb!
- ½ teaspoon salt & ¼ teaspoon black pepper: The fundamental seasonings. Don’t be shy here—seasoning every layer is key to a flavorful cutlet.
- Olive oil or a neutral oil (like avocado or canola), for frying: You need enough to generously coat the bottom of your skillet. A neutral oil has a higher smoke point, but a light olive oil works beautifully and adds a hint of fruitiness.
- 1 cup chopped romaine lettuce: For that classic Caesar crunch and fresh contrast. Romaine is sturdy and won’t wilt immediately when it hits the warm chicken.
- ¼ cup shaved Parmesan cheese: Don’t use the pre-grated powder here! Shaving it yourself from a block with a vegetable peeler gives you those beautiful, delicate curls that melt slightly on contact with the warm chicken. It’s a game-changer.
- ¼ cup Caesar dressing: Use your favorite store-bought brand for ease, or go all out with a homemade Caesar dressing if you’re feeling fancy. The world is your oyster!
- 4 slices crusty bread or 2 sandwich rolls, toasted: The foundation! A sturdy, crusty ciabatta, a French baguette, or a good-quality brioche bun are all winners. Toasting is non-negotiable—it adds texture and prevents a soggy sandwich.
Let’s Build That Sandwich: A Step-by-Step Guide
Ready for the fun part? Let’s get our hands a little dirty and transform these simple ingredients into a masterpiece. I’ll walk you through each step with all my favorite kitchen hacks.
- Prep the Chicken: If you haven’t already, place your chicken breasts on a cutting board and, using a sharp knife, carefully slice them in half horizontally to create two thinner cutlets from each breast. If they need it, place them between plastic wrap and gently pound to an even ½-inch thickness. Chef’s Hack: This is a fantastic way to tenderize the meat and ensure it cooks in sync with the breading. Pat them dry with a paper towel—a dry surface helps the flour stick better!
- Create Your Breading Station: This is my favorite part—it feels so professional! Get three shallow bowls or plates. In the first, place your all-purpose flour. In the second, add your beaten eggs. In the third, combine the panko breadcrumbs, garlic powder, salt, and pepper. Mix the breadcrumb mixture well so the seasonings are evenly distributed. Chef’s Tip: Set this up in a line: flour, then egg, then breadcrumbs. This creates an efficient workflow and keeps one hand for dry ingredients and one for wet, minimizing breadcrumb-fingers chaos!
- The Breading Ballet: Now for the dance! Take one chicken cutlet and dredge it thoroughly in the flour, shaking off any excess. Next, dip it completely into the beaten egg, letting the excess drip off. Finally, press it firmly into the panko mixture, ensuring every inch is coated in that glorious, crunchy breading. Place the breaded cutlet on a clean plate and repeat with the remaining pieces. Chef’s Hack: Really press the panko onto the chicken. This ensures a solid, even crust that won’t fall off during frying.
- Fry to Golden Perfection: Pour enough oil into a large skillet to coat the bottom generously—about ¼ inch deep. Heat it over medium-high heat. To test if it’s ready, flick a tiny breadcrumb into the oil; if it sizzles immediately, you’re good to go! Carefully place your breaded chicken cutlets in the hot oil. Don’t overcrowd the pan; cook in batches if needed. Fry for 3-4 minutes per side, until the coating is a deep, golden brown and the chicken is cooked through (internal temperature of 165°F). Chef’s Tip: Resist the urge to move them around! Let them develop that beautiful crust before you flip. Once done, transfer them to a wire rack set over a paper towel-lined plate. This keeps them crispy on all sides, unlike resting directly on a plate where the bottom can steam and get soft.
- Assemble Your Masterpiece: While the chicken is resting for a minute (this allows the juices to redistribute), toss your chopped romaine lettuce with the Caesar dressing in a small bowl. Now, take your toasted bread or rolls. Place a crispy chicken cutlet on the bottom half, top it generously with the dressed romaine, and finish with a beautiful shower of those Parmesan shavings. Cap it with the top piece of bread, press down gently, and get ready for bliss.
How to Serve This Beauty
This sandwich is a complete meal in your hands, but a little something on the side never hurt anybody! I love serving it cut in half on a diagonal (because it just looks better, right?) on a vibrant plate.
For a true restaurant-style experience, a handful of crispy potato chips or a simple side of zesty pickle spears are my absolute go-tos. The vinegar from the pickles cuts through the richness of the sandwich perfectly. If you’re feeling a bit more virtuous, a simple side of cherry tomatoes drizzled with a little balsamic glaze or a light, citrusy salad is a fantastic way to balance out the meal. And don’t forget plenty of napkins—this is a joyfully messy affair!
Make It Your Own: Delicious Twists & Swaps
The beauty of this recipe is its versatility. Feel free to play around and make it suit your mood or dietary needs!
- Spicy Sriracha Caesar: Add 1-2 tablespoons of sriracha to your Caesar dressing and mix well. This adds a fantastic kick that plays so well with the creamy, garlicky base.
- Bacon & Avocado Bliss: Because bacon makes everything better, right? Add a few slices of crispy, crumbled bacon and some creamy slices of avocado to the sandwich assembly. It’s a next-level upgrade.
- Grilled Chicken Version: Want to lighten it up? Skip the breading and frying! Simply season your chicken cutlets with salt, pepper, and a bit of that garlic powder, then grill or pan-sear them until cooked through. You’ll lose the crunch but keep all the fantastic flavor.
- Gluten-Free Friendly: Easily done! Use your favorite gluten-free all-purpose flour and gluten-free panko breadcrumbs. The process is exactly the same, and you’ll still get a wonderfully crispy result.
- The “Everything Bagel” Remix: Mix 2 tablespoons of everything bagel seasoning into your panko breadcrumbs before breading the chicken. It adds an incredible oniony, garlicky, seedy crust that is absolutely to die for.
Chef Emily’s Kitchen Notes
This recipe has been a living, evolving thing in my kitchen. I’ve made it for best friends after a long day, for my partner as a “just because” treat, and even as a hearty pack-and-go lunch for a picnic. I’ll never forget the time I was filming a video for this recipe and accidentally knocked over my entire bowl of flour. It looked like a winter wonderland in my kitchen! We had to stop filming, clean up the hilarious mess, and start again. It just goes to show that even in a “messy-apron-wearing” chef’s kitchen, things don’t always go perfectly—and that’s totally okay! The sandwich was still incredible. The recipe is forgiving, so don’t be afraid of it. Make it your own, and most importantly, have fun with it.
Your Questions, Answered!
I’ve gotten a lot of questions about this sandwich over the years, so I’ve compiled the most common ones here to help you out!
- Q: Can I bake the chicken instead of frying it?
A: Absolutely! For a healthier option, place your breaded chicken cutlets on a wire rack set over a baking sheet (this promotes air circulation for maximum crispiness). Spray them lightly with cooking spray or a light drizzle of oil, and bake at 400°F (200°C) for 15-20 minutes, flipping halfway through, until golden and cooked through. - Q: My breading is falling off! What did I do wrong?
A: This usually happens for one of two reasons: 1) The oil wasn’t hot enough when you added the chicken, causing the coating to absorb oil instead of searing. Or 2) You didn’t shake off the excess flour or egg. Make sure to do a firm press in the breadcrumb stage and ensure your oil is sizzling-hot before you begin. - Q: Can I make the chicken ahead of time?
A: You can, but it’s best served fresh. If you must, cook the chicken cutlets and let them cool completely. Store them in a single layer in an airtight container in the fridge for up to 2 days. Re-crisp them in a 350°F (175°C) oven or an air fryer for a few minutes. I don’t recommend assembling the whole sandwich ahead of time, as the bread will get soggy. - Q: What’s the best bread to use?
A: You want something with structure! A soft, floppy bread will get squashed and soggy. My top picks are ciabatta rolls, a sturdy sourdough, or a French baguette. Toasting is mandatory for creating a barrier against the dressing and chicken juices.
Nutritional Information (Approximate)
I believe in balance and enjoying the food you love! Here’s a rough breakdown of what you’re getting in one hearty sandwich. Please note that this can vary based on the specific brands of ingredients you use, the amount of oil absorbed, and the size of your chicken breast.
Per Sandwich (Approx.):
Calories: 550 | Total Fat: 25g | Saturated Fat: 5g | Cholesterol: 145mg | Sodium: 900mg | Total Carbohydrates: 45g | Dietary Fiber: 2g | Sugars: 3g | Protein: 35g
A Quick Note: The sodium content is largely driven by the dressing, cheese, and seasoning. You can reduce this by using a low-sodium dressing, less salt in the breading, or a lighter hand with the Parmesan. For a lower-carb option, serve it as a salad by placing the crispy chicken on a bed of the dressed romaine! It’s all about making it work for you.
Final Thoughts from My Kitchen to Yours
There’s something so satisfying about a recipe that takes a beloved classic and reimagines it in a way that feels brand-new — and that’s exactly what this Crispy Chicken Caesar Sandwich does. It’s comfort and freshness, crunch and creaminess, all living happily between two slices of perfectly toasted bread. Every bite gives you that balance of crisp lettuce, juicy chicken, tangy Caesar dressing, and salty Parmesan — the kind of bite that makes you pause for just a second and say, “Wow, that’s really good.”
What I love most about this recipe is its versatility. It can be lunch, dinner, or even a game-day showstopper. It’s the kind of sandwich that works just as well served casually on a paper plate as it does plated up next to a chilled glass of white wine. It’s unfussy, reliable, and bursting with flavor — the exact kind of recipe I love sharing from my kitchen to yours.
So the next time you’re craving something that feels indulgent yet fresh, familiar yet exciting, remember this sandwich. Grab your skillet, a few pantry staples, and your favorite loaf of bread. In less than 30 minutes, you’ll have something that looks impressive, tastes incredible, and reminds you that a little bit of crunch and a whole lot of flavor can make even an ordinary day feel special.