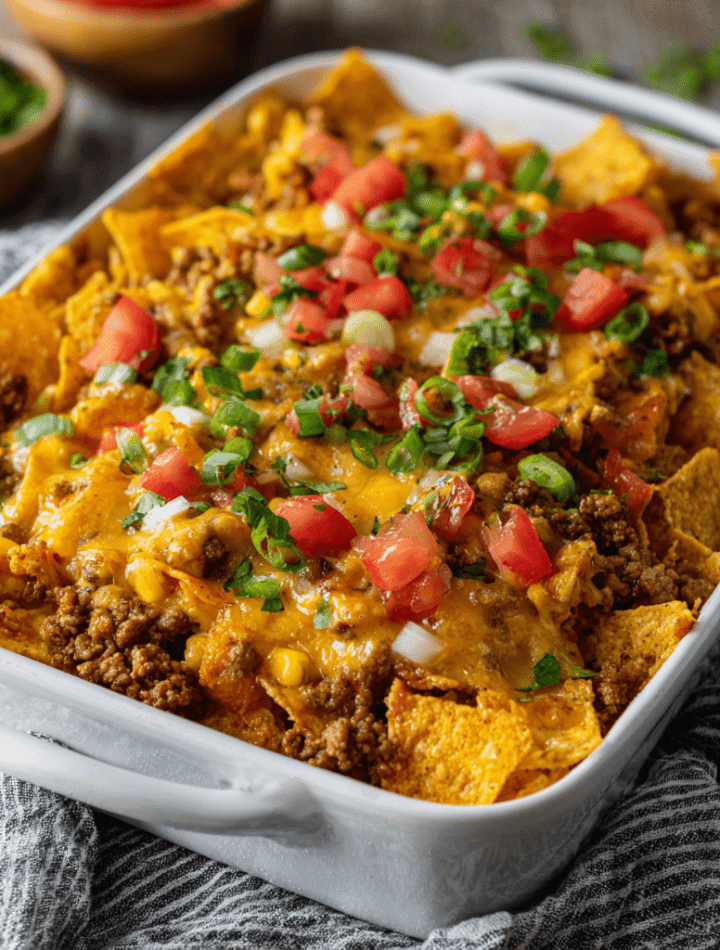
Dorito Casserole: The Ultimate Comfort Food Mashup You NEED to Make
Hey there, friend! Pull up a chair and let’s talk about one of life’s greatest joys: comfort food that doesn’t require a culinary degree or a full day of prep. You know those days when you’re craving something bold, cheesy, and unapologetically delicious? The kind of meal that makes kids’ eyes light up and adults sneak back for a second helping before they’ve even finished their first? Well, my friend, you’ve just found your kitchen’s new MVP.
This isn’t just any casserole. This is Dorito Casserole—a glorious, crunchy, creamy, flavor-packed masterpiece that takes everything we love about taco night and marries it to our favorite cheesy chips. It’s the dish that laughs in the face of complicated recipes and says, “Hey, let’s just have some fun and make something awesome.” It’s ridiculously easy to throw together, it’s a total crowd-pleaser, and it’s guaranteed to leave everyone at the table with a happy, full belly. So, grab your favorite apron (the messy one is totally welcome here), and let’s make a memory, one cheesy, crunchy bite at a time.
The Night My Kitchen Got a Little Crunchier
I’ll never forget the first time I dared to toss a bag of Doritos into a casserole. It was a chaotic Wednesday, the kind where my culinary school training was screaming for a perfectly seared protein and a delicate pan sauce, but my soul was screaming for something easy and nostalgic. I stared into my pantry, saw that bright red bag, and had a flashback to my teenage years, sitting on the floor of my best friend’s living room, watching movies and crushing bags of Nacho Cheese Doritos straight from the bag.
I thought, “What if we could capture that pure, unadulterated joy in a dinner?” I browned some beef, mixed in my favorite taco fixings, and took a leap of faith, layering those iconic chips right into the dish. The smell that wafted from my oven was nothing short of magical. When I pulled it out, all golden and bubbly, and took that first bite, I knew I had stumbled onto something special. It was a happy accident that tasted like a crunchy, cheesy hug. It reminded me that the best food isn’t always the fanciest—it’s the food that makes you smile.
Gathering Your Flavor Arsenal
Here’s the beautiful part: you probably have most of this in your kitchen right now! This is a no-fuss, no-stress ingredient list that comes together to create something truly greater than the sum of its parts.
- 1 lb lean ground beef: I like 90/10 lean beef because it has great flavor without too much excess grease to drain. Feel free to swap in ground turkey or chicken for a lighter option!
- ½ yellow onion, chopped: This is our aromatic base, adding a sweet, savory depth. No yellow onion? A white or red one works just fine.
- 1 tsp minced garlic: Because a little garlic makes everything better. Fresh is fantastic, but the jarred stuff is a total lifesaver on busy nights.
- 1 packet taco seasoning: This is our flavor shortcut superstar! It packs in all the chili powder, cumin, and paprika we need. For a homemade twist, use 2 tbsp of your own blend.
- 12 oz frozen corn: It adds a pop of sweetness and a lovely texture. Canned corn (drained) works in a pinch, too.
- 14.5 oz can petite diced tomatoes with green chiles (like Rotel): This is my secret weapon for a little zing! The tomatoes get saucy, and the green chiles add a subtle kick. If you’re sensitive to spice, use a can of plain diced tomatoes.
- 1 cup sour cream: This is the key to the creamy, luscious texture that holds everything together. It also cools down the spices perfectly. Greek yogurt is a great tangy substitute.
- 3 cups crushed Doritos (nacho cheese flavor): The star of the show! Crush them with your hands right in the bag for a fun stress-reliever. You want a mix of crumbs and small pieces for maximum crunch distribution.
- 3 cups Mexican blend shredded cheese: Because more cheese is always the answer. This pre-shredded blend melts beautifully, but a hand-shredded combo of cheddar and Monterey Jack is next-level.
Let’s Build Our Masterpiece: Step-by-Step
Ready? This is where the magic happens. It’s so simple, you’ll have it in the oven before you know it!
- Preheat and Prep: First things first, get that oven heating to a cozy 350°F (175°C). This gives your casserole a warm welcome and ensures even cooking. While it’s warming up, lightly grease your trusty 9×13-inch baking dish. A quick spritz of cooking spray or a swipe of butter does the trick!
- Brown the Beef: Grab a large skillet and set it over medium heat. Crumble in your ground beef, and add the chopped onion and garlic. Cook it all up, breaking the meat into small pieces with your spoon, until it’s beautifully browned and the onions are soft and translucent. Now, here’s a pro-tip: carefully drain off any excess fat. This keeps our casserole from getting greasy and lets all the other flavors shine.
- Spice It Up & Simmer: Time for the flavor party! Sprinkle in the taco seasoning, then add the frozen corn and the entire can of diced tomatoes with green chiles (don’t drain it!). Give it a good stir until everything is warmly coated in those spices. Let it simmer for about 5 minutes. You’ll see it thicken slightly and smell absolutely incredible. This step is crucial for marrying all the flavors together.
- The Creamy Transformation: Take the skillet off the heat. This is important! If you add the sour cream while the skillet is still on the burner, it might separate or curdle. Stir in that cool, creamy sour cream and one cup of your shredded cheese. Watch as the mixture turns into a creamy, cheesy, dreamy filling. It’s a beautiful thing.
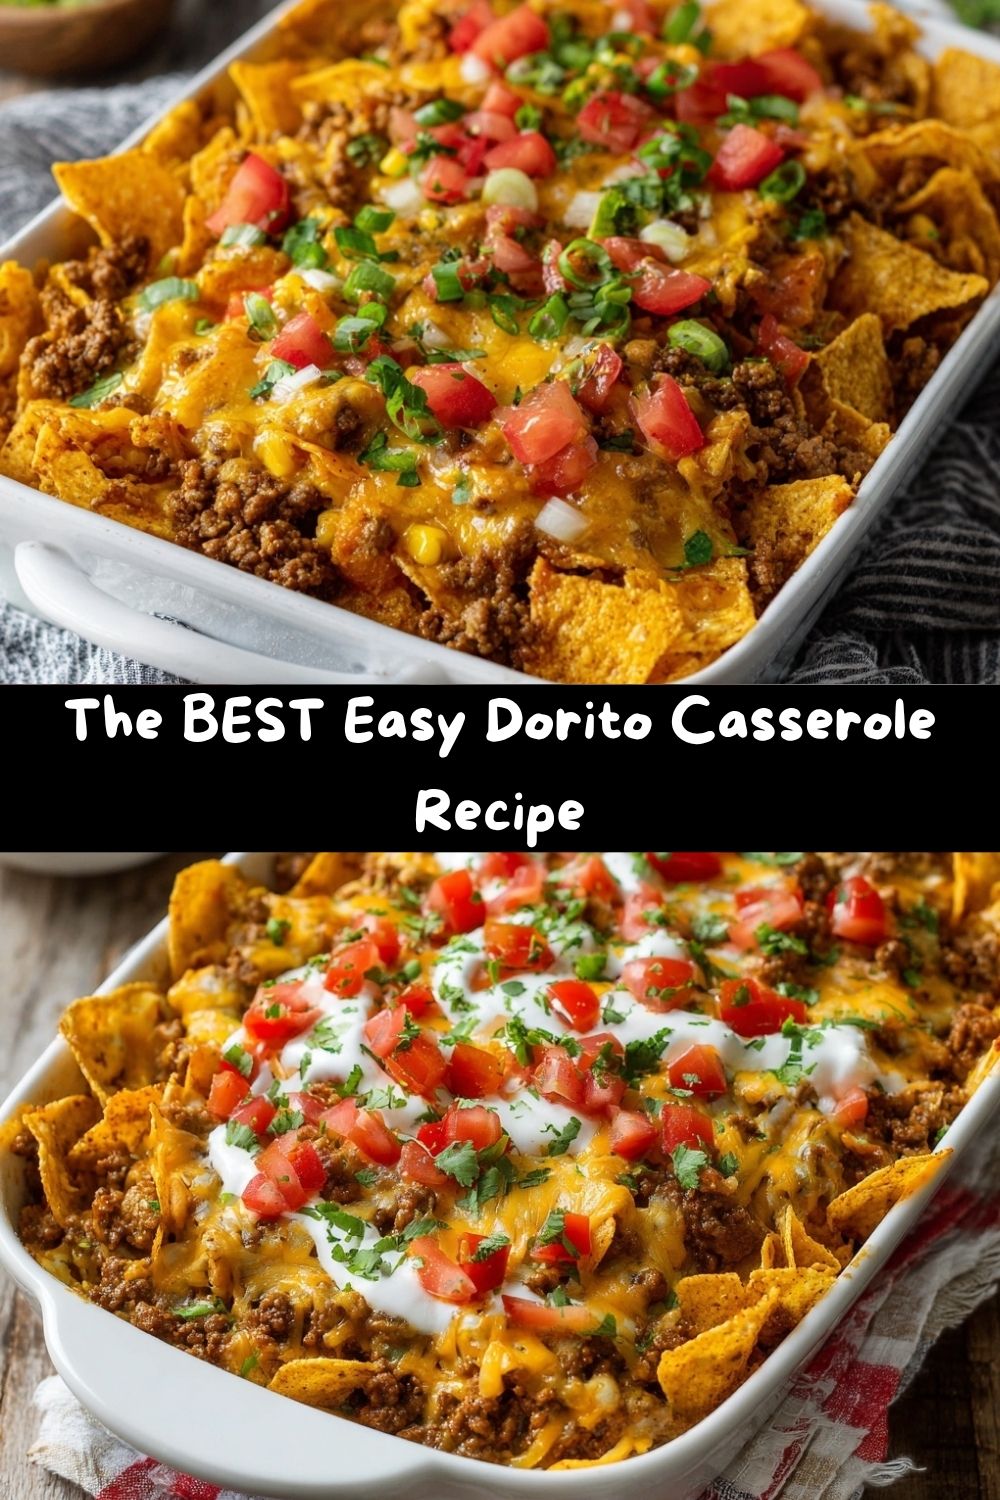
- Layer with Love: Now for the fun, architectural part! Spread half of your crushed Doritos in an even layer at the bottom of your prepared baking dish. This creates a fantastic crunchy base that soaks up just enough flavor. Next, pour the entire meat mixture over the chips and spread it out evenly. Top it with the remaining crushed Doritos, followed by the final, glorious two cups of cheese. Don’t be shy with that cheese—cover every inch!
- Bake to Bubbly Perfection: Slide your masterpiece into the preheated oven and let it bake for 20-25 minutes. You’re looking for the cheese to be completely melted, bubbly, and maybe even just starting to get a few golden spots. Your whole house will smell like a Tex-Mex dream.
How to Serve This Cheesy Wonder
Okay, you’ve pulled this gorgeous, bubbling pan of joy from the oven. Now what? Let it rest for about 5 minutes before you dive in. This little pause allows the layers to set just enough so you can get a clean scoop.
I love serving this family-style, right from the dish in the center of the table. Use a sturdy spatula to lift out hearty portions. The real magic happens with the toppings! Set up a little “casserole bar” with bowls of:
- Cool, creamy dollops of sour cream
- Diced, fresh tomatoes for a bright pop
- Sliced green onions or chopped cilantro for a fresh finish
- Sliced jalapeños for those who like it extra spicy
- A big spoon for scooping up chunky salsa or a drizzle of hot sauce
It’s a complete meal in one dish, but a simple side of a crisp green salad or some refreshing slices of avocado always complements it perfectly.
Make It Your Own: Delicious Twists & Swaps
The beauty of this recipe is its flexibility! Don’t be afraid to play with it and make it suit your taste buds or dietary needs.
- Spicy Fiesta Swap: Use Spicy Nacho or Cool Ranch Doritos for a different flavor profile! You can also use a can of hot diced tomatoes with green chiles and add a 4 oz can of diced green chiles for more heat.
- Hearty Bean Boost: Stretch the recipe further and add fiber by mixing in a 15 oz can of drained and rinsed black beans or pinto beans with the corn and tomatoes.
- Full Vegetarian Makeover: Skip the ground beef entirely! Use a plant-based ground “meat” or a full 15 oz can of black beans (rinsed and drained) as a direct substitute. The result is just as satisfying.
- Chicken Chow Twist: Not in the mood for beef? No problem! Use 2 cups of shredded cooked chicken (rotisserie chicken is perfect here) and mix it in with the tomatoes and corn. You might want to add a splash of chicken broth if the mixture seems dry.
- Extra Creamy Dream: For an even richer, creamier texture, stir in a 10.5 oz can of condensed cheddar cheese soup along with the sour cream. It’s decadent and oh-so-good.
Chef Emily’s Kitchen Confessions
I’ll let you in on a little secret: the first time I made this, I was so impatient that I didn’t let it rest after baking. I went in with my spatula and it was a glorious, delicious, cheesy mess! The layers slid everywhere, but you know what? It still tasted absolutely amazing. So, don’t stress about perfection.
Over the years, I’ve learned that the best way to crush the Doritos is right in the bag. Just seal the top, press out the air, and go to town with your hands or a rolling pin. It’s strangely therapeutic! This recipe has become my go-to for potlucks, and I always get asked for the recipe. It’s the dish that proves comfort food doesn’t have to be complicated to be unforgettable.
Your Questions, Answered!
I’ve gotten a lot of questions about this casserole over the years, so I’ve gathered the most common ones here to help you out.
Q: My casserole turned out a bit soggy. What happened?
A: The most common culprit is not crushing the chips enough. You want a good mix of fine crumbs and small pieces to create a sturdy base and topping. Also, make sure you’re draining the excess fat from the beef thoroughly. Finally, don’t skip the simmering step—it helps cook off some of the liquid from the tomatoes.
Q: Can I make this Dorito Casserole ahead of time?
A: You can! Assemble the casserole completely, cover it tightly with plastic wrap or foil, and refrigerate for up to 24 hours. When you’re ready, bake it straight from the fridge. You may need to add 5-10 minutes to the baking time since it will be cold.
Q: What’s the best way to reheat leftovers?
A: To preserve the crunch, the oven or air fryer is your best friend! Reheat individual portions in a 350°F oven for 10-15 minutes or in an air fryer at 350°F for 5-7 minutes. The microwave will work in a pinch, but it will soften the chips.
Q: Can I use a different type of chip?
A: Absolutely! While Nacho Cheese Doritos are the classic, this is a great way to use up other chips. Fritos, tortilla chips, or even Cheetos would create a fun and tasty twist. Just know that the flavor profile will change.

Dorito Casserole
- Total Time: 40 minutes
- Yield: 6 - 8 1x
Description
Bold, cheesy, and loaded with flavor—this Dorito Casserole is the ultimate comfort food mashup. Think taco night meets your favorite chips, all baked into one irresistible, family-friendly dish. It’s crunchy, creamy, and ridiculously easy to throw together.
Ingredients
1 lb lean ground beef
½ yellow onion, chopped
1 tsp minced garlic
1 packet taco seasoning
12 oz frozen corn
14.5 oz can petite diced tomatoes with green chiles
1 cup sour cream
3 cups crushed Doritos (nacho cheese flavor)
3 cups Mexican blend shredded cheese
Instructions
Preheat oven to 350°F (175°C).
In a large skillet, cook ground beef, onion, and garlic over medium heat until browned. Drain excess fat.
Stir in taco seasoning, corn, and diced tomatoes. Simmer for 5 minutes.
Remove from heat and stir in sour cream and 1 cup of the cheese.
In a greased 9×13 baking dish, layer half the crushed Doritos, then the meat mixture, and top with the remaining Doritos and cheese.
Bake for 20–25 minutes, or until cheese is melted and bubbly.
- Prep Time: 15 minutes
- Cook Time: 25 minutes
Nutrition
- Calories: 480 / Serving
- Sodium: 980mg / Serving
- Fat: 28g / Serving
- Carbohydrates: 32g / Serving
- Protein: 25g / Serving
A Quick Bite on Nutrition
Hey, we’re all about balance here at Tasty Chow! This Dorito Casserole is the definition of a hearty comfort food, and it’s totally okay to enjoy that. It’s packed with protein from the beef and cheese, and we’ve got some veggies in there with the corn, tomatoes, and onions.
If you’re looking for ways to lighten it up a bit, my go-to swaps are using lean ground turkey, low-fat sour cream (or Greek yogurt), and reduced-fat cheese. You can also serve it with a big, vibrant side salad to add freshness and volume to your meal. Remember, food is about joy and nourishment, both for the body and the soul. This casserole delivers big on the joy part!
Approximate Nutrition Per Serving (based on 8 servings):
Calories: 480 | Fat: 28g | Carbs: 32g | Protein: 25g | Sodium: 980mg
Your New Go-To Comfort Food Awaits
And there you have it! Your guide to creating the most epic, crowd-pleasing, joy-inducing Dorito Casserole. This recipe is more than just a list of ingredients and steps; it’s an invitation to relax in the kitchen, to embrace a little nostalgia, and to create a meal that’s guaranteed to bring smiles to the table.
It’s the dish you’ll make for busy weeknights, for game day gatherings, and for those times when you just need a big, cheesy, crunchy hug on a plate. I am so thrilled to share this with you. So, from my messy, happy kitchen to yours, I hope you love every single bite.
If you make it (and you totally should!), I’d love to hear about it! Tag me on social @TastyChow so I can see your beautiful creations. Now, go forth and chow down!
With love and a full heart,
Emily