Walking Taco Casserole: Your New Favorite Fiesta in a Dish!
Hey there, friend! Pull up a chair and let’s talk about one of life’s greatest simple pleasures: that magical moment when you crush a bag of Fritos, pour in some taco meat, and give it a good shake. You know the one—the walking taco. It’s the MVP of county fairs, football games, and “I don’t want to do dishes” nights. But what if we could capture all that crunchy, cheesy, beefy joy and bake it into one glorious, bubbling, family-sized masterpiece?
Well, grab your favorite baking dish because that’s exactly what we’re doing today. This Walking Taco Casserole is the ultimate easy-breezy comfort food. It’s got layers of perfectly seasoned ground beef, melty cheese that stretches for miles, and a golden, crunchy Frito crown that will have everyone at the table begging for seconds. It’s the kind of meal that solves problems—what to feed a crowd, what to make on a busy weeknight, and how to put a massive, happy smile on everyone’s face. So, preheat that oven, and let’s make a little magic together. This isn’t just dinner; it’s a fiesta on a plate, and you’re the head chef!

A Fairground Favorite, Reimagined for the Family Table
I have a core memory that involves a paper boat, a plastic fork, and the world’s messiest—and most delicious—snack. I was about ten years old at our local county fair, trailing behind my dad, who was clutching a giant stuffed animal he’d just won. The air was thick with the smell of funnel cakes and livestock, but my focus was laser-sharp on the 4-H stand. They were serving “Frito Boats,” which was my small town’s fancy name for a walking taco.
I watched, mesmerized, as the vendor slit open a single-serving bag of Fritos, scooped in a ladle of steaming taco meat, and let me go to town at the topping bar. I piled on cheese, sour cream, and a reckless amount of pickled jalapeños. That first bite was a symphony of textures and flavors—the hot and cold, the crunchy and soft. It was pure, unadulterated joy. This casserole is my love letter to that memory. It takes that handheld fun and turns it into a shareable, hug-in-a-baking-dish that brings that same fairground excitement right to your kitchen table.
Gathering Your Flavor Party: The Ingredients
Here’s the beautiful part: this recipe is all about simplicity and big flavor. You probably have most of this in your pantry right now! Let’s break it down.
- 1½ lbs Ground Beef: I like an 80/20 blend for the best flavor, but leaner works too! For a twist, try ground turkey or chicken.
- 1 Small Onion, diced: This is our flavor base! The little bits caramelize and sweeten as they cook, building a fantastic foundation. No onion? A teaspoon of onion powder will do in a pinch.
- 1 Packet Taco Seasoning: The ultimate shortcut to big flavor. Feel free to use your favorite low-sodium brand or make your own blend with chili powder, cumin, and garlic powder!
- ¾ cup Water: This works with the seasoning packet to create our saucy, flavorful beef mixture. Don’t skip it!
- 1 (10 oz) can Rotel (Diced Tomatoes with Green Chilies), drained: This is my secret weapon for a little zing! The tomatoes add freshness and the green chilies give a subtle, built-in kick. If you’re sensitive to heat, use a can of mild Rotel or just plain diced tomatoes.
- 1 (15 oz) can Black Beans, rinsed and drained: I love adding these for a boost of fiber and protein, making the casserole a bit more hearty and wholesome. Pinto or kidney beans are great substitutes!
- 2 cups Shredded Cheddar or Mexican Blend Cheese, divided: Cheese pull, anyone? We use some in the middle and save some for the top. I’m a big fan of a Mexican blend for its melty perfection, but sharp cheddar is always a winner.
- 1 (9.25 oz) bag Fritos Corn Chips: The star of the show! Their unique corn flavor and sturdy crunch hold up beautifully in the bake. Pro-tip: Don’t crush them too small—we want some good texture!
- Optional Toppings: This is where you make it your own! Shredded lettuce, a dollop of cool sour cream, diced fresh tomatoes, sliced jalapeños, creamy avocado, or a sprinkle of green onions. The fresh, cool toppings contrast perfectly with the hot, cheesy bake.
Let’s Build Our Masterpiece: Step-by-Step Instructions
Ready to see how this all comes together? It’s so simple, you might just do a happy dance right there in your kitchen. Let’s get layering!
- Preheat and Prep: First things first, get that oven preheating to a nice, hot 375°F (190°C). This ensures it’s ready to go when our casserole is assembled. While it’s warming up, grab your trusty 9×13-inch baking dish and give it a quick spritz with cooking spray. A little prep now means easy cleanup later—a chef’s best friend!
- Brown the Beef: Place a large skillet over medium heat and add your ground beef and diced onion. Use your spoon or spatula to break the meat up as it cooks. We’re looking for a nice, even brown here, with no pink left. Once it’s perfectly cooked, carefully drain off the excess fat. This step is key for a casserole that’s flavorful but not greasy.
- Create the Filling: Now for the magic! To the same skillet, add the taco seasoning, water, drained Rotel, and rinsed black beans. Give it all a good stir until everything is beautifully coated in that seasoning. Let it simmer for about 5 minutes. You’ll see the sauce thicken slightly and the flavors will meld together into something truly special. Your kitchen should smell amazing right now!
- The First Layer: Time to build our base! Take about half of the bag of Fritos and spread them evenly across the bottom of your prepared baking dish. Don’t be shy—press them down gently. They create a fantastic crunchy foundation that soaks up all the saucy goodness.
- The Heart of the Dish: Carefully pour the entire skillet of your beef and bean mixture over the Frito layer. Use your spoon to spread it into a nice, even blanket, making sure to cover all the chips.
- The Cheesy Middle: Grab 1½ cups of your shredded cheese and sprinkle it generously and evenly over the beef layer. This is the melty, gooey glue that holds everything together. Watch it disappear under a mountain of cheesy goodness!
- Bake to Bubbly Perfection: Slide your creation into the preheated oven, uncovered, for 15-20 minutes. You’re waiting for that gorgeous moment when the cheese is completely melted, bubbly, and maybe even starting to get a few golden-brown spots. That’s the signal of deliciousness!
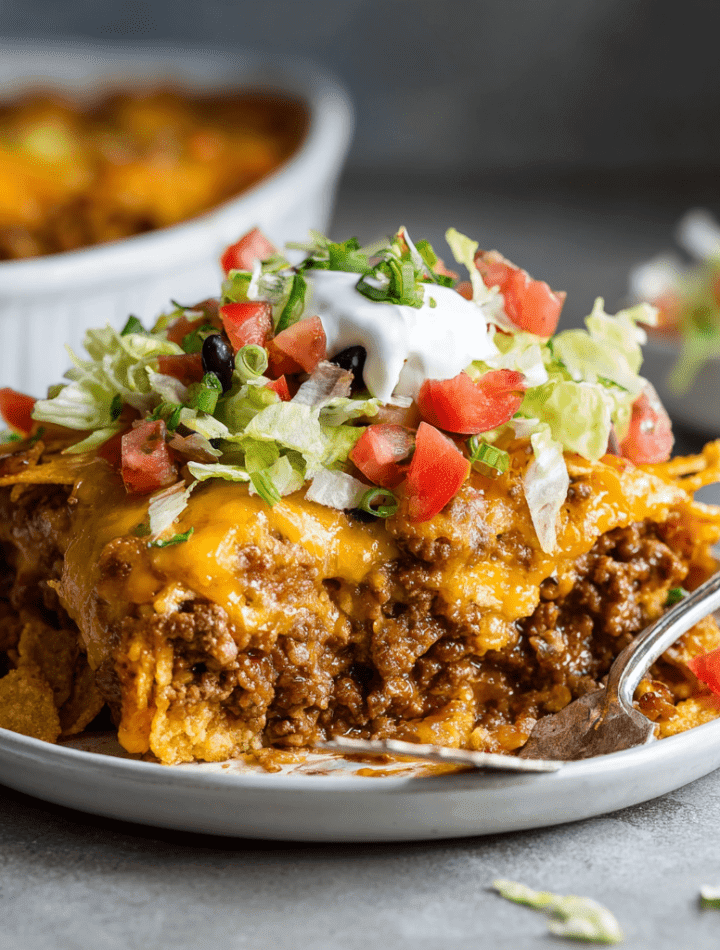
- The Grand Finale: Pull the casserole out of the oven (carefully, it’s hot!). Immediately top it with the remaining ½ cup of cheese and the rest of the Fritos. The residual heat will melt that extra cheese, and the fresh Fritos on top will give you that ultimate CRUNCH factor.
- Top and Serve: This is the fun part! Let everyone customize their own bowl. Set out all your optional toppings and let the crowd go wild. The contrast of the hot casserole with the cold, crisp lettuce and cool sour cream is absolutely divine.
How to Serve Your Walking Taco Casserole
This dish is a celebration, so let’s serve it like one! I love placing the baking dish right in the middle of the table, surrounded by little bowls of all the colorful toppings. It’s an instant, interactive feast. For serving, a large spoon or a sturdy spatula is your best bet to get through those crunchy layers.
While it’s fantastic all on its own, you can absolutely turn this into a bigger spread. I love pairing it with a simple, zesty corn and black bean salad, some creamy cilantro-lime rice, or just some quick-pickled red onions for a bright, tangy bite. And don’t forget the margaritas or a cold glass of horchata for the full fiesta experience! For a casual game-day gathering, you can even scoop servings directly into individual Frito bags for a fun, nostalgic throwback.
Make It Your Own: Delicious Recipe Variations
One of the best things about this casserole is how adaptable it is. Got a different craving or dietary need? No problem! Here are a few of my favorite twists:
- Breakfast for Dinner: Swap the ground beef for a pound of cooked breakfast sausage. Use a can of diced green chilies instead of Rotel, and mix in some frozen hash browns. Top with a fried egg for the ultimate morning-meal casserole!
- Spicy Fiesta: Turn up the heat! Use hot taco seasoning, a can of hot Rotel, and mix a diced jalapeño or two into the beef as it cooks. Top with pickled jalapeños and a drizzle of spicy crema.
- Turkey Taco Twist: For a lighter option, ground turkey is a fantastic substitute for the beef. Just make sure to add a tiny splash of olive oil to the pan since it’s leaner.
- Doritos Dynamite: Feel like mixing it up? Use a bag of Nacho Cheese Doritos instead of Fritos for an extra cheesy, colorful crunch. The cool ranch flavor is also a surprisingly delicious option!
- “Taco Salad” Style: For a lower-carb version, skip the bottom layer of Fritos entirely. Just put the meat mixture in the dish, top with cheese, and bake. Serve a handful of fresh Fritos and all the toppings on the side for a deconstructed taco salad bake.
Chef Emily’s Kitchen Notes
This recipe has become a legend in my own home, and it’s evolved in fun ways. I once, in a frantic “the grocery store was out of Fritos” moment, used tortilla chips. It was still delicious, but let me tell you, nothing quite replicates that specific Frito flavor and crunch—it’s worth seeking out! I’ve also learned that while you *can* assemble this ahead of time, wait to add the top layer of Fritos until right before baking, or they’ll get soggy. And a little confession: my favorite way to eat the leftovers is cold, straight from the fridge the next day. The flavors have melded even more, and I’m not sorry about it.
Your Questions, Answered: FAQs & Troubleshooting
I’ve made this more times than I can count, and I’ve heard all your brilliant questions! Here are the answers to the most common ones.
- Can I make this walking taco casserole ahead of time? Absolutely! You can assemble the whole thing (through step 6), cover it tightly, and refrigerate it for up to 24 hours. When you’re ready, just pop it in the oven. You might need to add a few extra minutes to the bake time since it’s going in cold. Just remember to add the final Fritos in the last 5 minutes so they stay crunchy.
- My casserole turned out a bit soggy. What happened? The most common culprit is not draining the Rotel or the beef thoroughly enough. Make sure you really press the liquid out of the tomatoes and drain the fat from the beef after browning. Also, be sure to use the full bag of Fritos—that top layer is crucial for texture!
- Can I freeze this? You can, but with a caveat. The Fritos will lose their crunch upon thawing and reheating. For best results, I recommend freezing just the cooked beef mixture. Let it cool, then freeze it in an airtight container for up to 3 months. Thaw in the fridge overnight, then assemble and bake with fresh Fritos and cheese as directed.
- What other chips can I use? While Fritos are classic, you can experiment! As I mentioned, Doritos work well. For a sturdier tortilla chip, look for a thick, restaurant-style chip that can hold up to the moisture. Avoid thin, delicate chips as they’ll turn to mush.
A Quick Note on Nutrition
I’m all about balance, friends! This casserole is a hearty, comforting dish, and it’s helpful to know what’s inside. The provided nutritional info is a good estimate, but remember that toppings and specific brand choices (like cheese and seasoning) can change the numbers. The ground beef and black beans provide a solid protein punch to keep you full, and the black beans also add valuable fiber. To lighten it up a bit, you can use lean ground beef or ground turkey, reduced-fat cheese, and load up on those fresh veggie toppings like lettuce and tomatoes to add volume and nutrients without a lot of calories. As always, enjoy this as part of a varied and balanced diet!
Final Thoughts from My Kitchen to Yours
Well, there you have it! My everything-I’ve-got recipe for the most epic, easy, and satisfying Walking Taco Casserole. This dish is more than just a recipe; it’s a reminder that the best meals are often the simplest, most fun ones. They’re the ones that bring people together, create a little mess, and leave everyone feeling happy and full.
I truly hope this recipe becomes a regular in your dinner rotation, the star of your next potluck, or the solution to your next “what’s for dinner?” dilemma. If you make it (and I really hope you do!), I’d love to hear about it. Tag me on social @TastyChow so I can see your beautiful creations! Now, go forth and create some delicious chaos. Happy cooking!
— With love and a full baking dish,
Emily