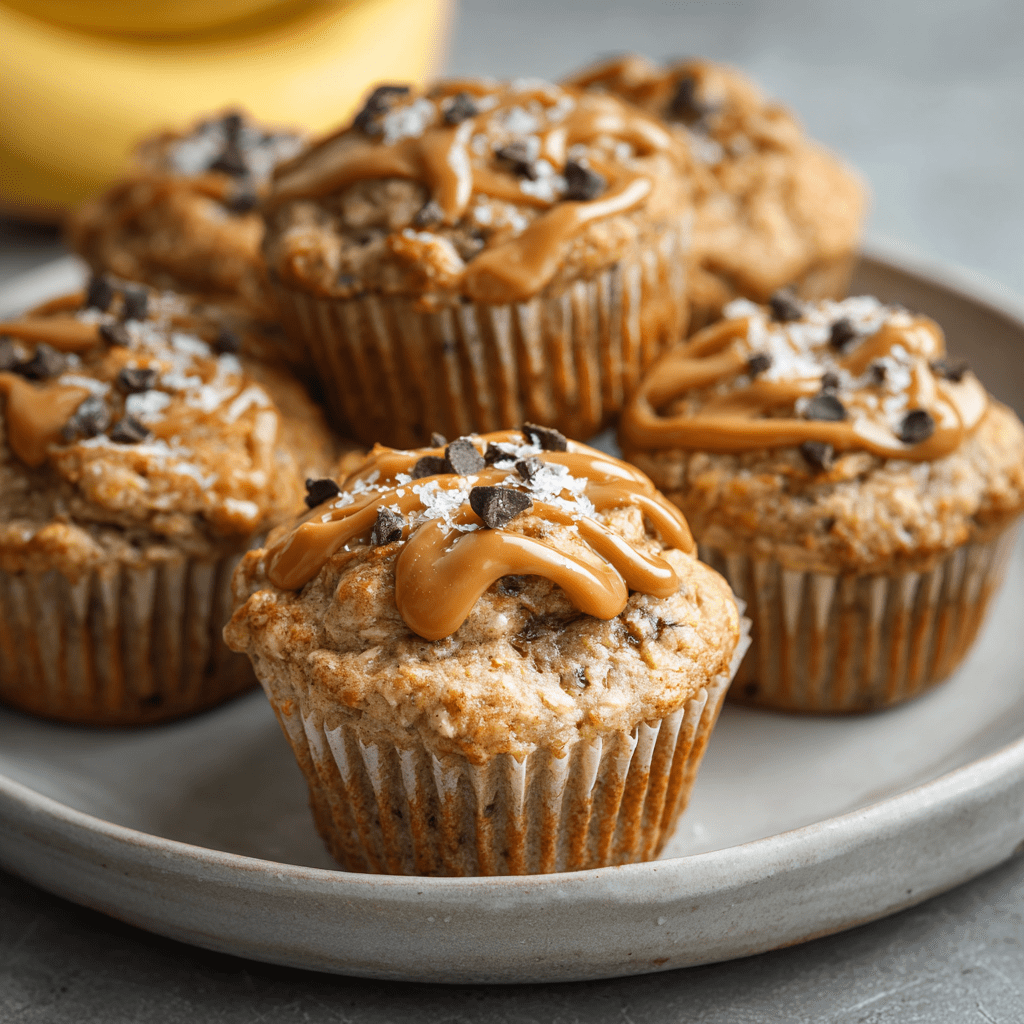
Honey Butter Cornbread Poppers – Easy Mini Cornbread Muffins
Hey there, friend! Let me let you in on a little secret: the fastest way to make any meal feel like a celebration is with a basket of warm, golden cornbread. But what if we took that classic comfort and turned it into something even more fun, shareable, and downright irresistible? Enter my Honey Butter Cornbread Poppers!
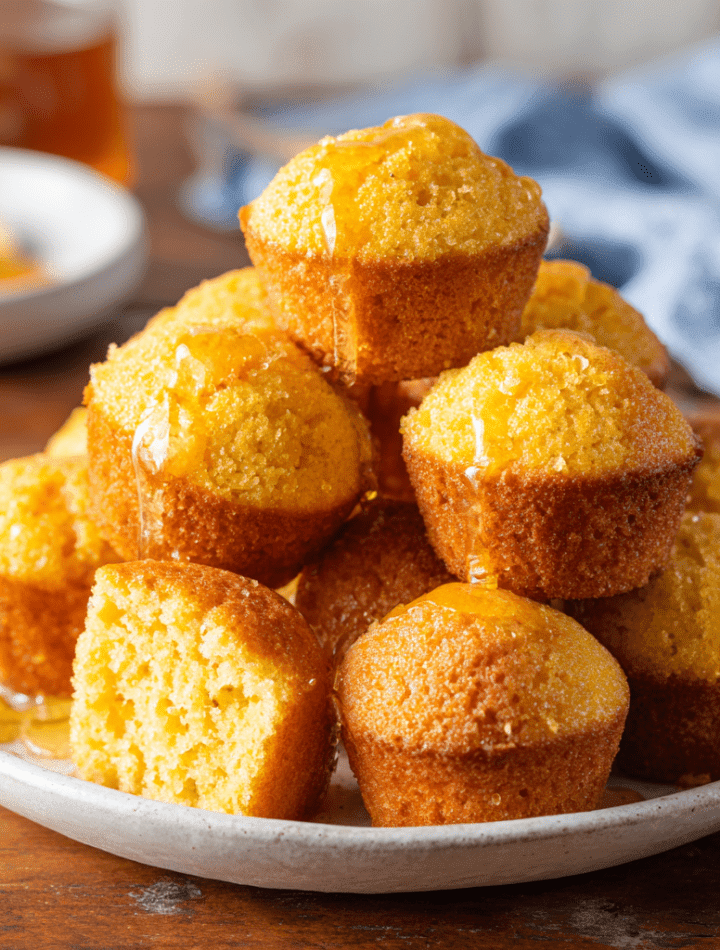
Imagine this: mini muffins, perfectly golden and crisp on the outside, with a soft, fluffy, and tender crumb inside. Each little popper is infused with the rich, toasty flavor of melted butter and the gentle, floral sweetness of honey. They’re the kind of bite that makes you close your eyes and sigh with happiness. I’ve been making these for years for everything from big family potlucks to cozy weeknight soups, and I can’t wait to share the magic with you. They’re incredibly easy to whip up, and I promise they’ll disappear faster than you can say “pass the butter!” So, tie on your favorite apron, and let’s make some kitchen magic together.
A Spoonful of Sweet Memories
My love affair with cornbread started not in a fancy restaurant, but in my Grandma Eleanor’s humble kitchen. She wasn’t one for measuring cups; she’d use an old jelly jar for the buttermilk and her hands to scoop the cornmeal. Her cast-iron skillet was a cherished family heirloom, seasoned with decades of love. The sound of her cornbread batter sizzling as it hit the hot bacon grease is a core memory for me. I’d sit at her Formica table, swinging my legs, waiting for that first warm wedge slathered in honey butter. When I started developing this recipe, I wanted to capture that same soul-warming feeling but in a format perfect for today’s gatherings. Turning her classic into these fun, poppable bites felt like a way to honor her legacy while creating new traditions. Every time I bake a batch, the smell takes me right back to that sunny kitchen, and I know she’d absolutely adore these little guys.
Gathering Your Sunshine Ingredients
This recipe is a beautiful balance of simple, wholesome ingredients. Here’s what you’ll need to make about 24 little bites of joy. Don’t forget to check out my notes for each one—they’re like little kitchen whispers to help you bake with confidence!
- 1 cup cornmeal – This is the star of the show! It gives our poppers that classic, slightly gritty texture and gorgeous golden color. For the best flavor, look for a medium-grind cornmeal.
- 1 cup all-purpose flour – Our trusty sidekick! The flour provides structure, so our poppers are fluffy and light, not dense and crumbly.
- ¼ cup sugar – Just enough to complement the natural sweetness of the honey without making the cornbread taste like cake. Feel free to reduce it slightly if you prefer a more savory cornbread.
- 1 tablespoon baking powder – This is our leavening hero! It’s what makes the poppers puff up beautifully in the oven. Make sure yours is fresh for maximum lift.
- ½ teaspoon salt – A crucial flavor enhancer! Salt balances the sweetness and makes all the other ingredients sing. Don’t skip it!
- ½ cup butter, melted – Hello, richness and flavor! Using melted butter in the batter gives us an incredibly moist crumb and a lovely, buttery taste. I use unsalted, but salted works too—just adjust the added salt slightly.
- ¼ cup honey – The sweet soul of the recipe! I love using a local, raw honey for its complex flavor. For a deeper taste, try buckwheat honey.
- 1 cup buttermilk – The secret to ultimate tenderness! The acidity in buttermilk reacts with the baking powder for a fantastic rise and a tangy flavor that cuts the sweetness. No buttermilk? No problem! See my variations below for an easy swap.
- 2 large eggs – Our binding agents! Eggs add structure and richness, giving the poppers a beautiful, cake-like texture.
Let’s Make Some Magic: Step-by-Step Instructions
Ready to see how these little wonders come together? It’s a simple process, but a few chef-approved tricks will take your poppers from good to “can-I-have-the-recipe?” great. Let’s do this!
- Preheat Oven & Prep Pan: First things first, get that oven preheating to a toasty 375°F (190°C). While it’s warming up, generously grease your mini muffin tin with butter or non-stick spray. I’m a big fan of using a pastry brush to get melted butter into every nook and cranny for an extra-golden, non-stick finish. You can use paper liners, but I find you get a better crust without them!
- Combine Dry Ingredients: Grab a large mixing bowl and add your cornmeal, all-purpose flour, sugar, baking powder, and salt. Now, take a whisk and give them a really good whisking for about 30 seconds. This isn’t just about mixing; we’re aerating the flour and making sure the baking powder is evenly distributed, which is key for a uniform rise. No one wants a popper with a baking powder surprise!
- Whisk Wet Ingredients: In a separate medium bowl, combine your melted butter and honey. Whisk them together until they’re a beautiful, glossy liquid. Then, pour in the buttermilk and crack in the eggs. Whisk it all until it’s smooth and perfectly emulsified. Pro-tip: if your melted butter is super hot, let it cool for a minute before adding the eggs so you don’t accidentally cook them!
- The Grand Combine: Here comes the most important step! Pour your lovely wet mixture into the bowl with the dry ingredients. Now, put that whisk away and grab a spatula or a wooden spoon. Gently fold the batter together. I mean it—be gentle! Stir just until the last streaks of flour disappear. A few lumps are totally fine; overmixing is the enemy of tender cornbread and will make it tough. Think “just combined.”
- Fill & Bake to Perfection: Using a small cookie scoop or two spoons, fill each prepared mini muffin cup about ¾ of the way full. This gives them the perfect amount of space to rise into adorable little domes. Slide the pan into your preheated oven and bake for 12-15 minutes. You’ll know they’re done when the tops are golden and the edges are just starting to pull away from the pan. The toothpick test never lies—it should come out clean or with a few moist crumbs attached.
- Cool & Serve with Love: As soon as the pan is out of the oven, let the poppers rest in the tin for exactly 5 minutes. This allows them to set up so they don’t fall apart when you take them out. Then, carefully transfer them to a wire rack or straight onto a serving plate. For an extra glossy, decadent finish, brush the warm tops with a little extra honey butter. Serve them warm and watch the smiles appear!
How to Serve These Golden Gems
Oh, the possibilities! While these Honey Butter Cornbread Poppers are absolutely sublime all on their own, they love to play well with others. Here are a few of my favorite ways to serve them up:
- The Classic Combo: Pile them high in a rustic basket lined with a checkered cloth next to a big, steaming bowl of chili, a hearty bean soup, or a pot of spicy gumbo. It’s a match made in comfort food heaven.
- Brunch Bites: Serve them alongside scrambled eggs, crispy bacon, and fresh fruit for a brunch spread that will have everyone raving. They’re the perfect sweet-and-savory bridge on the plate.
- Party Platter Perfect: Skewer each warm popper with a cute decorative pick and arrange them on a platter with a little bowl of honey butter or spicy pepper jelly for dipping. Instant party hit!
- Packed with Love: Tuck a few cooled poppers into a lunchbox for a special homemade treat. They’re a wonderful surprise that says “I’m thinking of you” in the middle of the day.
Get Creative! Flavor Twists & Swaps
Once you’ve mastered the classic, have fun playing with flavors! This recipe is a fantastic canvas for your creativity. Here are a few of my favorite variations:
- Jalapeño Cheddar: Spice things up! Fold ½ cup of shredded sharp cheddar cheese and ¼ cup of finely diced jalapeños (seeds removed for less heat) into the batter right before filling the tins. The sweet, spicy, and cheesy combo is unreal.
- Buttermilk Swap: Out of buttermilk? No sweat! Make your own “sour milk” by adding 1 tablespoon of white vinegar or lemon juice to a liquid measuring cup, then filling it with milk to the 1-cup line. Let it sit for 5 minutes until it curdles slightly, and voilà!
- Blueberry Lemon Bliss: For a dessert-like twist, gently fold ¾ cup of fresh blueberries and the zest of one lemon into the batter. The burst of juicy berry and bright lemon is a total game-changer.
- Gluten-Free Goodness: You can easily make this recipe gluten-free by swapping the all-purpose flour for a 1:1 gluten-free baking blend. I’ve had great success with this swap, and no one can tell the difference!
- Herb Garden Delight: Go savory! Add 2 tablespoons of finely chopped fresh herbs like chives, rosemary, or thyme. They’re incredible served with roast chicken or stew.
Chef Emily’s Kitchen Notes
This recipe has been a living, evolving thing in my kitchen. The first time I made them, I may have gotten a little overzealous and filled the muffin cups to the absolute brim. Let’s just say I created a giant, connected cornbread landscape instead of individual poppers! It was hilarious and still delicious, but a good lesson in giving them room to breathe. Over the years, I’ve found that using a #40 cookie scoop is my secret weapon for perfectly portioned, mess-free poppers. I’ve also learned that these little guys freeze like a dream. I always make a double batch and stash half in the freezer for those days when I need a quick comfort food fix. Just pop them in a toaster oven to warm up, and it’s like you just baked them!
Your Cornbread Questions, Answered!
I’ve gotten so many wonderful questions about this recipe over the years. Here are the answers to the most common ones to ensure your baking success!
- Q: My cornbread is dry. What happened?
A: The most common culprit is overmixing the batter! Remember, mix just until combined. Another reason could be over-baking. Ovens can vary, so start checking at the 10-minute mark. Using a digital oven thermometer can help you ensure your oven temperature is accurate.
- Q: Can I make this in a regular muffin tin or as a skillet cornbread?
A: Absolutely! For standard muffins, fill the liners ⅔ full and bake for 15-18 minutes. For a skillet cornbread, pour the batter into a well-greased, preheated 9-inch cast-iron skillet and bake for 18-22 minutes. The hot skillet gives you an incredible crispy crust.
- Q: Why did my poppers not rise much?
A: This is almost always due to old baking powder. Baking powder loses its potency over time. To test it, stir half a teaspoon into a cup of hot water. If it doesn’t bubble vigorously, it’s time for a new can.
- Q: Can I make the batter ahead of time?
A: I don’t recommend it. The baking powder starts working as soon as it gets wet, so letting the batter sit will result in less-rise-y poppers. For the best results, mix and bake right away!
A Quick Nutritional Glance
While we’re all about indulgence and joy here at Tasty Chow, I know many of you like to keep track of what you’re enjoying. Here’s a general breakdown per popper (based on 24 poppers, without any extra honey butter brushed on top). Remember, these are estimates, and actual numbers can vary based on the specific brands of ingredients you use.
- Calories: ~110
- Fat: 5g
- Carbohydrates: 14g
- Protein: 2g
These poppers are a wonderful source of quick energy and, more importantly, pure happiness. Enjoy them as part of a balanced diet filled with delicious, homemade food!
Final Thoughts from My Kitchen to Yours
Well, my friend, we’ve reached the end of our cornbread journey—or really, just the beginning of yours! I truly hope this recipe becomes a staple in your home, just like it is in mine. There’s something so special about the simple act of baking, of filling your home with the warm, buttery scent of these poppers, and of sharing them with people you love. Food is my love language, and recipes like this are my favorite way to connect with all of you.
So, go forth and bake with confidence! Don’t be afraid to get a little messy, to make them your own with fun add-ins, and to create your own delicious memories around the table. I’d love to hear how your Honey Butter Cornbread Poppers turn out. Tag me on social @emilywalker or shoot me an email with your photos and stories!
Happy baking, and as always, chow down!
— Emily 🧡