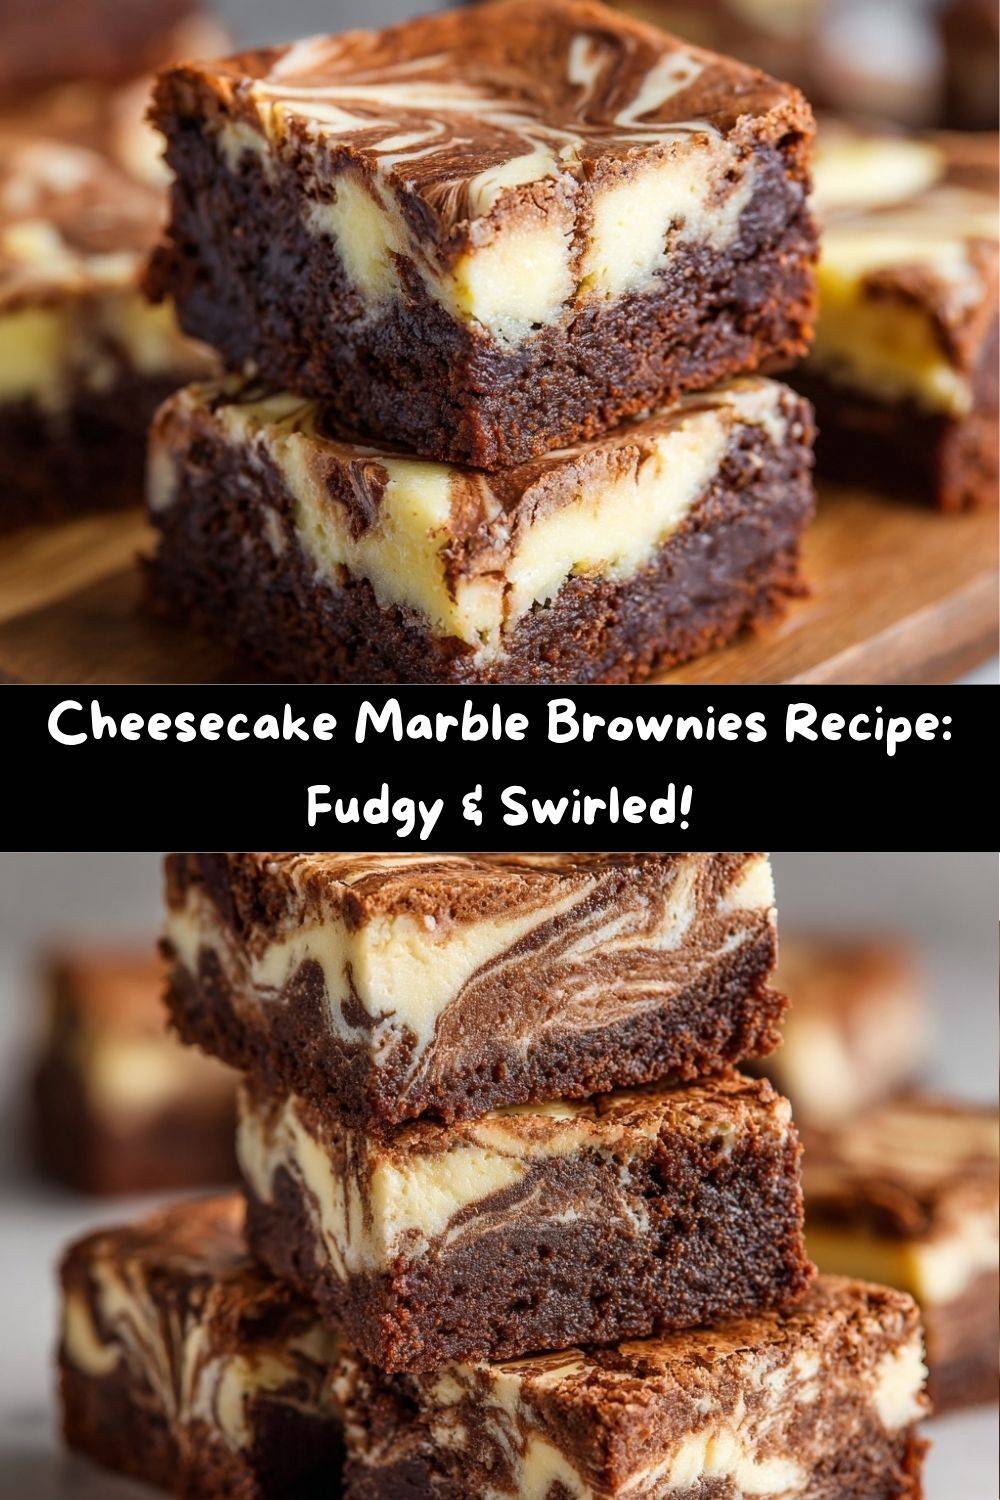
Cheesecake Marble Brownies: Your New Favorite Dessert
Hey, my fellow chowhounds! Let’s get one thing straight right out of the gate: choosing between a fudgy, dark-chocolate brownie and a smooth, tangy slice of cheesecake is a form of culinary torture that no one should ever have to endure. It’s like asking a parent to pick a favorite child—it’s just not right! So, what’s a dessert lover to do?
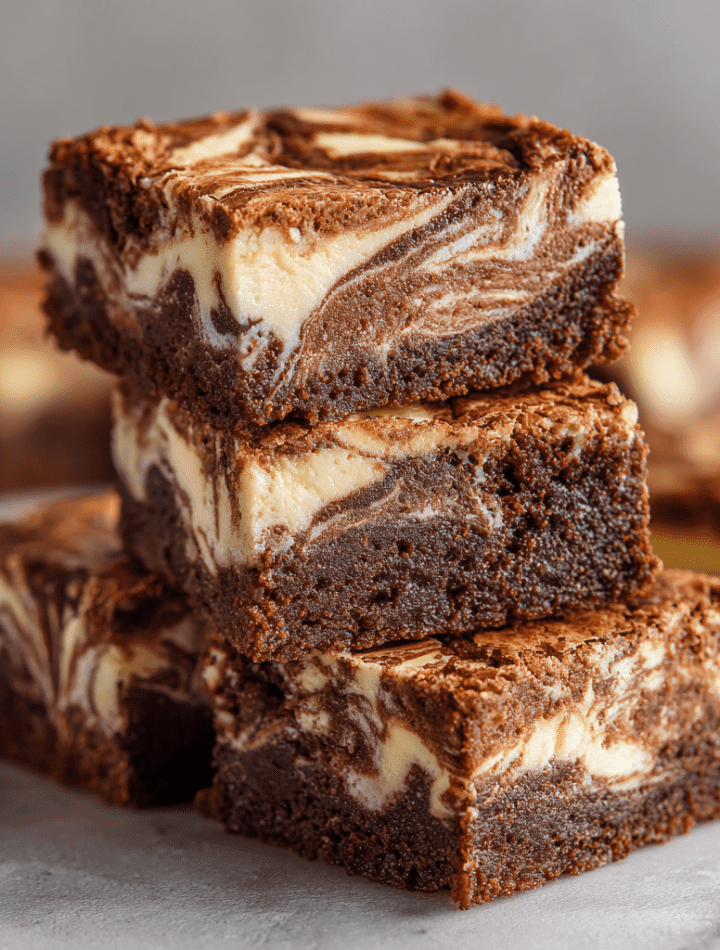
You make the ultimate power couple: Cheesecake Marble Brownies.
Imagine this. You sink your teeth into a brownie so rich and fudgy it practically whispers sweet nothings to your soul. Then, your spoon glides through a cloud of creamy, lightly sweetened cheesecake, swirled right into that deep chocolate abyss. Each bite is a perfect, marbled masterpiece—a little bit brownie, a little bit cheesecake, and 100% pure, unadulterated joy. This isn’t just a recipe; it’s a two-for-one dessert deal that will make you the undisputed hero of every potluck, bake sale, and “I just need something chocolate” Tuesday night. So, preheat your ovens and grab your favorite mixing bowl. We’re about to make magic happen.
The Happy Kitchen Accident That Started It All
I’ll never forget the first time I encountered a cheesecake brownie. I was about ten years old, “helping” my grandma in her wonderfully chaotic kitchen. She was a woman who believed recipes were more like suggestions, and on this particular day, she was making her famous fudge brownies. At the same time, she had a bowl of leftover cheesecake filling from a pie she’d made earlier.
Instead of stashing it in the fridge, she looked at the brownie batter, looked at the cheesecake filling, and got this wonderfully mischievous glint in her eye. “Let’s see what happens,” she whispered to me. We swirled that cheesecake right into the brownies, crossed our fingers, and popped the pan in the oven. What emerged was a revelation—a cracked, beautiful top with creamy rivers running through it. We ate them warm, straight from the pan, with milk, and I remember thinking it was the most brilliant dessert invention in the history of the world. This recipe is a loving homage to her spirit of kitchen adventure, with a few of my own chef-y twists to make it truly unforgettable.
Gathering Your Marble Brownie Squad
Here’s your grocery list for greatness! Don’t be intimidated by the two batters—it’s simpler than it looks, and I’ve got tips for every single ingredient.
For the Cheesecake Batter:
- 12 oz Cream Cheese, softened: This is the heart of the swirl. Pro Tip: Take it out of the fridge at least an hour before. Soft cream cheese blends smoothly, leaving no lumpy bits behind. For a lighter twist, Neufchâtel cheese works beautifully.
- ¾ cup Granulated Sugar: Sweetens the cheesecake layer just enough to balance the tang.
- 2 large Eggs, room temperature: Room temp eggs incorporate much more easily into the cream cheese, creating a silky texture. Just pop them in a bowl of warm water for 5 minutes if you forgot!
- 2 teaspoons Vanilla Extract: The classic flavor enhancer. Use the real stuff—it makes a difference!
- Zest of 1 Lemon or Orange (optional): My little “chef’s kiss.” This adds a subtle, bright note that cuts through the richness and makes the flavors pop. Highly recommended!
For the Brownie Batter:
- 1 cup Unsalted Butter: The foundation of our fudgy texture. Using unsalted lets you control the salt level perfectly.
- 1⅓ cups Semi-Sweet Chocolate Chips: We’re melting these right in with the butter for an intense chocolate base. Feel free to use a chopped dark chocolate bar for an even richer flavor.
- 1½ cups Granulated Sugar: Sweetens and helps create that beautiful, shiny, crackly brownie top we all love.
- 4 large Eggs: Yes, four! This gives our brownie base its structure and that incredible, dense-yet-tender crumb.
- 1 tablespoon Vanilla Extract: A full tablespoon! Trust me, it amplifies all the other flavors.
- ¼ teaspoon Almond Extract (optional): This is my secret bakery-style weapon. It doesn’t taste like almond; it just makes the chocolate taste more chocolatey. It’s pure magic.
- 1 cup All-Purpose Flour: The structural backbone. For a fudgier brownie, we don’t over-mix once the flour is in.
- 1 cup Unsweetened Cocoa Powder: Use a good quality one! This is where the deep, dark chocolate flavor comes from.
- 1 teaspoon Salt: Crucial for balancing the sweetness and making the chocolate flavors sing. Don’t skip it!
- 1 teaspoon Instant Espresso Powder: My other secret weapon! This won’t make your brownies taste like coffee; it just deepens and enhances the chocolate flavor in a way that will blow your mind.
Let’s Make Some Marbled Magic: Step-by-Step
Ready to swirl? Follow these steps, and you’ll be a brownie-marbling pro in no time. I’ve packed each step with my favorite kitchen hacks to ensure your success.
- Preheat & Prep: Preheat your oven to 350°F (175°C). Now, line your 9×13-inch pan with parchment paper, leaving an overhang on the two long sides. Why? This creates a “sling” that lets you lift the entire slab of brownies out of the pan for effortless, crumb-free slicing. Give the parchment a quick light spritz with cooking spray—this ensures nothing sticks.
- Whip the Cheesecake Layer: In a medium bowl, beat the softened cream cheese with an electric mixer until it’s completely smooth and creamy. This should take about 1 minute. Scrape down the sides and add the sugar, beating for another minute until it’s well incorporated. Now, add the eggs one at a time, followed by the vanilla and citrus zest if you’re using it. Beat just until the mixture is uniform and silky. Set this beautiful bowl of cloud-like fluff aside.
- Concoct the Brownie Base: This is where the magic begins. In a medium saucepan over low heat, melt the butter and chocolate chips together, stirring constantly. Chef’s Tip: Low and slow is the key here! We don’t want to scorch the chocolate. Once it’s a smooth, glossy pool of deliciousness, remove it from the heat. Let it cool for just a minute or two—you don’t want to scramble your eggs! Whisk in the sugar. Then, add the eggs one at a time, whisking well after each addition. Stir in the vanilla and almond extracts. Now, place a sieve over the saucepan and sift in the flour, cocoa powder, salt, and espresso powder directly into the wet ingredients. This prevents lumps and ensures everything is evenly distributed. Switch to a spatula and fold the dry ingredients in until just combined. A few streaks of flour are okay! Over-mixing is the enemy of a fudgy brownie.
- The Grand Swirl Assembly: Time for the main event! Pour about two-thirds of that luscious brownie batter into your prepared pan and spread it into an even layer. It might be thick, just do your best. Next, gently spoon the cheesecake batter over the top, trying to cover most of the brownie layer. Now, take the remaining brownie batter and dollop it randomly over the cheesecake layer. Here’s the fun part: take a butter knife or a skinny spatula and gently drag it through the layers in a “S” or figure-eight pattern. Don’t overdo it! 4-5 passes are all you need to create a beautiful marble effect without muddying the two batters together.
- Bake to Perfection: Slide the pan into your preheated oven and bake for 35-40 minutes. You’re looking for the edges to be set and the center to have a very slight jiggle—it shouldn’t look liquidy. A toothpick inserted into a brownie-dominant section should come out with a few moist crumbs, not wet batter. Resist the urge to overbake! These continue to set up as they cool.
- The Crucial Cool-Down: This is the hardest part, my friends. You must let the brownies cool completely in the pan on a wire rack. I know, the aroma is intoxicating, but slicing into warm cheesecake brownies is a recipe for a gooey (albeit delicious) mess. For the cleanest, most beautiful slices, I even recommend popping the fully cooled pan into the fridge for an hour before cutting.
How to Serve These Show-Stopping Brownies
Okay, they’re baked, they’re cooled, and you’ve managed to not eat the entire pan with your bare hands. Bravo! Now, let’s talk presentation. These brownies are stars all on their own, but a little flair never hurt anybody.
For a simple, elegant touch, dust the top with a light snowfall of powdered sugar right before serving. If you’re feeling extra (and when am I not?), warm individual squares for about 15 seconds in the microwave and serve them à la mode with a scoop of high-quality vanilla bean ice cream. The contrast of warm brownie, cool ice cream, and creamy cheesecake is a religious experience. A drizzle of salted caramel or a handful of fresh raspberries on the side also takes this dessert from “wow” to “HOW DID YOU MAKE THIS?!”
Mix It Up! Creative Twists on the Classic
Once you’ve mastered the basic marble, the kitchen playground awaits! Here are a few of my favorite ways to riff on this recipe:
- Peanut Butter Paradise: Swirl ½ cup of warm, creamy peanut butter into the cheesecake batter before marbling. You get a chocolate-peanut butter-cheesecake trifecta of amazingness.
- Mocha Madness: Dissolve 1 tablespoon of instant espresso powder into 1 tablespoon of hot water and mix it directly into the cheesecake batter for a full-on coffee flavor that pairs perfectly with the chocolate.
- Black Forest Twist: Fold ½ cup of dried cherries into the brownie batter and use the orange zest in the cheesecake layer. It’s like a Black Forest cake in brownie form!
- Gluten-Free & Fudgy: Simply swap the all-purpose flour for your favorite 1:1 gluten-free flour blend. The texture remains incredibly fudgy and no one will know the difference.
- Cookie Crunch: Before baking, sprinkle the top with a handful of crushed Oreos or chocolate chip cookies for an irresistible crunchy texture.
Chef Emily’s Corner: Notes from My Kitchen
This recipe has been my go-to for years, and it’s evolved with me. The almond and espresso powder additions were total “aha!” moments during late-night baking sessions. I’ve learned that the quality of your cocoa powder is the single biggest factor in the depth of your chocolate flavor, so splurge a little on the good stuff if you can.
And a funny story? I once brought a pan of these to a friend’s party, and her toddler, upon seeing the marbled top, loudly declared, “Mommy, it looks like a cow!” We now affectionately call them “Cow Brownies” in our circle. Whatever you call them, just know that they are made with a whole lot of love and a belief that every day is better with a little swirl in it.
Your Brownie Questions, Answered!
Q: My cheesecake swirl sank to the bottom! What happened?
A: This usually happens if the brownie batter is too thin. Make sure you’re using the full amount of flour and cocoa powder, and don’t over-mix after adding the eggs. A thicker brownie batter acts as a sturdy base to hold up the cheesecake layer.
Q: Can I use a boxed brownie mix for the base?
A> You absolutely can, you clever cookie! Prepare the mix according to the “fudge-like” directions on the box (usually this means using one less egg or adding an extra egg yolk). Then, just proceed with the cheesecake swirling steps as written. It’s a fantastic shortcut!
Q: How should I store these, and how long do they last?
A> Because of the cheesecake layer, these need to be stored in the refrigerator in an airtight container. They will stay perfectly delicious for up to 5 days. You can also freeze them for up to 3 months! Just slice, wrap individually in plastic wrap, and thaw in the fridge overnight.
Q: The center is still super jiggly after 40 minutes. Is it done?
A> A slight jiggle in the very center is perfect—it will set up as it cools. If a large area (more than 3-4 inches) seems liquidy, give it another 5 minutes and check again. Oven temperatures can vary, so trust your instincts!
Nutritional Information*
Okay, let’s be real—we’re not eating cheesecake marble brownies for our health. But for those who like to keep track, here’s a rough breakdown per serving (based on 18 brownies).
- Calories: ~330
- Fat: 20g
- Carbohydrates: 35g
- Sugar: 26g
- Protein: 5g
*Please note: This is an estimate generated from an online nutrition calculator. Values can vary based on specific ingredients and serving sizes. Enjoy these as a delightful treat!
Final Thoughts from My Kitchen to Yours
Well, my friend, there you have it. The recipe that perfectly solves the “brownie or cheesecake?” dilemma forever. I hope these Cheesecake Marble Brownies bring as much laughter and satisfaction to your kitchen table as they have to mine. They’re more than just a dessert; they’re a reminder that the best things in life (and in baking) often come from a happy accident and a willingness to swirl things together.
So, thank you for spending this time with me. Now, go forth and bake! And when you pull that beautifully marbled pan out of the oven, be sure to tag me @TastyChow so I can see your masterpiece. Happy baking!
With love and a full belly,
Emily