Your New Go-To Snack: Healthy Energy Balls That Are Actually Fun to Make!
Hey there, fellow food lover! Raise your hand if this sounds familiar: it’s 3 PM, your energy has decided to take an unscheduled vacation, and the siren song of the vending machine is getting louder by the minute. Or maybe you’re running out the door, stomach growling, wishing you had something healthy to grab. Well, my friend, I’m about to change your entire snacking life. Get ready to meet your new kitchen BFF: the infinitely customizable, no-bake, healthy energy ball.
I’m a firm believer that healthy eating shouldn’t feel like a chore. It should be delicious, exciting, and honestly, a little bit fun. That’s exactly the spirit behind these six energy ball recipes. We’re starting with one brilliant, simple base formula and then letting our imaginations run wild. From the cozy, spiced warmth of a Carrot Cake ball to the zesty, sunny kick of a Lemon Zest bite, there’s a flavor here for every mood and craving.
Best of all? These are so easy. We’re talking 10 minutes, one bowl (or food processor), and zero oven required. They’re perfect for meal prep, lunchboxes, post-workout fuel, or just when you need a little “hug” in snack form. So, tie on your favorite apron (the messy one is always the best), and let’s create something magical together. Your future self, happily snacking away, will thank you.
A Spoonful of Nostalgia: Where My Love for Energy Bites Began
This whole energy ball obsession of mine? It started not in a fancy culinary school kitchen, but in my grandma’s cozy, flour-dusted haven. She wasn’t one for fancy gadgets or complicated recipes. Her magic was in simple, wholesome food made with heaps of love. I vividly remember one afternoon, feeling peckish after school, and she presented me with a plate of sticky, date-filled, oat-y little mounds. They looked humble, but one bite transported me to heaven.
She called them her “Keep-Goin’ Bites.” No recipe card, just a little of this, a handful of that—rolled together with her wise, wrinkled hands. As we stood there munching, she’d tell me stories. That connection, that feeling of being nourished in body and soul, is what I try to bring to every recipe I create. My modern energy balls are a direct descendant of Grandma’s “Keep-Goin’ Bites.” They’re my way of sharing that same feeling of simple, joyful sustenance with you. Now, let’s make some new kitchen memories, shall we?
Gathering Your Energy Ball Arsenal: The Base Ingredients
The beauty of this recipe is its flexibility! Think of this list as your blueprint. Once you master the base, you can freestyle with whatever you have in your pantry.
- Old-Fashioned Rolled Oats (1 ½ cups): This is our foundation! They give the balls structure and a lovely, chewy texture. Chef’s Insight: Be sure to use rolled oats, not instant or steel-cut. Instant oats can get too mushy, and steel-cut won’t soften enough. For a gluten-free version, just make sure your oats are certified GF!
- Soft, Pitted Medjool Dates (1 cup): Nature’s candy and our magical natural sweetener! They bind everything together with their sticky, caramel-like goodness. Pro Tip: If your dates are feeling a little dry or firm, soak them in warm water for 10 minutes, then drain thoroughly before using. This brings them back to life!
- Nut or Seed Butter (½ cup): The glue and the rich, creamy heart of the operation. I love creamy almond butter, but classic peanut butter is a superstar here too. Substitution Tip: Sunflower seed butter works beautifully for a nut-free version! Just make sure it’s the runny, natural kind for the best binding.
- Chia Seeds or Ground Flaxseed (2 tablespoons): A tiny but mighty boost of fiber, omega-3s, and nutrients. They also help soak up any excess moisture and firm everything up. Chef’s Insight: I like to use a mix sometimes! They both do the job wonderfully.
- A Pinch of Sea Salt: Don’t you dare skip this! Salt is a flavor enhancer and makes all the other ingredients, especially the sweet ones, pop and taste more like themselves.
Let’s Get Rolling: Your Foolproof Step-by-Step Guide
Ready to see some kitchen magic happen? This process is so simple and satisfying. I promise, you’ll be a pro in no time.
- Prep Your Dates. First things first, give your dates a quick check. Make sure every single one is pitted! A hidden pit is no one’s friend. If they’re on the drier side, remember that quick warm water bath I mentioned. A soft date is a happy, sticky date.
- Combine in the Food Processor. This is my preferred method for the smoothest, most uniform texture. Toss your pitted dates, oats, nut butter, chia/flax seeds, and salt into the bowl of a food processor. Little Chef Hack: Pulse the mixture a few times first to break up the dates before letting it run. This prevents the blade from getting stuck!
- Blend to Perfection. Now, let the machine run! Process for about 60-90 seconds, stopping to scrape down the sides if needed. You’re looking for a mixture that looks like coarse sand and, when you pinch a bit between your fingers, it holds together firmly. If it seems too dry and crumbly, add a teaspoon of water or maple syrup and pulse again. If it’s too wet, add another tablespoon of oats.
- The Bowl Method (No Food Processor? No Problem!). If you don’t have a food processor, a sturdy bowl and some muscle work great! Simply chop your dates as finely as possible with a knife before adding them to the bowl with the other ingredients. Use a spoon or (even better) your hands to mix and squish everything together until it’s well combined and moldable.
- Time to Roll! Using a tablespoon or a small cookie scoop, portion out the mixture. Roll each portion between your palms to form a smooth, one-inch ball. Pro Tip: If the mixture is sticking to your hands, lightly dampen them with a bit of water or a tiny touch of oil. It makes the process completely mess-free!
- Chill Out. Place your beautiful little energy balls on a parchment-lined baking sheet or plate and pop them in the fridge for at least 30 minutes. This crucial step allows them to firm up and lets the flavors meld together into something truly special.
How to Serve & Savor Your Homemade Energy Balls
Okay, the hard part is over (wait, was there a hard part?). Now for the fun! How you serve these is half the joy.
I love storing them in a gorgeous glass jar right on my counter—it’s a delicious little decoration and a constant reminder to grab a healthy bite. For a pretty party platter, arrange an assortment of the different flavors and watch them disappear! They’re the perfect pre-dinner nibble with a glass of wine or a post-yoga pick-me-up.
For the ultimate on-the-go experience, toss a couple in a small reusable container in your bag. They’re your secret weapon against hanger, no matter where the day takes you. Pair one with a piece of fruit for a balanced mini-meal, or crumble one over your morning yogurt or oatmeal for a delightful texture and flavor boost. However you eat them, do it with joy!
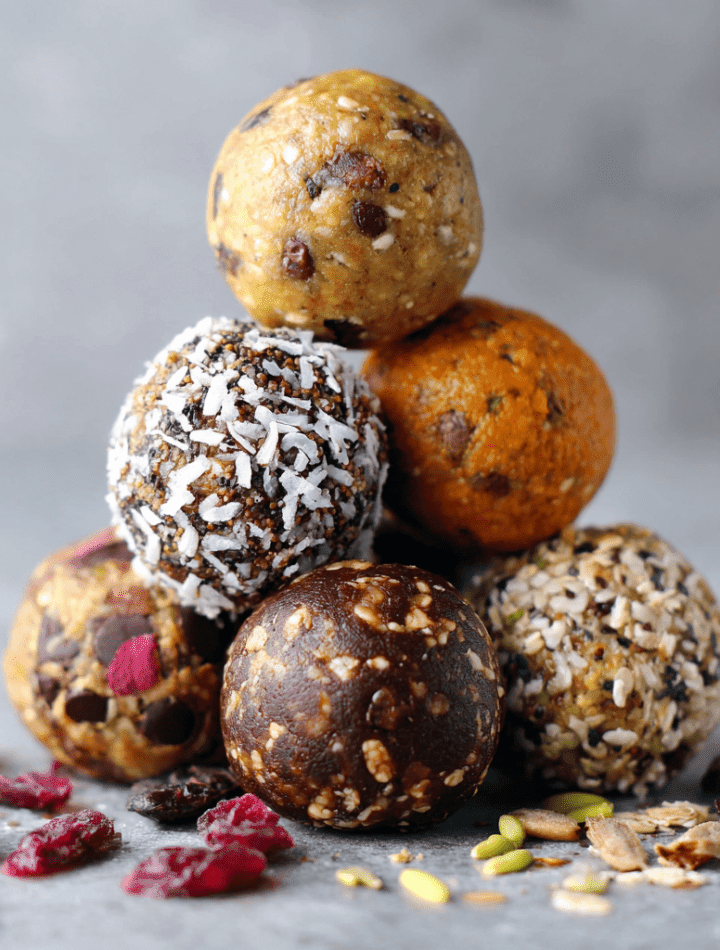
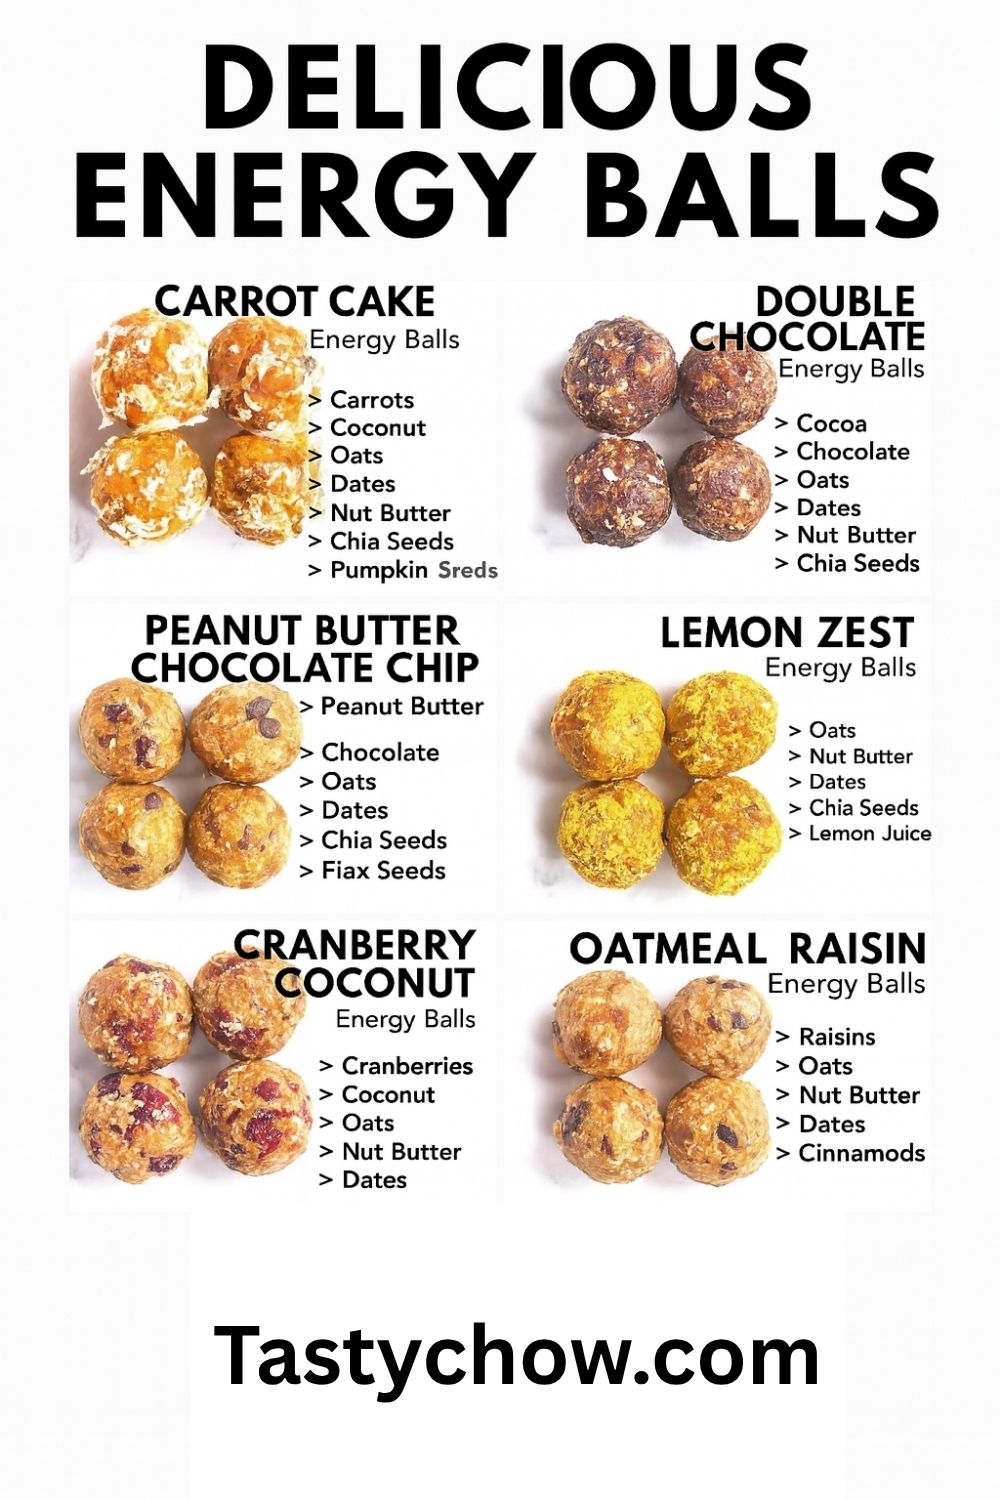
Six Flavor Adventures: Pick Your Favorite!
This is where we get to play! Add these extra ingredients to the base recipe to create six totally different flavor experiences.
- 1. Carrot Cake Energy Balls: Add ⅓ cup finely grated carrot, 2 tablespoons unsweetened shredded coconut, ¼ teaspoon cinnamon, and a tablespoon of chopped pumpkin seeds. It’s like eating a slice of cake, but guilt-free!
- 2. Double Chocolate Energy Balls: Hello, chocolate lovers! Add 2 tablespoons of cocoa powder and 3 tablespoons of mini chocolate chips. Rich, fudgy, and utterly irresistible.
- 3. Peanut Butter Chocolate Chip: A classic for a reason! Use peanut butter as your nut butter and add 3 tablespoons of mini chocolate chips. It’s the timeless combo we all adore, in a healthy, portable package.
- 4. Lemon Zest Energy Balls: For a bright, sunny kick! Add the zest of one whole lemon and a tablespoon of fresh lemon juice. It’s zesty, refreshing, and surprisingly uplifting.
- 5. Cranberry Coconut Energy Balls: Tart, sweet, and tropical! Add ¼ cup dried cranberries and ¼ cup unsweetened shredded coconut. It feels like a vacation in every bite.
- 6. Oatmeal Raisin Energy Balls: Comfort in a ball! Add ¼ cup raisins and ½ teaspoon of ground cinnamon. It’s like your favorite cozy cookie, but packed with real, lasting energy.
Chef Emily’s Kitchen Confidential
Over the years, this recipe has become a living, breathing thing in my kitchen. I’ve learned a few things! First, don’t be afraid to get your hands dirty. The “squish and mix” method is not only effective, it’s weirdly therapeutic. Second, I once accidentally used salted sunflower seeds in the carrot cake version and it was a *revelation*—the salty-sweet combo was incredible! So feel free to experiment with add-ins like chopped nuts, different dried fruits, or even a pinch of espresso powder in the chocolate ones.
The biggest evolution? Realizing these are the perfect recipe to make with kids or friends. It’s a no-stress, creative activity that ends with a delicious reward. Some of my best kitchen laughter has happened while rolling these little balls of joy.
Your Energy Ball Questions, Answered!
Let’s tackle some common snags and questions to make sure your energy ball journey is smooth sailing.
- Q: My mixture is too dry and won’t stick together! What did I do wrong?A: No worries, this is an easy fix! The culprit is usually dates that are a bit too dry. Simply add a liquid a teaspoon at a time—water, maple syrup, or even a little more nut butter—and pulse/mix again until it comes together.
- Q: My mixture is too wet and sticky. Help!A: Been there! Just add a bit more of your dry ingredients. An extra tablespoon or two of oats or shredded coconut should absorb that excess moisture and get you to the perfect rolling consistency.
- Q: How long do these actually last? And can I freeze them?A: They’ll stay fresh in an airtight container in the fridge for up to 2 weeks. For long-term storage, they freeze like a dream! Layer them in a container with parchment paper between layers and freeze for up to 3 months. Just thaw for a few minutes before eating.
- Q: Can I make these without a food processor?A: Absolutely! I mentioned the bowl method earlier. The key is to chop your dates very finely with a knife first. Then, use your hands to really squish and knead everything together until it’s uniformly mixed and holds its shape.
A Note on Nourishment
While I’m a chef, not a nutritionist, I can tell you why I feel so good about these as a snack. They’re made with whole, real-food ingredients. The oats provide complex carbs and fiber for sustained energy release—no sugar crash here! The nut butter and seeds add healthy fats and a bit of protein to keep you full and satisfied. And the dates offer natural sweetness along with fiber and nutrients, unlike refined sugar.
They are energy-dense, so I usually enjoy one or two as a serving. Think of them as a powerful little fuel pellet, not a low-calorie diet food. They’re about quality nourishment that tastes incredible and keeps you going. It’s a win-win!
Your New Snacking Journey Starts Now
And there you have it! Your complete guide to becoming an energy ball master. I hope you feel inspired, empowered, and excited to run to your kitchen. This isn’t just a recipe; it’s a template for endless creativity. It’s a way to take control of your snacks and fill your day with a little more joy and a lot more flavor.