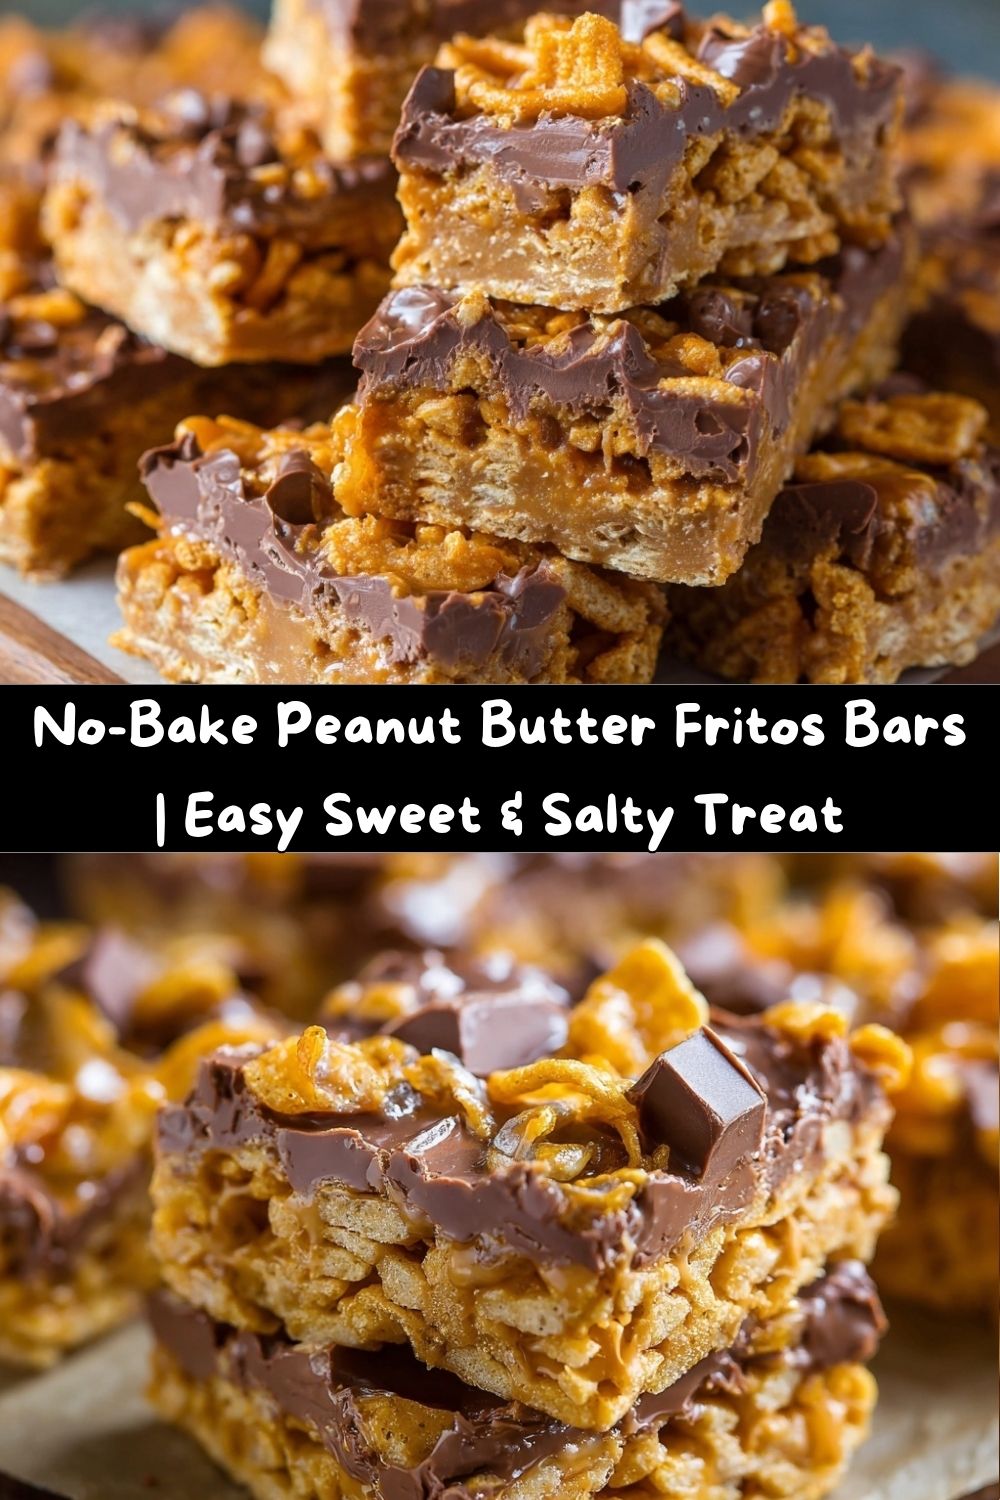
No-Bake Peanut Butter Fritos Bars: Your New Favorite Sweet & Salty Obsession
Hey there, my fellow flavor-chaser! Let’s get real for a second. Are you having one of those days? You know the ones. The clock is ticking towards snack o’clock, your sweet tooth is staging a full-scale rebellion, and the thought of turning on the oven feels like a monumental task worthy of a superhero. Or maybe you’re just scrolling, dreaming of that perfect, quirky treat to bring to the potluck that will have everyone asking, “Wait, what’s IN these? They’re incredible!”
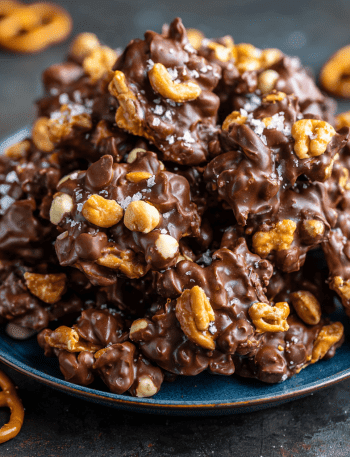
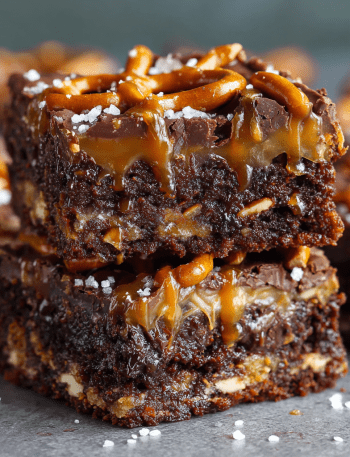
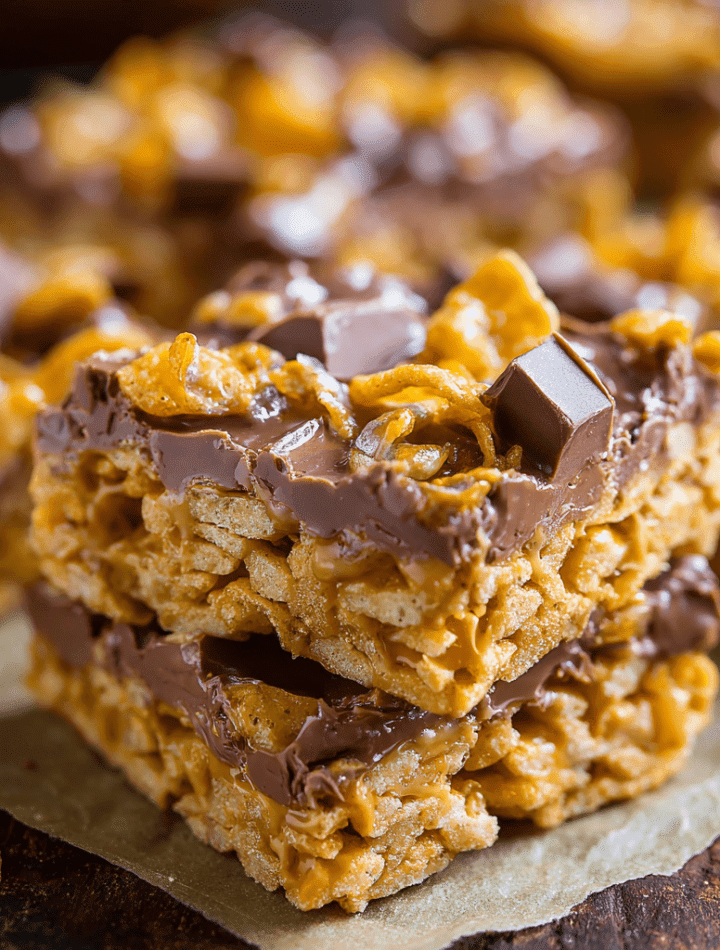
Well, my friend, stop the scroll and grab your favorite mixing bowl, because I’m about to introduce you to your new kitchen best friend: No-Bake Peanut Butter Fritos Bars. I’m not exaggerating when I say these are a life-changing level of easy. We’re talking crunchy, salty Fritos corn chips, smothered in a luxuriously thick and gooey peanut butter blanket, all topped with a layer of melty, semi-sweet chocolate. It’s the ultimate mash-up of snack aisle magic and homemade heart.
The best part? You probably have most of this in your pantry right now, and the whole glorious process happens in the microwave. No preheating, no baking, just pure, unadulterated, sweet-and-salty joy in about 30 minutes flat. So, tie that apron on (embrace the mess, I always do!), and let’s make something deliciously addictive together.
The Happy Accident That Started It All
I’ll never forget the first time I stumbled upon this beautiful, bizarre creation. It was a sweltering summer afternoon, the kind where even the idea of baking a batch of cookies made me break a sweat. My cousin’s kids were over, buzzing with energy and demanding a “fun snack.” My pantry was looking a little bare, with just a few lonely bags of Fritos from a recent chili night and my ever-present jar of peanut butter staring back at me.
In a moment of “what’s the worst that could happen?” inspiration, I decided to whip up a quick, no-bake peanut butter bar—but I’d run out of Rice Krispies. In a moment of pure, chaotic genius, I grabbed the Fritos. The kids looked at me like I had three heads when I started crushing the chips into the pan. But the second that warm, sweet peanut butter mixture hit the salty corn, the most incredible aroma filled the kitchen. The silence that fell over the room when they took their first bite was all the confirmation I needed. We had a winner. It was a messy, happy, and utterly delicious accident that’s now a permanent part of my recipe box.
Gather Your Ingredients: The Dream Team
This is where the magic starts! Here’s your shopping list for pure bliss. I’ve doubled the classic recipe because, trust me, you’ll want a full 9×13 pan of this goodness.
- 2 (9 oz) bags Fritos Original Corn Chips – This is our star! Their unique corn flavor and sturdy crunch hold up perfectly against the gooey peanut butter. Chef’s Insight: Don’t substitute with tortilla chips; their texture and salt level are different. Fritos are key!
- 2 cups light corn syrup – This is our binding agent, giving the bars their chewy, hold-together texture. Substitution Tip: For a deeper flavor, you can use golden syrup or even honey, though it will alter the taste profile slightly.
- 2 cups granulated sugar – It sweetens the deal and, when melted with the syrup, creates that fantastic, glossy base.
- 2 cups creamy peanut butter – Use a standard, no-stir kind for the best consistency. The natural, oily ones can sometimes separate. This is the rich, nutty heart of the bar!
- 2 cups semi-sweet chocolate chips (Optional, but HIGHLY recommended) – Because peanut butter and chocolate are a match made in heaven. Fun Twist: Feel free to swap these for milk chocolate, dark chocolate, or even a mix with butterscotch chips!
- ½ tsp vanilla extract (Optional, but awesome) – A little splash adds a wonderful depth of flavor and warmth to the peanut butter layer. It’s my secret weapon in many no-bake treats!
- Flaky sea salt for topping (Optional) – A light sprinkle over the finished chocolate layer elevates everything, making the sweet and salty flavors POP.
Let’s Make Some Magic: Your Step-by-Step Guide
Ready? This is so fast and fun. Let’s do this!
- Prep Your Pan: Grab that 9×13 inch baking dish and give it a good coating with butter or non-stick spray. You can also line it with parchment paper, leaving some overhang on the sides. This is my preferred method because it makes lifting the whole slab out for easy cutting a total breeze! Chef’s Hack: A little parchment paper is your best friend for clean-up and perfect bars.
- Crunch Time: Pour both bags of Fritos into your prepared pan. Now, get your hands in there! Gently crush the Fritos just a bit. You’re not aiming for dust here—you want a mix of larger pieces and smaller crumbs to create that perfect, interesting texture. Chef’s Commentary: I love this part. It’s strangely therapeutic! Just press and crumble lightly.
- The Microwave Magic: In a large, microwave-safe bowl (I’m talking BIG—this mixture will bubble up), combine the corn syrup and granulated sugar. Whisk it together a bit. Now, pop it in the microwave and heat it on HIGH for 2-3 minutes. You’re looking for it to be boiling and for the sugar to be completely dissolved. Important Tip: Keep an eye on it! Microwave powers vary. It should be bubbling vigorously when you take it out. And please, use oven mitts—that bowl will be HOT.
- Create the Gooey Goodness: Carefully remove the hot bowl from the microwave. Immediately add the peanut butter (and the vanilla extract, if you’re using it) to the hot syrup mixture. Now, stir, stir, stir! Use a sturdy spatula and keep going until it’s completely smooth, glossy, and heavenly. You’ll see it come together into a thick, pourable peanut butter sauce.
- The Big Pour: Working quickly, pour this glorious hot peanut butter mixture directly over the waiting Fritos in the pan. Use your spatula to gently spread it around, making sure every last chip gets coated in that sweet, nutty love. Try to get it as even as you can.
- The Chocolate Cloud (Optional, but C’mon!): If you’re going for the chocolate top—and you really should—now’s the time! Immediately sprinkle the chocolate chips evenly over the hot peanut butter layer. Wait about a minute for the residual heat to begin melting them. Then, take a butter knife or an offset spatula and gently spread the now-melty chips into a smooth, decadent chocolate layer. Chef’s Hack: For a pretty finish, you can drag the tip of your knife through the chocolate to create swirls.
- The Final Countdown: Setting Up: Now, for the hardest part: waiting. Let the pan cool completely at room temperature until the bars are set. This usually takes about an hour. If you’re as impatient as I am, you can speed this process up by popping the pan into the refrigerator for about 20-30 minutes. Once set, use a sharp knife to cut them into bars. Pro Tip: For super clean cuts, you can briefly run your knife under hot water and wipe it dry between slices.
How to Serve These Beauties
Okay, you’ve got a pan of golden, chocolate-topped deliciousness. Now what? Presentation is part of the fun!
I love serving these on a big, colorful platter for a party. They’re the ultimate finger food. For a casual movie night at home, just leave them right in the pan and let everyone dig in—no judgment here! If you’re feeling fancy, you can place each bar in a colorful cupcake liner; it makes them easy to grab and looks adorable. They pair perfectly with a tall glass of cold milk, a hot coffee, or even a creamy milkshake. Honestly, they’re pretty perfect all on their own.
Get Creative! Fun Flavor Twists & Swaps
The basic recipe is a solid 10/10, but playing with flavors is where the real kitchen joy lives! Here are a few of my favorite ways to mix it up:
- Butterscotch Swirl: Swap out half (or all!) of the chocolate chips for butterscotch chips. The butterscotch and peanut butter combo is a nostalgic dream.
- The “Elvis” Special: After spreading on the chocolate layer, sprinkle on some cooked, crumbled bacon. Trust me on this one. Sweet, salty, smoky, crunchy perfection.
- Peanut Butter Cup Extreme: Use Reese’s Peanut Butter Chips instead of semi-sweet chocolate chips for an ultra-peanutty experience.
- Nutty Crunch: Stir ½ cup of chopped peanuts or pecans into the Fritos before adding the peanut butter mixture for an extra layer of texture.
- Festive Fun: Sprinkle the top with holiday-colored sprinkles while the chocolate is still soft for a birthday or celebration.
Emily’s Chef Notes & Kitchen Confessions
This recipe has evolved so much since that first hot summer day. I’ve learned that a pinch of flaky sea salt on top is non-negotiable for me—it just makes the flavors sing. I also once, in a moment of sheer distraction, tried to use chunky peanut butter. While still tasty, the smooth stuff definitely gives a better, more cohesive texture for spreading. My biggest kitchen confession? I still eat the trimmings and uneven bits straight from the cutting board. That’s the chef’s treat, and it’s a rule in my house!
Your Questions, Answered!
I’ve made these bars a zillion times, and I’ve heard all your wonderful questions. Here are the most common ones!
Q: My mixture got hard really fast and was difficult to pour. What happened?
A: This means your syrup/sugar mixture was likely a bit too hot, causing the peanut butter to seize up a touch. It’s okay! Just work quickly and use your spatula to press and spread it as best you can. It will still taste amazing. Next time, you can try microwaving for 15-30 seconds less.
Q: Can I make these gluten-free or vegan?
A> Absolutely! Fritos are famously gluten-free, so you’re already halfway there. To make them vegan, ensure your sugar is vegan (some is processed with bone char), use a vegan peanut butter, and swap the chocolate chips for a dairy-free brand. The corn syrup is naturally vegan.
Q: How should I store these, and how long do they last?
A: Store them in an airtight container at room temperature for up to 5 days. You can also layer them between sheets of parchment paper so they don’t stick together. They can be refrigerated, but it will make the chocolate layer very firm and the bar less chewy.
Q: Can I use a different chip, like Chex Mix or pretzels?
A> You bet! The method works with any sturdy, crunchy snack. A mix of Fritos and pretzels is divine. Just keep the total volume roughly the same (about 18 oz of crunchy stuff).
Nutritional Information (Approximate, Per Bar)
Let’s be real—this is a treat, and we’re here to enjoy it! But I know many of you like to keep track, so here’s a rough estimate per bar (based on 24 servings). Remember, these values can change based on the specific brands you use and any modifications you make.
- Calories: ~354
- Carbohydrates: 42g
- Fat: 18g
- Sugar: 31g
- Protein: 6g
This is a energy-dense snack, perfect for a pre-hike boost or a post-game treat. Everything in moderation, including moderation—so sometimes, you just gotta have that second bar!
Final Thoughts from My Kitchen to Yours
And there you have it! The story, the secrets, and the step-by-step guide to what might just become your most-requested treat. I love this recipe because it proves that you don’t need fancy techniques or a ton of time to create something truly special and joy-inducing. It’s fun, it’s a little quirky, and it brings people together over that universal language of sweet and salty.
I really hope you give these No-Bake Peanut Butter Fritos Bars a try. When you do, I’d love to hear about it! Tag me on social @TastyChow or leave a comment below with your favorite twist. You’re not just making a snack; you’re making a memory. Now go on, get that fork, and let’s chow down!
With love and a full heart,
Emily