Celebrate Love with These Classic Valentine’s Sugar Cookies
Hey there, my fellow food lover! Emily here, from my flour-dusted kitchen to yours. Can you feel it? That little buzz of excitement in the air? Valentine’s Day is just around the corner, and while fancy dinners are lovely, there’s something truly magical about homemade treats made with your own two hands.
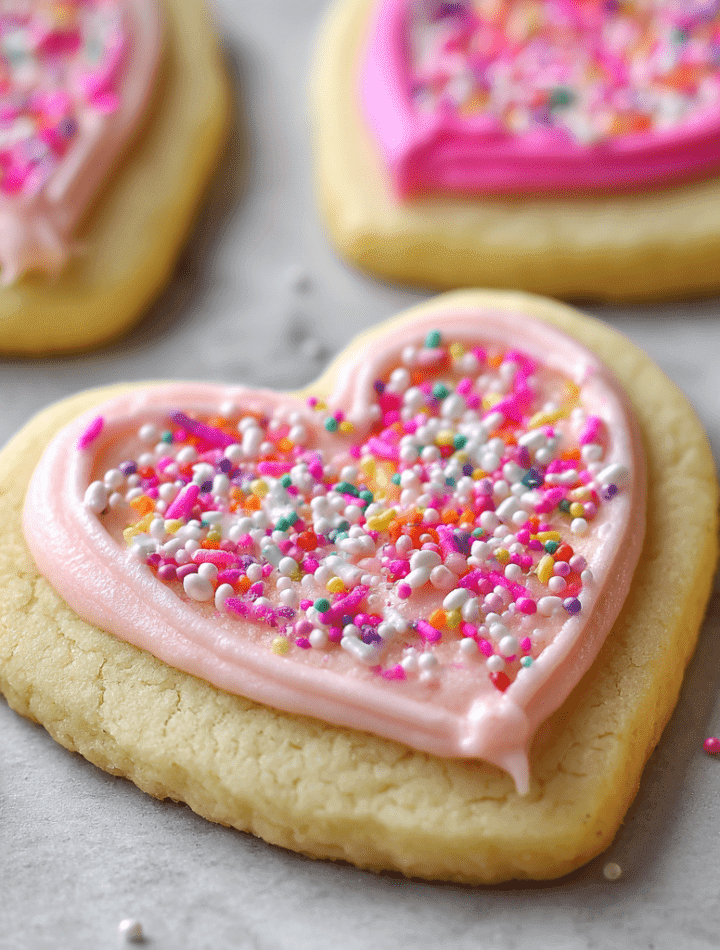
Today, I’m sharing my absolute go-to recipe for the most buttery, soft, and perfectly sliceable Valentine’s Day Sugar Cookies. These aren’t just any cookies; they’re edible love letters. They hold their shape beautifully for those gorgeous heart cut-outs, but they melt in your mouth with a tender, delicate crumb that store-bought versions can only dream of. They’re the perfect project for a cozy afternoon, whether you’re baking with your significant other, having a giggly frosting session with the kids, or simply treating yourself—because self-love deserves a cookie, too!
Think of these cookies as your sweet, blank canvas. We’re going to roll them out, cut them into hearts, and then unleash our inner artists with colorful icing and a blizzard of sprinkles. So, tie on that apron (the messy one is always the best), and let’s make something delicious that’s truly made with love.

The Cookie That Started with a Flour Bomb
My love affair with these cookies started long before culinary school, in my Grandma Jean’s warm, always-smelling-of-something-sweet kitchen. I couldn’t have been more than seven, standing on a wobbly wooden stool, watching her with wide eyes. She was a sugar cookie purist—no fancy flavors, just pure, sweet, buttery goodness.
One Valentine’s Day, she handed me the rolling pin, a lump of chilled dough, and a heart-shaped cutter that was older than my mom. “Alright, Emmy,” she said, her eyes twinkling, “the secret is a cold dough and a warm heart.” I remember the intense concentration, my tiny tongue stuck out, as I pressed that cutter down. Of course, my first attempt was more of a lopsided blob than a heart, and I definitely created a flour bomb that dusted the entire kitchen (and the cat). But Grandma just laughed, reshaped the dough, and said, “We’ll just call that one ‘rustic.'” That afternoon, covered in flour and sticky with pink icing, I learned that the real magic wasn’t in the perfect shape, but in the joy of making and sharing something sweet with someone you love. That’s the spirit I bake these with every single time.
Gathering Your Cookie Crew: The Ingredients
This is a simple, classic list, but every ingredient plays a starring role. Here’s what you’ll need and why each one matters:
- 1 cup (2 sticks) unsalted butter, softened – This is the soul of your cookie! Using unsalted butter lets you control the salt level. “Softened” is key here—it should be cool to the touch but leave a slight indent when you press it. Pro tip: if you forget to take it out, you can quickly soften it by cutting it into tablespoons and letting it sit for 15-20 minutes.
- 1 cup granulated sugar – Our sweetener and the namesake! Creaming this with the butter is what creates that light, tender texture we’re after.
- 1 large egg – The binder that brings everything together. Make sure it’s at room temperature to emulsify smoothly into the butter and sugar.
- 1 tsp pure vanilla extract – The flavor enhancer. Don’t be shy here; a good quality vanilla adds a beautiful, warm depth. For a fun twist, you could use almond extract (just ½ tsp, as it’s stronger!).
- 2 ½ cups all-purpose flour – The structure of our cookie. I like to fluff the flour in the bag, then spoon it into my measuring cup and level it off. This prevents accidentally using too much and making the dough dry.
- ½ tsp baking powder – Our little leavening helper! This gives the cookies just the slightest lift, keeping them soft and pillowy instead of rock-hard.
- ¼ tsp salt – The flavor balancer! Even in sweet recipes, salt is essential. It cuts the sweetness and makes all the other flavors pop.
- Royal icing or buttercream for decorating – The artist’s palette! Royal icing dries hard and smooth, perfect for detailed work. Buttercream is richer and softer. I’ll link my favorite recipes for both below!
- Your favorite festive decorations! Think: Food coloring, sprinkles, sanding sugar, edible glitter – This is where you let your personality shine! Go for classic red and pink or a full rainbow explosion.
Let’s Bake! Your Step-by-Step Guide to Cookie Perfection
Ready? Let’s do this! I’ll walk you through every step with my favorite chef hacks to ensure your cookies are absolute showstoppers.
- Cream the Butter and Sugar: In a large bowl, beat the softened butter and granulated sugar together on medium-high speed for a full 2-3 minutes. Chef’s Hack: Don’t skimp on this time! We’re not just mixing; we’re incorporating tiny air bubbles into the fat, which is what gives the cookie its lovely, light texture. It should look pale yellow and fluffy.
- Incorporate the Egg and Vanilla: Scrape down the sides of the bowl with a spatula (a crucial step for even mixing!), then add the egg and vanilla extract. Mix on medium until everything is completely smooth and well-combined.
- Combine the Dry Ingredients: In a separate bowl, whisk together the flour, baking powder, and salt. This ensures the leavening and salt are evenly distributed throughout the flour, so every bite is consistent.
- Bring the Dough Together: With your mixer on low speed, gradually add the dry ingredients to the wet ingredients. Mix just until the flour disappears and a soft dough forms. Overmixing here can develop gluten and make the cookies tough, so as soon as you don’t see any more dry flour, stop!
- The All-Important Chill Time: Divide the dough in half, shape each half into a flat disk, and wrap tightly in plastic wrap. Chill for at least 1 hour, or up to 2 days. I know, waiting is the hardest part! But this step is non-negotiable. It solidifies the butter, which prevents the cookies from spreading into puddles in the oven. It also makes the dough much easier to roll out.
- Roll and Cut: Preheat your oven to 350°F (175°C). Line your baking sheets with parchment paper. Take one disk of dough out of the fridge and let it sit for 5-10 minutes to become just pliable enough to roll. On a lightly floured surface, roll the dough to a consistent ¼-inch thickness. Use your favorite heart-shaped cutters to stamp out your cookies! Pro tip: Dip your cutter in flour between cuts to prevent sticking.
- Bake to Golden-Edged Perfection: Place the cut-out cookies on your prepared baking sheets, about an inch apart. Bake for 8-10 minutes. You’re looking for the edges to be just barely starting to turn a light golden brown. The centers should still look soft and set, but not wet. They will continue to cook on the hot baking sheet as they cool. This is the secret to a soft center!
- The Final, Crucial Step: Cool Completely: Let the cookies cool on the baking sheet for 5 minutes before transferring them to a wire rack to cool completely. I know you’ll be tempted to ice them warm, but please resist! Any residual heat will melt your beautiful icing into a sad, runny puddle. Patience, my friend!
Sharing the Love: How to Serve Your Masterpieces
Now for the best part—showing off your edible works of art! Presentation is half the fun.
I love piling these cookies high on a beautiful cake stand or a rustic wooden board for a real “wow” factor at a party. For an extra-special gift, stack a few in a clear cellophane bag, tie it with a gorgeous ribbon, and attach a little handwritten note. It’s a gift that truly comes from the heart.
These cookies are the perfect companion to a cold glass of milk, a hot cup of coffee, or even a glass of bubbly Prosecco for the adults. Set up a cookie decorating station at your Valentine’s brunch or party with different colored icings and bowls of sprinkles—it’s a guaranteed hit for all ages and a wonderful way to make memories together.
Get Creative! Fun Recipe Variations
Feel like mixing it up? This dough is a fantastic base for so many fun flavors!
- Lemon Zest Love: Add the zest of one large lemon to the dough when you cream the butter and sugar. The bright, citrusy flavor is a gorgeous contrast to the sweet icing.
- Almond Dream: Swap the vanilla extract for ½ teaspoon of almond extract. It gives the cookies a classic, bakery-style flavor that is simply irresistible.
- Chocolate-Dipped Delight: Skip the intricate icing and simply dip half of each cooled cookie into melted dark, milk, or white chocolate. Let them set on parchment paper for an elegant, no-fuss finish.
- Funfetti Valentine’s: Before chilling, mix in ½ cup of red, pink, and white sprinkles (the long “jimmies” work best) into the dough for a confetti-filled surprise in every bite!
- Gluten-Free Swap: You can easily use a 1:1 gluten-free all-purpose flour blend in place of the regular flour. The texture might be slightly more delicate, but they’ll be just as delicious!
Emily’s Chef’s Notes
This recipe has been my trusty sidekick for years, and it’s evolved through many a kitchen experiment. I once, in a hurry, tried to skip the chill time. Let’s just say I ended up with one giant, cookie-shaped blob instead of delicate hearts. Lesson learned—the fridge is your friend!
I also highly recommend a “test cookie.” Bake just one cookie first to check your oven’s temperature and your rolling thickness. It’s a little trick I learned in culinary school that saves a whole batch! And remember, lopsided hearts have more character. It’s the love you bake into them that counts, not perfection.
Your Questions, Answered!
Q: My cookies spread too much! What happened?
A: The most common culprits are: 1) Your butter was too warm/your dough wasn’t chilled enough. 2) You over-measured your flour. Remember to spoon and level! 3) Your oven might be running a bit cool. An oven thermometer is a cheap and invaluable tool!
Q: Can I make the dough ahead of time?
A: Absolutely! The dough disks can be wrapped tightly and refrigerated for up to 2 days, or frozen for up to 3 months. Just let it thaw slightly in the fridge before rolling.
Q: My royal icing is too runny/thick. Help!
A: Icing consistency is everything! For outlining, you want a “toothpaste” consistency. For “flooding” (filling in the shape), you want a “honey” consistency—it should smooth out within 10-15 seconds. If it’s too thick, add tiny drops of water. If it’s too thin, add a bit more powdered sugar.
Q: Why are my cookies tough?
A: This is almost always due to overmixing once the flour is added, or rolling the dough with too much force. Mix just until combined and roll gently for the most tender cookie.
Nutritional Information*
*Please note: These values are approximate and can vary based on specific ingredients used and portion size.
Per Cookie (without icing):
Calories: ~150 | Total Fat: 7g | Saturated Fat: 4.5g | Cholesterol: 25mg | Sodium: 25mg | Total Carbohydrates: 18g | Dietary Fiber: 0g | Sugars: 9g | Protein: 2g
This recipe yields about 24 cookies, depending on the size of your cutter. Remember, this is a treat meant to be enjoyed and shared in the spirit of love and celebration!
A Final Sweet Thought
Well, my friend, there you have it—my heart (and my recipe) on a plate. I hope this guide fills your kitchen with the incredible smell of baking cookies and your heart with the joy of creating something beautiful. Whether you’re a seasoned baker or this is your first time picking up a rolling pin, you can absolutely do this.
So, go on. Preheat that oven, get your hands a little messy, and whip up a batch of edible love. I can’t wait to see your beautiful creations! Tag me on social @TastyChow with your cookie masterpieces so I can share in the fun.
Happy Baking, and Happy Valentine’s Day!
— Emily 🍪❤️