NYC Red Velvet Cookies: Your New Favorite Bakery-Style Treat
Hey there, my fellow food lover! Let’s talk about a cookie that’s more than just a cookie. It’s a showstopper. A moment. The kind of treat that makes you do a little happy dance right there in your kitchen.
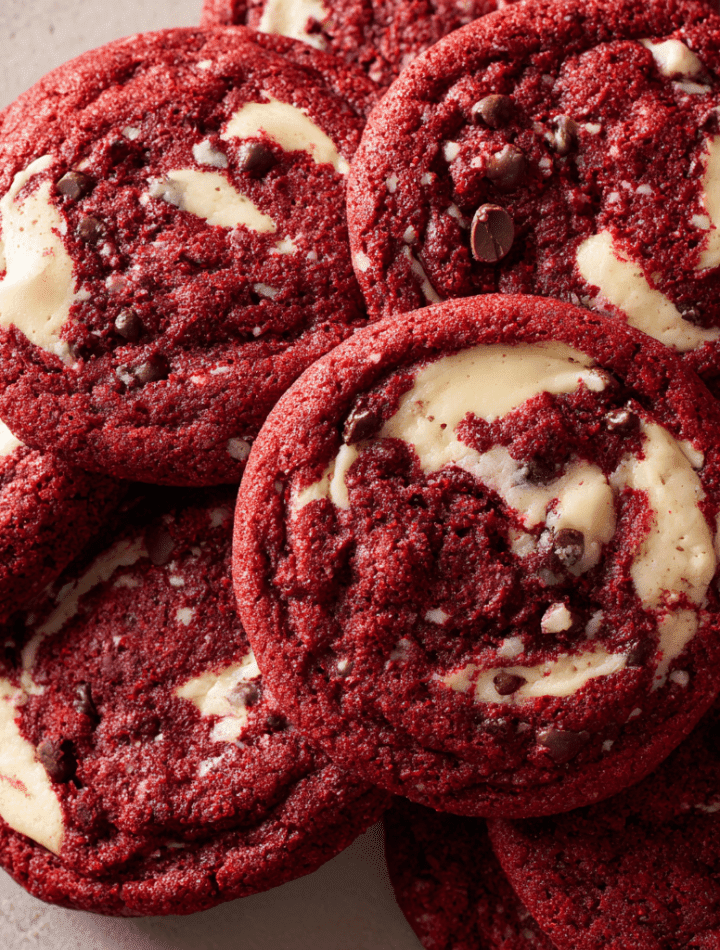
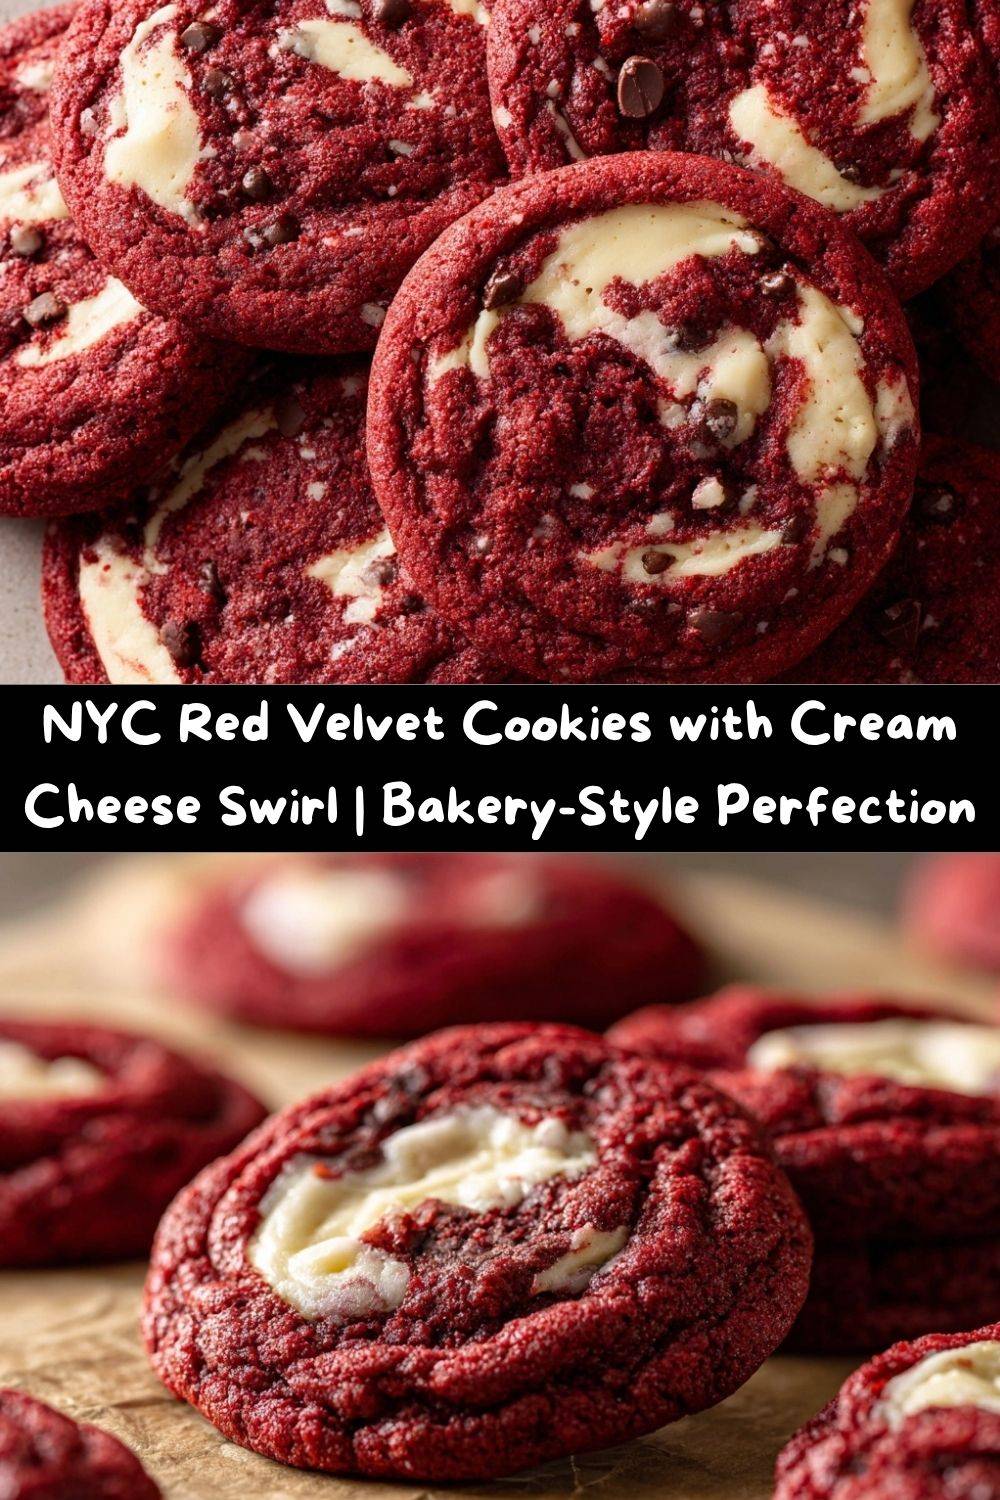
I’m talking about these NYC-Style Red Velvet Cookies with a dreamy Cream Cheese Swirl. Imagine the rich, cocoa-kissed flavor of your favorite red velvet cake, but transformed into an ultra-soft, chewy cookie with those perfect, slightly crisp edges. Now, picture a sweet, tangy cream cheese swirl marbled right through the center, creating little pockets of pure bliss in every single bite.
This isn’t just a recipe; it’s a ticket to creating that iconic, “I-can’t-believe-I-made-this” bakery magic right in your own home. They look gorgeous, they taste even better, and I promise, they’re totally doable. So, tie on your favorite apron (the messy one is always the best), and let’s make something incredibly delicious together.
The Day I Fell in Love with a Cookie
It all started on a blustery fall day in New York City. I was visiting a friend, and we were dodging tourists in Times Square when we ducked into a tiny, unassuming bakery that smelled like heaven. There, in a gleaming glass case, sat the most beautiful cookies I had ever seen. They were a deep, dramatic red, studded with dark chocolate, and swirled with what looked like vanilla ice cream.
We bought two, still warm from the oven, and found a bench outside. That first bite was pure magic. The cookie was simultaneously crisp and meltingly soft, with that distinct, slightly tangy red velvet flavor, and the cool, creamy swirl sent me straight to dessert nirvana. I must have looked like a complete fool, sitting there with my eyes closed, just savoring it. My friend laughed and said, “You look like you just fell in love.” And you know what? I had. I spent the entire train ride home dreaming of how to recreate that feeling in my own kitchen. This recipe is the happy result of all those delicious experiments.
Gathering Your Cookie-Making Magic
Here’s everything you’ll need to create these stunning cookies. Don’t just think of them as ingredients; think of them as the building blocks of pure joy!
For the Red Velvet Cookies:
- 2 ½ cups all-purpose flour: The trusty foundation of our cookie. For a slightly softer cookie, you can swap in ½ cup of cake flour, but all-purpose works beautifully.
- 1 tsp baking powder & ½ tsp baking soda: Our leavening dream team! The baking powder gives them a lovely lift, while the baking soda helps them spread and get that perfect chewy texture.
- ¼ tsp salt: Do not skip this! Salt is the flavor superhero that makes all the other ingredients—especially the chocolate and sweetness—pop.
- 1 cup unsalted butter, softened: The key to a soft, rich cookie. “Softened” means it should give easily when you press it, but not be greasy or melted. This is non-negotiable for getting that light and fluffy creamed base!
- 1 cup granulated sugar: This sweetens the deal and helps create those delightfully crisp edges we all crave.
- 1 large egg: Our binding agent, bringing everything together. Make sure it’s at room temperature to blend seamlessly into the butter and sugar.
- 2 Tbsp buttermilk: This is the secret weapon for that authentic red velvet “tang” and an incredibly tender crumb. No buttermilk? No problem! Add ½ tsp of white vinegar or lemon juice to 2 Tbsp of regular milk and let it sit for 5 minutes.
- 1 Tbsp red food coloring: For that iconic, vibrant red. I highly recommend using a gel food coloring for a rich, deep color without adding extra liquid.
- 1 tsp vanilla extract: The aromatic backbone that makes everything smell and taste like home.
- ½ cup mini chocolate chips (optional): I say “optional,” but I highly encourage them! The mini chips distribute chocolatey goodness in every single bite without overwhelming the cookie.
For the Cream Cheese Swirl:
- 4 oz cream cheese, softened: Full-fat is best for the creamiest, most stable swirl. Again, softened is key so it blends smoothly!
- ¼ cup powdered sugar: Sweetens the cream cheese without the grittiness of granulated sugar, giving us a silky-smooth swirl.
- ½ tsp vanilla extract: A little extra vanilla in the swirl adds another layer of wonderful flavor.
Let’s Bake! Your Step-by-Step Guide to Perfection
Ready to get your hands a little red? Follow these steps, and you’ll be a red velvet cookie pro in no time. I’ve packed this section with all my favorite chef hacks to ensure your success!
- Preheat and Prep: Fire up your oven to 350°F (175°C). This gives it plenty of time to reach the perfect temperature. Line two baking sheets with parchment paper. Trust me, this is the easiest way to prevent sticking and makes cleanup a dream. Chef’s Hack: If you have a dark-colored baking sheet, reduce the oven temp by 25°F to prevent the bottoms from over-browning.
- Whisk the Dry Team: In a medium bowl, whisk together your flour, baking powder, baking soda, and salt. Whisking, instead of sifting, is my lazy-but-effective way to make sure all those leaveners are evenly distributed. This is the first step to a cookie with a uniform, beautiful texture.
- Cream the Butter & Sugar: In a large bowl, use an electric mixer (or some serious arm power!) to beat the softened butter and granulated sugar together for a full 3-4 minutes. Don’t rush this! We’re not just mixing; we’re creaming. This process incorporates tiny air bubbles into the dough, which is what gives our cookies that lovely, light texture. You’ll know it’s ready when the mixture turns noticeably paler and fluffy.
- Combine the Wet Ingredients: Beat in the egg, buttermilk, red food coloring, and vanilla extract until the mixture is smooth and a stunning, uniform red. It might look a little curdled at first—that’s totally normal! Just keep mixing, and it will come together.
- Bring It All Together: Now, with your mixer on low speed, gradually add the dry ingredients to the wet ingredients. Mix until just combined, and there are no more dry streaks of flour. Chef’s Hack: Overmixing at this stage develops gluten, which can lead to tough cookies. A few flour patches are okay—we’ll take care of them in the next step!
- Fold in the Chocolate: Using a spatula, gently fold in the mini chocolate chips (if using). This final hand-mixing ensures we don’t overwork the dough.
- Scoop and Roll: Scoop out tablespoon-sized portions of dough. I love using a small cookie scoop for perfectly uniform cookies, but a tablespoon measure works great too. Roll them gently into balls and place them about 2 inches apart on your prepared baking sheets. They need their personal space to spread and become the gorgeous cookies they’re destined to be.
- Create the Swirl: In a small bowl, mix the softened cream cheese, powdered sugar, and vanilla until it’s completely smooth. Now, take a small dollop (about ½ teaspoon) and place it on top of each dough ball. Using a toothpick or a skewer, gently swirl the cream cheese into the red velvet dough. Don’t mix it in completely! We want beautiful, distinct marbling. Chef’s Hack: For super neat swirls, you can even pop the cream cheese mixture into a small zip-top bag, snip off the corner, and pipe little dots onto the cookies before swirling.
- Bake to Gooey Perfection: Bake for 12-15 minutes. You’re looking for lightly golden edges, but the centers should still look soft and slightly underdone. This is the secret to a chewy center! They will continue to cook on the hot baking sheet as they cool.
- The Most Important Step: Cool! Let the cookies cool on the baking sheet for at least 10-15 minutes before transferring them to a wire rack. I know it’s tempting, but this allows them to set up properly. If you try to move them too soon, they might fall apart. Your patience will be rewarded, I promise!
How to Serve These Stunning Cookies
Okay, you’ve created a masterpiece. Now, let’s talk about the grand finale! These cookies are fantastic all on their own, still slightly warm with a glass of cold milk. But why stop there?
For the ultimate indulgence, place a warm cookie on a plate and top it with a small scoop of vanilla bean ice cream. The contrast of warm cookie and cold, creamy ice cream is a classic for a reason—it’s pure happiness.
Hosting a party? Stack them high on a beautiful cake stand for a stunning, bakery-worthy display. They’re the perfect festive treat for Valentine’s Day, Christmas, or any holiday where you want to add a pop of color and joy.
My personal favorite way to enjoy them? With a hot cup of coffee on a lazy weekend morning. The slight tang of the red velvet and cream cheese is a perfect match for the bitterness of the coffee. It’s a little moment of self-care, one delicious bite at a time.
Get Creative! Fun Twists on the Classic
Once you’ve mastered the basic recipe, the kitchen playground is open! Here are a few of my favorite ways to mix things up:
- White Chocolate Dream: Swap the mini chocolate chips for white chocolate chips. The sweet, creamy flavor of white chocolate pairs incredibly well with the red velvet and cream cheese. It’s an elegant and decadent twist!
- Gluten-Free Goodness: You can easily make these gluten-free! Simply replace the all-purpose flour with a 1:1 gluten-free baking blend. I’ve had great success with brands like Bob’s Red Mill or King Arthur Flour.
- Lemon Zest Zing: Add a teaspoon of fresh lemon zest to the cream cheese swirl. The bright, citrusy note cuts through the richness and adds a wonderfully refreshing layer of flavor.
- Red Velvet Crinkle Version: For a fun, festive look, roll the dough balls (without the cream cheese swirl) in powdered sugar before baking. They’ll spread and crackle, creating a beautiful crinkle effect. You can add the cream cheese swirl on top before baking as usual.
- Double the Swirl: Feeling extra? Make a full batch of the cream cheese mixture and sandwich two cookies together with it for the most epic red velvet cream cheese cookie sandwich you’ve ever seen.
Chef Emily’s Kitchen Confessions
This recipe has seen a few… *ahem*… learning experiences in my kitchen. The first time I made them, I was so excited I used cold cream cheese. Let’s just say I ended up with cream cheese *chunks* instead of a smooth swirl. We live and we learn!
I’ve also found that the dough is even better if you have the time to let it chill for 30 minutes in the fridge. It prevents a little more spreading and makes the flavors even richer. But let’s be real, sometimes you need cookies NOW, and I can confirm they are still absolutely fantastic as a bake-now recipe.
This is your kitchen, your rules. Make them your own!
Your Questions, Answered!
I’ve gotten so many questions about these cookies over the years. Here are the answers to the most common ones!
Q: My cookies spread too much and got flat. What happened?
A: This is almost always a butter issue! Make sure your butter is *softened*, not melted or greasy. An oven that hasn’t fully preheated can also be the culprit. And finally, if your baking sheets are too warm when you put the dough on them, they’ll start spreading prematurely. Always use cool baking sheets for each batch.
Q: Can I make the dough ahead of time?
A: Absolutely! You can scoop the dough balls (without the cream cheese swirl) and freeze them on a baking sheet. Once solid, transfer them to a freezer bag. You can bake them straight from the freezer, just add 1-2 minutes to the baking time. It’s like having gourmet cookie dough on demand!
Q: My cream cheese swirl sank/disappeared. How do I prevent that?
A: Make sure your cream cheese mixture is thick enough. If it seems runny, you can add a tiny bit more powdered sugar. Also, don’t swirl it too deeply into the dough—a gentle, shallow swirl on the surface is perfect. Placing the dollop right in the center of the dough ball and swirling lightly helps it stay put.
Q: My red color isn’t very vibrant. How can I fix that?
A> Gel food coloring is your best friend here! The liquid kind is mostly water and won’t give you that deep, bakery-red color. A high-quality gel or paste food coloring makes all the difference in the world.

NYC Red Velvet Cookies with Cream Cheese Swirl : Bakery-Style Perfection
- Total Time: 35 minutes
- Yield: 20–24 cookies
Description
These NYC-style red velvet cookies are ultra-soft, rich in flavor, and packed with chocolate chips and a dreamy cream cheese swirl. With crisp edges and gooey centers, they deliver bakery-level magic straight from your oven. They’re the kind of cookies that make you pause mid-bite and say “wow.”
Ingredients
For the Cookies:
• 2 ½ cups all-purpose flour
• 1 tsp baking powder
• ½ tsp baking soda
• ¼ tsp salt
• 1 cup unsalted butter, softened
• 1 cup granulated sugar
• 1 large egg
• 2 Tbsp buttermilk
• 1 Tbsp red food coloring
• 1 tsp vanilla extract
• ½ cup mini chocolate chips (optional)
For the Cream Cheese Swirl:
• 4 oz cream cheese, softened
• ¼ cup powdered sugar
• ½ tsp vanilla extract
Instructions
Preheat oven to 350°F (175°C). Line two baking sheets with parchment paper.
In a bowl, whisk together flour, baking powder, baking soda, and salt. Set aside.
In a large bowl, cream butter and sugar until light and fluffy (3–4 minutes).
Add egg, buttermilk, red food coloring, and vanilla. Mix until smooth.
Slowly mix dry ingredients into wet ingredients until just combined. Fold in chocolate chips if using.
Scoop tablespoon-sized portions of dough and roll into balls. Space them 2 inches apart on baking sheets.
In a small bowl, mix cream cheese, powdered sugar, and vanilla until smooth.
Add a small dollop of the cream cheese mix onto each dough ball. Swirl gently with a toothpick.
Bake for 12–15 minutes, until edges are lightly golden but centers still soft. Cool before serving.
- Prep Time: 20 minutes
- Cook Time: 15 minutes
Nutrition
- Calories: 220 / Cookie
- Sugar: 16g / Cookie
- Fat: 11g / Cookie
- Carbohydrates: 27g / Cookie
- Protein: 3g / Cookie
Nutritional Information (Because Balance is Key!)
Alright, let’s keep it real. These are a decadent, special-occasion treat, and they’re meant to be enjoyed as such! The nutritional info below is an estimate per cookie (assuming a yield of 22 cookies) and can vary based on specific ingredients and brands used.
Each glorious cookie contains approximately: Calories: 220 | Sugar: 16g | Fat: 11g | Carbohydrates: 27g | Protein: 3g
Remember, enjoying homemade treats is about more than just numbers—it’s about the joy of baking, the happiness of sharing, and savoring every single bite. So, enjoy them mindfully and without guilt!
Your New Go-To Showstopper Cookie
And there you have it! Your complete guide to creating these unbelievable NYC-Style Red Velvet Cookies. From that first nostalgic bite in the city to the countless happy faces I’ve seen after sharing this recipe, these cookies hold a special place in my heart.
They prove that you don’t need a fancy bakery downtown to experience something truly magical. All you need is a few simple ingredients, a little bit of love, and the courage to get a little red food coloring on your fingers.
I am so incredibly proud of you for taking the time to bake something beautiful today. Now, go forth and conquer! I can’t wait to hear all about your cookie adventures. Tag me on social @TastyChow so I can see your gorgeous creations!
With a full heart and a happy, flour-dusted apron,
Emily