Holiday S’mores Bars: Your New Favorite Festive Treat!
Hey there, friend! Chef Emily here, coming at you from my kitchen, which currently smells like a glorious mix of melted chocolate, toasted marshmallows, and a hint of candy cane. Is there anything more magical than that combo? If you’re like me, you live for those moments where a single bite of something can whoosh you right back to your happiest memories—for me, that’s summer campfires and the simple, sticky joy of a perfect s’more.
But let’s be real, building a campfire in the middle of your holiday hustle isn’t exactly practical. (And trust me, I’ve considered it!). That’s why I became obsessed with creating a dessert that captures that same gooey, chocolatey, nostalgic magic but in a form that’s perfect for your cookie exchange, holiday party, or a cozy night in watching festive movies. Enter these Holiday S’mores Bars with Candy Cane Crunch.
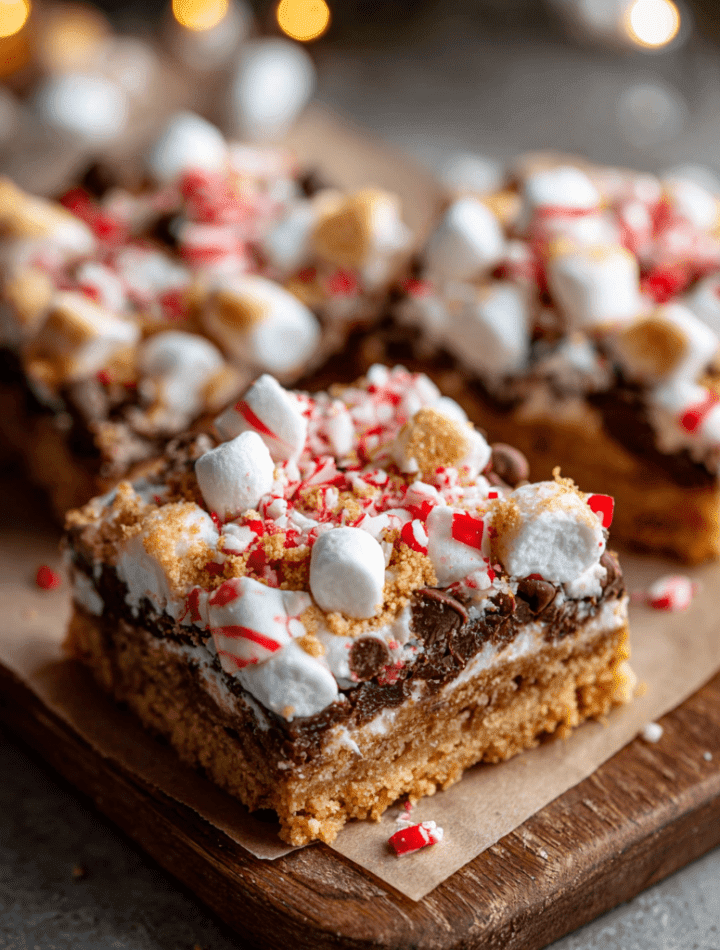
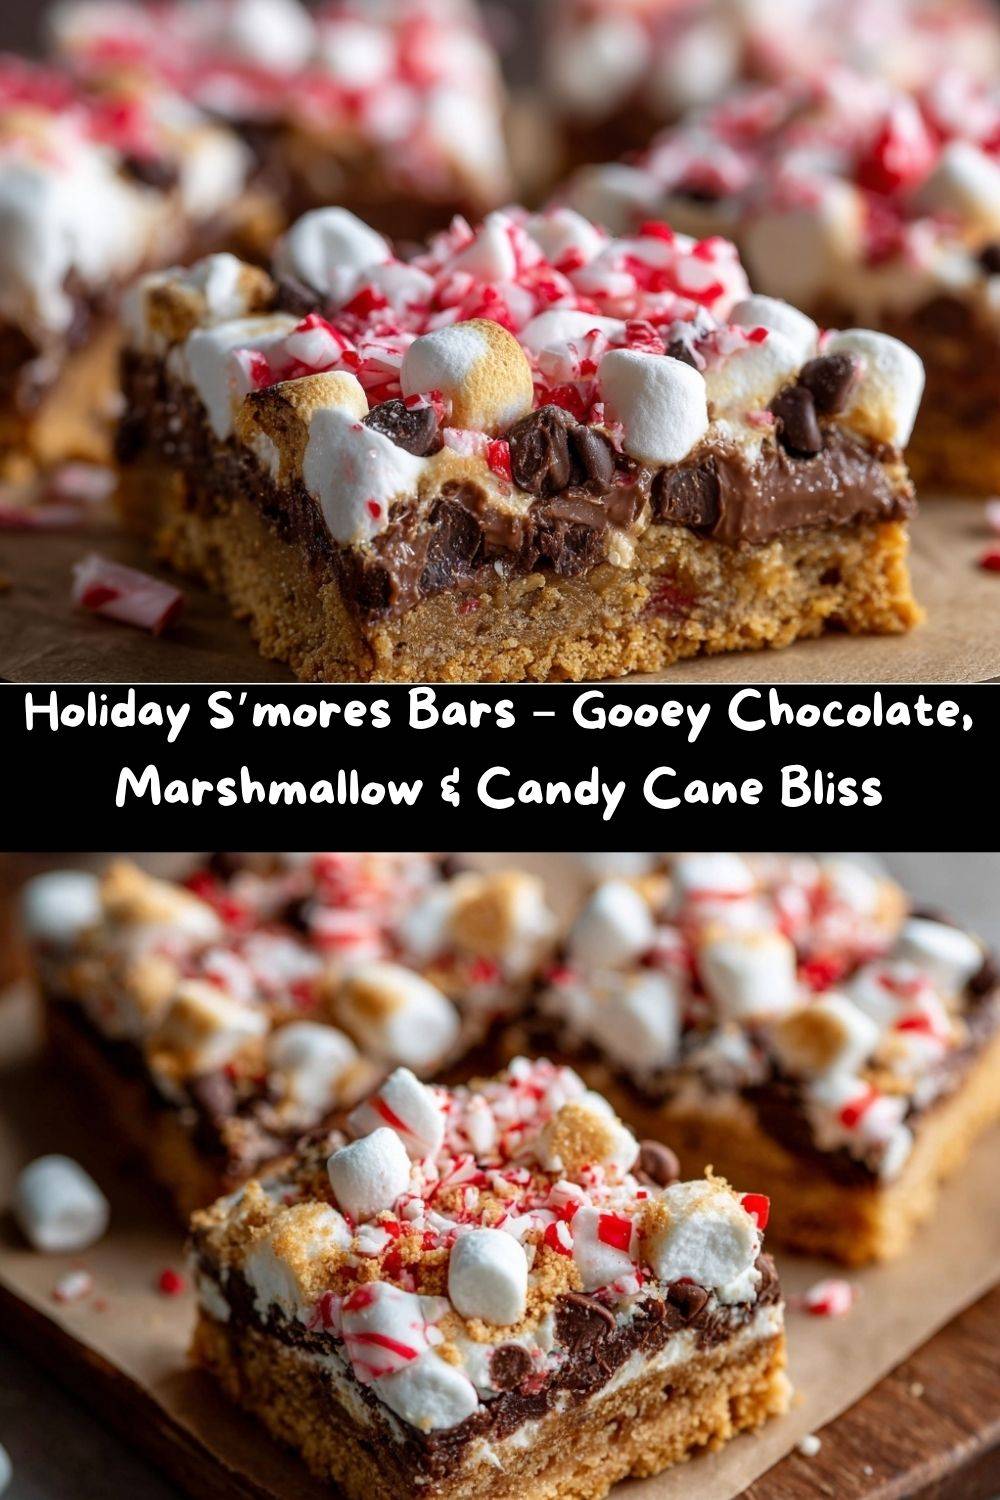
We’re taking a buttery graham cracker crust, loading it up with a soft, cookie-like filling packed with dark chocolate and mini marshmallows, and then giving it a full-blown festive makeover with a sprinkle of crushed candy cane. The result? A bar that’s chewy, crunchy, minty, and chocolatey all at once. It’s a holiday party in your mouth, and everyone’s invited. So, tie on your favorite apron (the messy one is always the best!), and let’s make some magic together.
A Campfire Memory & A Holiday Dream
My love for s’mores runs deep. It all started with my grandma’s backyard, long before culinary school was even a twinkle in my eye. We’d have these big family gatherings, and as the sun went down, my grandpa would light the fire pit. The rule was simple: you couldn’t have a s’more until you could point out three constellations. Let me tell you, I became an expert on the Big Dipper real fast!
I’ll never forget the feeling—the warmth of the fire on my face, the sound of family laughter, and the sheer anticipation of toasting my marshmallow to a perfect golden brown. That first bite, where the melted chocolate and gooey marshmallow would inevitably drip down my chin, was pure, unadulterated joy. I wanted to bottle that feeling. Years later, during a particularly chaotic December, I was craving that simple comfort but needed a dessert I could make ahead for a party. I started playing in the kitchen, and after a few, ahem, “happily failed” experiments (we don’t talk about the marshmallow volcano incident), these Holiday S’mores Bars were born. They’re my way of bringing a little campfire warmth to the coldest, coziest time of the year.
Gathering Your Festive Ingredients
This is where the fun begins! Here’s your shopping list for these unforgettable bars. I’ve also included some of my favorite chef insights and substitution tips, because I believe in making recipes work for you and your pantry.
For the Graham Cracker Crust:
- 1¼ cups graham cracker crumbs: The classic base! It gives us that authentic s’mores flavor. Chef’s Tip: You can buy pre-crumbed crackers or pulse whole ones in a food processor. If you’re outside the US, any plain, sweet biscuit like Digestives will work beautifully.
- ⅔ cup unsalted butter, melted: This is the glue that holds our crust together and gives it that rich, irresistible flavor. Using unsalted lets you control the salt level perfectly.
- ⅓ cup granulated sugar: A little sweetness to balance the slight bitterness of the crackers and make our crust extra delicious.
For the Gooey Filling:
- 2¼ cups all-purpose flour: The backbone of our bar cookie layer. For a slightly denser, chewier bar, you can swap in ½ cup of bread flour—it’s a fun little baker’s secret!
- 1 tsp baking soda: Our leavening agent, giving the bars a lovely lift and soft texture.
- 1 tsp salt: Do not skip this! Salt is a flavor superhero—it makes the chocolate taste richer and balances all the sweetness. I use fine sea salt.
- ¾ cup unsalted butter, softened: “Softened” is key here! Leave it on the counter for an hour before you start. It should yield to a gentle press. This creams perfectly with the sugar for a light and fluffy base.
- ¾ cup granulated sugar and ¾ cup brown sugar: The dynamic duo! White sugar gives us spread and crispness, while brown sugar (pack it firmly into your measuring cup!) brings moisture, chew, and that deep, caramel-like flavor.
- 2 large eggs: They bind everything together and add richness. Make sure they’re at room temperature for the best emulsion with the butter and sugar.
- 1 tsp vanilla extract: The aromatic heart of so many baked goods. Use the real stuff if you can—it makes a world of difference.
- 1½ cups mini marshmallows, divided: We’re stirring some in for hidden pockets of gooeyness and saving some for that gorgeous toasted top! Minis are essential here—large marshmallows will create too much moisture.
- 1 cup dark chocolate chips: I love the depth of dark chocolate against the sweet marshmallow, but semi-sweet or milk chocolate chips are fantastic, too! Feel free to use chunks for even bigger, melty pockets.
- 6 crushed candy canes: The star of the holiday show! They add a refreshing minty crunch and the most festive look. See my tips in the instructions for the easiest way to crush them without making a huge mess.
Let’s Build These Bars! (Step-by-Step)
Ready to create some holiday magic? Follow these steps, and you’ll be a s’mores bar superstar in no time. I’ve tucked my favorite kitchen hacks right in here with you.
- Prep the Pan & Preheat: First things first, preheat your oven to 350°F (175°C). This is our sweet spot for a golden crust and a perfectly baked center. Now, take your 13×9-inch baking pan and line it with parchment paper, leaving some overhang on the two long sides. Chef’s Hack: This isn’t just for easy cleanup—it’s your golden ticket to lifting the entire slab of bars out of the pan for pristine, crumb-free cutting. A little spritz of cooking spray under the parchment helps it stick to the pan.
- Make the Crust: In a medium bowl, stir together the graham cracker crumbs, melted butter, and granulated sugar until it resembles wet sand. Dump this mixture into your prepared pan and press it down firmly and evenly into one compact layer. I like to use the bottom of a measuring cup to really get it packed in. Bake this for 8 minutes. It will be fragrant and slightly set. Let it cool on a rack while you make the filling. This quick pre-bake ensures our crust stays crisp and doesn’t get soggy.
- Prepare the Filling: In a medium bowl, whisk together the flour, baking soda, and salt. Set this aside. Now, in a large bowl, using a hand mixer or a stand mixer with the paddle attachment, beat the softened butter, granulated sugar, and brown sugar together on medium speed for about 2-3 minutes. You want it to be light, fluffy, and pale in color. This step is crucial for texture—don’t rush it! Add the eggs, one at a time, beating well after each addition. Scrape down the bowl and beat in the vanilla extract.
- Combine & Assemble: With your mixer on low, gradually add the flour mixture to the wet ingredients. Mix just until the flour disappears—overmixing is the enemy of a tender bar! Now, grab a spatula and gently fold in 1 cup of the mini marshmallows and all of the chocolate chips. The batter will be thick and glorious! Spread this evenly over your slightly cooled crust. It’s a sticky job, so an offset spatula or lightly wet fingers work wonders here.
- The Festive Finish: Now for the fun part! Scatter the remaining ½ cup of mini marshmallows over the top. Then, take half of your crushed candy canes and sprinkle them over everything. This creates that beautiful, festive, crunchy topping.
- Bake to Perfection: Pop the pan into your preheated oven and bake for 20-25 minutes. You’re looking for a golden brown top, and the edges should be slightly pulling away from the pan. The center might still look a tiny bit soft—that’s perfect! It will set up as it cools. Chef’s Secret: For extra-toasted marshmallows, you can pop it under the broiler for 30-60 seconds at the very end, but watch it like a hawk!
- The All-Important Cool & Chill: This is the hardest part, I know! Let the pan cool completely on a wire rack. Then, and this is non-negotiable for clean cuts, transfer it to the refrigerator for at least 2 hours, or even overnight. This firms everything up so you can slice through the gooey marshmallows and chocolate without a mess.
- Slice & Serve: Use the parchment paper overhang to lift the entire block of bars out of the pan and onto a cutting board. Slice into squares with a sharp knife. For a final festive touch, sprinkle with the remaining crushed candy canes right before serving for that extra pop of color and minty crunch!
How to Serve Your Holiday Masterpiece
Okay, you’ve created a show-stopping dessert. Now, let’s talk presentation! These bars are stunning all on their own, but a little flair never hurt.
I love arranging them on a beautiful rustic wooden board or a festive platter. For an extra touch of “wow,” you can dust them with a little powdered sugar right before serving—it looks like a light dusting of snow! A small scoop of vanilla bean ice cream or a dollop of peppermint whipped cream on the side takes this from a treat to a full-blown dessert experience.
These are the ultimate portable dessert, making them perfect for your holiday cookie swap (you’ll be the most popular person there!), as a gift for neighbors (wrap them in a cute cellophane bag with a ribbon), or as the grand finale on your Christmas dessert table. They’re rich, so cutting them into 20 smaller bars is perfect for sharing… or not, I won’t judge!
Get Creative! Fun Flavor Twists
One of my favorite things about this recipe is how adaptable it is! Feel like mixing it up? Here are a few of my favorite variations:
- The Peppermint Patty: Swap the dark chocolate chips for a cup of Andes mint baking pieces or chopped-up peppermint patties. Double the minty, chocolatey goodness!
- Gingerbread Spice: Want a deeper, spicier flavor? Add 1 tsp of ground ginger, ½ tsp of cinnamon, and ¼ tsp of cloves to the flour mixture. It’s like a gingerbread house and a s’more had a delicious baby.
- Salty Sweet Supreme: For all my salty-sweet lovers, fold in ½ cup of crushed pretzel pieces with the chocolate chips and sprinkle a little flaky sea salt on top with the candy canes. The contrast is incredible.
- White Chocolate Wonderland: Use white chocolate chips instead of dark and maybe even a handful of dried cranberries for a pretty red-and-white holiday look.
- Gluten-Free Friendly: You can easily make this gluten-free! Use gluten-free graham crackers for the crust and a 1:1 gluten-free all-purpose flour blend (like Bob’s Red Mill) for the filling. The result is just as delicious.
Chef Emily’s Kitchen Notes
This recipe has seen a few evolutions in my kitchen. The first time I made it, I was so excited I tried to cut into it while it was still warm. Let’s just say I ended up with a delicious, but very messy, “s’mores dip” situation. The chilling step was born out of that delicious failure!
I’ve also learned that the quality of your candy canes matters. The pure peppermint ones have the best flavor, and I find it’s easiest to unwrap them, place them in a heavy-duty zip-top bag, and crush them with a rolling pin. Less flying candy shards! This recipe is now a non-negotiable part of my holiday season, and I love hearing how it becomes a part of yours, too.
Your Questions, Answered!
I’ve gotten a few questions about these bars over the years, so I’ve compiled the most common ones here to help you out!
- Q: My marshmallows on top got really hard after baking. What happened?
A: This can happen if they get a bit over-toasted. It’s still delicious! To prevent it, make sure you’re using mini marshmallows and not over-baking the bars. You can also try adding all the marshmallows halfway through the baking time, but I find the one-step method works great for me at 22 minutes. - Q: Can I make these ahead of time?
A: Absolutely! In fact, I highly recommend it. They are the perfect make-ahead dessert. Once cooled and sliced, store them in an airtight container in the fridge for up to 5 days, or you can freeze the whole block (well-wrapped) for up to 2 months. - Q: My crust is crumbling when I try to press it in. Help!
A: No worries! This usually means you need a bit more “glue.” Add another tablespoon of melted butter to the crumb mixture. It should hold together when you pinch it. - Q: The candy cane topping is getting sticky. Is that normal?
A: Yes! The peppermint oil in the candy canes will start to melt and get a little sticky after a day, especially if left at room temp. This is totally normal and doesn’t affect the taste. I recommend sprinkling the final reserve of candy canes on right before serving for the prettiest presentation.
Nutritional Information (Because Balance is Key!)
Hey, we all love indulging—especially during the holidays! I’m a big believer that dessert should bring joy, not guilt. These bars are definitely a treat, but knowing what’s in them helps you enjoy them mindfully. Here’s a rough breakdown per bar (based on 20 servings). Keep in mind that these numbers can vary depending on the exact ingredients and brands you use:
Per Bar (approximate):
-
Calories: 405
-
Total Fat: 21g
-
Saturated Fat: 12g
-
-
Carbohydrates: 50g
-
Sugars: 32g
-
-
Protein: 4g
-
Fiber: 2g
-
Cholesterol: 60mg
-
Sodium: 365mg
-
Iron: 2.2mg
If you’re looking to lighten them up just a touch, here are a few small swaps that won’t sacrifice flavor:
-
Use dark chocolate chips for a slightly lower sugar content and deeper chocolate flavor.
-
Cut smaller portions—these bars are rich, so even a half-size piece satisfies a sweet tooth beautifully.
-
Skip the extra candy cane topping if you prefer a less-sweet finish (or replace it with a light dusting of cocoa powder or crushed freeze-dried raspberries for color).
Ultimately, these Holiday S’mores Bars are meant to be savored and shared. Bake them with love, enjoy every gooey, minty, chocolatey bite, and balance it all with laughter, friends, and maybe a brisk holiday stroll afterward. Because that, my friend, is what joyful eating is all about.
Final Thoughts from My Kitchen
Well, friend, we’ve reached the best part—where you finally get to sit back, take that first bite, and let the magic happen. These Holiday S’mores Bars aren’t just a dessert; they’re a whole mood. Cozy fireside nights, laughter echoing through the house, and the soft crackle of nostalgia baked right in. Every layer—the buttery graham crust, gooey chocolate, toasty marshmallows, and peppermint crunch—comes together to make something that feels like joy itself.
What I love most about this recipe is how it bridges memories and moments. It’s the childhood wonder of a campfire treat, all dressed up for the holidays with a sparkle of candy cane cheer. Whether you’re sharing them at a party, gifting them to neighbors, or sneaking a square after midnight (no judgment here!), these bars have a way of turning an ordinary day into a celebration.
So, as the snow falls or the fairy lights twinkle, I hope your kitchen feels a little warmer and your heart a little fuller. Bake these with love, share them generously, and don’t forget to save one for yourself—you’ve earned it.
Happy baking, and happy holidays from my kitchen to yours.
– Chef Emily