White Chocolate Candy Cane Cookies – Peppermint Christmas Cookie Recipe
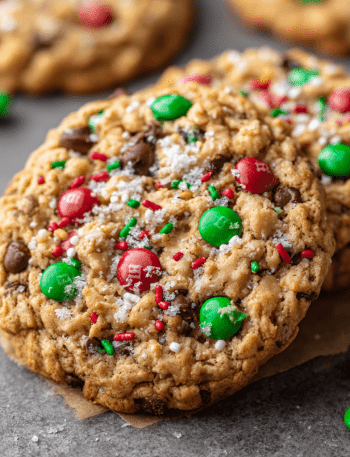
Hey there, my festive friend! Is your kitchen smelling like a winter wonderland yet? If not, I have the absolute *perfect* recipe to get you there. We’re talking about my all-time favorite holiday cookie: White Chocolate Candy Cane Cookies. Imagine this: a soft, chewy, buttery cookie that melts in your mouth. Now, add creamy, dreamy pockets of white chocolate and a festive crunch of sweet, minty crushed candy canes. Every single bite is a little celebration—a symphony of textures and flavors that just screams “Happy Holidays!”
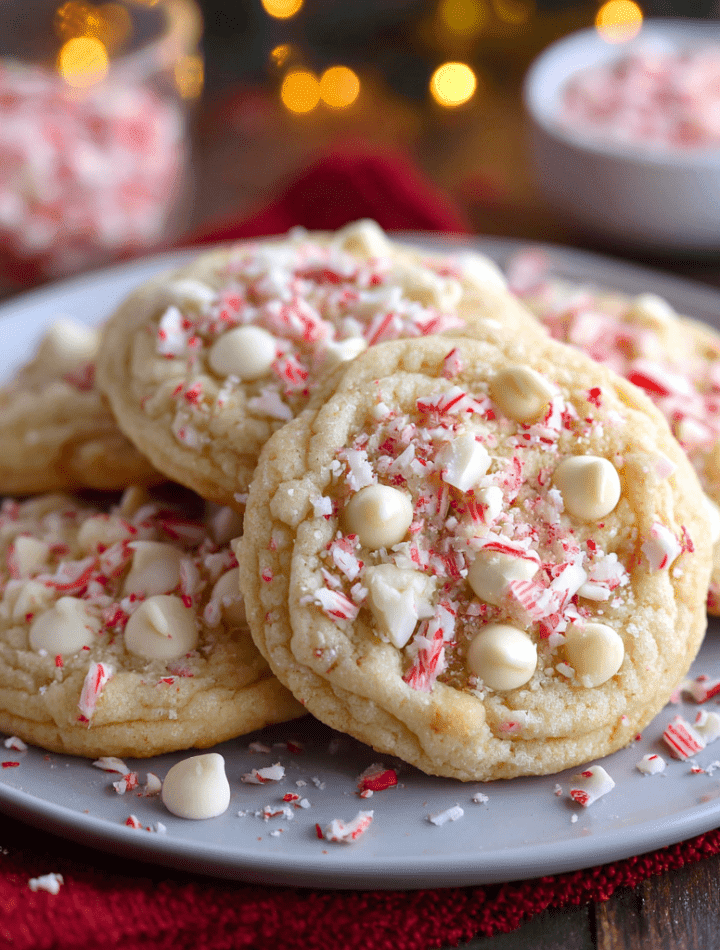
I bake these every single year without fail. They’re the star of my cookie platters, the most requested treat by my friends and family, and the one recipe that makes my kitchen feel truly, magically like Christmas. They’re stunningly beautiful with their red and white speckles, incredibly fun to make, and they fill your home with the most inviting, warm, and pepperminty aroma. Whether you’re hosting a holiday party, leaving out a treat for Santa, or just cozying up with a movie and a plate of cookies, this recipe is your new best friend. So, tie on that apron, and let’s make something delicious that’s sure to become a new tradition in your home, too!

The Great Peppermint Mishap of ’08
I have to share a little story with you. The very first time I attempted a version of these cookies, it was a bit of a… well, let’s call it a “learning experience.” I was so excited, channeling my inner grandma with her trusty rolling pin. But instead of gently crushing the candy canes in a bag, I thought, “Hey, let’s just whack them on the counter with all my might!” Picture this: shiny red plastic wrappers, a determined (and slightly overzealous) me, and one mighty SMACK. Candy cane shards flew EVERYWHERE. My kitchen looked like a crime scene from the North Pole. My cat, Mr. Whiskers, had red speckles for a week. But you know what? The cookies were still a hit. That hilarious, messy moment taught me that holiday baking isn’t about perfection; it’s about the joy, the laughter, and the delicious results. Now, I use my food processor (a much safer bet!), but I always smile, remembering that peppermint explosion and the imperfect, beautiful joy of baking.
Gathering Your Cookie Crew (The Ingredients!)
Alright, let’s gather our cast of characters! One of the best things about this recipe is that you probably have most of these ingredients in your pantry already. Here’s what you’ll need and a little chef’s insight on each one:
- ½ cup softened butter & ½ cup shortening: This dynamic duo is the secret to the perfect texture! The butter gives us that rich, irresistible flavor, while the shortening keeps the cookies wonderfully soft and chewy. If you only have butter, that’s okay, but the texture will be a bit more crisp.
- ½ cup white sugar & ¾ cup brown sugar: We’re using both! White sugar helps the cookies spread just a bit and get a lovely crisp edge, while the molasses in the brown sugar is our cheat code for that soft, moist, chewy center we all dream about.
- 1½ teaspoons vanilla extract & 1 teaspoon peppermint extract: Vanilla is the warm, cozy base note. The peppermint extract is the star of the show—it gives that bright, festive flavor throughout the entire cookie. A little pro-tip: make sure yours is pure peppermint extract, not “mint,” which can taste more like spearmint gum.
- 2 large eggs: Our binding agents! They bring everything together and add richness. Make sure they’re at room temperature to create a smoother, more emulsified dough.
- 3 cups all-purpose flour: The foundation of our cookie. I like to fluff my flour with a spoon before measuring it, then level it off with a knife. This prevents accidentally using too much and ending up with dry cookies.
- 1 teaspoon baking soda & ½ teaspoon salt: Baking soda gives us that perfect lift and spread. Don’t forget the salt! It’s not there to make things salty, but to make all the other flavors pop and balance the sweetness.
- ¾ cup crushed candy canes: The festive crunch! You can find these pre-crushed, but it’s easy to do yourself (just… gently!). Unwrap them, place them in a sealed plastic bag, and use a rolling pin to crush them. You want a mix of fine powder and small chunks for the best texture.
- 1 cup white chocolate chips: Creamy, sweet, and the perfect partner for peppermint. I prefer using white chocolate chips in the dough because they hold their shape better, but feel free to use chopped white chocolate bars for more melty pockets.
Let’s Get Baking: Your Step-by-Step Guide to Cookie Perfection
Ready to create some magic? Follow these steps, and you’ll be a holiday cookie hero in no time. I’ve sprinkled in all my best chef hacks to make sure your cookies turn out perfect!
- Preheat and Prep: First things first, get that oven preheating to a toasty 350°F (175°C). Now, line your baking sheets with parchment paper. This is my number one tip for preventing sticking and ensuring easy cleanup. No parchment? A silicone baking mat works wonders too!
- Cream the Good Stuff: In a large bowl, beat together the softened butter, shortening, white sugar, and brown sugar. We’re not just mixing here; we’re going for “light and fluffy.” Beat it on medium-high speed for a full 2-3 minutes. This step is crucial because it incorporates air into the dough, which gives our cookies a lovely lift. You’ll see the color pale and the texture become almost like a smooth frosting.
- Incorporate the Wet Team: Mix in the vanilla and peppermint extracts. Now, beat in the eggs one at a time, making sure the first egg is fully incorporated before adding the second. This helps create a smooth, cohesive dough and prevents it from curdling.
- Bring in the Dry Squad: Turn your mixer down to low speed. Gradually add in the flour, baking soda, and salt. I like to add it in about three parts to avoid a white cloud of flour erupting in my kitchen! Mix just until the flour streaks disappear. Chef’s Hack: Squeeze a bit of dough in your hand. If it feels overly sticky, add another tablespoon of flour. You want it to be soft and slightly tacky, but not sticking to your fingers like glue.
- The Grand Finale Mix-In: Now for the fun part! Use a sturdy spatula or wooden spoon to stir in the crushed candy canes and white chocolate chips. Mixing them in by hand prevents over-mixing the dough and keeps those beautiful red speckles intact.
- Scoop and Space: Using a cookie scoop or a tablespoon, portion the dough into 1 to 1½ tablespoon balls. Place them about 2 inches apart on your prepared baking sheet. This gives them plenty of room to spread and become the perfect cookie shape.
- Bake to Perfection: Bake for 8-10 minutes. Don’t wait for them to turn golden brown! We want the tops to look “just set.” The centers might still look a tiny bit soft—that’s exactly what we want. They will continue to cook on the hot baking sheet as they cool, resulting in the ultimate soft and chewy texture.
- The Pro Garnish: As soon as you pull the baking sheet out of the oven, this is your chance to be a cookie artist. Press a few extra white chocolate chips and a tiny pinch of crushed candy cane onto the top of each warm cookie. This makes them look professionally decorated and extra indulgent.
- The Patience Test: I know it’s hard, but you must let the cookies cool on the baking sheet for a full 10 minutes before transferring them to a wire rack to cool completely. This step is non-negotiable for the perfect texture!
How to Serve These Festive Beauties
Presentation is half the fun with these cookies! Here are a few of my favorite ways to serve them up:
For a classic holiday platter, pile them high on a beautiful cake stand or a rustic wooden board. I love to tuck in a few springs of fresh rosemary or rosemary for a gorgeous green-and-red color pop. They look stunning next to classic chocolate chip cookies and gingerbread men.
Thinking of gifting? These cookies are the ultimate edible present. Place a stack in a clear cellophane bag, tie it with a big red ribbon, and attach a homemade tag. Or, line a festive tin with parchment paper and create layers of cookies separated by wax paper. It’s a gift made with love that anyone would adore.
And my personal favorite way to enjoy them? Still slightly warm from the oven, with a giant glass of cold milk or a mug of rich hot chocolate. The way the white chocolate melts slightly and the peppermint zings… it’s pure bliss.
Get Creative! Fun Recipe Variations
Love this base recipe? Let’s play with it! Here are a few delicious twists to keep things interesting:
- Dark Chocolate Dream: Not a white chocolate fan? No problem! Swap the white chocolate chips for dark chocolate chunks. The deep, rich chocolate paired with the bright peppermint is a classic, sophisticated combination.
- Gluten-Free Goodness: You can easily make these gluten-free! Simply replace the all-purpose flour with a 1:1 gluten-free flour blend. I’ve had great success with brands like Bob’s Red Mill or King Arthur.
- Candy Cane Thumbprints: Roll the dough balls as usual, then use your thumb or the back of a teaspoon to make an indent in the center. After baking, while the cookies are still warm, fill the indent with a dollop of peppermint frosting or a melted white chocolate drizzle.
- Peppermint Bark Cookies: Take the decadence up a notch! After the cookies have fully cooled, drizzle them with melted dark chocolate. It creates a gorgeous “peppermint bark” effect and adds another layer of flavor.
- Chewy Oatmeal Base: For a heartier cookie, replace 1 cup of the all-purpose flour with 1 cup of old-fashioned rolled oats. It adds a lovely chewy texture and makes them feel a little bit wholesome (we can pretend!).
Chef Emily’s Kitchen Notes
Over the years, this recipe has become a true staple in my kitchen, and it’s evolved in little ways. I used to be a “butter-only” purist, but adding shortening was a total game-changer for texture. My grandma, the original kitchen wizard, would always say, “The secret is in the squeeze,” meaning you have to feel the dough to know if it’s right. Trust your instincts!
One year, I was out of peppermint extract and tried using a few drops of peppermint essential oil (food-grade, of course!). It worked in a pinch, but the flavor wasn’t as warm. Stick with extract for the best results. And a final, funny note: I’ve learned to always crush a few extra candy canes. Why? Because someone (usually me) will inevitably sneak a handful of the crushed pieces straight from the bag. Some things never change!
Your Questions, Answered!
Let’s tackle some common questions to ensure your baking success!
- Q: My cookies spread too much and got flat. What happened?
A: This is usually because the butter was too warm or you didn’t use enough flour. Make sure your butter is just softened (you can leave an indent with your finger, but it shouldn’t be melty). And double-check your flour measurement—fluff, spoon, and level! - Q: Can I make the dough ahead of time?
A: Absolutely! You can scoop the dough balls, freeze them on a baking sheet, then transfer them to a freezer bag. They’ll keep for up to 3 months. When you’re ready, bake them straight from the freezer, just adding 1-2 minutes to the baking time. - Q: My candy canes melted and bled into the dough. How do I prevent this?
A: This is a common one! The key is to make sure your candy canes are crushed, not powdered. Having small chunks helps them retain their shape. Also, avoid over-mixing once they’re in the dough, and don’t over-bake the cookies. - Q: Can I use only peppermint extract and skip the vanilla?
A: I don’t recommend it. Vanilla extract provides a warm, round base flavor that enhances the peppermint. Using only peppermint can make the flavor taste a bit one-dimensional and sharp.
A Quick Note on Nutrition
Hey, we’re all about balance here at Tasty Chow! While these are definitely a special holiday treat, I know many of you like to keep track. Here’s a general estimate per cookie (based on a yield of 3 dozen):
Estimated per cookie: 130 calories | 6g fat | 18g carbs | 1g protein
Remember, these are just estimates, and the exact numbers can vary based on the specific brands of ingredients you use and the exact size of your cookies. The most important ingredient in these, however, is the joy of baking and sharing them with people you love. So enjoy every delicious, festive bite!
Your New Holiday Tradition Awaits
And there you have it, my friend! My heart and soul poured into one perfect peppermint cookie. I truly hope this recipe brings as much laughter, warmth, and deliciousness to your kitchen as it has to mine. Baking these cookies is more than just following steps; it’s about creating memories, sharing love, and embracing the messy, joyful spirit of the season.
I would be absolutely thrilled to see your creations! If you make these (and I really hope you do), please share a picture and tag me @TastyChowEmily on social media. You’ll make my whole day. From my messy, flour-dusted kitchen to yours, happy baking and happy holidays!
With love and a full cookie jar,
Emily