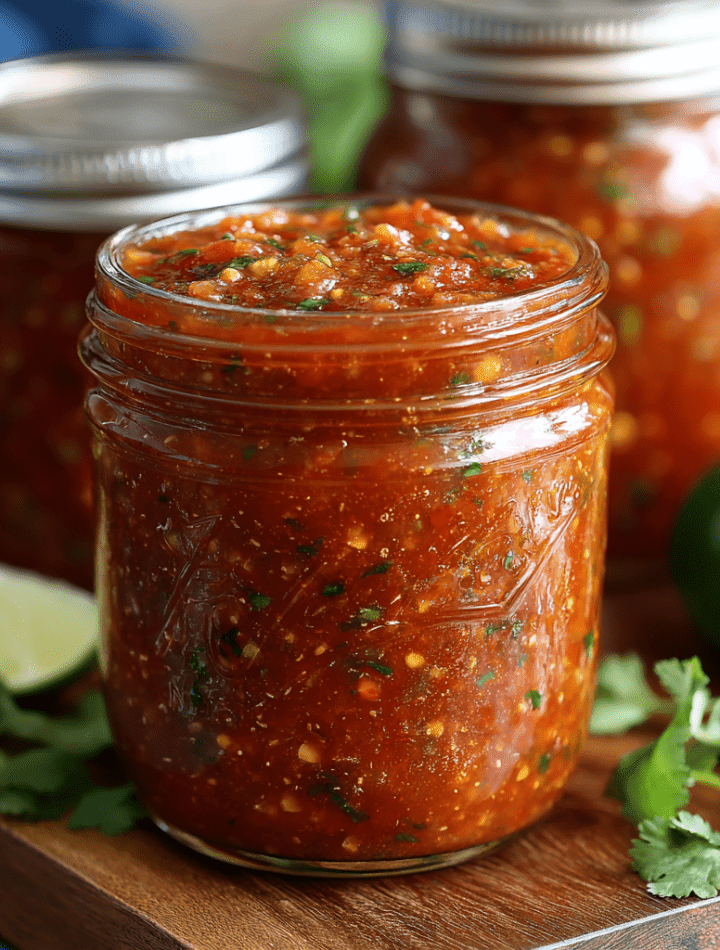
Homemade Salsa in Jars: Your New Favorite Kitchen Tradition
Hey there, friend! Pull up a chair and let’s chat for a minute. I want to talk about one of life’s simple, perfect pleasures: that moment you crack open a jar of homemade salsa. The *hiss-pop!* of the seal breaking, the bright, zesty aroma that hits you, the promise of a flavor that’s leagues beyond anything you can buy in a plastic tub. This isn’t just a recipe; it’s a jar full of sunshine, a little bit of love you can literally put on a shelf.
This particular zesty homemade salsa has become a cornerstone of my kitchen. It’s more than a condiment; it’s a tradition. The recipe was a game-changer gifted to me by my sister one Christmas, and now, it’s a ritual I share with my own kids. We crank up the music, pull out the biggest pot we own, and spend an afternoon chopping, stirring, and laughing, filling the kitchen with the most incredible smells. We make big, glorious batches that see us through taco Tuesdays, weekend football games, and last-minute snack attacks.
But the absolute best part? Gifting it. Tying a cute ribbon around a pint jar, tucking a bag of tortilla chips alongside it, and handing someone a taste of your kitchen is one of the most heartfelt gifts you can give. It says, “I made this just for you.” Whether it’s for a holiday, a hostess gift, or just a “thinking of you” surprise, this salsa is a delicious way to show you care. So, grab your favorite apron (the messy one with all the stains tells the best stories), and let’s make something delicious together!

The Salsa That Started It All: A Sister’s Gift
I’ll never forget the first time I tried this salsa. It was a chilly December evening, and my sister, Sarah, showed up at my door with a cardboard box clinking with glass. “Merry Christmas a little early,” she said with a grin. Inside were six perfect pint jars, each filled with a vibrant, ruby-red salsa. The label simply read, “Sarah’s Zesty Salsa.”
We opened one right then and there, devouring it with a bag of chips while standing over the kitchen island. It was a revelation! It had the perfect balance of tangy, spicy, and sweet, with a texture that was both chunky and saucy. I was hooked. I begged her for the recipe, and she handed me a stained, handwritten index card that I still treasure. That simple gift of food sparked a tradition. Now, every year, my kids and I make a “salsa production day.” They’re my official tomato-choppers and lime-juicers (though more lime juice ends up on their faces than in the bowl), and we laugh about the time I used a whole habanero by mistake—let’s just say we had to open all the windows! This recipe is a thread that connects my sister’s kitchen to mine, and now, I’m so thrilled to pass it on to you.
Gather Your Ingredients: Let’s Build Some Flavor!
Here’s everything you’ll need to create this salsa magic. Don’t be shy about tasting and adjusting as you go—cooking is an adventure, not a science experiment!
- 6 cups chopped tomatoes – This is your foundation! I love using a mix of ripe Roma tomatoes for their meaty, less-watery flesh and a few regular garden tomatoes for juiciness. Chef’s Insight: If fresh tomatoes aren’t in season, two 28-ounce cans of good-quality diced tomatoes (drained slightly) work beautifully and save you so much time!
- 1 ½ cups chopped onions – Yellow or white onions are perfect here, giving a robust, savory base note that mellows beautifully as it cooks.
- 1 cup chopped green bell peppers – These add a lovely, mild crunch and a touch of sweetness to balance the heat.
- ½ cup chopped jalapeños – Here’s where you control the fire! For mild salsa, remove the seeds and membranes. For a serious kick, leave them in! Substitution Tip: Swap with serrano peppers for more heat, or use poblano peppers for a smoky, gentle warmth.
- 4 cloves garlic, minced – Because what’s a great recipe without garlic? It adds that deep, aromatic flavor that makes the whole house smell incredible.
- 1/3 cup vinegar – I usually use white vinegar for its clean tang, but apple cider vinegar adds a lovely, faint fruity note that’s also delicious. This is crucial for both flavor and safe canning!
- 1 tablespoon salt – This is not just for seasoning; it’s a flavor enhancer that makes all the other ingredients pop. I use fine sea salt.
- 1 tablespoon sugar (optional) – A little secret weapon! This tiny bit of sugar doesn’t make the salsa sweet; it just rounds out the sharp edges of the acidity and tomatoes. Highly recommend!
- 1 teaspoon cumin – This is the soul of so many Tex-Mex dishes. It adds a warm, earthy, slightly smoky depth that makes this salsa taste truly authentic.
- ½ teaspoon black pepper – Freshly cracked is always best for the brightest flavor.
- ½ cup chopped fresh cilantro (optional) – I’m Team Cilantro all the way! It adds a burst of fresh, citrusy flavor. If you’re one of those folks who think it tastes like soap, just leave it out—the salsa will still be amazing.
- Juice of 1 fresh lime – Do not, I repeat, do not skip this! The bright, zesty acidity from fresh lime juice added at the end is what makes this salsa sing. Bottled lime juice just can’t compare.
Let’s Get Cooking: Your Step-by-Step Salsa Guide
Ready? Let’s transform this beautiful pile of ingredients into your new favorite condiment. I’ll walk you through every step with my favorite chef hacks to ensure your success!
- The Great Combine. Grab your largest, heaviest-bottomed pot or Dutch oven. This helps prevent scorching. Dump in your chopped tomatoes, onions, bell peppers, jalapeños, and minced garlic. Now, add the vinegar, salt, sugar, cumin, and black pepper. Chef’s Hack: Hold off on the cilantro and lime juice! We add those at the very end to keep their fresh, vibrant flavors from cooking out.
- Bring on the Bubble. Give everything a good stir to combine. Place the pot over medium-high heat and bring it to a lively boil. You’ll see bubbles breaking all across the surface. This is where the magic starts—the heat begins to break down the vegetables and meld the flavors together.
- The Simmer & Thicken. Once boiling, reduce the heat to a gentle simmer. Let it bubble away, uncovered, for 30-40 minutes. Stir it occasionally with a wooden spoon, lovingly scraping the bottom. You’ll notice the salsa slowly transforming, darkening in color and thickening to a perfect, spoonable consistency. Chef’s Tip: If you like a smoother salsa, you can use a potato masher about halfway through the simmering time to break up the chunks to your liking.
- The Grand Finale: Cilantro & Lime! After your salsa has thickened beautifully, take it off the heat. Now, stir in the fresh, chopped cilantro and the juice of that whole lime. Taste it! This is your moment. Does it need more salt? A pinch more sugar? Another squeeze of lime? Adjust it to make it perfect for your palate.
- Jarring Time (For Canning). While the salsa is simmering, wash your pint jars, lids, and bands in hot, soapy water. To sterilize, you can keep them in a simmering water bath (180°F) until you’re ready to use them. Using a ladle and a canning funnel (a lifesaver for keeping jar rims clean!), carefully fill the hot jars with the hot salsa, leaving a ½-inch of headspace at the top. Wipe the rims with a clean, damp cloth to ensure a perfect seal. Place the lids on and screw the bands on until they are fingertip-tight—don’t crank them on with all your might!
- The Water Bath. Carefully lower the filled jars into your boiling water canner, ensuring they are covered by at least 1-2 inches of water. Bring the water back to a rolling boil and process the jars for 15 minutes (adjusting for altitude if you live above 1,000 feet). After 15 minutes, turn off the heat, remove the lid, and let the jars sit in the water for 5 minutes before transferring them to a towel-lined countertop.
- The Reward: The “Ping!” As the jars cool, you’ll be serenaded by the most satisfying sound in a home cook’s kitchen: the musical “ping!” of the lids sealing. Let them rest, untouched, for 12-24 hours. Then, press the center of each lid to check the seal. If it doesn’t flex, it’s sealed! Any that didn’t seal should be refrigerated and eaten first.
How to Serve Your Masterpiece
Okay, the hard part is over (waiting for it to cool is the true test of willpower!). Now, for the fun part: eating and sharing!
For the classic experience, simply pop open a jar, grab a big bowl of sturdy, restaurant-style tortilla chips, and dig in. But don’t stop there! This salsa is a kitchen superstar. I love it spooned over grilled chicken or fish, folded into scrambled eggs for a killer breakfast taco, or used as a vibrant topping for baked potatoes. It’s the secret ingredient in my chili and makes an incredible base for a quick shakshuka.
For gifting, make it extra special! Tie a cute ribbon or a strip of burlap around the lid. Attach a handwritten tag with the name of the salsa and the date. I love creating a “Salsa Kit” gift: one pint jar of salsa, a bag of good tortilla chips, and maybe a little container of my favorite queso or guacamole seasoning mix. It’s a gift that truly comes from the heart (and the kitchen!).
Get Creative! Fun Salsa Variations
Once you’ve mastered the classic, have fun playing with the flavors! Here are a few of my favorite twists:
- Smoky Chipotle Salsa: For a deep, smoky flavor, replace the jalapeños with 2-3 canned chipotle peppers in adobo sauce (minced). It’s a game-changer for pairing with grilled meats!
- Tropical Mango-Pineapple Salsa: Reduce the tomatoes to 4 cups and add 2 cups of diced fresh mango and pineapple along with the other ingredients. Perfect for summer parties and fish tacos!
- Roasted Salsa Roja: Before chopping, place the tomatoes, onions, and jalapeños on a baking sheet and broil for 10-15 minutes, turning occasionally, until charred in spots. This adds an incredible, complex smokiness.
- “Creamy” Avocado Salsa (Not for Canning): For a fresh, immediate-use salsa, blend one ripe avocado with 2 cups of your finished, cooled salsa until smooth. It’s rich, creamy, and utterly addictive—but must be eaten within a day or two.
Chef Emily’s Extra Notes & Kitchen Confessions
This recipe has evolved so much since that first stained index card from my sister. I’ve learned that a splash of olive oil stirred in at the end (for non-canned jars) adds a lovely richness. I’ve also learned, the hard way, to always wear gloves when chopping super-hot peppers—I once rubbed my eye after handling jalapeños and let me tell you, that’s a mistake you only make once!
The beauty of this recipe is its flexibility. It’s a forgiving, friendly formula that welcomes your personal touch. Don’t be afraid to make it your own. That’s what home cooking is all about.
Salsa SOS: Your Questions, Answered!
I’ve made this salsa a zillion times, and I’ve answered just as many questions from friends and family. Here are the most common ones:
- Q: My salsa turned out too runny. What happened?
A: This usually means the salsa needed a longer simmer to evaporate more liquid. Next time, let it simmer for an extra 10-15 minutes. For this batch, you can drain off a little liquid, or use a slotted spoon to serve it. It’s still delicious! - Q: Why is my salsa bitter?
A: Bitterness can come from the tomato seeds or the white pith inside the peppers. Try seeding your tomatoes and peppers more thoroughly next time. Also, that pinch of sugar is a great bitterness-balancer! - Q: Do I HAVE to process it in a water bath? Can’t I just put it in the fridge?
A: You absolutely can skip the canning process! Just let the salsa cool completely, then ladle it into clean jars and store it in the refrigerator. It will keep beautifully for 2-3 weeks. The water bath canning is only necessary for long-term shelf-stable storage. - Q: One of my jars didn’t seal! What do I do?
A: No panic required! Just pop that jar in the fridge and label it “EAT ME FIRST.” It’s still perfectly good; it just needs to be refrigerated and consumed within a few weeks. Check the rim of the jar for any tiny nicks or cracks that might have prevented a seal.
A Quick Peek at the Good Stuff (Nutritional Info)
I’m all about balance—indulgent cheesy casseroles and light, vibrant bites. This salsa definitely falls into the “feel-good” category! It’s packed with fresh vegetables and is naturally low in calories and fat. Here’s a general breakdown per 2-tablespoon serving:
- Calories: ~10
- Carbohydrates: 2g
- Fat: 0g
- Sugar: 1g
- Sodium: 90mg
Remember, this is a rough estimate and can vary based on the exact size and variety of your ingredients. But the bottom line? It’s a guilt-free way to add a massive punch of flavor to just about anything!
Final Thoughts: A Jar Full of Love
And there you have it, my friend! My heart-on-a-sleeve, all-in, everything-you-need-to-know recipe for Homemade Salsa in Jars. This recipe represents everything I love about cooking: connection, tradition, and the simple joy of sharing something you made with your own two hands.
I hope this recipe finds a happy home in your kitchen, becomes a part of your own family traditions, and brings as much joy to your table as it has to mine. Now, I’d love to hear from you! Tag me @TastyChow on social media when you make your batch—I want to see your beautiful jars! Tell me, what’s your favorite thing to eat with salsa?