Creamy Cottage Cheese Ice Cream: Your New High-Protein Dessert Obsession
Hey there, my fellow flavor fanatic! Let me ask you a question. Have you ever been staring into the freezer, craving something cold, creamy, and utterly indulgent, only to be met with the sad reality of sugary pints that leave you feeling, well… kind of blah? You want that satisfying spoonful of joy, but you also want to feel amazing *after* you eat it. If you’re nodding your head, my friend, you have just stumbled upon your new dessert soulmate.
Get ready to have your mind (and your taste buds) completely blown. This isn’t just another “nice try” healthy dessert. This is a game-changer. We’re making the dreamiest, creamiest, no-churn ice cream that just so happens to be packed with protein and sweetened with all-natural goodness. The secret weapon? Cottage cheese. I know, I know! But trust me—when blitzed in a high-speed blender, it transforms into the most luxuriously smooth and neutral base you can imagine. It’s the perfect blank canvas for our flavor adventures.
This Cottage Cheese Ice Cream is my go-to for a post-workout treat, a late-night snack that doesn’t haunt me with guilt, or a simple “I deserve something wonderful” moment. It comes together in just 10 minutes with 5 clean ingredients you can feel great about. So, grab your blender and your favorite apron—it’s about to get deliciously creamy in here.
The Happy Accident That Started It All
This recipe was born from a classic “Emily in the kitchen” moment. Picture this: It was a sweltering summer afternoon, and I had a serious hankering for my favorite frozen yogurt. I raced to the freezer, flung open the door… and found an empty container. The tragedy! But I had a mission. My eyes landed on a tub of cottage cheese I’d been using for my morning toast. A wild, slightly crazy thought popped into my head: “What if…?”
It reminded me of my grandma, who always said cottage cheese with a drizzle of honey and some peaches was nature’s perfect dessert. I thought, let’s just take that idea and run with it—straight to the blender and into the freezer. I threw in that cottage cheese, a generous glug of maple syrup, a splash of vanilla, and gave it a whirl. The sound it made was… promising. I poured the silky mixture into a pan, crossed my fingers, and waited. A few hours later, I scooped out a spoonful. Friends, it was a revelation. It was cool, creamy, subtly sweet, and had that perfect melt-in-your-mouth quality of soft-serve. I literally did a little happy dance right there in my kitchen. And just like that, a star was born.
Gather Your Dream Team: Just 5 Simple Ingredients
This is the beautiful part. You don’t need a long grocery list or any fancy, hard-to-find items. This recipe is all about letting a few superstar ingredients shine. Here’s your lineup:
- 2 cups Cottage Cheese: This is our MVP! I recommend using a good-quality, full-fat (4% milkfat) cottage cheese for the ultimate creamy texture and rich flavor. The fat content is your friend here! However, low-fat works too if that’s your preference. Just make sure it’s not non-fat, as we need a little fat for that luscious mouthfeel.
- ¼ cup Sugar-Free Maple Syrup or Raw Honey: Our natural sweeteners. The maple syrup gives a beautiful, deep flavor and keeps the recipe refined sugar-free. Raw honey adds a lovely floral note. If you don’t need it to be sugar-free, regular maple syrup works perfectly!
- 1 tsp Vanilla Extract: The quintessential flavor enhancer. Don’t skip this! A good quality vanilla adds a warm, aromatic depth that makes the ice cream taste truly special. For a fun twist, you could use vanilla bean paste to get those gorgeous little specks throughout.
- 2 tbsp Creamy Almond Butter or Peanut Butter: This is our magic trick for added creaminess and a hint of nutty flavor. It helps create a richer, more ice cream-like consistency. Feel free to use any nut or seed butter you love—sunflower seed butter would be fantastic for a nut-free version!
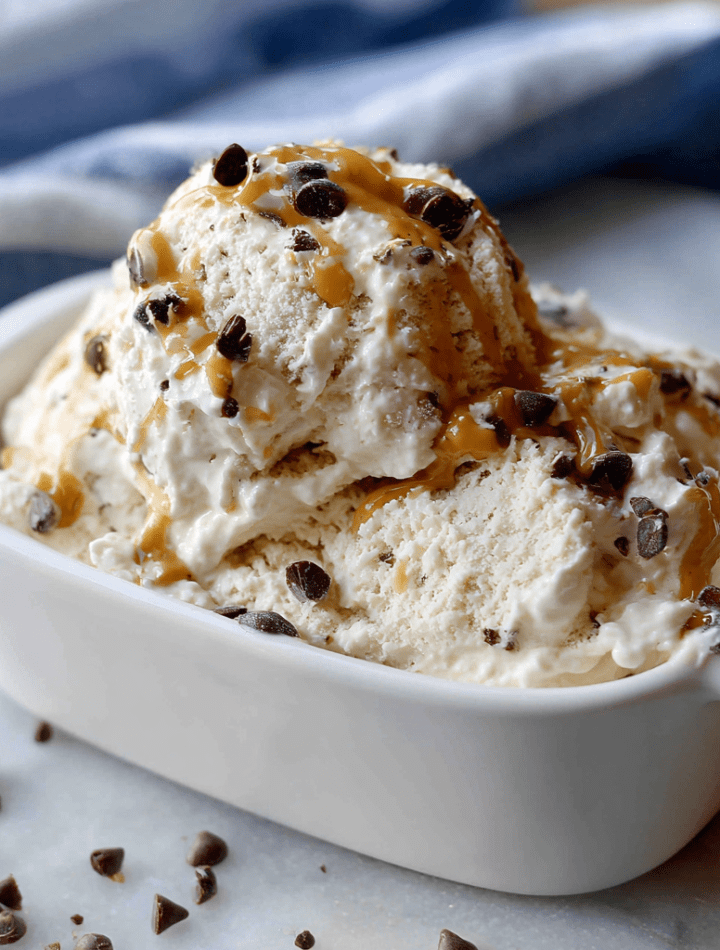
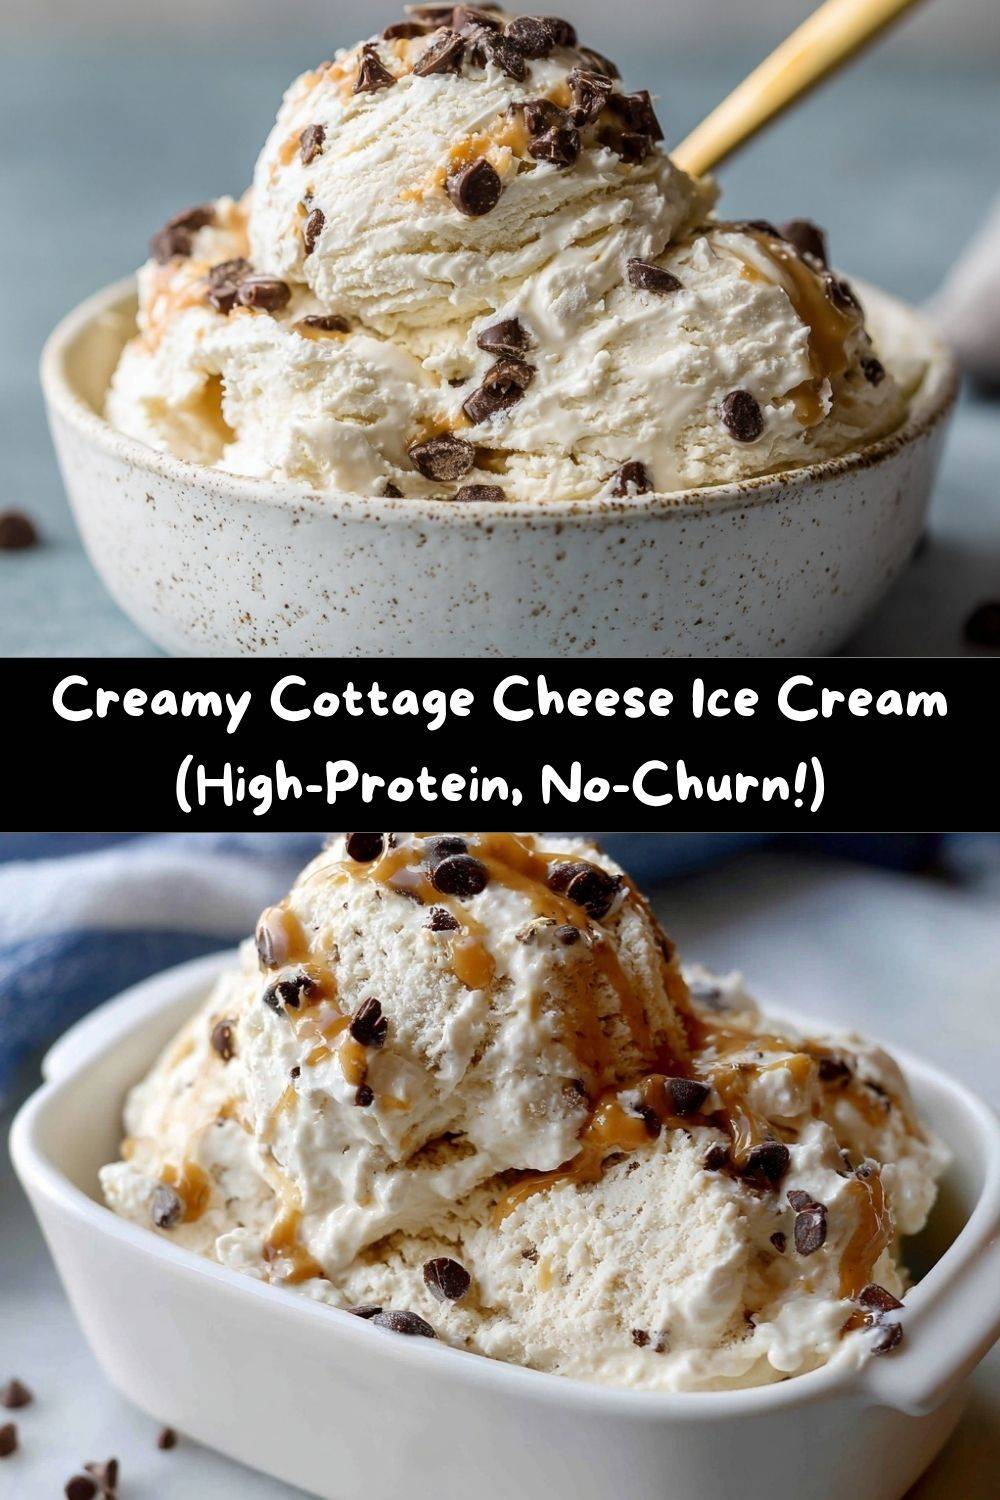
- ⅓ cup Sugar-Free Chocolate Chips: A little textural contrast for that classic chocolate chip ice cream experience. I love the sugar-free ones to keep things clean, but regular mini chocolate chips, cacao nibs, or even chopped dark chocolate are all fabulous choices.
Let’s Make Some Magic: Your Foolproof Steps to Ice Cream Heaven
I promise, this is easier than waiting in line at an ice cream shop. We’re going from zero to hero in three simple steps: Blend, Mix, Freeze. Let’s do this!
- Blend Until Silky Smooth. Add your cottage cheese, maple syrup (or honey), vanilla extract, and almond butter straight into the pitcher of a high-speed blender or the bowl of a food processor. Now, here’s my number one chef hack for this recipe: BLEND LONGER THAN YOU THINK YOU NEED TO. I’m talking a solid 60-90 seconds on high. You want to whip it until it’s completely, utterly smooth, with no graininess whatsoever. Stop and scrape down the sides once or twice to make sure everything gets incorporated. This patience is the secret to a perfectly creamy final product, I promise!
- Stir in Your Goodies. Once your base is velvety and dreamy, pour it into a medium bowl. Now, grab a spatula and gently fold in those glorious chocolate chips. Folding, rather than stirring aggressively, ensures they stay intact and are evenly distributed. This is also the time to get creative—if you’re adding any other mix-ins like crushed nuts or berries, now’s the time!
- Freeze to Perfection. Pour your beautiful ice cream mixture into a loaf pan or any freezer-safe container with a lid. A loaf pan is my go-to because it creates the perfect depth for scooping. Smooth the top with your spatula, pop on the lid (or cover tightly with plastic wrap), and tuck it into the freezer. Let it work its magic for 2-3 hours. You’re aiming for firm but scoopable—this isn’t a rock-hard ice cream!
- The Grand Finale: The Scoop! When you’re ready to serve, here’s another little pro-tip: take the ice cream out of the freezer and let it sit on the counter for 5-10 minutes before you try to scoop it. This allows it to soften just enough to get that perfect, creamy, soft-serve-like texture that will make you swoon.
How to Serve Your Masterpiece
You can absolutely eat this straight from the container with a spoon (no judgment here!), but why not make it an event? A little presentation goes a long way in making a healthy treat feel truly decadent.
I love scooping a generous portion into a chilled bowl or a fancy waffle cone. Then, it’s topping time! A light drizzle of warm peanut butter, a sprinkle of flaky sea salt, and a few fresh raspberries create an incredible sweet-and-salty situation. For a classic sundae, go for a dollop of whipped coconut cream, a handful of chopped toasted almonds, and an extra shower of chocolate chips. If you’re feeling fruity, pile on some sliced strawberries or caramelized peaches. The possibilities are endless, so have fun with it!
Shake Things Up! 5 Delicious Twists to Try
Once you’ve mastered the classic chocolate chip version, the flavor world is your oyster! This base recipe is incredibly versatile. Here are a few of my favorite riffs:
- Cookies & Cream: After blending the base, fold in ½ cup of crushed gluten-free or regular Oreo-style cookies for that nostalgic childhood favorite.
- Strawberry Cheesecake: Add ⅓ cup of freeze-dried strawberry powder to the blender with the other ingredients. After pouring into the pan, swirl through 2 tablespoons of sugar-free strawberry jam and a handful of crushed gluten-free graham crackers.
- Mocha Chip: For the coffee lovers! Add 1-2 tablespoons of instant espresso powder or strongly brewed, cooled coffee to the blender. Fold in dark chocolate chips for a sophisticated mocha kick.
- Blueberry Muffin: Fold in ⅓ cup of dried blueberries and a teaspoon of cinnamon into the base. It tastes just like a baked good in ice cream form!
- Piña Colada: Swap the vanilla extract for coconut extract, use ¼ cup of canned coconut milk instead of the nut butter, and fold in ⅓ cup of finely chopped dried pineapple and unsweetened shredded coconut.
From My Kitchen to Yours: A Few Parting Tips
This recipe has become such a staple in my house that I almost always have a batch in the freezer. It’s evolved a bit since that first happy accident—I found that adding the nut butter made it even creamier and less prone to iciness. My husband, who was initially *very* skeptical of the cottage cheese concept, is now its biggest fan and requests it weekly. The funniest part? I once brought it to a potluck and didn’t tell anyone the secret ingredient until they’d all raved about it. The looks on their faces were priceless! It just goes to show that sometimes, the most unexpected ingredients create the most beloved dishes.
Your Questions, Answered!
I’ve made this recipe more times than I can count, and I’ve heard all your wonderful questions. Here are the most common ones:
- My ice cream turned out icy, not creamy. What happened? The most common culprit is not blending the cottage cheese long enough. You really need to whip it until it’s completely smooth. Another reason could be using a low-fat or non-fat cottage cheese, which has a higher water content. Full-fat is always best for creaminess!
- Can I make this dairy-free? Absolutely! While I haven’t found a perfect 1:1 substitute for the cottage cheese, a great dairy-free option is to use 1 (13.5 oz) can of full-fat coconut cream (chilled) blended with ¼ cup maple syrup and 1 tsp vanilla. It won’t be high-protein, but it will be deliciously creamy and dairy-free!
- Do I need an ice cream maker? Nope! That’s the beauty of this “no-churn” method. Your blender and freezer do all the work. No fancy equipment required.
- How long does it keep in the freezer? It’s best enjoyed within 1-2 weeks. After that, it can start to form ice crystals. For the best texture, I recommend eating it within the first few days!
Let’s Talk Nourishment
Now, I’m a chef, not a registered dietitian, so please take these numbers as a friendly estimate. The exact values will depend on the specific brands of ingredients you use. But here’s the general breakdown per serving (assuming the recipe makes 4 servings):
Per Serving (approx.): Calories: 220 | Fat: 13g | Carbs: 10g | Sugar: 5g (natural) | Protein: 14g | Fiber: 2g
What I love about this is that you’re getting a fantastic dose of protein from the cottage cheese, which helps keep you full and satisfied. The fats from the nut butter are healthy and satiating, and the sugars are all naturally occurring from the maple syrup or honey, without any refined sugars. It’s a treat that truly nourishes your body while delighting your senses.
Ready, Set, Scoop!
And there you have it! Your new secret weapon for a healthy, delicious, and unbelievably easy frozen treat. This Creamy Cottage Cheese Ice Cream is proof that you don’t have to choose between flavor and feeling good. It’s a recipe built for real life—busy schedules, big cravings, and happy bellies.
I am so incredibly excited for you to try this. When you do, please come back and tell me all about it! Leave a comment below or tag me on social @TastyChow—I love seeing your kitchen creations. Now, go forth and blend your way to happiness. Your spoon is waiting!
With a full heart and a happy spoon,
— Emily