The Ultimate Italian Meatball Sub: A Warm, Cheesy Hug on a Roll
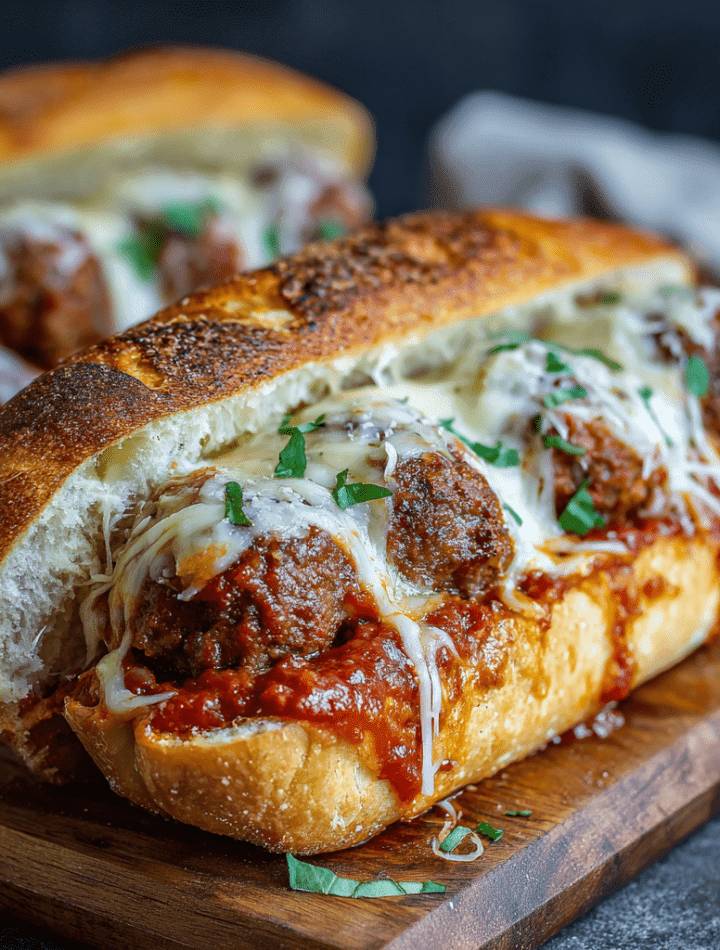
Hey there, friend! Let’s talk about one of life’s greatest simple pleasures. We’re not talking about a fancy, fussy, ten-course meal. Nope. Today, we’re diving headfirst into the glorious, messy, and utterly irresistible world of the Italian Meatball Sub. Picture this: tender, homemade meatballs, seasoned with love and simmered in a rich, garlicky marinara. They’re piled high into a crusty, toasted roll and smothered with a blanket of melty, bubbly mozzarella cheese. One bite and you’re transported to a place of pure comfort.
This isn’t just a sandwich; it’s an experience. It’s the kind of meal that brings everyone to the table, no questions asked. It’s perfect for a busy weeknight when you need a hero dinner, for game day when you want to be the MVP of the snack table, or for a weekend feast that feels special without any of the stress. As a chef who has made more meatballs than I can count, I can tell you with confidence: the homemade version, with a few simple tricks, absolutely blows the deli counter out of the water. So, tie on your apron (embrace the mess, I always do!), and let’s make something truly delicious together.

A Sunday Supper Memory
My love affair with meatball subs started long before culinary school, in my grandma’s kitchen that always smelled like garlic and basil. Sundays were for sauce. She’d start a big pot of her marinara in the morning, letting it bubble away all afternoon until the whole house felt warm and welcoming. The real magic happened when she’d gently lower her giant, perfectly seasoned meatballs into that crimson sea. My brother and I would hover, hoping for a “tester” meatball straight from the pot.
She’d always save a few meatballs, some extra sauce, and a loaf of crusty Italian bread for our favorite post-church treat. She’d assemble these open-faced masterpieces, cheese melting into every nook and cranny, and broil them until they were golden perfection. We’d eat them at the kitchen counter, sauce inevitably dribbling down our chins, and life felt simple and good. This recipe is my homage to those Sundays—a little nod to Grandma and her belief that the best food is food shared with love.
Gathering Your Flavor Arsenal
Here’s everything you’ll need to create these epic subs. Don’t be intimidated by the list—a lot of it is pantry staples, and I’ve included my best chef tips and swaps to make it your own!
For the Meatballs (The Heart of the Operation!):
- 3 lbs ground beef (80/20): The 80/20 blend is my gold standard here. That bit of fat keeps the meatballs incredibly juicy and flavorful as they bake. If you use a leaner blend, they might be a tad drier.
- 2 tsp kosher salt & 1 tsp black pepper: The essential foundation of seasoning. Don’t be shy!
- 1 tsp garlic powder: While we use fresh garlic in the sauce, a little powder in the meat mixture gives a consistent, mellow garlicky base note.
- 2 large eggs: Our binder! They hold everything together so your meatballs don’t fall apart in the sauce.
- 1 ½ cups Panko breadcrumbs: I love Panko for its light, airy texture that makes for a tender meatball, not a dense one. Chef’s Tip: If you only have traditional breadcrumbs, that’s fine! You might need a touch less.
- 1 ½ cups freshly grated Parmesan cheese: Please, please, please grate it yourself! The pre-shredded stuff in a bag contains anti-caking agents that can make it grainy and less melty. Freshly grated Parm melts right into the meatballs, adding a salty, nutty, umami punch.
- ½ cup fresh Italian parsley, chopped: This adds a pop of fresh, herbaceous flavor that brightens up the whole party.
- Optional: 1 tsp Italian seasoning or dried oregano & ½ tsp red pepper flakes: These are your flavor boosters! The Italian seasoning deepens the herbal profile, and the red pepper flakes add a subtle, welcome heat.
For Assembly (The Grand Finale!):
- 48–64 oz marinara sauce: Use your favorite high-quality jarred sauce to save time, or go all-out with your own homemade recipe. No judgment here!
- 4 cups shredded mozzarella cheese: For that iconic, stretchy, cheesy pull. Low-moisture, whole-milk mozzarella is best for melting.
- 8 sub rolls or a loaf of French bread: Get the good, crusty stuff! A sturdy roll is essential to hold up to the saucy, cheesy goodness without getting soggy.
- 4 tbsp butter or garlic butter: For toasting the rolls. Garlic butter, of course, adds an extra layer of flavor heaven.
- Optional toppings: Get creative! I love roasted red peppers for sweetness, pickled onions for a tangy crunch, or a handful of fresh basil for a fragrant finish.
Let’s Get Cooking: Building the Perfect Sub, Step-by-Step
Ready to make some magic? Follow these steps, and you’ll be a meatball sub master in no time.
- Preheat and Prep: Fire up your oven to 375°F (190°C). Line a large, rimmed baking sheet with parchment paper. This is a lifesaver for easy cleanup! Chef’s Hack: If you have a wire rack, place it on the baking sheet. This lets the hot air circulate around the meatballs, helping them brown evenly on all sides.
- Mix the Meatballs (With Love, Not Overwork!): In a large bowl, add your ground beef, salt, pepper, garlic powder, eggs, Panko, Parmesan, parsley, and any optional seasonings. Now, here’s the secret to tender meatballs: use your hands to mix everything together, but stop as soon as the ingredients are just combined. Overmixing is the enemy—it makes the meatballs tough. It should be a uniform mixture, but not pasty.
- Form and Bake: Using your hands or a handy scoop, portion the mixture and roll it into 1.5-inch balls. You should get about 24-32 meatballs. Place them on your prepared baking sheet, giving them a little space to breathe. Bake for 20-22 minutes, until they’re beautifully browned and cooked through. Baking them instead of pan-frying is my preferred method—it’s hands-off, less messy, and they cook so evenly!
- Simmer in Sauce: While the meatballs are baking, pour your marinara sauce into a large skillet or saucepan and warm it over medium-low heat. Once the meatballs are out of the oven, gently transfer them into the simmering sauce. Let them cozy up in there for 5-10 minutes. This allows the meatballs to soak up some of that saucy flavor, making them even more incredible.
- Toast the Rolls: Don’t skip this step! Split your sub rolls and generously butter the insides. You can toast them in the oven for a few minutes (while it’s still hot from the meatballs) or in a skillet on the stovetop until they’re golden and crisp. This creates a protective barrier against the sauce, ensuring your sub has a satisfying crunch and doesn’t get soggy.
- The Big Assembly: Now for the fun part! Place your toasted rolls on a clean baking sheet. Using a slotted spoon, load each roll with 3-4 saucy meatballs. Don’t be afraid to pack them in! Spoon a little extra sauce over the top, but don’t drown them—you want a saucy sub, not a soup sandwich.
- The Cheesy Blanket: Pile a generous handful of shredded mozzarella over the meatballs on each sub. This is where you get to be generous. If you’re using any other toppings like roasted red peppers, now’s the time to add them under the cheese.
- Broil to Perfection: Switch your oven to Broil. Place the assembled subs on the middle rack and broil for 2-3 minutes. WATCH THEM CLOSELY! The broiler works fast. You’re waiting for that magical moment when the cheese is completely melted, bubbly, and spotted with gorgeous golden-brown bits.
- The Grand Finale: Carefully remove your masterpiece from the oven. Let them rest for just a minute (the cheese is molten lava hot!). Then, garnish with a sprinkle of fresh chopped basil or an extra dusting of Parmesan. Serve immediately and accept the compliments!
How to Serve Your Masterpiece
Presentation is part of the fun! I like to serve these subs right on the baking sheet, lined with parchment or a clean kitchen towel, for a casual, “dig in!” family-style vibe. For individual plates, I always recommend a sheet of deli paper or parchment underneath the sub—it keeps the plate clean and makes it easier to handle.
What to serve on the side? You can’t go wrong with a simple, crisp green salad with a sharp vinaigrette to cut through the richness. For the ultimate comfort food spread, classic garlic bread (because more bread is always a good idea) or a pile of crispy potato wedges or oven-baked fries are absolutely perfect. And don’t forget plenty of napkins—this is a proudly messy affair!
Make It Your Own: Delicious Twists & Swaps
The beauty of this recipe is its versatility. Here are a few of my favorite ways to mix it up:
- The “Triple Threat” Meatball: Use a blend of 1 lb ground beef, 1 lb ground pork, and 1 lb ground veal or Italian sausage (casings removed) for an incredibly deep, complex flavor. This is the classic Italian-American trifecta!
- Turkey or Chicken Twist: For a lighter option, swap the ground beef for lean ground turkey or chicken. To keep them moist, add an extra tablespoon of olive oil to the meatball mixture.
- Spicy Arrabbiata Style: Love heat? Use a spicy Arrabbiata sauce instead of classic marinara, and don’t forget the optional red pepper flakes in the meatballs! Top with sliced pepperoncini for an extra kick.
- The “Parmesan Crisp” Upgrade: Before adding the mozzarella, sprinkle a little extra grated Parmesan directly onto the meatballs and sauce. When it broils, it creates an incredible, crispy, cheesy layer on top of the gooey mozzarella.
- Low-Carb/Veggie-Packed: Skip the roll and serve your saucy, cheesy meatballs over a bed of zucchini noodles (“zoodles”), spaghetti squash, or even a creamy polenta for a cozy, satisfying bowl.
Chef Emily’s Kitchen Notes
This recipe has been a staple in my kitchen for years, and it’s evolved with me. I used to be a strictly pan-fry meatball person until one hectic night I threw them in the oven out of desperation. The result was so much easier and just as delicious—it was a total game-changer! Another funny fail: I once tried to use all breadcrumbs and no egg, thinking I could skip a step. Let’s just say we had “Italian Meatball Crumbles” instead of subs that night. A delicious, if not structurally sound, lesson learned. The egg is non-negotiable for hold-together-ness!
Your Questions, Answered!
Here are answers to some common questions I get about this recipe.
Q: Can I make the meatballs ahead of time?
A: Absolutely! You can form the raw meatballs and keep them covered in the fridge for up to 24 hours before baking. You can also bake them, let them cool completely, and freeze them in a single layer on a baking sheet before transferring to a freezer bag. They’ll keep for up to 3 months. Simmer them frozen in the sauce, just add a few extra minutes.
Q: My meatballs are tough. What happened?
A: The most common culprit is overmixing. When you work the meat mixture too much, the proteins tighten up, leading to a denser, tougher texture. Mix just until combined, and you’ll be golden.
Q: The sub got soggy. How can I prevent this?
A: Two key steps: 1) TOAST YOUR ROLL! This is your #1 defense. 2) Don’t over-sauce the sub before the final broil. A moderate amount of sauce is perfect; you can always serve extra on the side for dipping.
Q: Can I use a different cheese?
A: Of course! While mozzarella is classic, a blend of mozzarella and provolone is fantastic for a sharper flavor. Fontina is also a dream for its amazing meltability.
Nutritional Information (Per Sub, Approximate)
Hey, we’re all about balance here! This is a hearty, satisfying meal, and it’s helpful to know what you’re enjoying. This information is an estimate based on the specific ingredients listed.
- Calories: 690 kcal
- Protein: 38g (Great for muscle repair and keeping you full!)
- Carbohydrates: 45g (Fuel for your day!)
- Fat: 38g
- Saturated Fat: 15g
- Cholesterol: 150mg
- Sodium: 1250mg (If you’re watching sodium, you can reduce the salt in the meatballs and use a low-sodium marinara.)
- Calcium: 350mg (Thank you, all that cheese!)
- Iron: 4mg
Final Tasty Thoughts
And there you have it, my friend! Your very own guide to creating the most unforgettable, soul-satisfying Italian Meatball Subs right in your kitchen. This recipe is built on love, good ingredients, and a few simple chef secrets. It’s meant to be shared, to be messy, and to bring a whole lot of joy to your table.
I hope this recipe becomes a new favorite in your home, creating its own set of delicious memories. If you make it, I’d be absolutely thrilled if you tagged me @TastyChow on social media so I can see your beautiful creations! Now, go forth and chow down.
With love and a full belly,
Chef Emily


