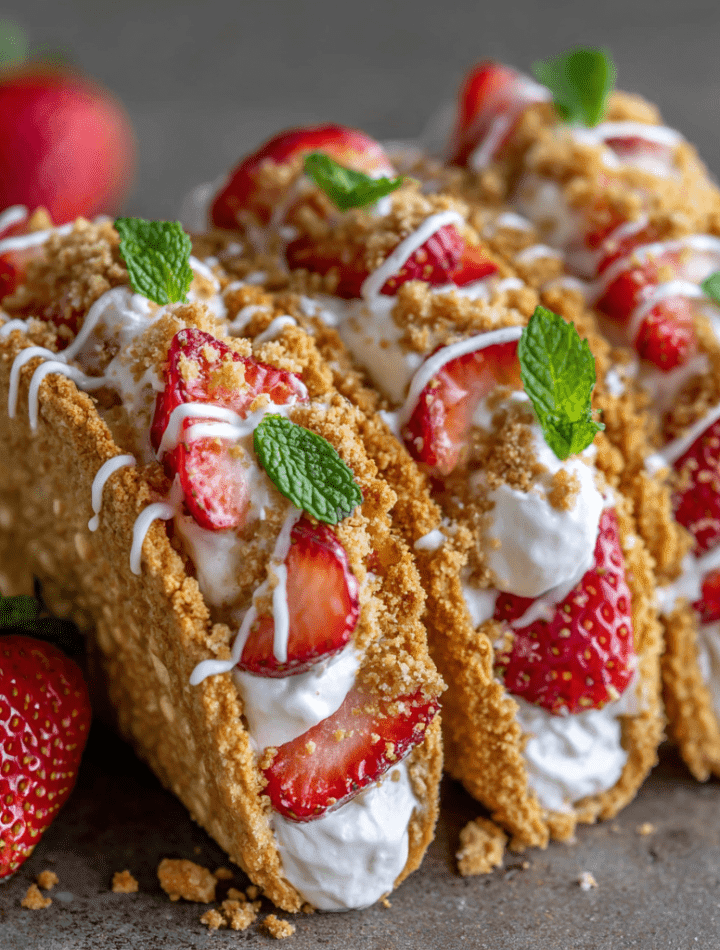
Strawberry Crunch Cheesecake Tacos: Your New Favorite No-Bake Dessert!
Hey there, friends! Chef Emily here, coming to you from my wonderfully flour-dusted kitchen. Is it just me, or is there something magical about a dessert that breaks all the rules? We love a classic cheesecake, but sometimes, you want something a little more playful, a little more hands-on, and a whole lot more fun. That’s exactly why I’m so utterly obsessed with these Strawberry Crunch Cheesecake Tacos.
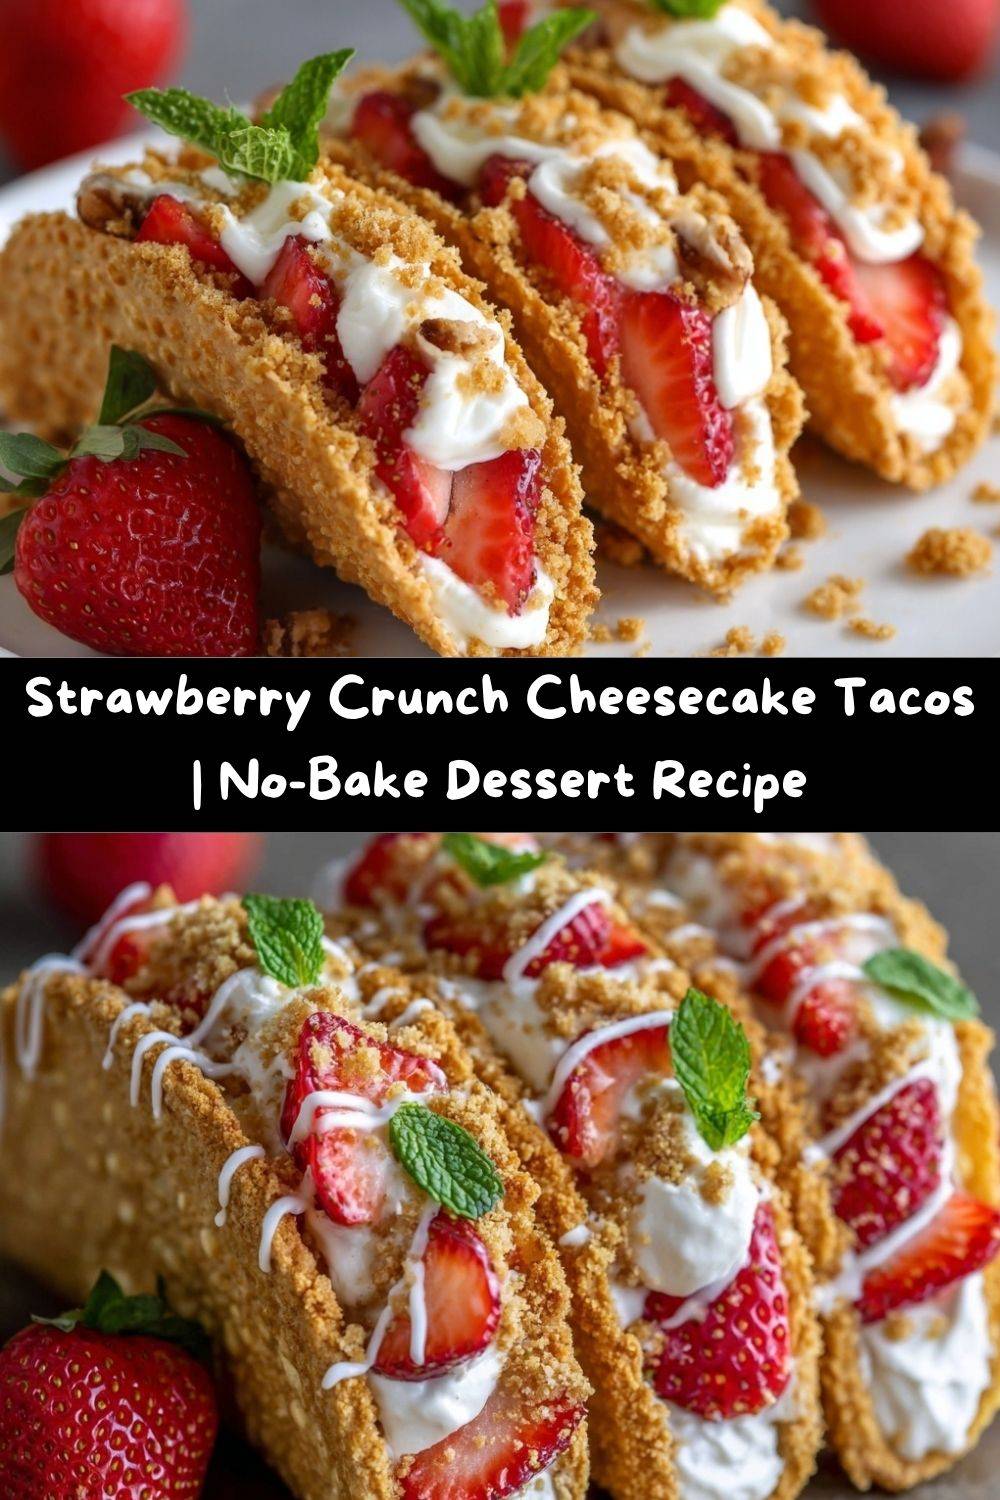
Imagine this: a sweet, golden, graham cracker shell that shatters with a delightful crunch. Inside, you’ll find the creamiest, dreamiest no-bake strawberry cheesecake filling, bursting with fresh berry flavor and a hint of sunny lemon zest. And because we believe more is more, we’re finishing it all off with a drizzle of luxurious white chocolate. This is the kind of dessert that makes you feel like a kid at a summer fair and a fancy pastry chef all at once.
The best part? You don’t even have to turn on your oven. These adorable, handheld treats are perfect for beating the summer heat, impressing guests at your next BBQ, or just treating yourself because, well, it’s Tuesday! They’re the ultimate crowd-pleaser, combining everything we love—creamy, fruity, crunchy, and sweet—into one irresistible, taco-shaped package. So, tie on your favorite apron (the one with the strawberry stains, it tells a story!), and let’s make something deliciously unforgettable together.
A Sweet Slice of Nostalgia
This recipe didn’t just pop into my head out of nowhere. It’s a love letter to my childhood summers, specifically to those iconic strawberry shortcake ice cream bars I’d trade my favorite trading cards for. You know the ones—the vanilla ice cream coated in that impossibly good, crumbly, strawberry-speckled shell.
I can still picture myself, about eight years old, sitting on my grandma’s back porch steps, trying to eat one faster than the sun could melt it. That combination of creamy, cold, and crunchy was a revelation. This cheesecake taco is my grown-up, slightly more sophisticated (but still super fun!) homage to that memory. It captures that same joyful spirit but lets us play with textures and flavors in our own kitchen. It’s my way of wrapping up that feeling of pure, uncomplicated summer joy and sharing it with you.
Gathering Your Taco Toolkit: The Ingredients
Don’t you just love a recipe with a simple, straightforward ingredient list? Every component here has a job to do, creating a perfect symphony of flavor and texture. Let’s break it down.
- 16 oz Cream Cheese, softened: This is the star of our creamy filling. Pro Chef Tip: Please, please let it come to room temperature! This is the #1 secret to a lump-free, silky-smooth cheesecake filling. If it’s cold, you’ll end up with a chunky mess, and we’re going for cloud-like fluffiness.
- 1 cup Granulated Sugar: Sweetens the deal perfectly. You can reduce this by a couple of tablespoons if your strawberries are super sweet, but this amount gives us that classic cheesecake balance.
- 2 tsp Vanilla Extract: The flavor backbone. It enhances the cream cheese and strawberry flavors beautifully. For a real treat, try using vanilla bean paste—you’ll see those lovely little specks throughout your filling!
- ½ cup Heavy Cream: This is our magic wand for lightness. When we whip it into the cream cheese, it introduces air and volume, transforming the filling from dense to dreamily fluffy.
- 2 cups Fresh Strawberries, finely chopped: The fruity heart of the recipe! Using fresh berries gives us that bright, authentic flavor and a lovely little pop of texture. If you’re in a pinch, thawed frozen strawberries will work, but be sure to pat them VERY dry to avoid a runny filling.
- Zest of 1 Lemon: My secret weapon! A little lemon zest doesn’t make the tacos taste lemony; it just makes the strawberry flavor sing brighter and cuts through the richness. Don’t skip it!
- 3 cups Graham Cracker Crumbs: The foundation of our crunchy taco shells. You can buy them pre-crumbed or smash up whole crackers in a zip-top bag. It’s a fantastic way to get out any kitchen frustrations!
- ½ cup Unsalted Butter, melted: This is the glue that holds our taco shells together. Using unsalted butter lets us control the salt level perfectly.
- ½ cup Chopped Toasted Pecans (optional): I love adding these for a deeper, nutty flavor and extra crunch. If you have a nut allergy or just aren’t a fan, feel free to leave them out—the tacos will still be incredible.
- ½ cup White Chocolate Chips, melted (for drizzle): This is the elegant finishing touch. The creamy, sweet white chocolate pairs perfectly with strawberry and makes these look professionally decorated.
- Extra Strawberries & Mint Leaves for Garnish (optional): A little fresh berry and a pop of green mint make these tacos look absolutely stunning on a platter. We eat with our eyes first!
Let’s Build These Beautiful Tacos: Step-by-Step
Ready for the fun part? This is where we roll up our sleeves and get a little creative. Don’t worry if your first taco shell isn’t perfect—mine weren’t either! They all taste amazing.
- Make the Taco Shells: In a medium bowl, combine your graham cracker crumbs, melted butter, and toasted pecans (if using). Mix it with a fork until it resembles wet sand and holds together when you pinch it. Now, for the shaping! You have two easy options: Chef’s Hack #1: Turn a standard muffin tin upside down. Spoon the crumb mixture over the space between two muffin cups, molding it with your fingers into a cute, sturdy taco shell shape. Chef’s Hack #2: If you have a mini taco mold, that works perfectly too! Press the mixture firmly into the molds. Once all your shells are formed, carefully transfer the entire tin/mold to the fridge to chill for at least 20 minutes. This sets the butter and makes the shells firm and easy to handle.
- Prepare the Filling: While the shells are chilling, let’s make the glorious filling. In a large bowl, beat the room-temperature cream cheese and granulated sugar together with an electric mixer on medium speed until it’s completely smooth and lump-free. This should take about 2-3 minutes. Scrape down the sides of the bowl. Now, add the vanilla extract, lemon zest, and heavy cream. Chef’s Hack #3: Turn your mixer to medium-high and beat for another 2-3 minutes. Watch as it transforms into a light, whipped, and fluffy cloud of deliciousness. Finally, switch to a spatula and gently fold in the finely chopped strawberries. We fold to keep all that air we just whipped in!
- Assemble the Tacos: Take your chilled taco shells out of the fridge. They should be firm and hold their shape. Now, carefully remove them from the muffin tin or mold. Chef’s Hack #4: For a super pretty look, spoon your filling into a large piping bag (or a zip-top bag with the corner snipped off) and pipe it generously into each shell. If you’re not into piping, just carefully spoon it in. Don’t be shy—fill them right up!
- Chill and Garnish: Place your assembled cheesecake tacos on a tray or platter and refrigerate them for at least 2 hours. This crucial step allows the flavors to meld and the filling to set up perfectly. Right before serving, melt your white chocolate chips in the microwave in 20-second bursts, stirring each time. Drizzle it artistically over the tacos and garnish with a fresh strawberry slice and a tiny mint leaf. Voilà!
How to Serve & Wow Your Guests
Presentation is half the fun with these tacos! I love serving them on a large, rustic wooden board or a bright, colorful platter. Arrange them in a sunburst pattern so everyone can see their beautiful filling. For a real “wow” factor, place the platter in the center of the table and watch eyes light up.
These are the ultimate party dessert. They’re perfect for a summer picnic, a baby or bridal shower, a kid’s birthday party, or just as a fancy finish to a casual taco Tuesday dinner (because why not have dessert tacos after dinner tacos?!). They’re completely handheld, so no plates or forks are needed—just lots of napkins for those happy, smiling faces.
Get Creative! Fun Flavor Twists
Once you’ve mastered the classic strawberry, the flavor world is your oyster… or should I say, your taco? Here are a few of my favorite ways to mix things up:
- Mixed Berry Bliss: Swap the strawberries for a mix of raspberries, blueberries, and blackberries. The color is stunning, and the flavor is a total summer celebration.
- Chocolate Lover’s Dream: Replace the graham crackers with chocolate wafer crumbs for the shells. Fold mini chocolate chips into the filling instead of strawberries, and drizzle with dark or milk chocolate.
- Peaches and Cream: Use finely chopped, ripe peaches in the filling and add a tiny pinch of cinnamon to the graham cracker shell mixture. It’s like a summer peach cobbler in taco form!
- Lighter Lemon-Berry: For a slightly lighter version, use Neufchâtel cheese (the lighter cousin of cream cheese) and fold in some light whipped topping instead of heavy cream. The result is still delicious but a bit less rich.
- Gluten-Free Goodness: Simply use your favorite gluten-free graham crackers or gluten-free vanilla cookies to make the crumbs for the shell. The rest of the recipe is naturally gluten-free!
From My Kitchen to Yours: Chef’s Notes
This recipe has become a staple in my house, and it’s evolved a bit since the first time I tested it. My first batch had shells that were a little too thick and fell apart—a delicious learning experience! The key is to press the crumb mixture firmly but not too thickly when forming the shells.
I also love making a double batch of the shells and storing them in an airtight container in the freezer. Then, on a busy week, I can just whip up the filling and assemble them for a last-minute treat that looks like I spent all day in the kitchen. It’s my little secret for always being ready for surprise guests (or surprise cravings)!
Your Questions, Answered!
Let’s tackle a few common questions to make sure your taco-making journey is smooth and successful.
Q: My filling is too runny. What happened?
A: This usually happens for one of two reasons: the cream cheese was too cold when beaten, causing it to seize, or the strawberries added too much liquid. Always use room-temperature cream cheese and be sure to pat your chopped strawberries very dry with a paper towel before folding them in.
Q: Can I make these ahead of time?
A: Absolutely! You can make the shells up to 2 days ahead and store them in an airtight container at room temperature. The filling can be made 1 day ahead and kept in the fridge. I recommend assembling the tacos the day you plan to serve them for the best texture.
Q: My shells are crumbling when I try to fill them. Help!
A: No worries! This likely means they needed more chilling time. Pop them back in the fridge for another 15-20 minutes. Also, make sure you’re using the full amount of butter—it’s essential for binding the crumbs together.
Q: I don’t have an electric mixer. Can I make this by hand?
A: You can, but it will take some elbow grease! Make sure your cream cheese is VERY soft. Use a sturdy whisk and a lot of arm power to whip the cream cheese and sugar until smooth before whisking in the cream. It won’t be *quite* as fluffy, but it will still be delicious.
Nutritional Information (Because Knowledge is Power!)
Okay, let’s talk numbers! Remember, this is a dessert, and it’s all about balance and enjoyment. Here’s a general breakdown per taco (assuming 24 tacos, with pecans, and including the white chocolate drizzle).
- Calories: ~210 kcal
- Fat: 13g
- Carbohydrates: 20g
- Sugar: 13g
- Protein: 2g
If you’re looking to lighten them up, you can use reduced-fat cream cheese, skip the white chocolate drizzle, or use a sugar substitute designed for baking. But my personal philosophy? Life is short. Savor the real, delicious thing, and just enjoy one or two of these incredible tacos as a special treat!
Final Sweet Thoughts
And there you have it, my friends! My complete guide to creating these ridiculously fun and delicious Strawberry Crunch Cheesecake Tacos. I hope this recipe brings as much joy and laughter to your kitchen as it has to mine. It’s a reminder that cooking doesn’t always have to be serious—it can be playful, creative, and a little bit silly, and that’s where some of the best memories are made.
I would be absolutely thrilled to see your creations! If you make these, please tag me on social @TastyChow and use the hashtag #ChefEmilyEats. Seeing your beautiful tacos totally makes my day.
Now, go forth and chow down! With love and a full heart,
Emily