No-Bake Chocolate Chip Cookie Dough Brownie Bombs – The Ultimate Sweet Bite
Hey there, my fellow flavor fanatic! Let’s be real for a second. Are you, like me, someone who believes the best part of baking cookies is sneaking a spoonful (or three) of the raw dough before it even hits the oven? And do you also believe that a pan of fudgy, decadent brownies is basically a love letter to your soul?
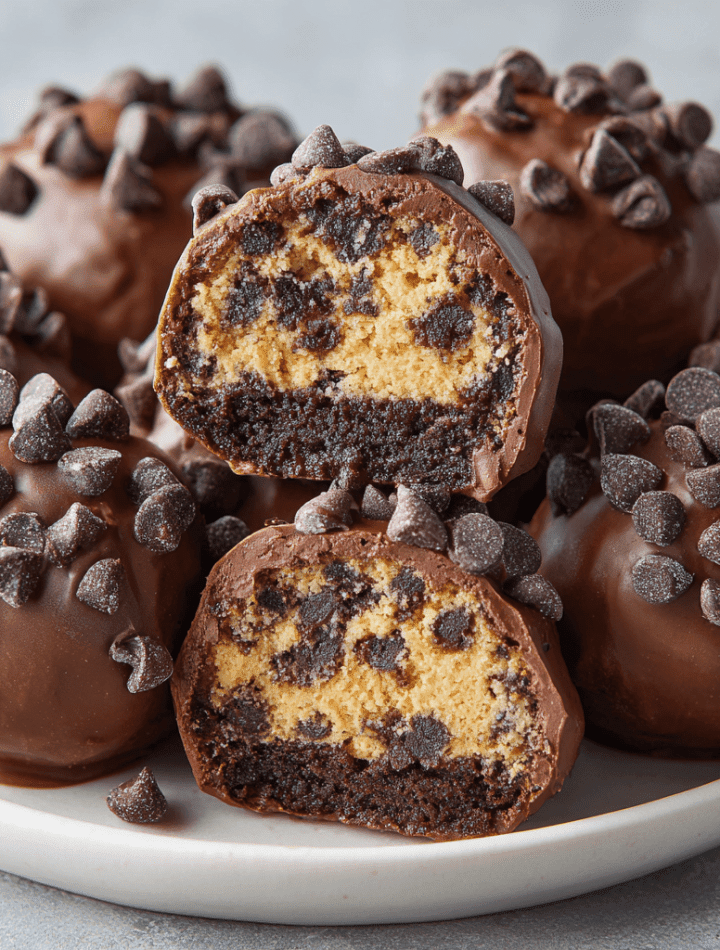
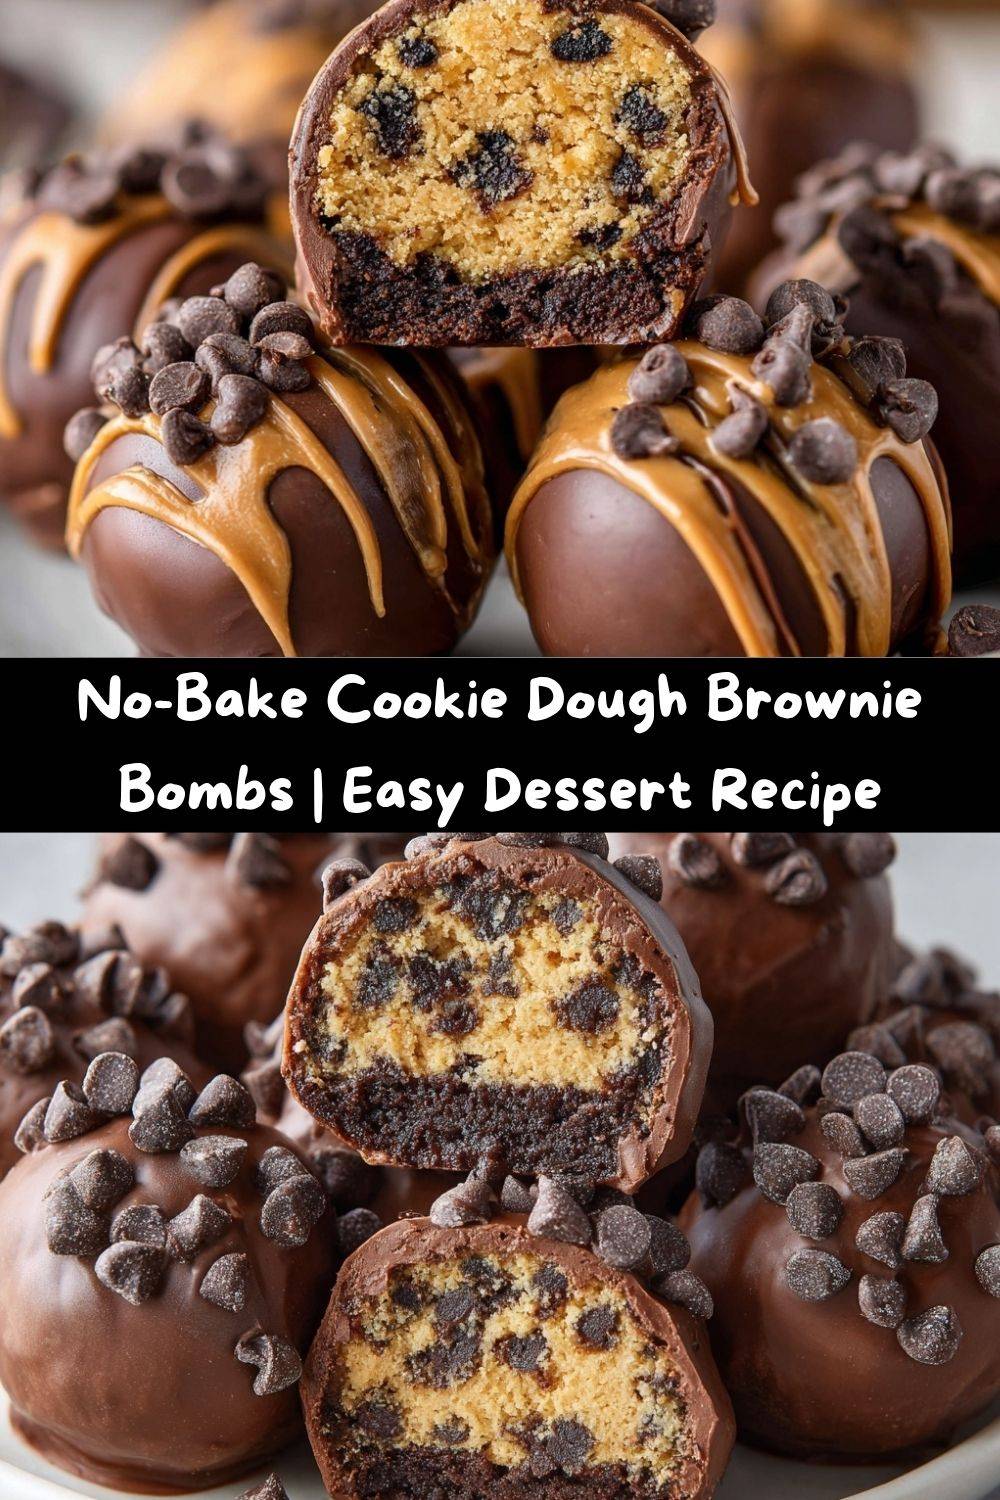
Well, my friend, prepare to have your dessert world rocked. I’ve taken our two greatest sweet-treat loves and combined them into one mind-blowing, no-bake, bite-sized masterpiece. I’m talking about my No-Bake Chocolate Chip Cookie Dough Brownie Bombs.
Imagine this: a soft, safe-to-eat, egg-free chocolate chip cookie dough ball, hugged tightly by a layer of the most fudgy, rich brownie you can imagine. Then, we take that little sphere of joy and give it a glamorous coat of silky, snappy semisweet chocolate. It’s a triple threat of texture and taste, and the best part? Your oven gets to take a well-deserved nap. These are the ultimate treat for when a cookie isn’t enough and a brownie feels too simple. They’re for potlucks where you want to be the undisputed dessert hero, for late-night cravings that demand something extraordinary, and for gifting to friends who deserve a little edible confetti. Consider this your official warning: they disappear faster than you can say “just one more!”
The Day I Created a Kitchen Monster (In the Best Way)
This recipe was born from a beautiful, beautiful kitchen disaster. Picture this: it was a sweltering summer day, the kind where even thinking about turning on the oven felt like a cardinal sin. I was testing a new brownie recipe, but my heart wasn’t in it. My stand mixer was sitting there, looking lonely, and a rogue tub of cookie dough was calling my name from the fridge.
In a moment of what I can only describe as divine, sugar-fueled inspiration, I looked at a crumbled brownie on the cooling rack, looked at the cookie dough, and had a “what if…” moment. What if I just… rolled them together? I scooped a little dough, smashed a brownie around it, and took a tentative bite. The heavens opened. Angels sang. My dog, Chowder, perked up his ears. It was pure, unadulterated magic. The only thing missing was a chocolate shell to lock in all that perfection. A quick dip in some melted chocolate chips later, and a legend was born. It was messy, it was imperfect, but it was, without a doubt, one of the most delicious “happy accidents” to ever come out of my kitchen.
Gathering Your Sweet Squad: The Ingredients
Here’s everything you need to create these little bites of bliss. I’ve included some of my favorite chef-y insights and swaps so you can make them your own!
For the Egg-Free Cookie Dough:
- ½ cup unsalted butter, softened: This is the base of our dough, providing that classic rich, creamy flavor and texture. Chef’s Tip: “Softened” means when you press your finger into it, it leaves a slight indent. Don’t melt it! If you only have salted butter, just reduce the added salt in the recipe by a pinch.
- ½ cup brown sugar & ¼ cup granulated sugar: The dynamic duo! Brown sugar brings that deep molasses moisture, while granulated sugar gives us a little structure and sweetness. This combo is the secret to a soft, chewy texture.
- 2 Tbsp milk: A splash of milk brings everything together into a pliable dough. Any kind you have works—dairy or non-dairy like almond or oat milk are great.
- 1 tsp vanilla extract: The flavor enhancer! It rounds out all the sweet notes. For a next-level experience, try using vanilla bean paste.
- 1¼ cups all-purpose flour (heat-treated): This is our key to making the dough safe to eat! *See the FAQ section for the super simple 5-minute method to heat-treat your flour and kill any potential bacteria.
- ½ tsp salt: Never skip the salt! It’s the wingman that makes all the chocolate and sweetness pop. It balances the flavors perfectly.
- ½ cup mini chocolate chips: I prefer minis because they distribute more evenly in our little dough balls, ensuring every bite has a pocket of melty chocolate.
For Assembly & Coating:
- 1 box prepared fudge brownies, cooled: The lazy chef’s best friend! Using a box mix is a huge time-saver and gives consistently fudgy results. Of course, if you have a favorite homemade recipe, use it! Just make sure it’s a fudgy, dense style, not a cakey one, so it’s easier to mold.
- 12 oz semisweet or dark chocolate chips: For our glorious chocolate shell. I love the depth of flavor from semisweet, but milk chocolate is a dreamy, sweeter option.
- 1 Tbsp coconut oil or vegetable shortening (optional): This is my little secret for a perfectly smooth, thin, and snappy chocolate coating. It helps the chocolate flow beautifully and set with a gorgeous sheen.
Let’s Get Our Hands Dirty: The Step-by-Step Fun
Alright, apron on! Let’s transform these ingredients into the dessert bombs of your dreams.
- Make the Cookie Dough: In a medium-sized bowl, cream together the softened butter, brown sugar, and granulated sugar. We’re going for light and fluffy here—this should take about 2 minutes with a hand mixer or stand mixer. This step is crucial for a non-grainy texture! Now, beat in the milk and vanilla extract until the mixture is smooth and well-combined.
- Incorporate the Dry Goods: Switch to a spatula or wooden spoon (to avoid over-mixing). Gently stir in the heat-treated flour and salt. Mix just until no dry streaks remain. Now, for the grand finale, fold in those adorable mini chocolate chips.
- Chill Out: Using a small cookie scoop or a tablespoon, portion the dough and roll it into 1-inch balls. Place them on a parchment-lined baking sheet and pop them into the freezer for a solid 30 minutes. Chef’s Hack: This firming-up step is non-negotiable! A firm dough ball is MUCH easier to wrap in brownie and won’t squish out the sides.
- Prepare the Brownie “Hug”: While the dough chills, take your cooled brownies and crumble them into a large bowl. You can also just tear off small, flat pieces. We need the brownie to be pliable enough to wrap around our frozen dough centers.
- The Assembly Line: Time for the fun part! Take a flattened piece of brownie (about the size of your palm), place a frozen cookie dough ball in the center, and gently wrap the brownie around it. Press and roll it gently between your hands to form a smooth, seamless ball. If the brownie is cracking, it might be too cold—let it sit at room temp for 5 minutes. Place each completed bomb back on the parchment-lined tray. Once they’re all assembled, I like to give them another 15-minute freeze to ensure they’re super firm for dipping.
- The Chocolate Dip: In a microwave-safe bowl, combine the chocolate chips and coconut oil (if using). Microwave in 30-second bursts, stirring vigorously after each interval, until the chocolate is completely smooth and melted. Do not overheat! Using a fork or a dipping tool, lower a brownie bomb into the chocolate. Swirl it around to coat completely, let the excess drip off, and then gently place it back on the parchment paper. For a little flair, you can sprinkle on some sea salt or extra mini chips before the chocolate sets.
- The Final Chill: Let the chocolate set at room temperature, or for a faster set, pop the tray back in the fridge for about 30 minutes. And voilà! You’ve just created dessert magic.
How to Serve These Show-Stopping Bombs
Presentation is part of the fun! These little guys are so pretty all on their own, but a little extra love makes them feel extra special.
For a party, pile them high on a beautiful cake stand or a rustic wooden board. They look incredible when they’re all slightly different, showing off their homemade charm. Drizzle a little melted white chocolate over the top for a bakery-worthy finish.
If you’re gifting them (lucky friend!), a simple cellophane bag tied with a ribbon makes a gorgeous and delicious present. Stack them in a mason jar for a cute, portable treat.
And for the ultimate at-home experience? I won’t judge if you just stand by the fridge with one in each hand. They are fantastic slightly chilled, but I also love them at room temperature when the chocolate is just a little softer. Serve them with a big glass of cold milk, a hot coffee, or even a scoop of vanilla ice cream on the side for the ultimate indulgence.
Get Creative! Flavor Twists & Swaps
Once you’ve mastered the classic, the playground is open! Here are a few of my favorite ways to mix things up:
- Salted Caramel Surprise: Poke a small hole in your cookie dough ball before freezing and stuff it with a single soft caramel or a few chocolate-covered coffee beans. The gooey, salty center is a revelation.
- Peanut Butter Paradise: Replace half the butter in the cookie dough with creamy peanut butter. Roll the finished bombs in chopped peanuts before the chocolate sets for a crunchy finish.
- Mint Chocolate Chip: Add ¼ teaspoon of peppermint extract to the cookie dough along with the vanilla. Use dark chocolate for the coating for a sophisticated, after-dinner mint vibe.
- The “Blonde Bombshell”: Use a pan of baked blondies instead of brownies for the outer layer. It’s a butterscotch-vanilla dream!
- Gluten-Free & Vegan Friendly: Use a 1:1 gluten-free flour blend and ensure your brownies are GF. For a vegan version, use plant-based butter, your favorite milk, and vegan chocolate chips. For the brownie layer, there are amazing boxed vegan brownie mixes or you can use a homemade one.
Chef Emily’s Kitchen Confidential
This recipe has evolved so much since that first messy kitchen experiment! My biggest lesson learned? Patience with the chilling. I know it’s tempting to rush, but a firm, frozen center is your best friend for a clean assembly. I also used to be a purist with the chocolate, but adding that tablespoon of coconut oil was a total game-changer for the coating—so much smoother and easier to work with.
A funny story: I once brought a huge batch to a family picnic, and my uncle, in his excitement, tried to eat three at once. Let’s just say there was a very dramatic, very happy chocolate incident. It’s now a running family joke whenever I make them. The moral of the story? Savor them slowly… or don’t. I won’t tell!
Your Questions, Answered!
Q: How do I heat-treat flour, and is it really necessary?
A: It’s the most important step for food safety! To heat-treat flour at home, simply spread it on a baking sheet and bake at 350°F (175°C) for 5-7 minutes, stirring once, until it reaches 165°F (74°C) on a food thermometer. Let it cool completely before using. This kills any potential bacteria, making your dough perfectly safe to eat.
Q: My brownie layer is cracking when I try to wrap the dough. Help!
A> No worries! This usually means the brownies are too cold or too crumbly. Let the brownie crumbs sit at room temperature for 5-10 minutes to become more pliable. You can also add a tiny teaspoon of milk or even a dab of frosting to the brownie crumbs to help them bind together better.
Q: Can I make these ahead of time?
A: Absolutely! They are the perfect make-ahead dessert. Store them in an airtight container in the refrigerator for up to 5 days, or you can freeze them for up to 3 months. Just let them thaw in the fridge before serving.
Q: My chocolate is seizing or getting clumpy. What did I do wrong?
A> The enemy of melted chocolate is water! Even a single drop can cause it to seize. Make sure your bowls, spoons, and bombs are completely dry. If it does seize, try stirring in a tiny bit more coconut oil or vegetable shortening (about a teaspoon at a time) to smooth it back out.
A Little Note on Nutrition
Let’s be real, my friends—these are a treat, through and through! I believe in enjoying indulgent desserts mindfully and without guilt. Each bomb is a rich, satisfying bite meant to be savored.
The estimated nutritional info per bomb (assuming 24 servings) is around 220 calories, with 12g of fat, 25g of carbohydrates, and 18g of sugar. They also provide about 2g of protein. Because they are so rich, one or two is usually enough to satisfy that deep, chocolatey craving. For a slightly lighter option, you could explore the gluten-free and vegan swaps mentioned above, or use a sugar-free brownie mix and sugar-free chocolate chips. But remember, life is about balance—a little decadence is good for the soul!
Your New Go-To Dessert Awaits
And there you have it! My ultimate, no-bake, crowd-pleasing, heart-winning Chocolate Chip Cookie Dough Brownie Bombs. This recipe is a celebration of everything I love about food: fun, flavor, and sharing joy with the people we care about.
I am so incredibly excited for you to try these. I want to see your beautiful creations! When you make them, please tag me on social @TastyChow and use the hashtag #TCBrownieBombs. I love seeing your kitchen adventures and featuring them in my stories.
Now, go forth, get a little messy, and make something delicious. Your taste buds will thank you.
With a full heart and a happy belly,
— Emily