Your New Favorite Slice of Sunshine: The Best Ever Homemade Coconut Cream Pie
Hey there, my fellow food lover! Let’s talk about dreams for a second. Not the kind you have while sleeping, but the kind you have while staring into your fridge, hoping for a little slice of sweet, creamy heaven. You know the one. It’s the pie that whispers promises of velvety custard, a flaky, buttery crust, and a cloud of whipped cream so light it practically floats. Well, my friend, stop dreaming. I’m about to hand you the keys to the kingdom with my absolute Best Ever Homemade Coconut Cream Pie.
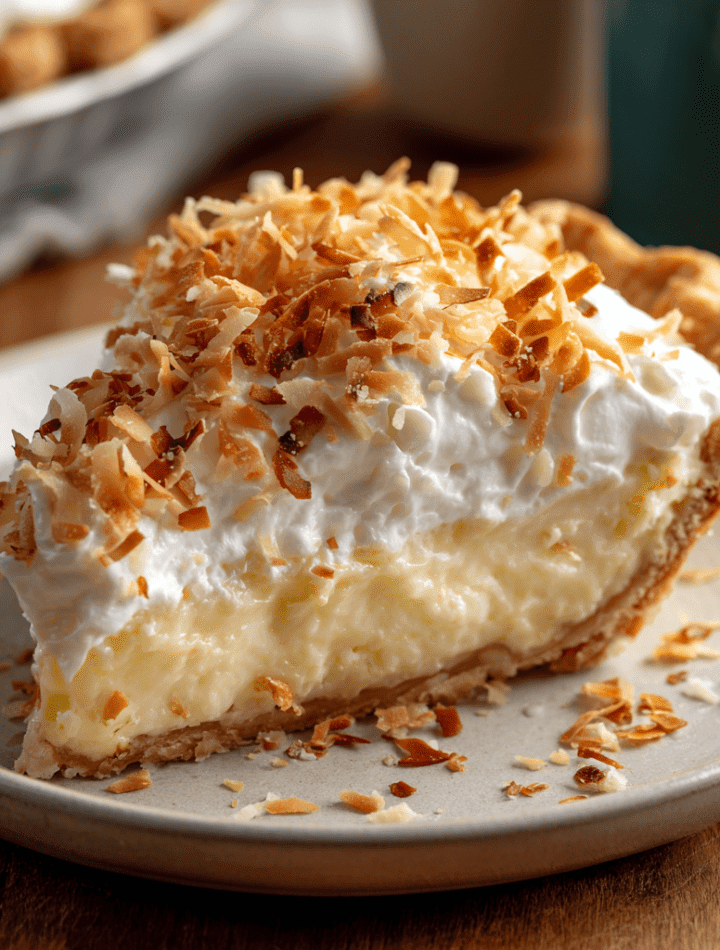
This isn’t just any pie. This is the pie that wins bake-offs, mends fences, and turns an ordinary Tuesday into a celebration. It’s cool, creamy, and packed with so much tropical coconut flavor, you’ll feel like you’re on a mini-vacation with every single bite. We’re talking about a from-scratch custard so smooth it will make your eyes roll back in your head, all nestled in a golden, pre-baked crust and topped with a fluffy mountain of freshly whipped cream. And that final sprinkle of toasted coconut? That’s the crunch that sends this dessert straight into the hall of fame.
I know pie can feel a little intimidating, but trust me—and my slightly flour-dusted apron—this recipe is totally doable. We’re going to walk through every single step together, with plenty of my favorite chef hacks and a whole lot of encouragement. So, tie on your favorite apron, grab your whisk, and let’s make a pie that’s going to have everyone at your table asking for seconds (and the recipe!).

A Slice of Grandma’s Kitchen
This pie, for me, is pure nostalgia. It takes me right back to my grandma’s kitchen, a place that always smelled like a beautiful collision of coffee, cinnamon, and whatever magic she was whipping up that day. She wasn’t a fancy chef; she was a master of comfort. And her coconut cream pie was the ultimate comfort food.
I remember standing on a wobbly wooden stool, my chin just barely clearing the countertop, watching her pour the hot, fragrant custard into the crust. She’d always let me have the custard-coated whisk to lick clean. That first taste—warm, sweet, and intensely coconutty—was a revelation. She’d toast the coconut flakes in her old cast-iron skillet, and the nutty, warm aroma would fill the whole house. It was a signal that something special was happening. Making this pie now isn’t just about following a recipe; it’s about recreating that feeling of love, patience, and the simple, profound joy of a dessert made with care. Every time I take a bite, I’m eight years old again, standing in that sunny kitchen, feeling utterly loved.
Gathering Your Coconut Dream Team: The Ingredients
Great pies start with great ingredients. Here’s everything you’ll need, plus a little “chef’s insight” for each one to help you understand the *why* behind the *what*.
- 1 (9-inch) pre-baked pie crust – Let’s be real, a from-scratch crust is amazing, but a high-quality store-bought one is a fantastic time-saver! No judgment here. The key is to pre-bake it (blind bake) so it stays crisp and flaky under that luscious filling.
- ¼ cup granulated sugar – This sweetens our custard base. It’s the perfect amount to complement the coconut without making it overly sweet.
- 3 tbsp cornstarch – This is our thickening hero! It gives the custard that perfect, sliceable-yet-creamy texture. Chef’s Tip: You can swap this with an equal amount of all-purpose flour, but the custard will be slightly more opaque and less silky.
- ½ tsp salt – Don’t you dare skip this! Salt is the flavor booster that makes all the other ingredients sing. It cuts the sweetness and deepens the coconut flavor.
- 3 cups whole milk – For the richest, dreamiest custard, whole milk is the way to go. The fat content is essential for that luxurious mouthfeel. For an even richer pie, you can use half whole milk and half canned coconut milk!
- 4 large egg yolks – These are the heart of the custard, providing incredible richness, color, and thickening power. Chef’s Tip: Save the egg whites for a healthy omelet or a batch of meringue cookies!
- 1 tsp vanilla extract – Use the good stuff! Pure vanilla extract adds a warm, complex flavor that partners beautifully with coconut.
- 2 cups sweetened shredded coconut – This is where the big coconut flavor comes from! The sweetened variety gives us that classic taste and a wonderful chewy texture throughout the filling.
- 1 cup heavy whipping cream – This is for our glorious topping. Make sure it’s cold, cold, cold for the best volume when whipping.
- 2 tbsp powdered sugar – It dissolves instantly into the cream, giving us a smooth, not gritty, sweetness. It also helps stabilize the whipped cream a bit.
- ½ tsp vanilla extract (for whipped topping) – A little extra vanilla in the cream takes the topping to the next level.
- ¼ cup toasted coconut flakes (for garnish) – This is the pièce de résistance! Toasting coconut unlocks a deep, nutty flavor and adds a crucial crunch. You can use sweetened or unsweetened flakes here.
Let’s Build this Beautiful Pie: Step-by-Step Instructions
Okay, team! It’s go-time. Read through all the steps once before you start, and remember: the key to a perfect custard is constant, loving attention. You’ve got this!
- Get Your Crust Ready: First things first, make sure your pie crust is fully baked and completely cooled. We don’t want a hot crust melting our beautiful custard! Place it on a wire rack while you work. Chef’s Hack: To prevent a soggy bottom, you can give the cooled, baked crust a quick brush with a beaten egg white and pop it back in the oven for 2-3 minutes. This creates a waterproof barrier!
- The Custard Foundation: In a medium saucepan (not over heat yet), whisk together the ¼ cup granulated sugar, 3 tablespoons of cornstarch, and that all-important ½ teaspoon of salt. Whisking them together dry first prevents any pesky cornstarch lumps later. It’s a little step that makes a huge difference.
- Introduce the Wet Ingredients: Gradually whisk in the 3 cups of whole milk. Do this slowly at first to create a smooth paste, then you can add the rest more quickly. Now, whisk in the 4 large egg yolks until the entire mixture is smooth, homogenous, and a lovely pale yellow color.
- The Thickening Magic: Now, place the saucepan over medium heat. This is where the patience comes in. Start whisking. And keep whisking. I mean it! Don’t stop. At first, it will seem like nothing is happening, but after 8-10 minutes, you’ll feel it start to thicken. Keep going until you get the first big, lazy “bloop” of a bubble breaking the surface. Let it bubble for just 60 seconds to cook out the starchy taste from the cornstarch. Chef’s Hack: If you’re worried about lumps, you can switch to a silicone spatula and scrape the bottom and corners of the pan as it thickens.
- Finish the Filling: Remove the pan from the heat immediately. Whisk in the 1 teaspoon of vanilla extract and the 2 cups of sweetened shredded coconut. The vanilla will sizzle and smell amazing! Give it a good stir until the coconut is fully incorporated.
- Into the Crust & Chill: Pour the hot coconut custard directly into your waiting pie shell. Smooth the top with a spatula. Now, here is the MOST IMPORTANT TIP for a perfect pie: take a piece of plastic wrap and press it directly onto the surface of the hot custard. This prevents a skin from forming! Chill the pie for at least 4 hours, but overnight is even better. This gives the custard time to set up perfectly.
- The Fluffy Topper: When you’re ready to serve, make the whipped cream. Pour the 1 cup of COLD heavy cream into a chilled bowl. Using a hand mixer or a stand mixer with the whisk attachment, beat on medium-high speed until it just starts to thicken. Add the 2 tablespoons of powdered sugar and the ½ teaspoon of vanilla. Continue beating until soft peaks form—that means when you lift the beaters, the cream forms a peak that gently flops over. Don’t overbeat, or you’ll make butter!
- Garnish and Serve: Take the plastic wrap off the chilled pie. Either spread the whipped cream beautifully over the top with a spoon or spatula, or pipe it on for a fancy look. Finally, shower the top with the ¼ cup of toasted coconut flakes. Slice, serve, and accept the compliments!
How to Serve This Masterpiece
Presentation is part of the fun! For the perfect slice, dip a sharp, thin-bladed knife in hot water and wipe it dry before each cut. This gives you those stunning, clean slices that show off all the beautiful layers.
I love serving this pie on simple, white plates to let the creamy white filling and golden toasted coconut really pop. A little extra sprinkle of toasted coconut on the plate adds a professional touch. This pie is rich, so a standard slice is perfect, but let’s be honest… no one will say no to a slightly bigger piece!
It’s the ultimate dessert for a summer barbecue (that cool cream is so refreshing), a show-stopping finish to a holiday feast, or just because it’s Wednesday and you deserve a treat. Pair it with a cup of strong coffee or a glass of cold milk for the ultimate experience.
Make It Your Own: Delicious Recipe Variations
Once you’ve mastered the classic, feel free to get creative! Here are a few of my favorite twists on this coconut cream dream.
- Chocolate-Coconut Twist: Add a layer of magic! Before pouring in the custard, spread a thin layer of warm chocolate ganache or even just melted semi-sweet chocolate over the bottom of the cooled crust. Let it set for a few minutes, then add the coconut filling. It’s a Mounds Bar in pie form!
- Tropical Escape: Fold in ½ cup of well-drained crushed pineapple or diced mango into the custard along with the shredded coconut. It adds a lovely burst of fruity freshness.
- Toasted Coconut Infusion: For a deeper, nuttier coconut flavor, toast *all* of the shredded coconut before adding it to the custard. Just spread it on a baking sheet and bake at 350°F for 5-10 minutes, stirring often, until golden brown.
- Dairy-Free Delight: You can easily make this vegan! Use a vegan pie crust, swap the whole milk for canned full-fat coconut milk, and use a vegan egg substitute for the yolks (like ¼ cup cornstarch total). For the topping, chill a can of full-fat coconut milk and whip the solid part with powdered sugar for a dairy-free “whipped cream.”
- Boozy Banana Boost: For a bananas foster vibe, add a layer of sliced bananas over the crust before adding the filling. A tablespoon of dark rum or Malibu coconut rum stirred into the custard with the vanilla takes it over the top!
Chef Emily’s Kitchen Notes
This recipe has been a living, evolving thing in my kitchen. The first time I made it post-culinary school, I was so confident I didn’t whisk constantly… and I ended up with a lumpy, slightly scorched mess. My cat looked at me with pity. It was a humbling moment that taught me the value of patience and a good whisk!
Over the years, I’ve found that toasting the coconut garnish is non-negotiable for me. That flavor and texture contrast is everything. I also sometimes like to add a tiny pinch of nutmeg to the custard—it’s a hidden warmth that people can’t quite place but always love. Don’t be afraid to make this pie your own; that’s the joy of cooking from the heart.
Your Coconut Cream Pie Questions, Answered!
Let’s tackle some common questions to ensure your pie-perfect success!
Q: My custard is lumpy! Can I fix it?
A: Absolutely! Don’t panic. Just immediately strain the hot custard through a fine-mesh sieve into your pie crust. The sieve will catch any lumps, and you’ll still have a perfectly smooth filling. Then, stir in your coconut as usual.
Q: Why did my whipped cream get watery?
A: This usually means it was either over-whipped or the bowl/cream wasn’t cold enough. For next time, make sure everything is chilled. If it’s happening now, you can sometimes re-whip it with a splash of new, cold cream to bring it back together.
Q: Can I make this pie ahead of time?
A: You sure can! This pie is a fantastic make-ahead dessert. You can assemble the filled crust (with plastic wrap directly on the custard) and refrigerate it for up to 2 days. I recommend adding the whipped cream and toasted coconut garnish the day you plan to serve it for the best texture and crunch.
Q: My pie filling is too runny. What happened?
A: This typically means the custard didn’t quite cook long enough. It needs to come to a full bubble and maintain it for that full 60 seconds to activate the cornstarch’s full thickening power. If it’s a little soft, it will still taste delicious, just serve it in a bowl! For next time, use a timer and make sure you see those thick bubbles.
A Quick Note on Nutrition & Prep
While we’re all about indulgence here at Tasty Chow, I believe in being transparent about what’s in our food! This is a celebratory dessert, rich and satisfying. A single slice of this heavenly pie comes in at around 560 calories. It’s a source of energy (carbs) from the sugar and crust, and it’s rich (fat) from the coconut, milk, egg yolks, and cream, which is what makes it so decadently creamy.
The good news is, a little goes a long way! It’s also a vegetarian-friendly recipe and a fantastic make-ahead option for feeding a crowd. So, you can enjoy a slice guilt-free, knowing you’ve made something wonderful from scratch.
- Prep Time: 20 mins
- Chill Time: 4 hrs
- Total Time: 4 hrs 20 mins
- Serves: 8
Final, Delicious Thoughts
Well, my friend, we’ve done it. We’ve journeyed together from a bag of shredded coconut to a glorious, picture-perfect Homemade Coconut Cream Pie. I am so incredibly proud of you for taking the time to create something so special from scratch. This pie is more than just a dessert; it’s a labor of love, a connection to memories (old and new), and a surefire way to bring a smile to anyone’s face.