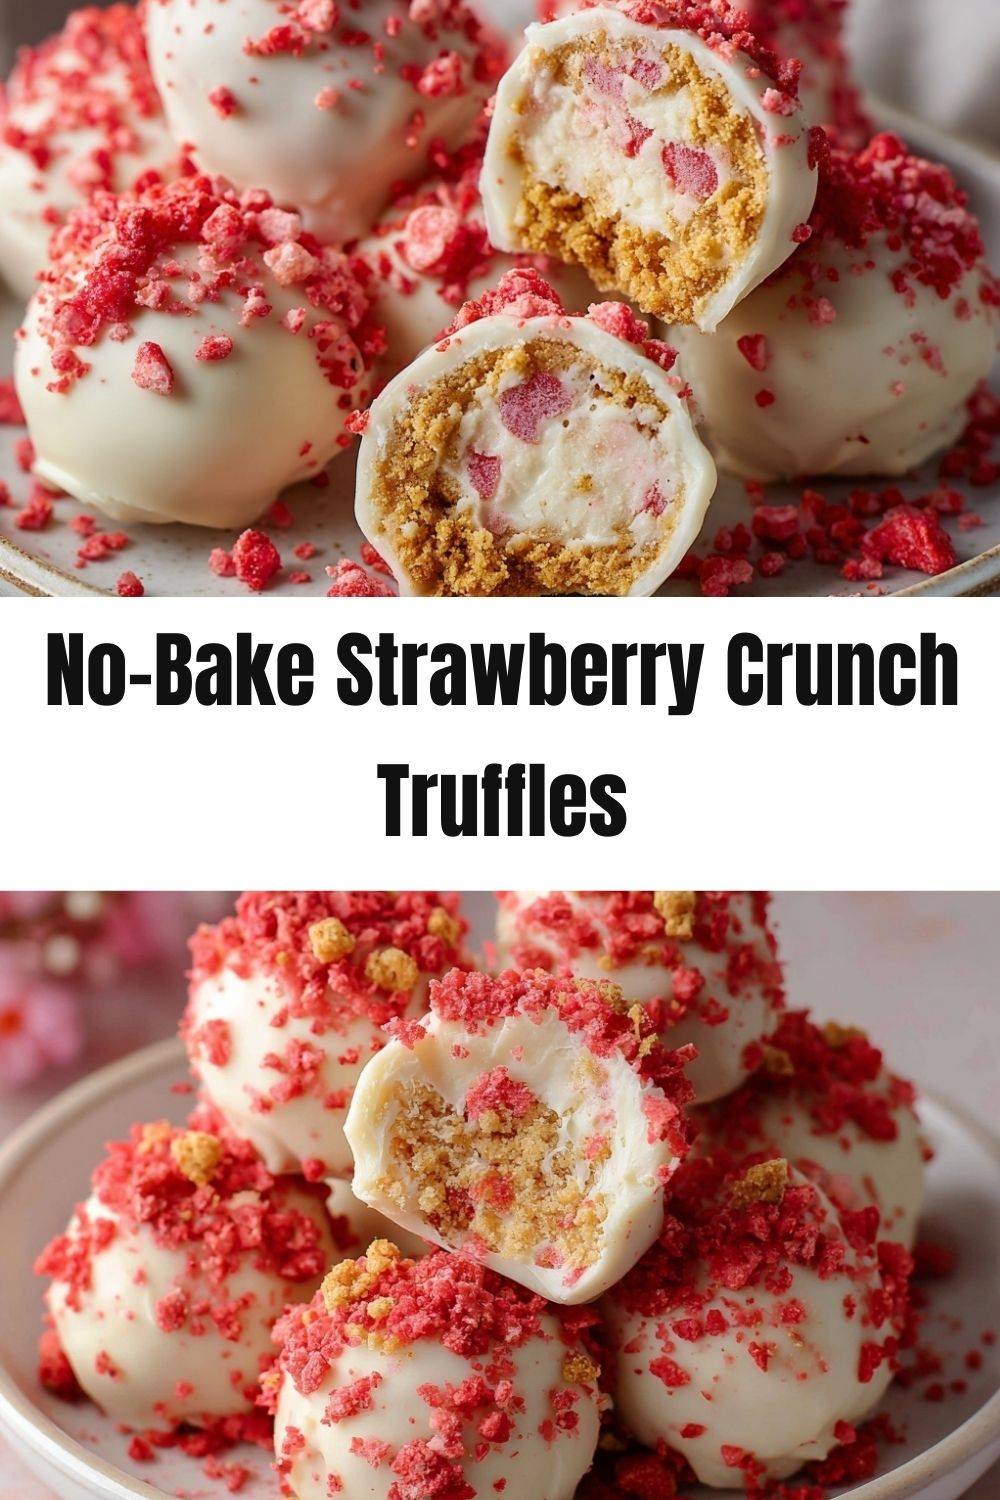
Strawberry Crunch Truffles: Your New Favorite No-Bake Bite!
Hey there, friend! Pull up a chair and let’s chat about one of life’s greatest pleasures: that magical moment when a dessert hits all the right notes. Creamy, crunchy, sweet, and just a little bit nostalgic. If your tastebuds just did a happy dance at that description, you are in for the most delightful treat. Today, we’re making Strawberry Crunch Truffles, and I promise, these are about to become your go-to for potlucks, gift-giving, or just a sneaky little “I-deserve-this” moment at the end of a long day.
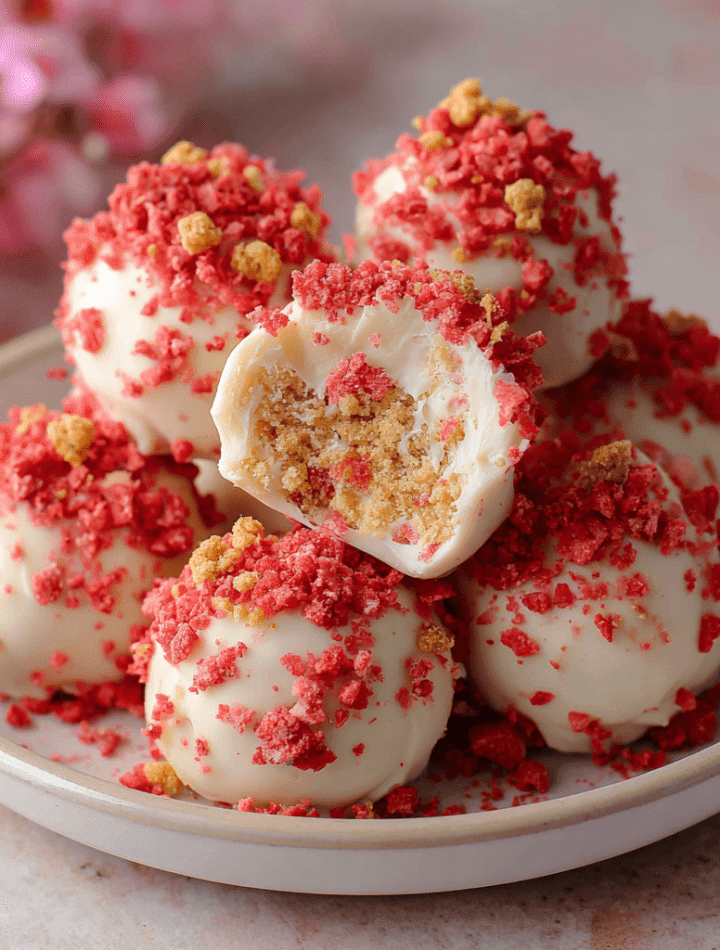
Imagine the taste of those classic strawberry shortcake ice cream bars from the ice cream truck—the ones with the fluffy vanilla center and that iconic, impossible-to-resist pink crumb coating. Now, picture that flavor transformed into a rich, decadent, no-bake truffle you can make in under an hour. That’s exactly what we’re doing. These bites are pure, unadulterated bliss: a creamy, slightly tangy filling speckled with real strawberry powder, all hugged by a shell of white chocolate and a crispy, strawberry-kissed golden cookie crunch.
No oven required, no fancy equipment needed. Just a few simple ingredients, a couple of bowls, and a willingness to get your hands a little messy (the best part, if you ask me!). Whether you’re a seasoned pro or just starting your kitchen adventures, these truffles are your ticket to impress-ville. They look like you fussed for hours, but our little secret is that they’re incredibly simple. So, tie on your apron—the cute one with the flour stains tells the best stories—and let’s make something delicious together.
A Sweet Slice of Nostalgia
This recipe didn’t start in a fancy test kitchen; it started on a hot summer sidewalk, circa 1994. I can still hear the distant jingle of the ice cream truck turning onto our street. My sister and I would scramble for change, bursting out the front door with a mission: to get our hands on those neon-colored strawberry shortcake bars. For me, it was never just about the ice cream. It was about the crunch. That vibrant, slightly sandy, sweet coating was the prize. I’d nibble around the edges just to save it for last.
Years later, in culinary school, we were deconstructing classic flavors and I kept circling back to that memory. How could I capture that specific joy in a new form? After more experiments than I can count (including a truly disastrous attempt involving actual ice cream), the idea for these truffles was born. They’re my grown-up, shareable homage to those sticky-fingered summer afternoons. They have that same soul-warming comfort, but with a richer, more sophisticated cream cheese base that makes them feel special. Every time I make them, I’m transported right back to my grandma’s porch, savoring every last crumb. It’s a flavor that connects generations, and I can’t wait for you to make your own memories with it.
Gathering Your Delicious Supplies
Here’s the beautiful part: the ingredient list is short, sweet, and full of potential for swaps. Let’s break it down. You’ll need two separate portions of the crunchy elements, so I like to measure everything out at the start.
- For the Filling:
- 1 cup crushed Golden Oreos (about 10 cookies): This is the foundation of our crunch! Golden Oreos have that perfect vanilla flavor without the chocolate competing with our strawberry star. Chef’s Tip: You can use a food processor or just pop them in a zip-top bag and roll with a rolling pin. We want fine crumbs here for a smooth filling.
- 4 oz cream cheese, softened: Full-fat is my friend here for the creamiest, richest texture. CRUCIAL: Let it sit on the counter for at least 30 minutes. A soft cream cheese blends seamlessly; cold cream cheese will leave you with lumpy truffle dough. For a twist, try using strawberry cream cheese!
- ¼ cup freeze-dried strawberries, crushed: This is our flavor powerhouse! Freeze-dried fruit gives an intense, natural strawberry punch without adding any moisture (which would make our truffles soggy). Find them in the snack or dried fruit aisle. Crush them into a fine powder—a few tiny chunks are okay for texture!
- For the Coating:
- ½ cup white chocolate chips or melting wafers: Melting wafers (like Candy Melts) are formulated to set firmly and smoothly, making them ideal for dipping. High-quality chocolate chips work too; just add a teaspoon of coconut oil when melting for a smoother, thinner consistency.
- ½ cup crushed Golden Oreos: We’ll mix these with our strawberry powder for that iconic “crunch” shell. A slightly coarser crush here is great for maximum texture.
- ¼ cup freeze-dried strawberries, crushed: More strawberry magic! Mixed with the cookie crumbs, it creates that beautiful pink, flavorful coating we’re after.
Let’s Make Some Truffle Magic: Step-by-Step
Ready to roll? Literally! Here’s your foolproof guide to truffle success, with all my favorite kitchen hacks sprinkled in.
- Create the Truffle “Dough.” In a medium bowl, combine your 1 cup of finely crushed Golden Oreos, the softened cream cheese, and the ¼ cup of strawberry powder. Use a sturdy spatula or your clean hands to mix it all together. At first, it’ll seem crumbly, but keep going! As the cream cheese warms from your touch, it’ll come together into a soft, pliable, slightly pink dough that smells like strawberry dreams. Chef’s Hack: If the mixture feels too dry, let it sit for 5 minutes. The moisture from the cream cheese will continue to absorb the crumbs. Too sticky? Add a tablespoon more of crushed cookies.
- Roll and Chill. Line a baking sheet or plate with parchment paper. Scoop out about 1 tablespoon of dough per truffle. Roll it firmly between your palms to form a smooth ball. Place it on the parchment. Repeat until all the dough is used—you should get about 12 lovely little orbs. Now, pop the whole tray into the freezer for 15-20 minutes. This step is non-negotiable! A firm, cold ball is much easier to dip and won’t fall apart in your melted chocolate.
- Prep the Signature Crunch. While the balls chill, make your coating station. In a shallow bowl or plate, mix the remaining ½ cup of coarsely crushed Golden Oreos and ¼ cup of strawberry powder. Stir it up so the pink powder coats all the golden bits. Set this next to your workspace.
- Melt & Dip Like a Pro. Melt your white chocolate in a microwave-safe bowl in 20-second bursts, stirring vigorously between each burst, until completely smooth. Do not overheat! Alternatively, use a double boiler. Transfer about half of the melted chocolate to a small, deep cup or glass—this makes dipping so much easier. Take your chilled truffle balls out of the freezer. Spear one with a fork (or use dipping tools) and dunk it into the chocolate, swirling to coat completely. Let the excess drip off by tapping the fork gently on the rim of the cup.
- Crunchify & Set. Immediately, while the chocolate is still wet, roll the dipped truffle in your prepared crunch mixture. Use a spoon to help scoop and pat the coating all over for full coverage. Place it back on the parchment paper. Repeat with all truffles. If your chocolate starts to thicken, re-melt it for a few seconds. Once all are coated, return the tray to the fridge for a final 10-minute chill to set everything perfectly.
How to Serve These Beauties
Okay, the hard part is over (resisting eating them all immediately). Now, let’s make them shine! For a casual treat, pile them high on a rustic wooden board or in a colorful ceramic bowl. They’re perfect for a party because they’re finger-food friendly.
Want to get fancy? Place each truffle in a small, pastel-colored paper candy cup (the kind you see for cupcakes or chocolates). Arrange them in a gift box lined with tissue paper—they make the most heartfelt, homemade gift for teachers, neighbors, or friends. I love giving these with a tag that says “A Little Sweet Crunch for Your Day.”
For serving at home, pair them with a cup of hot coffee, a glass of cold milk, or even a glass of bubbly prosecco for a truly decadent dessert moment. The contrast of the cool, creamy center with the crispy shell is pure textural heaven.
Get Creative: Recipe Variations
The basic formula is a canvas for your creativity! Here are a few of my favorite twists:
- Lemon Berry Bliss: Swap the freeze-dried strawberries for freeze-dried raspberries. Add the zest of one lemon to the cream cheese filling. Use a yellow candy melt or lemon-flavored white chocolate for coating. Sunshine in a bite!
- Cookies & Cream Dream: For a chocolatey version, use regular chocolate sandwich cookies (like classic Oreos) instead of Golden Oreos. Omit the strawberries for a pure cookies-and-cream truffle. Roll the coated balls in extra chocolate cookie crumbs.
- “Neapolitan” Style: Make the original strawberry filling. For the coating, melt dark, milk, and white chocolate separately. Drizzle each one over the chilled, un-dipped truffles for a striped effect, then roll in the strawberry crunch. You get all three flavors!
- Vegan/Veggie-Friendly: Use vegan cream cheese and check that your sandwich cookies are vegan-friendly (many are!). For the coating, use dairy-free white chocolate. It works like a charm!
- Protein-Packed Pop: For a slightly healthier spin, replace half of the cookie crumbs in the filling with vanilla or strawberry protein powder. You may need a splash of milk to bring the dough together. A great post-workout treat!
Chef Emily’s Notes from My Kitchen to Yours
This recipe has evolved from those early “ice cream disaster” days! My biggest lesson learned? Patience with the chilling steps. I once tried to dip a warm ball and created a chocolatey, crumbly puddle. We laugh about it now, but it was a sad moment for dessert. Trust the process—the freezer is your co-pilot here.
I also love playing with the shape. Sometimes, instead of balls, I’ll press the dough into a parchment-lined loaf pan, chill it, and then slice it into small bars before dipping. It’s a fun, different look! These truffles keep beautifully in an airtight container in the fridge for up to a week, and they actually freeze wonderfully for up to a month. Just thaw in the fridge before serving.
FAQs & Troubleshooting
Q: My truffle mixture is too sticky to roll. Help!
A: No worries! This usually means the cream cheese was a bit too warm or the crumbs were too fine. Pop the whole bowl in the fridge for 10 minutes to firm up the cream cheese. You can also dust your hands with a little powdered sugar or extra cookie crumbs to prevent sticking while rolling.
Q: Why did my white chocolate coating crack after dipping?
A: This is often a temperature shock. If your truffle balls are too cold (like, frozen solid), the warm chocolate seizes and cracks as it sets. Aim for chilled but not rock-hard. Let them sit at room temp for 2-3 minutes before dipping if they’ve been in the freezer longer than 20 minutes.
Q: Can I use fresh strawberries instead of freeze-dried?
A: I don’t recommend it for this recipe. Fresh fruit adds too much water, which will make your filling soggy and prevent it from setting properly. The intense, dry powder of freeze-dried fruit is key for that potent flavor and correct texture.
Q: My coating isn’t sticking to the chocolate layer. What did I do wrong?
A: You might have waited too long to roll after dipping! The chocolate sets quickly. Work in small batches—dip 2-3 truffles, then immediately roll them in the crunch before moving on to the next set. The coating needs wet chocolate to adhere to.
A Quick Nutritional Glance
While these are absolutely a treat, here’s a general breakdown per truffle (based on the original recipe yielding 12): Approximately 130 calories, 7g fat, 14g carbs, 2g protein. Remember, this is an estimate and can vary based on specific brands and any modifications you make. Using reduced-fat cream cheese or different cookies will alter the values. I believe in balance—enjoy one or two of these delightful bites mindfully as part of a joyful eating experience!
Final Thoughts: Share the Love!
And there you have it! Your very own batch of Strawberry Crunch Truffles, ready to bring smiles. What I love most about this recipe is how it connects us—to sweet memories, to the people we share them with, and to the simple joy of creating something wonderful with our own hands.
I hope you have as much fun making these as I do. Don’t forget to snap a picture of your gorgeous creations! Tag me on social @TastyChow—nothing makes my day more than seeing your kitchen wins. Now, go grab a truffle (you’ve earned it!), pour yourself something delicious, and savor that perfect bite of creamy, crispy bliss.
Until next time, keep your spoons handy and your heart full.
— Emily 🍓