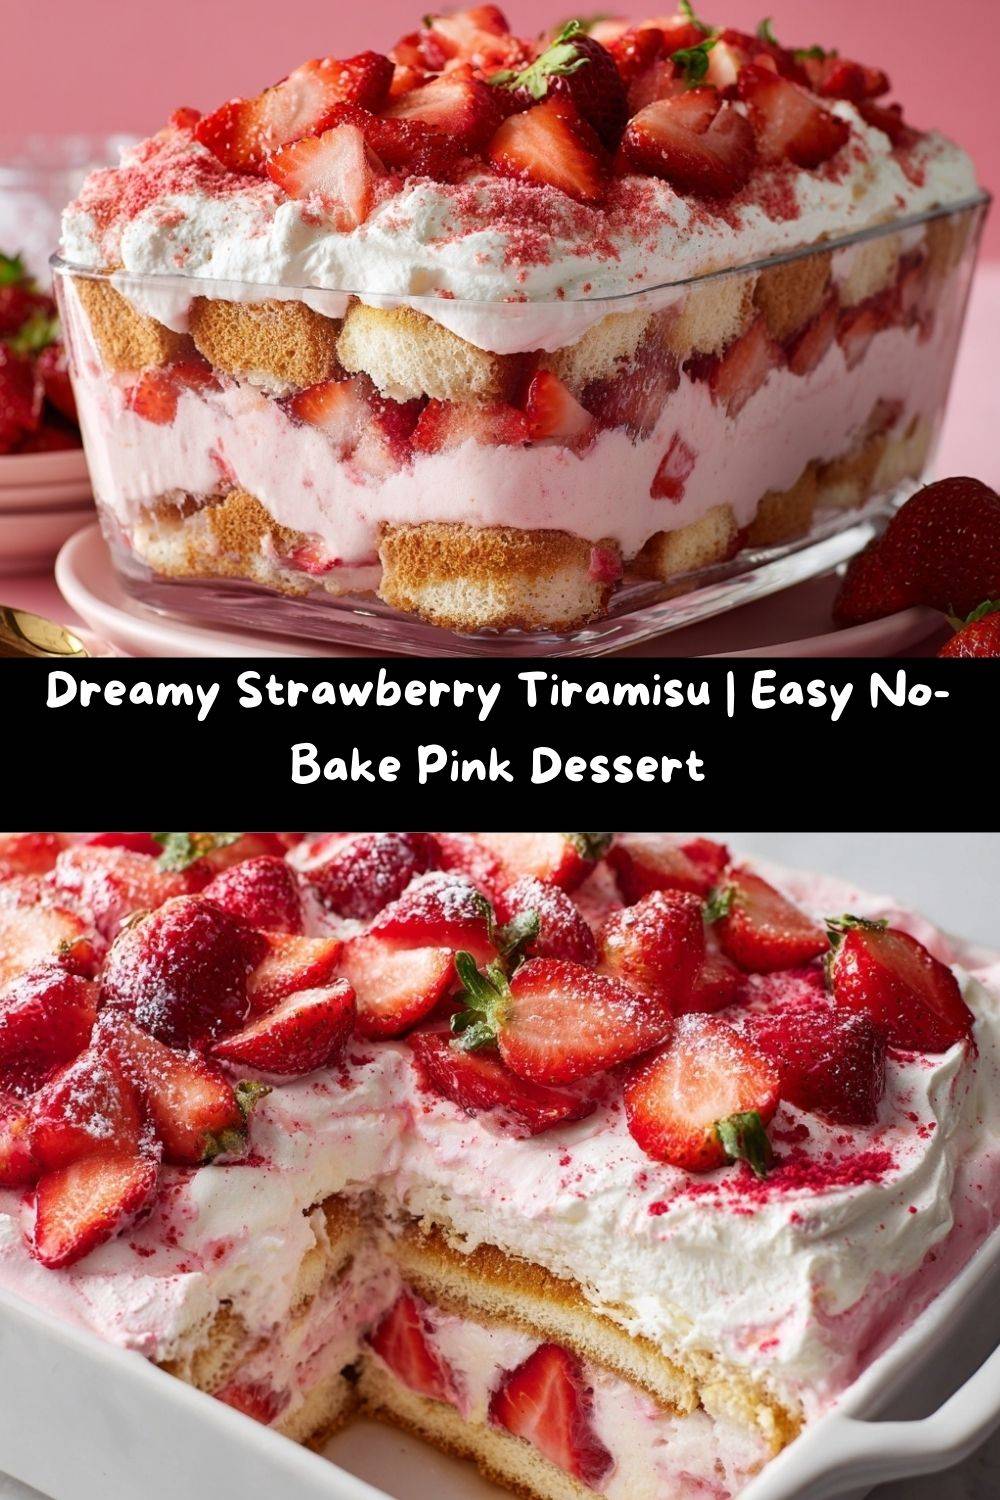
Strawberry Tiramisu: Your New Favorite Pink Dream Dessert
Hey there, friend! Grab a cup of coffee (or a glass of rosé, I won’t judge) and pull up a chair. I want to talk about one of life’s greatest pleasures: dessert. Specifically, a dessert that looks like a fluffy pink cloud and tastes like a strawberry field in the height of summer. I’m so excited to share this Strawberry Tiramisu recipe with you today.
We all know and adore classic tiramisu, right? That magical Italian layering of coffee-soaked ladyfingers and rich mascarpone cream? It’s a staple in my heart. But what happens when we take that brilliant, no-bake framework and give it a springtime, berry-filled makeover? Magic, my friend. Pure, delicious magic.
This isn’t just a dessert; it’s a showstopper. It’s the kind of thing you bring to a brunch and instantly become the most popular person there. It’s what you make for a girls’ night in when you want to celebrate. It’s perfect for Mother’s Day, Valentine’s Day, or just a Tuesday when you need a little extra joy. The best part? You don’t even have to turn on your oven. It’s cool, creamy, fruity, and has that gorgeous blush tone that just makes everyone smile. So, let’s ditch the espresso, grab some ripe strawberries, and make a tiramisu that’s pretty in pink and impossible to resist.
The Strawberry Stand That Started It All
This recipe takes me right back to the side of a sun-drenched country road when I was about ten years old. My grandma and I would take her old pickup truck to the “good” strawberry stand, the one run by the farmer with the kindest eyes and the dirtiest boots. We’d buy two flats, and the scent of warm strawberries would fill the cab all the way home.
Back in her kitchen, the rule was you had to eat at least a handful while you worked—quality control, she called it. We’d make jam, shortcake, and sometimes, just a big bowl of macerated berries with a splash of cream. That simple, sun-ripened flavor is what I’m chasing with every bite of this tiramisu. I wanted to capture that childhood joy in a more elegant, shareable package. This dessert is my love letter to those afternoons with Grandma, to the taste of peak-season berries, and to the idea that the best recipes often start with a simple, happy memory (and maybe a few stolen strawberries).
What You’ll Need: A Breakdown of the Pink Dream Team
Here’s your shopping list! I’ve added my little chef-y notes next to each one because knowing your ingredients is the first step to kitchen confidence.
- 1½ cups fresh strawberries, hulled and sliced – This is your flavor STAR. Look for berries that are deep red and fragrant. If they’re a bit bland, a pinch more sugar in the purée will help. Chef’s Insight: In a pinch, frozen and thawed strawberries will work, but fresh gives the brightest flavor.
- 2 tablespoons granulated sugar – This draws out the berries’ natural juices and creates that essential syrupy soak for our ladyfingers.
- 1 tablespoon lemon juice – The secret weapon! A splash of bright acidity balances the sweetness and makes the strawberry flavor pop. Fresh is best here.
- 1 cup cold heavy cream – Cold is non-negotiable. It whips up higher and faster. This gives our cream layer its dreamy, cloud-like texture.
- 1 cup mascarpone cheese – The rich, velvety heart of any tiramisu. Let it sit on the counter for 15-20 minutes before using to soften slightly—it blends like a dream. Sub Tip: In an absolute emergency, full-fat cream cheese can stand in, but mascarpone’s mild sweetness is worth seeking out.
- ¼ cup powdered sugar – It dissolves instantly into our cream, preventing any graininess. No one wants gritty tiramisu!
- 1 teaspoon pure vanilla extract – The flavor anchor. It rounds out all the other ingredients beautifully.
- 18–20 ladyfinger cookies (Savoiardi) – These light, airy sponges are the traditional choice. They soak up the strawberry purée perfectly without turning to mush. Chef’s Note: Find them in the international aisle or near the cookies!
- Optional: A drop or two of pink or red food coloring – For that extra “wow” blush. I use a tiny bit of gel coloring for a vibrant pink without adding liquid.
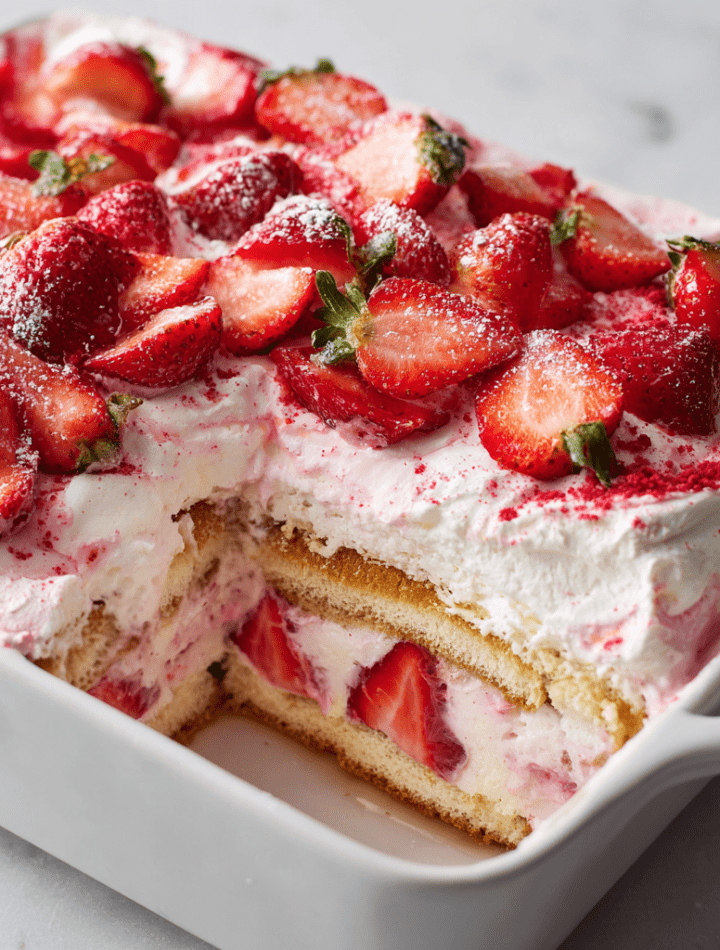
- For Topping: Crushed freeze-dried strawberries or fresh slices – Freeze-dried berries crushed into a powder are my GO-TO. They add intense strawberry flavor, a gorgeous color, and don’t get soggy. A game-changer for presentation!
Let’s Build This Masterpiece: Step-by-Step with Chef Emily
Ready to get your hands (slightly) messy? Follow these steps, and you’ll have a flawless dessert. I’m talking you through every move!
- Make the Strawberry Soak: Toss your hulled strawberries, granulated sugar, and lemon juice into a blender or food processor. Blitz it until it’s completely smooth. Now, here’s a pro-tip for a silky texture: strain this purée through a fine-mesh sieve into a shallow bowl. This removes the seeds and any fibrous bits, giving you a beautiful, smooth liquid for dipping. Push it through with a spatula to get every last drop of that pink gold! Taste it. Is it heavenly? Good.
- Whip the Cream: Pour your COLD heavy cream into a large, clean bowl. Using a hand mixer or stand mixer with the whisk attachment, whip on medium-high until you get soft peaks. What’s a soft peak? When you lift the whisk, the cream forms a peak that gently curls over at the top. Don’t go further to stiff peaks yet—we’re going to fold it, and over-whipped cream can get grainy.
- Make the Mascarpone Base: In a separate bowl, combine your slightly softened mascarpone, powdered sugar, and vanilla. Beat this on medium just until it’s smooth, creamy, and combined. Warning: Over-beating mascarpone can cause it to “break” and look curdled. Short and sweet is the key!
- Combine the Creams: This is where the magic happens. Take about one-third of your whipped cream and gently fold it into the mascarpone mixture with a rubber spatula. This lightens the dense mascarpone. Now, fold in the remaining whipped cream with slow, gentle, sweeping motions until no white streaks remain. Be patient and gentle to keep all that air you whipped in. If using food coloring, add a tiny drop now and fold to distribute.
- The Dip & Layer Tango: Get your serving dish ready (an 8×8 dish or a pretty trifle bowl works great). Working quickly, take a ladyfinger and dip BOTH SIDES into the strawberry purée. You want it coated but not drowning—about 1-2 seconds per side. If it soaks too long, it’ll fall apart. Place them in a single layer in your dish. Break a few to fill in any gaps.
- Spread & Repeat: Spread half of your beautiful pink mascarpone cream evenly over the ladyfinger layer. Grab your bowl of purée and dip another layer of ladyfingers. Place them over the cream. Top with the remaining cream, spreading it all the way to the edges.
- The (Hardest) Part: The Chill: Cover your tiramisu tightly with plastic wrap. This is crucial. You must let it chill for at least 4 hours, but overnight is truly IDEAL. This waiting time is when the alchemy occurs. The ladyfingers soften into cake-like layers, the flavors marry, and the whole thing sets up into sliceable perfection. Trust the process!
- The Grand Finale – Garnish: Just before serving, sprinkle the top generously with crushed freeze-dried strawberry powder. It looks like pink snow and tastes incredible. Add a few fresh slices in the center for a fresh pop. Then, grab a spoon and dig in!
How to Serve Your Strawberry Tiramisu Like a Pro
Presentation is part of the fun! For a family-style vibe, serve it right from the dish you made it in. Let everyone scoop out their own generous portion. Want to get fancy? You can assemble it in individual glasses or mason jars for a stunning, portable dessert. I love using a clear glass trifle bowl—seeing those pretty pink layers is half the appeal!
Pairing ideas? This is lovely with a glass of Prosecco or Moscato d’Asti for a celebratory touch. For a non-alcoholic option, a sparkling pink lemonade or a crisp iced tea is perfect. Since it’s rich, a little goes a long way, so you’ll get 6-8 generous servings from one batch. Use a sharp knife dipped in hot water for the cleanest slices if you’re serving it square. And remember, the garnish is your friend—that pop of freeze-dried strawberry powder makes it look bakery-level gorgeous.
Mix It Up! 5 Delicious Twists on the Theme
Once you’ve mastered the basic pink beauty, try playing with these fun variations!
- Mixed Berry Bliss: Swap out half the strawberries for raspberries or blackberries in the purée. You’ll get a deeper, jewel-toned color and a complex berry flavor.
- Lemon Berry Brightness: Add the zest of one lemon to the mascarpone cream mixture. The lemon and strawberry combo is a classic for a reason—it’s irresistibly fresh and zingy.
- “Very Strawberry” Overload: Fold ½ cup of finely diced fresh strawberries into the mascarpone cream before layering. You get little bursts of fresh berry in every creamy bite.
- Chocolate-Dipped Dream: For a nod to the original, briefly dip the ladyfingers in a mixture of ½ cup strawberry purée and 2 tablespoons of chocolate hazelnut spread before layering. Thank me later.
- Dairy-Free & Gluten-Free Friendly: Use your favorite gluten-free ladyfingers or sponge cake slices. For the cream, use well-chilled full-fat coconut cream (just the solid part from the can) whipped with powdered sugar, and swap the mascarpone for a dairy-free cream cheese alternative. The texture will be slightly different but still delicious!
Emily’s Kitchen Notes & Stories
This recipe has evolved so much in my kitchen! The first time I tried it, I didn’t strain the purée, and let’s just say the texture was… rustic. The seed thing bothered me. Then, I got overzealous with the dipping and created a layer of strawberry soup at the bottom of my dish. Lesson learned: a quick dip is all you need!
My favorite memory with this dish was last spring. I made a huge tray for a neighborhood potluck, and I watched a tough-looking contractor who was fixing a roof down the street get talked into trying a piece by the homeowner. He came back for seconds, then thirds, and finally asked for the recipe to take home to his wife. That’s the power of a good dessert—it brings everyone together, no matter what. Now, I always make sure I have copies of the recipe handy when I serve it!
Your Questions, Answered!
Q: Can I make this more than a day ahead?
A: You can assemble it 24 hours ahead with perfect results. If you need to go further, 48 hours is the max I’d recommend, as the ladyfingers can start to get a bit too soft. The flavor is still great, though!
Q: My mascarpone mixture looks lumpy or curdled. What did I do wrong?
A> Don’t panic! This usually means the mascarpone was too cold when you mixed it, or you overbeat it. To fix it, let the whole bowl sit at room temp for 10 minutes, then whisk vigorously by hand or beat on low for a few seconds. It should smooth right out. If it’s really stubborn, beating in a tablespoon of the already-whipped cream can help bring it back.
Q: I don’t have ladyfingers. What can I use instead?
A> Pound cake or sponge cake sliced into ½-inch strips is a fantastic substitute. You can also use plain vanilla wafer cookies, though they’ll be sweeter. The dip-and-layer method is the same!
Q: Is there a way to make it less sweet?
A> Absolutely. You can reduce the powdered sugar in the cream to 2 tablespoons, and use only 1 tablespoon of sugar in the strawberry purée, especially if your berries are very sweet. Taste as you go!
Nutritional Info (For Your Curiosity!)
Okay, let’s be real—this is a special occasion dessert, and we’re here for the joy it brings! But for those who like to know, here’s a rough breakdown per serving (based on 8 servings). Remember, these are estimates, and actual values can vary based on your specific ingredients and substitutions.
Approximately Per Serving: 270 Calories | 16g Fat | 26g Carbs | 4g Protein
The fat comes primarily from the mascarpone and heavy cream, which give it that luxurious mouthfeel. The carbs are from the natural sugars in the strawberries and the ladyfingers. It’s a rich dessert, so a small slice is deeply satisfying. My philosophy? Enjoy every mindful, delicious bite without guilt. Life’s too short for flavorless desserts!
Final Thoughts from My Kitchen to Yours
Well, my friend, we’ve done it! We’ve created a dessert that’s as fun to make as it is to eat. This Strawberry Tiramisu is proof that you don’t need fancy equipment or complicated techniques to make something truly spectacular. You just need a few great ingredients, a little patience for the chill time, and a whole lot of love.
I hope this recipe finds its way to your table for a sunny brunch, a festive celebration, or one of those nights where you just deserve a pink treat. Remember, cooking is about the joy you pour into it. So if your layers are a little lopsided or you get a bit of pink cream on your apron (join the club!), it doesn’t matter one bit. What matters is the smile it brings to your face and the people you share it with.
Now, go forth and make something delicious! And if you do, I’d love to see it. Tag me over on the blog or socials so I can cheer you on. Happy cooking, and even happier eating!
— Emily 🍓